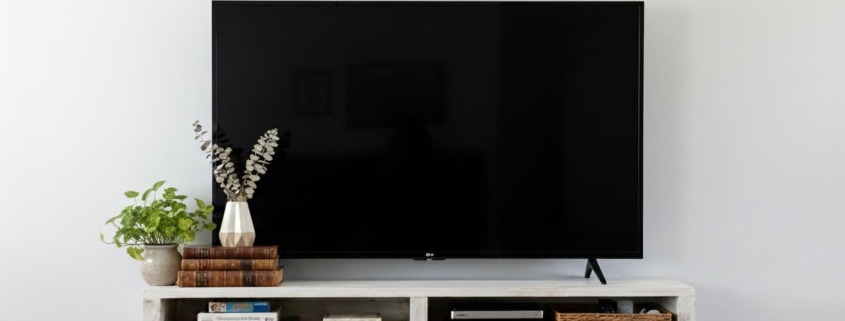
Hello all! I have a fantastic DIY project today that will help you with storage, organization, and will free up floor space.
Recently my son moved into his first college apartment and as you would expect in a first apartment, space is at a premium. My son wanted to mount his TV on the wall and also have storage for games and his components. To solve both issues I came up with a floating TV shelf stand that would maximize his storage but also be perfect in small rooms (depending if he wanted it in the bedroom, living room, family room, or other spot.)
There are many tv stand designs we could have bought, but he wanted a floating look and something that went with his modern apartment vibe. Together we talked about several design options, but ultimately decided to build this simple DIY project together.
After building and finishing the floating shelf in my workshop, we transported it to his college town for installation. It was pretty straightforward, but we had to finish the build by drilling holes for cable management once we got to his apartment (and could see the size of the plugs.) Once it was hung, he fished the wires for the TV and components through the holes we made and plugged it into the wall. Then we filled the shelf with games and gaming components.
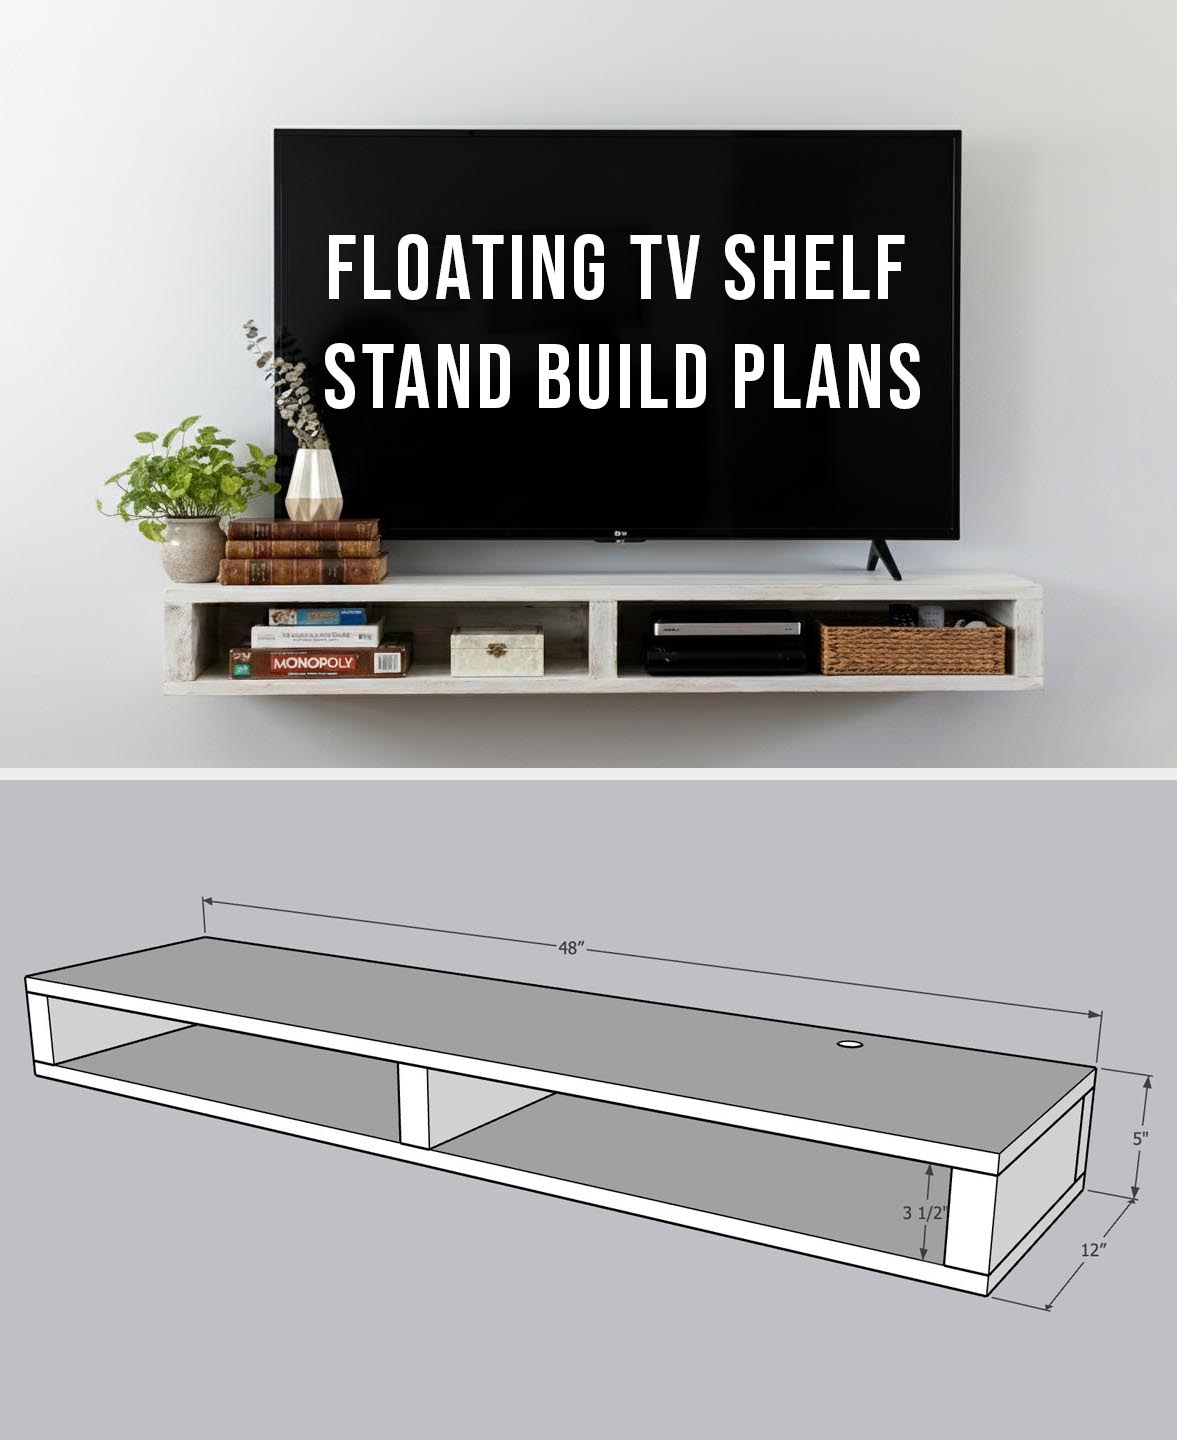
Measure your TV base before beginning. Feel free to enlarge the width of your floating tv stand. It’s not recommended to increase the depth of your shelf by more than an inch or two. Making your shelf deeper than 12 inches can cause your shelf to sag or not be as sturdy on the front edge.
This shelf is very easy to build and doesn’t require any special tools. You can have it completed in a couple hours and hung on the wall in about five minutes.
First you’ll need a few building materials and the right tools. I’ve listed them below for your convenience.
Floating TV Shelf Materials:
(I’ve included affiliate links for your convenience. I earn a small percentage from a purchase using these links. There is no additional cost to you. You can read more about affiliate links here.)
Depending on how tall you want your shelf, you can either use a 2″x 4″ (which would make the opening in your shelf 3 ½” tall). Or you can use a 2″x 6″ (which would make the opening 5 ½” tall). If you have a table saw, you can rip whatever size board to the custom height you want. (For this build, I ripped a 2″x 6″ down to 4″ wide for my frame.)
Once you determine the width you want, cut a piece at 48″ long. Then, cut your three pieces at 10 ½” long.
Installation Instructions:
It’s crucial that you install your shelf to wall studs for a secure installation. For this tutorial I am assuming you are mounting your floating shelf on a wood construction wall with drywall. If you have another wall type, you may need other use strong anchors (masonry anchors or other) to secure your shelf.
Use a level to make sure the shelf is level. Locate at least 2 studs (3 is better) behind the shelf and use structural screws at least 4″ long to attach through the back of the shelf into the studs. And that’s it. You’re done!
This shelf frees up space below for more storage or to keep a minimal and modern look in your home.
https://prettyhandygirl.com/wp-content/uploads/2017/09/Floating-TV-shelf-styled.jpg7681344Shara Mhttps://prettyhandygirl.com/wp-content/uploads/2021/07/PHG-logo-tagline-2020-1030x211-R.jpgShara M2026-01-02 07:00:002026-01-06 08:20:55How to Build a Floating TV Storage Shelf Stand
Easily learn how to install a ceiling fan by following this simple step-by-step installation process. No licensed electrician required.
Ceiling Fan Installation Project
I’ve installed probably a dozen ceiling fans in my life. Pretty Handsome Guy was remarking to me last night, “Wait, you mean you’ve never written a tutorial on how to install a ceiling fan on the blog?”
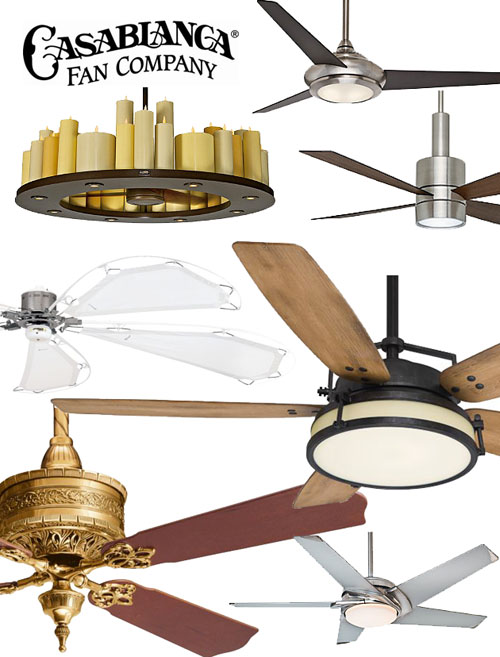
It’s true, most of the installs were pre-blogging days. For this reason, I was truly excited when Casablanca contacted me and asked if I wanted one of their new ceiling fans.
I knew it was a great opportunity to put together a tutorial for you so you could see that installing a ceiling fan is not a difficult DIY project!
Plus, we had Casablanca fans in our previous house and they are well made and will last a long time. Therefore, I have no hesitation recommending Casablanca to you!
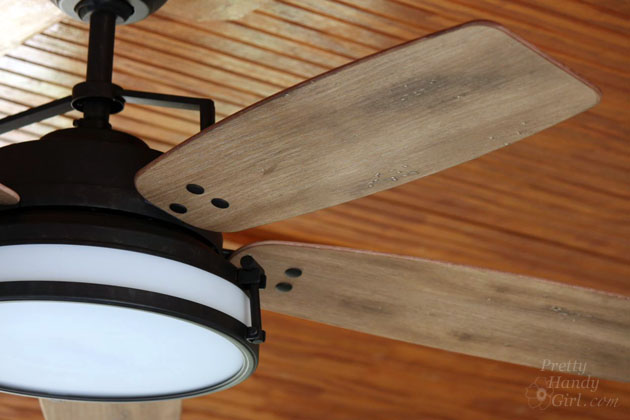
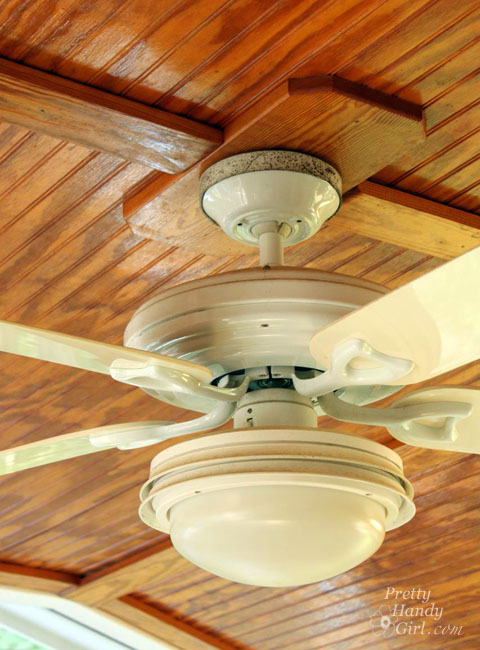
Okay, and I also wanted to change your mind about ceiling fans and design aesthetics. I know that some designers break out in hives when a client wants a ceiling fan. And who can blame them when the stereotypical ceiling fan looks like this:
Oh yes, she’s a beauty. And she’s all mine, complete with moldy canopy and boobilicious globe. In all seriousness, that fan was U-G-L-Y. Plus, it was a bit too small for our porch and didn’t do well with the warm air circulation. (You can figure out what size ceiling fan you need for your space in the FAQ section on the Casablanca site.)
You can now understand why I was actually delighted to hang out on top of an 8 foot ladder in 95 degree heat to install a new ceiling fan.
Yes, I was excited, especially because Casablanca has so many beautiful options for stylish fans. And I know, they have ceiling fans that will surely have the designers changing their tune.
Safety, Prep, and Hints Before You Install a Ceiling Fan:
Before I give you the full tutorial for the installation process, we need to talk about prep work and safety.
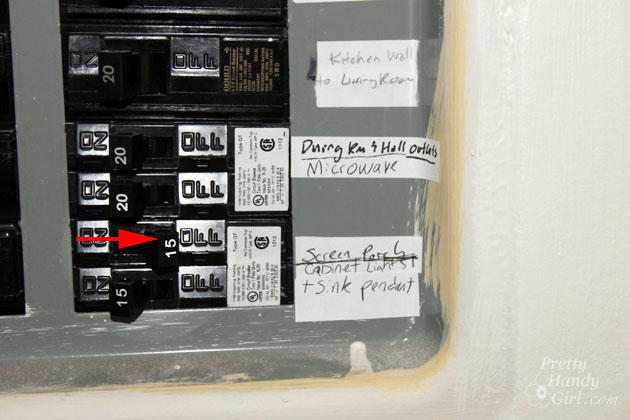
First, do not attempt any electrical projects until you have turned off the power to the light switch fixture or wall switches you are working on.
I like to turn on the fan and light (they are often on two different power lines) and then shut off the power on the circuit breaker. This gives me the visual assurance that the power is indeed off.
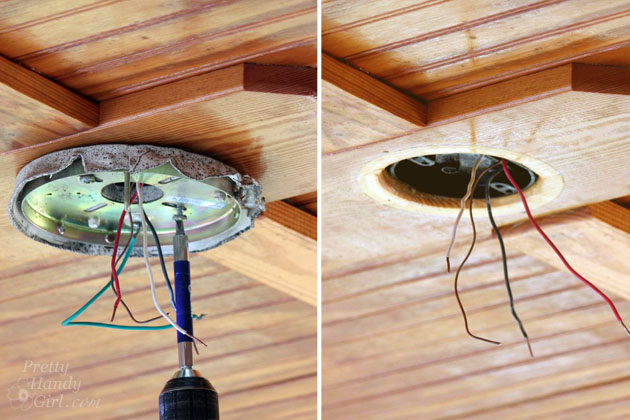
Next, if you are replacing a light fixture with a ceiling fan, you MUST make sure that the junction box is attached to a support.
This means the box is screwed into a ceiling joist, brace, or the junction box is attached to a Ceiling Fan Brace. Do not attach a fan to a ceiling fan box that is not able to hold the full weight of the fan (and all the vibration it will produce over the years.)
If you don’t have proper bracing for your fan—have no fear—look into purchasing a Ceiling Fan Brace that can be installed from inside the room (no need to crawl into the attic.)
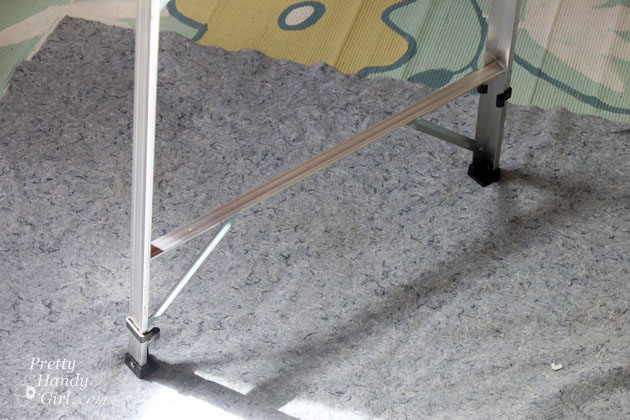
Finally, you need to have a Sturdy A-Frame Step Ladder tall enough to reach 1-2 feet below the fan during installation. And having an assistant who can hand you the motor when it’s time to hang the fan is a great way to save time and make the job a bit easier.
One handy tip: You will most likely drop a screw during the installation. If you are working on a porch with slats, lay down a blanket under the ladder to catch them. This also helps aid in a quick clean up from dust and dropped dry wall debris.
Ready to get your cool on by installing a beautiful new ceiling fan? Here are a few necessary tools you will likely need to make the process easier. Having the right tools makes it so much easier!
Let’s take a spin shall we:
Materials:
(I’ve included affiliate links for your convenience. I earn a small percentage from a purchase using these links. There is no additional cost to you. You can read more about affiliate links here.)
Turn off the power to your light fixture/fan in the circuit box.
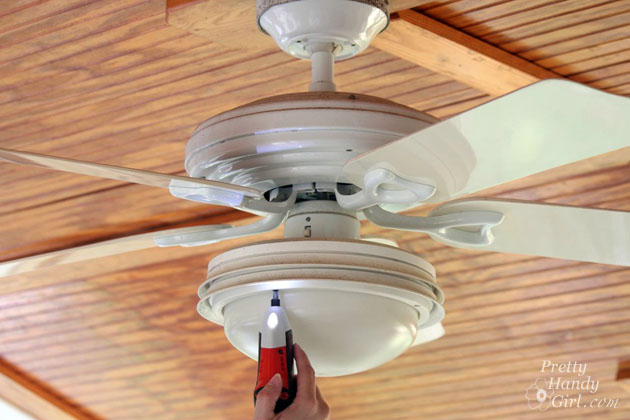
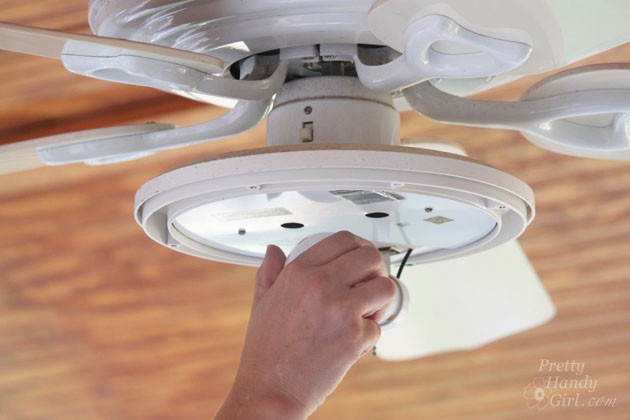
Remove the existing fan and/or light fixture:
Check to make sure the fan AND light do not have power to them.
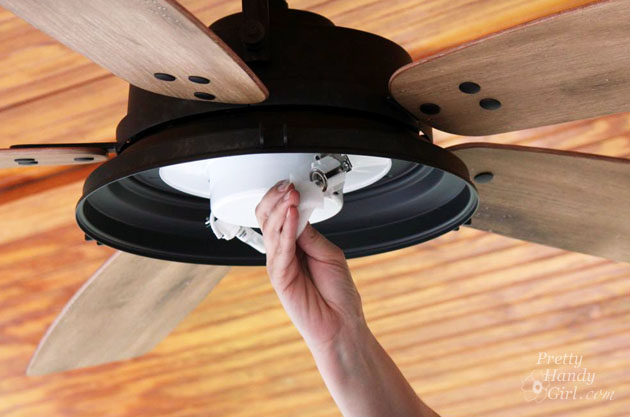
Begin by removing the existing fixture or fan. All ceiling fans are different, but most require removing the light kit before you can get access to the fan blades and motor. Assess the fixture and look for screws to unscrew.
Remove the light bulbs and save them for another fixture.
Keep removing screws until you can access the wiring. Disconnect the wire connectors from the light kit to the fan.
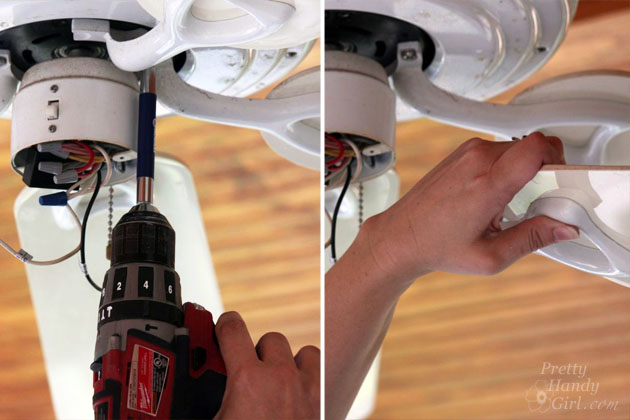
Remove the fan blade arms one at a time. It helps to remove blades opposite of one another to keep the fan semi-balanced.
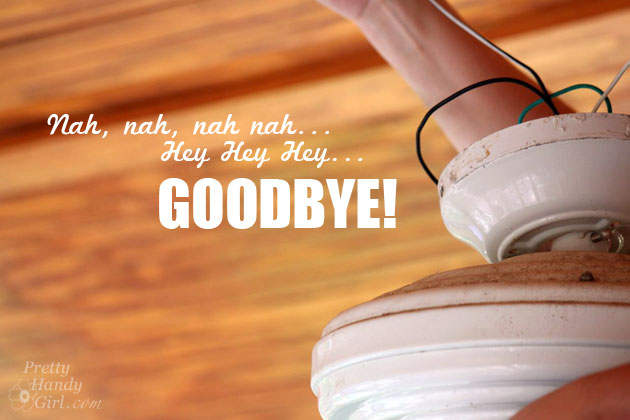
Disconnected the electrical wiring from the fan to the ceiling. Remove the ceiling fan motor. (Sing a tune if you like.)
Prior to choosing your new fan, it helps to know the ceiling height and determine the center of the room for placement.You want to find the right fan for the size of your room. As always, be sure to refer to your manufacturer’s instructions prior to install.
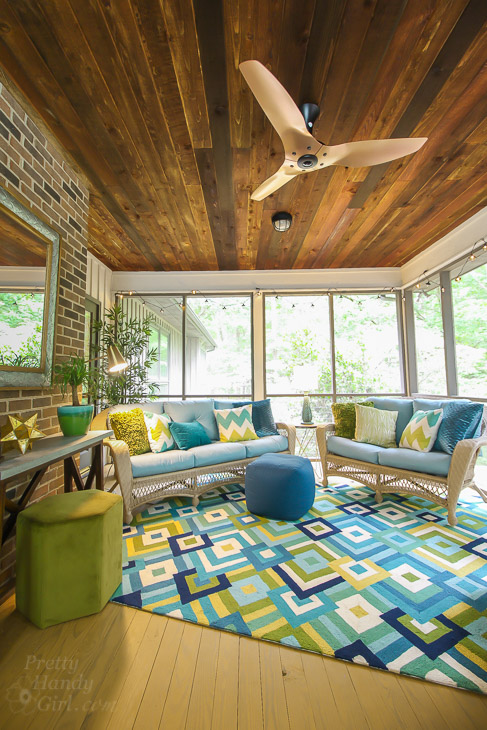
The new fan is not only stylish, but also a full 6″ wider than the previous fan. This means better airflow on our screen porch, which helps make that warm air a little cooler!
This may also help with energy savings in the hot summer months.
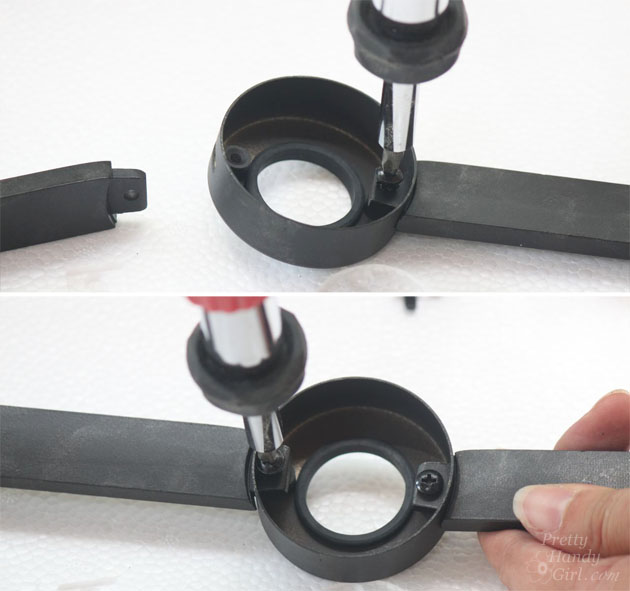
Before hanging the fan, the decorative arms need to be assembled. Screw the arms to the decorative cup:
Attach the arms to the side of the fan motor. Hand tighten the decorative screws.
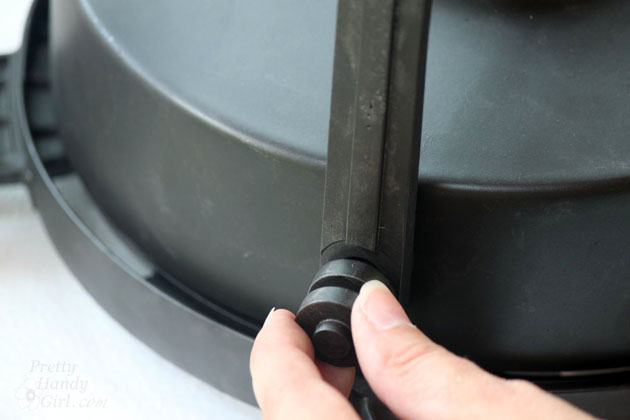
Insert the downrod through the decorative cup. Thread the wires through the top of the downrod. Loosen the set screw.
Turn the downrod into the top of the fan until it is tight. Tighten the set screw securely using pliers to insure a tight hold.
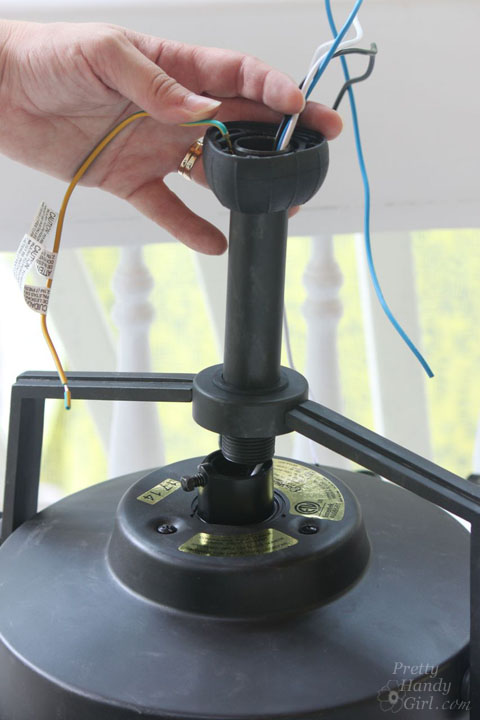
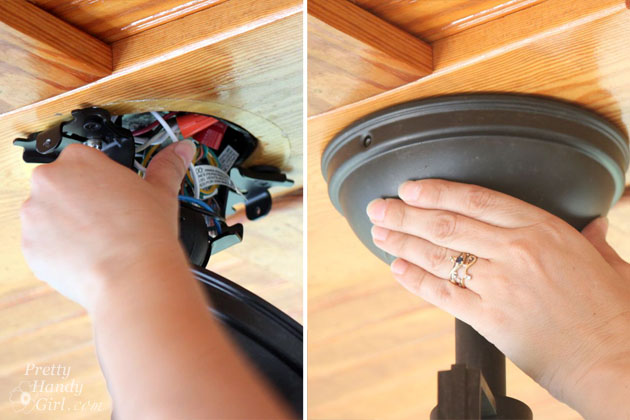
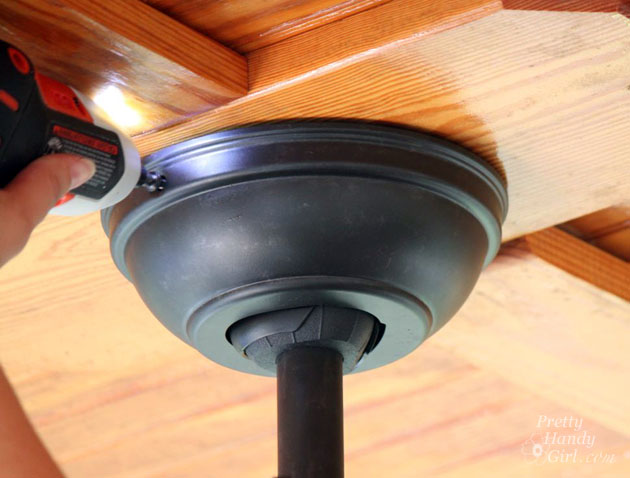
Slip the canopy over the downrod.
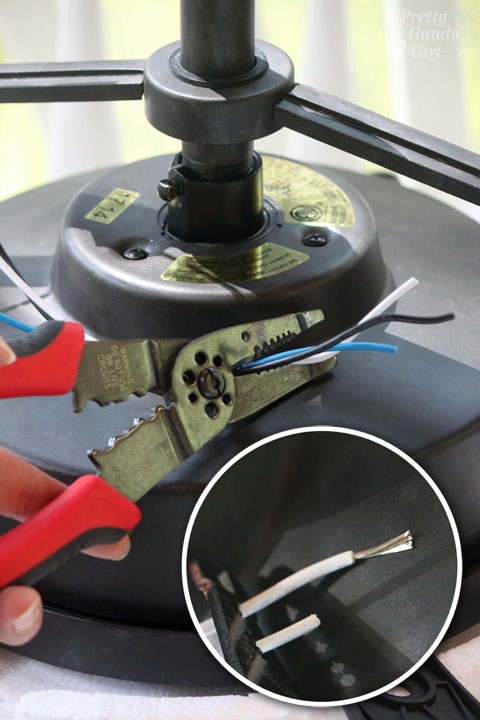
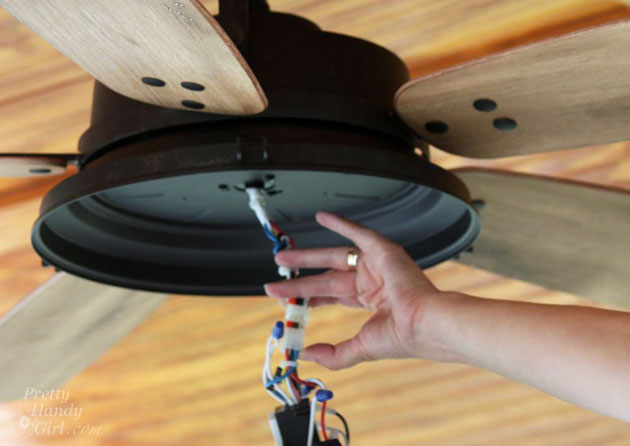
Trim the excess wires a little shorter (I like to leave 8-12″ more than I think I’ll need.) Strip approximately 3/4″ of the insulation off the ends of the wires.
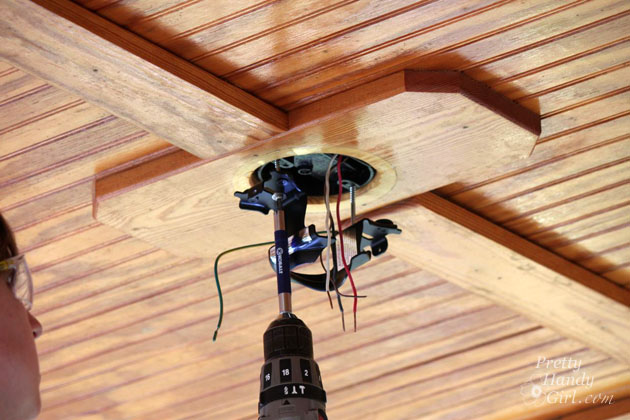
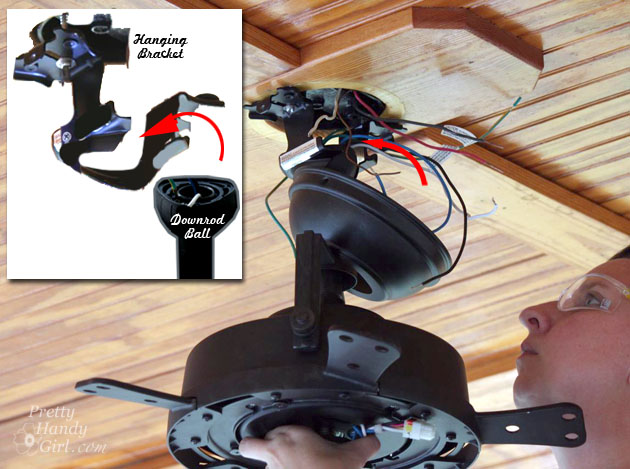
Locate the hanging bracket and secure it to the stud that holds the junction box, or secure it to the junction box if it is bolted to a ceiling fan brace. Pull on the hanging bracket to make sure there is no movement and it feels secure.
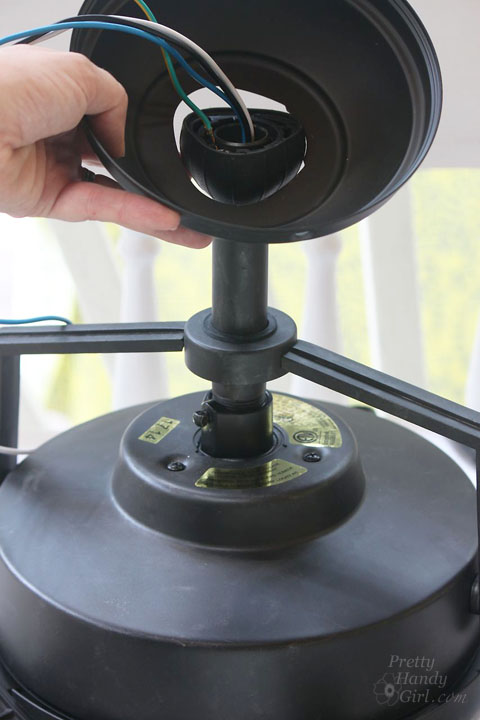
Bribe your assistant to hand you the ceiling fan motor. Gently slip the top of the downrod into the hanging bracket. Be careful not to pinch any of the wires.
Now you can let your assistant go. The hanging bracket will hold the fan while you make your wiring connections.
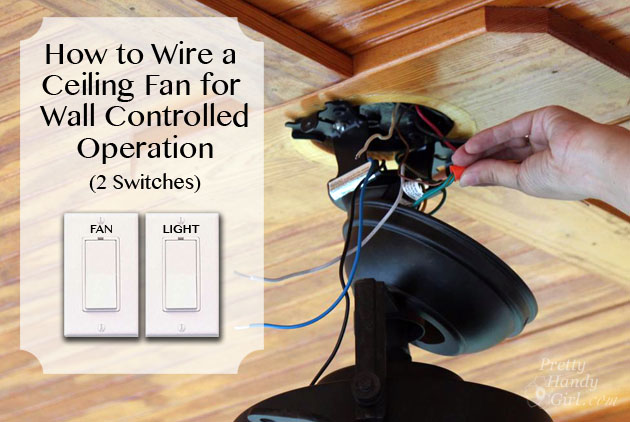
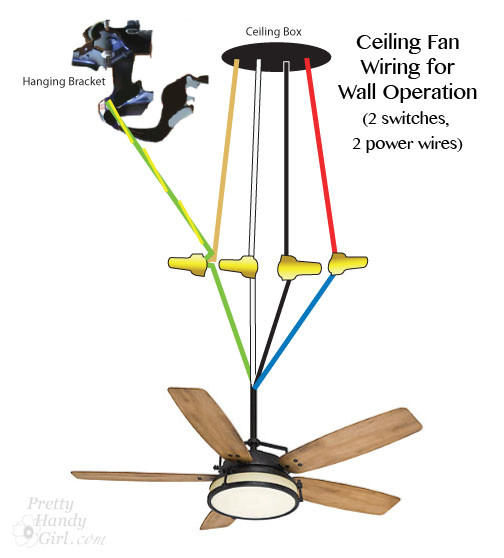
Wiring a Ceiling Fan for Wall Switch Control (with 2 power wires – one for the fan and one for the light):
Most of the ceiling fans installed in the past used two switches if it had a light. This means there are two separate power wires that are in the junction box.
Plus, one neutral wire and one ground. This is the standard installation for a ceiling fan that doesn’t have a remote and a receiver. It’s important to ensure you are working with the correct wire color for installation.
Always attach your ground wires first (copper, bare or green wires). You will want to attach the wires together with a wire nut and then wrap part of the bare wire around the ground screw attached to the mounting bracket.
Or in the case of the Casablanca fan, attach the green and yellow striped wire (from the hanging bracket) to the green wire from the fan and the ground wire from your ceiling box.
Next, attach the white neutral wire from the ceiling box to the white wire from the fan.
Attach the black wire from the ceiling box to the black wire on your fan. And finally, attach the additional power wire (usually red, but can be black or striped) to the blue wire (this color may vary) from the fan.
Gently tuck the wires into the ceiling junction box. It is good practice to put the white neutral wires on the opposite side of the box as the red and black power wires.
Cover the wires and mounting bracket with the canopy and screw it into place.
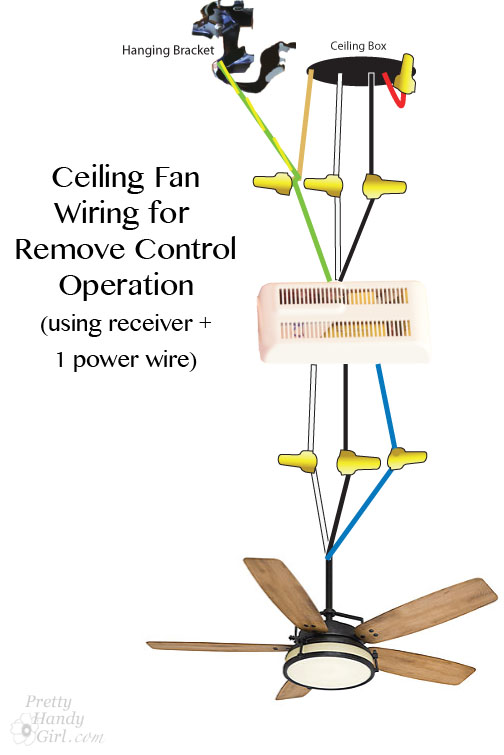
Wiring a Ceiling Fan for Remote Control Operation (using one power wire):
The Casablanca fan I installed has a remote control for the lights and fan speeds. The remote communicates to a receiver which independently controls the fan and lights.
This gadget effectively eliminates the need for two separate power wires.
Wiring with the receiver is a little more work because you are creating more connections, but it’s just as easy to do.
First, cap off your extra power wire (if you have one) and tuck it into the ceiling box. (For added safety, wrap electrical tape over the wire nuts and wire.)
Next, attach the ground wires together (copper, bare or green wires). Use a wire nut to attach the wires together, then wrap part of the bare wire around the ground screw attached to the mounting bracket.
Or in the case of the Casablanca fan, attach the green and yellow striped wire (from the hanging bracket) to the green wire from the receiver and the ground wire from your ceiling box.
Next, attach the white neutral wire from the ceiling box to the white wire from the receiver.
Attach the black wire from the ceiling box to the black wire on your receiver.
Now make the connections from the receiver to the fan. Attach the white wires first, then the black and finally attach the two blue wires together with a wire nut.
Carefully tuck the wires into the ceiling box. Then gently slide the receiver inbetween the hanging bracket and the ceiling box.
You might need to play with the wires a little to get everything to fit neatly.
Raise the canopy over the hanging bracket and secure it with the screws provided.
Step-by-Step Instructions for Installing the Fan Blades and Light Kit:
Installing the fan blades on the Caneel Bay are a little tricky, but once you get one blade assembly screw and nut attached it moves quickly.
It’s a good idea to try to attach blades across from one another to keep the fan relatively balanced.
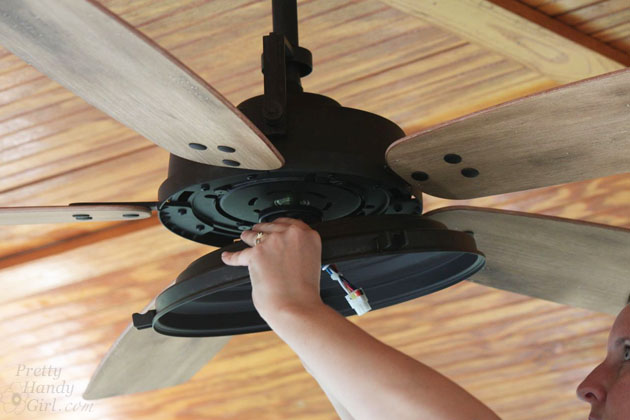
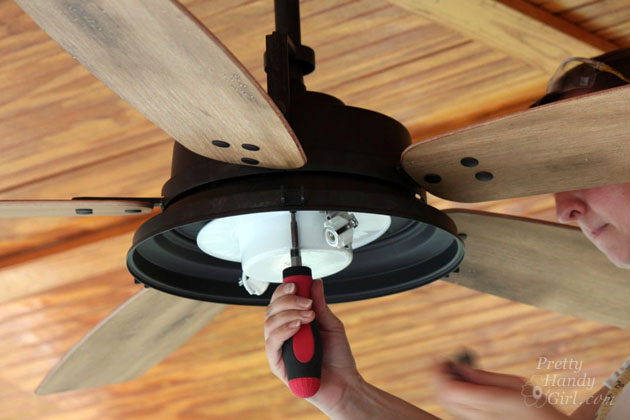
Lift the upper switch housing up onto the fan motor. Thread the wires through the center hole. Use the provided screws to attach the housing.
Connect the wires from the fan motor to the wires on the switch housing (light kit). Connecting them is super easy, just line up the colors and snap the wiring harness together and make sure it is secured.
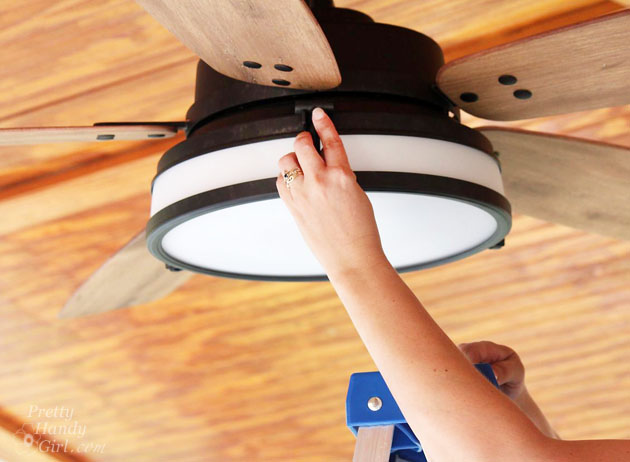
Screw the light kit (switch housing) into the fan.
Add the provided halogen light bulbs. (Avoid touching halogen bulbs with your fingers because the salt and oils in your skin could cause the bulbs to wear out faster.)
Attach the globe to the fan, making sure all the “hammers” on the globe ring are secured in the notches on the fan.
Turn the power on and make sure the light and fan works appropriately. If it fails to work, one of your wire connections may have come loose.
Turn off the power and check your connections.
It’s time to appreciate the beauty of a new ceiling fan. And enjoy the efficiency of the wider blade span as it moves the air and cools you off.
Excuse me now while I drink some ice cold lemonade and chill out.
Do you love the look of the Caneel Bay fan as much as I do? Or do you think you’d like a more modern ceiling fan?
I’ll be back next week to show you a few more changes I made on our screen porch. I hope you found this ceiling fan installation tutorial helpful.
Disclosure: This post is sponsored by Casablanca Fan Company. I was sent a complimentary fan and compensated for my time. All images, ideas and words are my own. I will always let you know the relationship I have with a brand via a disclosure. Also know that I am very particular about the brands I work with.
https://prettyhandygirl.com/wp-content/uploads/2014/09/detail-caneel-blades.jpg420630Brittany Baileyhttps://prettyhandygirl.com/wp-content/uploads/2021/07/PHG-logo-tagline-2020-1030x211-R.jpgBrittany Bailey2025-09-03 15:30:002025-09-03 15:09:35How to Install a Ceiling Fan
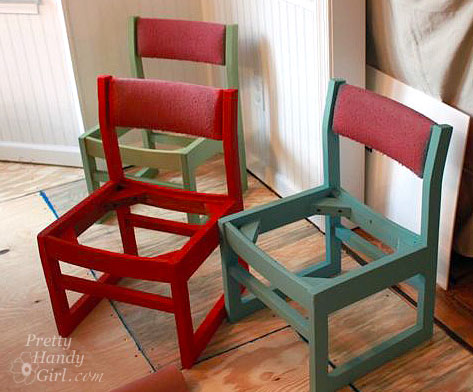
This DIY reupholster chair tutorial features a This End Up chair. You can follow the same basic steps to recover and renew similar chairs.
As a parent of two elementary school students, I always ask my kids’ teachers if they need anything for their room. Usually the answer is markers, wipes, or snacks.
But, my kindergartner’s teacher knows about my secret identity after having taught my older son for a year.
So, she didn’t hesitate to ask me if I could possibly recover a few really sad looking chairs that had seen their fair share of kindergarten butts. 😉
(I’ve included affiliate links for your convenience. I earn a small percentage from a purchase using these links. There is no additional cost to you. You can read more about affiliate links here.)
How to Reupholster This End Up Chairs (a Simple DIY)
These poor chairs were still very study and in good shape, but the fabric was nubby, pilled, stained, and not in good condition.
I love a good challenge, especially with a solid piece of furniture, so I took all three of the chairs home over the Christmas break for my next DIY project.
I knew I could give these chairs new life. The first step involved removing the seats and the old upholstery fabric.
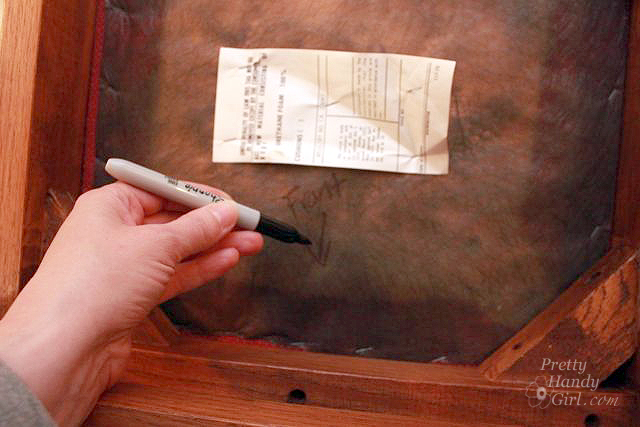
Before I touched the seats, I flipped over the chairs and marked the front side of the chair so they would fit together perfectly when I put them back together.
Next I removed all the screws securing the chair seat to the frame of the chair (all six of them.)
Because of the construction of these chairs, I found it necessary to use a longer bit on my drill to get into each hole.
I pried off the piping from the seat backs with a 5-in-1 painter’s tool and needle-nosed pliers. Then removed the old fabric and old foam.
After the seats were removed, each chair got a good cleaning, a little sanding and then a couple coats of Miss Mustard Seed Milk Paint(colors used: tricycle and luckett’s green) and the blue one was chalk painted.
I used the bonding agent with the milk paint to make sure the paint would stick to the chairs.
Finally, the chairs each got two coats of Minwax Polycrylic because those kindergartners are tough on furniture and this is a great way to give them a bit more protection.
Now on to the fun part!
How to Reupholster This End Up Style Chairs:
You can pick up the supplies at Home Depot, Lowe’s, or your local craft store.
Materials:
(I’ve included affiliate links for your convenience. I earn a small percentage from a purchase using these links. There is no additional cost to you. You can read more about affiliate links here.)
With a primary color palette, they are the perfect fabric choice for a kindergarten classroom.
Instructions:
Cut out fabric, oil-cloth (optional), and any additional batting a few inches larger than the bottom of the chair seat.
The great thing about this project is no sewing machine is needed for this upholstery project.
Layer thenew pieces of fabric face down on the floor. then the oil-cloth next (I put the oil-cloth face up so the fuzzy back side would be against the fabric to keep it from feeling too crinkly.)
Cut a square out of each corner about 1″ from the seat cushion corner.
Staple one staple into the center of each side. Work across form each other, gently stretching the fabric taut.
Add more staples along each side.
Corners are neatly folded and then stapled to secure them. Hammer any staples that didn’t go completely into the bottom of the seat.
Re-attach the seat to the chair frame by replacing all the screws.
Flip the chair right side up and follow these steps:
Layer batting, then fabric over the chair back. Trim the batting to fit perfectly on the back of the chair.
Cut the fabric about an inch wider on the two sides and the bottom. Fold under the raw edges of the fabric.
Secure the fabric to the chair back by stapling at the top of both sides first.
Next put a few staples into the bottom of the seat back (hidden from view.)
Continue stapling the fabric to the chair along the sides.
Set your staples as close to the frame as possible so the piping will hide your staples later.
https://prettyhandygirl.com/wp-content/uploads/2025/05/This-End-Up-Chair.jpg12001200Brittany Baileyhttps://prettyhandygirl.com/wp-content/uploads/2021/07/PHG-logo-tagline-2020-1030x211-R.jpgBrittany Bailey2025-05-07 22:32:402025-05-07 23:15:49How to Reupholster This End Up Chairs (a Simple DIY)
You can sew your own custom DIY bench cushion with piping. I’ll show you how to make your own bench cushion covers with this detail tutorial.
How to Sew a DIY Bench Cushion with Piping
I thought sewing a custom cushion for a was going to be a difficult project to sew.
And, I thought sewing a bench cushion with piping would be next to impossible.
However, once I figured out an easy way to create the box, it was actually very easy!
Let’s get started and I’ll show you how to make custom DIY Bench Cushions with an added detail of piping.
My Fabric Source:
Before we get started I wanted to let you in on a little secret. 🤫
The bench cushion and side table fabrics you see below are actually Target shower curtains!
That’s right, I didn’t use upholstery fabric, instead I used beautiful fabric shower curtains which are just a durable.
Remember this the next time you want to sew a bench cushion, dining bench or window seat cover.
You read that right. Fabric shower curtains are not only inexpensive, but they are durable and can stand up to moisture.
This makes them perfect for outdoor use. I bought both of these at fabric shower curtains at Target for under $20 each!
You could score cute fabric shower curtains on sale and save even more.
Materials:
(I’ve included affiliate links for your convenience. I earn a small commission from a purchase using these links. There is no additional cost to you. You can read more about affiliate links here.)
Once you have all your materials, let’s get sewing.
DIY Bench Cushion Tutorial
Follow these detailed steps to make your own bench seat cushion.
Preparing the Foam Cushion
Measure or lay your foam on top of the bench. Mark line(s) where you need to trim the cushion to fit the length of your bench.
The next step is to use an electric knife to cut through your piece of foam on the long side of the edges of the foam.
Wrap batting around your foam. Then trim the edges down to size.
I had enough to put two layers on top of the foam and one layer on the bottom of the cushion.
This will make for a cushier and less sharp-edged cushion.
Cutting out the pieces
1. Fold your bench fabric in half and lay it out. Place your cushion on top.
Trace around the cushion about 3/4″ wider on each side of the foam to determine the length of the fabric needed.
Cut through the two layers. This will give you a top and bottom panel for your cover.
2. Next let’s cut out four strips of fabric for the sides. First, plan on cutting your lengths 2″ longer than your cushion.
If your foam is 3″ and you use 1-2 layers of batting, you can use these measurements for your strips:
Front: 4.25″ wide by length + 2″
Sides (left and right): 4.25″ wide by length + 2″
*Back: 5.5″ wide by length + 2″
*Back Fold Over Flap: 3.5″ wide by length + 2″
*You may have noticed the back measurement is wider and has two strips. This is because we need to sew an overlapping flap and velcro to allow for the cover to be removable for washing.
Assembling the sides of the DIY bench cushion cover
1. Wrap the 4 strips around your cushion right sides facing in. (Reserve the back fold over piece for later.)
Pin the edges where they meet at your cushion corners. The back strip should line up with the sides on the one edge.
But, the other outside edge will extend 1.25″ taller than the rest.
2. Remove the sides and stitch where the pins are.
When you get to the back strip, fold over the excess so it matches the same height as the rest of the strips.
Then stitch along the back strip’s folded over your piece of fabric to secure it.
Set your sides aside for now. It is time to pin the piping to your cushion top.
1. Lay the top panel right side up on top of the cushion. Pin the long strip of piping on top of the fabric.
Line up the piping with the edges of the cushion. Be sure the raw edge of your piping is facing the raw edge of the fabric.
When you reach a corner, snip into the raw edge of the piping all the way (but not through) the rope piping.
Then turn your piping creating a 90 degree angle and continue pinning.
When you reach the start of your pinned piping, simply overlap the two alittle bit about 2″ and cut off the excess.
Your bench cushion top should look like this:
2. Set the top panel on your sewing machine and sew the piping into place.
Your needle will be very close to the piping, but it shouldn’t stitch into the rope.
This is where a zipper foot really helps get close to the piping and give you professional looking results, especially around the corners of your cushion.
Carefully sew and backstitch over the place where your piping overlaps.
Connecting the top and sides for the DIY bench cushion
1. Lay your top panel onto the cushion. Pick up your sides and begin pinning them to the top of the cushion.
(Note, the raw edge of your back panel should be lined up next to the piping and the hem on the back side should be facing up and away from the piping.)
Position your pins close to the piping but not on top of it. Try to line up the corners of your sides with the 90 degree corners of your piping.
2. Stitch the sides onto the top piece. Again, your needle will be very close to the piping but not over it.
This is a little trickier because you can’t see the piping, but you can feel it.
Just use your fingers to guide you. (Piping shown by the red arrowed line below.)
3. Remove the cushion cover from your sewing machine. Turn your top cover right sides out and test the fit on your cushion.
Hopefully at this point you don’t need a tighter fit and everything is looking good. You see it’s a fairly easy sewing project.
4. Repeat the steps above for “adding the piping” to sew piping onto your bottom cover.
Sewing the cushion back flap
1. Now you can pick up that back fold over strip that has been sitting all by its lonesome.
Fold the edges over twice on three sides (2 short and 1 long) to hem your flap. Press the hem with a hot iron.
Stitch along the folded hem to secure it.
2. Center and pin the flap along the back edge of the bottom panel (right sides together) as shown.
The raw edges should be facing out.
3. Stitch the back flap onto the bottom panel next to the piping. An inch or more of the panel will extend on both ends.
That’s perfectly fine, you want to leave it loose so it can tuck inside the cushion.
3. Turn your top panel and sides wrong sides out and put your cushion inside it. Then lay your bottom panel on top as shown.
Pin the bottom panel to the sides just like you did for the top panel. This time leave the back side unpinned (where your two flaps overlap.)
4. Now is a good time to trim any excess from your previously stitched seams of the entire bench.
(There will be a lot of fabric on the sewing machine, and this is just one less piece that could get caught while stitching.)
Trim off the corners at an angle.
Carefully peel the pinned cover off the cushion.
5. Stitch along the two sides and front of your cover. Leave the back length of the cover open.
Remember, use your fingers to feel for the piping.
6. Turn the cover right side out and slide the cushion into the cover.
Check the fit and make sure you don’t have any stray fabric that might have gotten caught while sewing.
You should have an opening in the back like this.
Adding the velcro closure to the back of the cover
1. Take out your coordinating velcro tape.
Pin the hook and loop velcro tape onto the backside and the back fold over flap.
To save money, I used 4 strips of 3″ velcro evenly spaced along the length of the opening.
But, you can certainly use one long piece of velcro if you wish.
2. Stitch the velcro onto the cushion. You can use a zig-zag stitch for extra strength (if you have destructive little boys like I do!)
Check the fit of the velcro.
3. If everything looks good, you can turn the cover inside out and trim off any excess raw edges.
Then turn the cover right side out and insert your cushion.
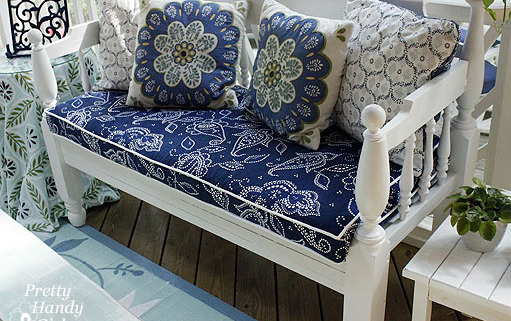
And that’s it! You are done and you have a professional-looking bench cushion with piping!
The best part is now you know how easy Sewing a DIY Bench Cushion with Piping can be!
This is such a versatile piece of furniture. It would make a great addition to a living room for extra seating or to use as entryway bench.
Add some pretty throw pillows and the only thing you need to do now is enjoy your beautiful easy sew bench cushion.
Want to see the rest of my screen porch makeover? I spent less than $125, that’s what I call an extreme budget!
Now that you knocked out a custom diy cushion, why not sew one of these 25 easy sewing projects next!
https://prettyhandygirl.com/wp-content/uploads/2011/07/angled_bench_view.jpg375511Brittany Baileyhttps://prettyhandygirl.com/wp-content/uploads/2021/07/PHG-logo-tagline-2020-1030x211-R.jpgBrittany Bailey2025-03-10 07:00:142025-05-06 15:15:13How to Sew a DIY Bench Cushion with Piping
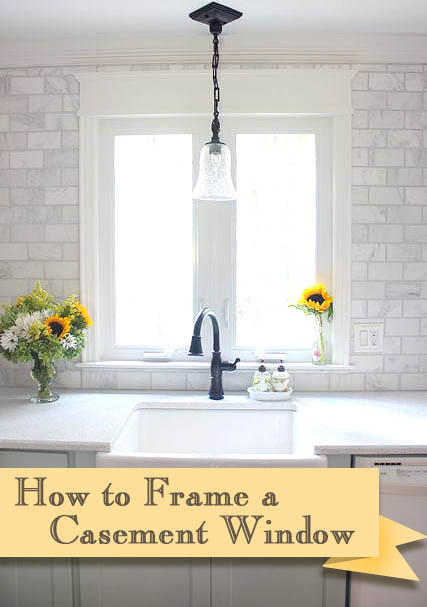
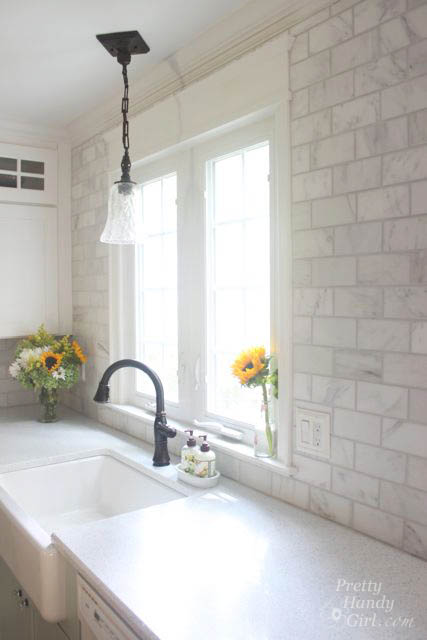
After installing a new casement window in our kitchen,I chose to install a beautiful decorative window moulding. Today I’m going to show you how easy it is to Install Trim and Casing Moulding!
How to Install Trim and Casing Moulding
I’m excited to be sharing more tutorials from the kitchen renovation. I hope you’ll excuse me as we jump back and forth in the renovation process. I’ve been trying to get the most relevant tutorials to you as soon as I can. Speaking of relevant, I understand there are a lot of under-dressed windows out there that need trim or could use a little more “WOW Factor”! Is that your case—ment? (Sorry, I couldn’t resist.)
Let’s go over the details for installing window trim and casing on a casement window. Have no fear if you have a double hung window or other, these techniques will work for those windows too.
Replacement vs. New Construction Windows:
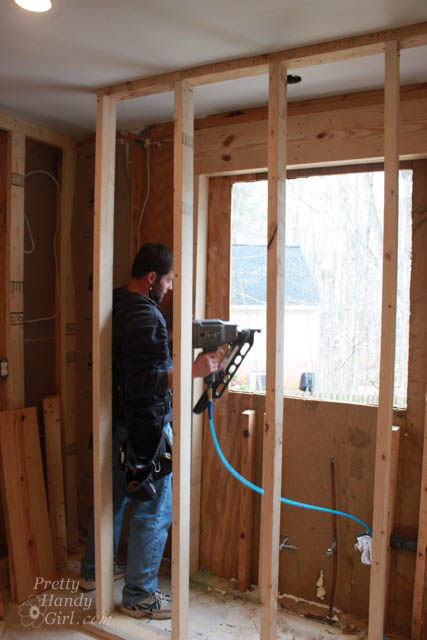
But, let’s back up for a minute. I wanted to share with you a little snafu that happened with our casement window. When I ordered it, the guy taking the order asked me a few questions and somewhere there was a translation breakdown. He thought I needed a replacement window because I was replacing an existing window. What he didn’t realize is that I was increasing the size of the window opening and therefore needed a new construction window. In the end, I was stuck with the replacement window, but my handman and I used as many weather-stripping, caulking, and water barrier techniques we could think of to keep it water tight.
This is what you need to know when ordering a new window: If you are removing the old and putting in a new window into the same frame, you can order a replacement window. If you are expanding or changing the size of your window opening (or you want to start with a full window replacement that you can flash on the exterior and add insulation around the rough opening) you will order a new construction window.
But, let’s learn how to install trim and casing moulding on a window.
Materials:(I’ve included affiliate links for your convenience. I earn a small percentage from a purchase using these links. There is no additional cost to you. You can read more about affiliate links here.)
Instructions for Installing Trim, Casing and Moulding on a Window:
The window has been installed. Use this opportunity to use an expanding foam to seal around the window frame while it’s exposed. This will cut down on drafts. Allow the foam to cure and trim off any excess that would interfere with the casing installation.
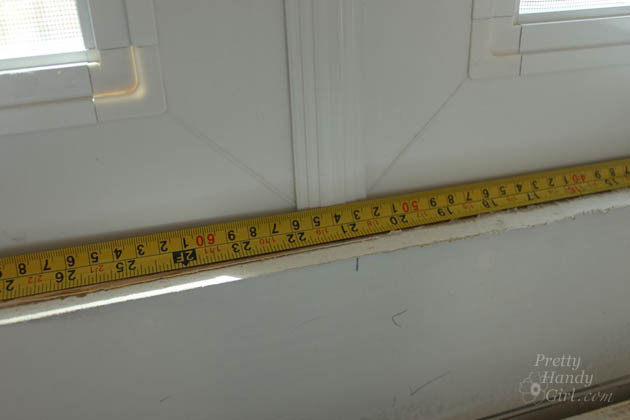
Find the center of your actual window (not the rough opening) and make a pencil mark under the window. Use this mark as your guide for the stool and the window trim.
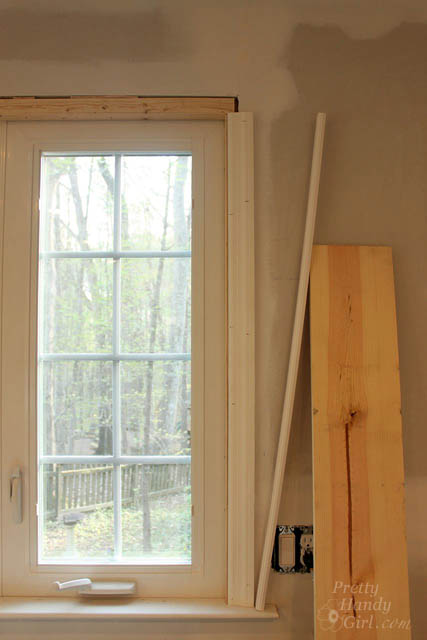
First measure and cut the window stool. You can use a jigsaw, coping saw or hand saw to cut out the edges of the stool so it fits snug against the window and has a reveal over the sides of the window. Take into consideration the width of the window casing and trim on each side and add an inch for the stool to extend beyond the trim. (see photo below to visualize the end product.)
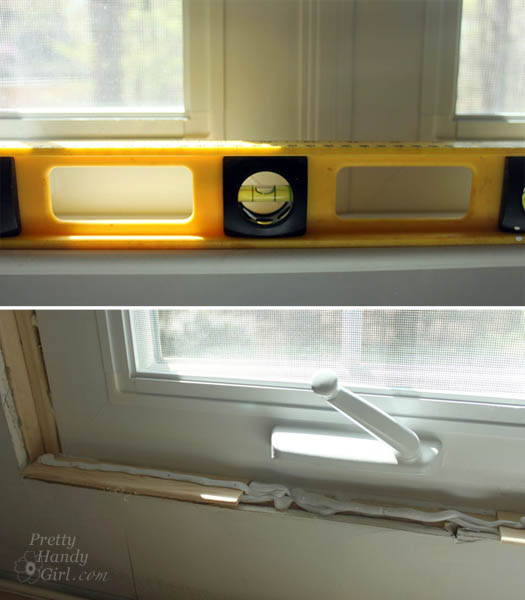
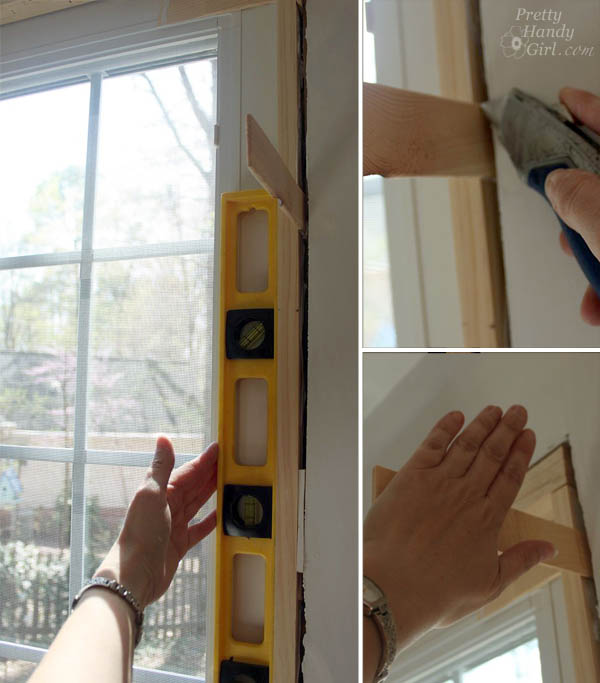
With your stool dry fit in place, check the level of the stool and use wood shims to level if necessary.
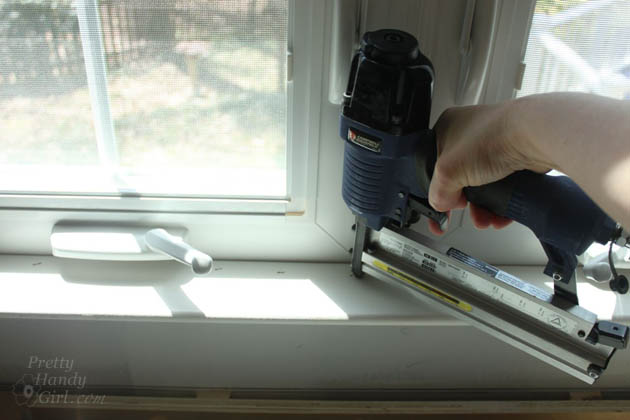
Add a bead of construction glue and set the stool on top. Secure the stool moulding to the window sill with nails.
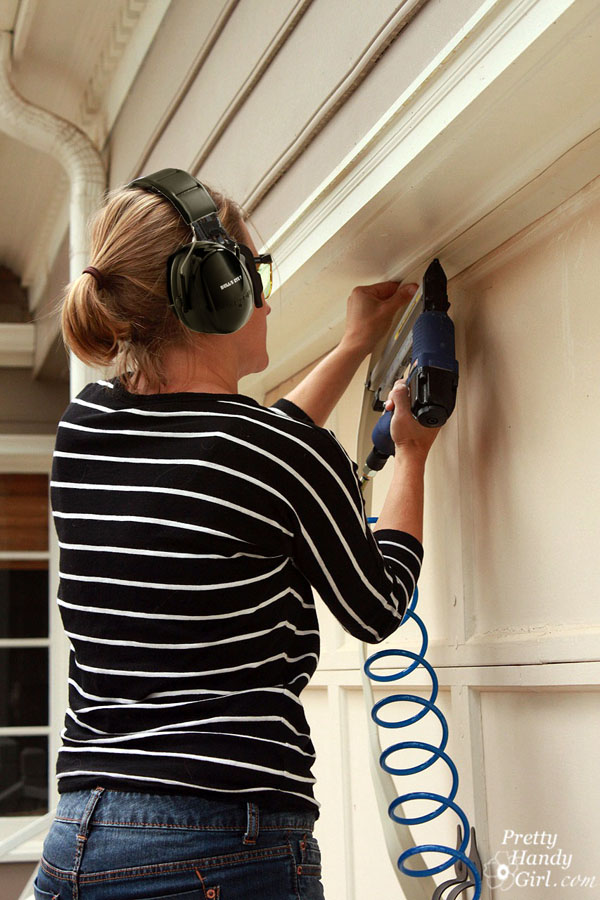
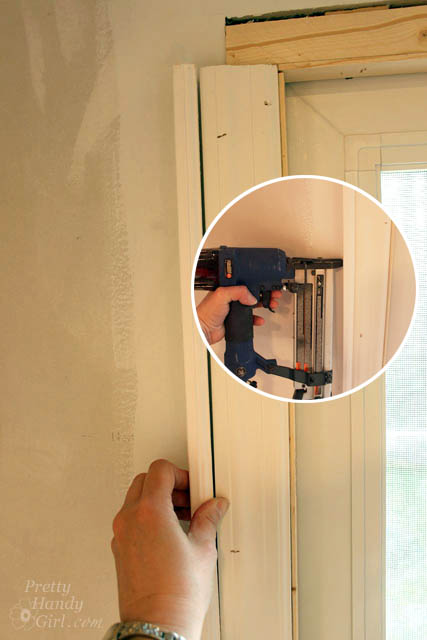
Safety note: When using a finish nailer be sure to wear eye protection and hearing protection. Don’t worry, you’ll look totally cool in your snazzy safety gear. It’s better than the missing eyeball look.
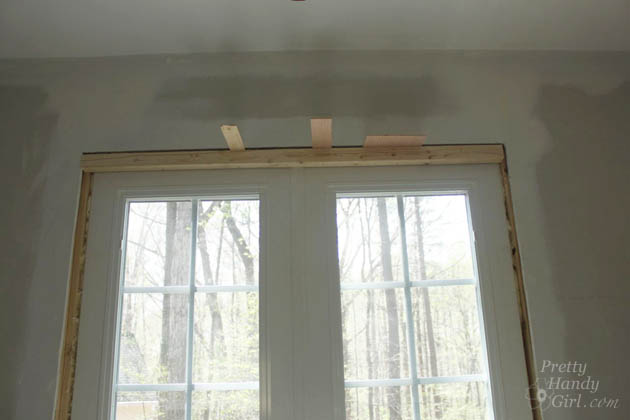
You may need to build out the window frame by cutting a 2×2″ board for the top of the window. Level the top with shims and secure it with finish nails.
Cut two more pieces of 2×2 for the sides. Make sure you have the same reveal on the window for each side (refer back to your center mark.)
Make sure the sides are plumb. Secure the sides with finish nails and break the shims off by scoring them with a utility knife and breaking them with your hand. (You don’t have to sing the Kung Fu Fighting song when doing this, but I do.)
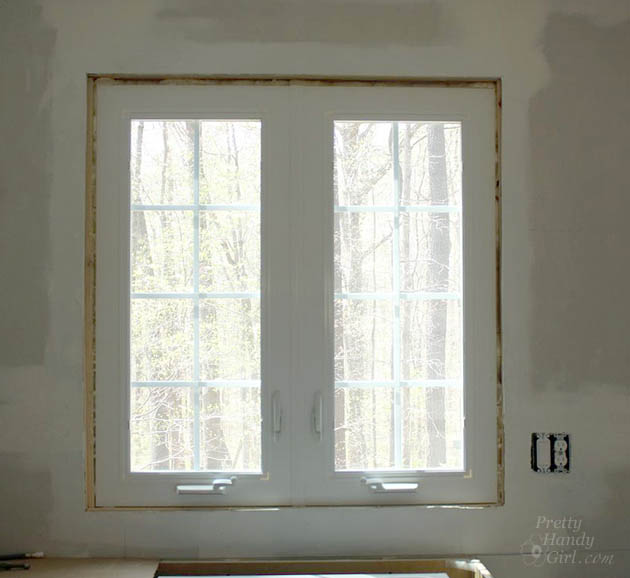
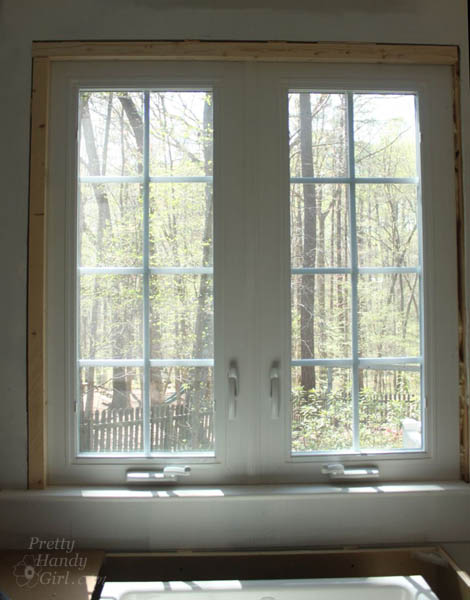
Time to add the side pieces of casing and backer board. The backer board is not necessary, but I like to beef up the trim on my doors and windows. It’s an easy process, and makes your home look more custom and less builder-grade.
Decide what amount reveal you want showing on the window stop. Mark this depth on the 2×2″ window stops. Typically 1/8″ to 1/4″ is used.
Measure and cut your window casing to meet the 1/8″ reveal. Be sure you have a consistent reveal from top to bottom and then secure the window casing with finish nails.
Measure and cut the backer band to the same height. Set it tight against the casing and secure with finish nails.
Your window should look like this at this point with the two side pieces of casing installed.
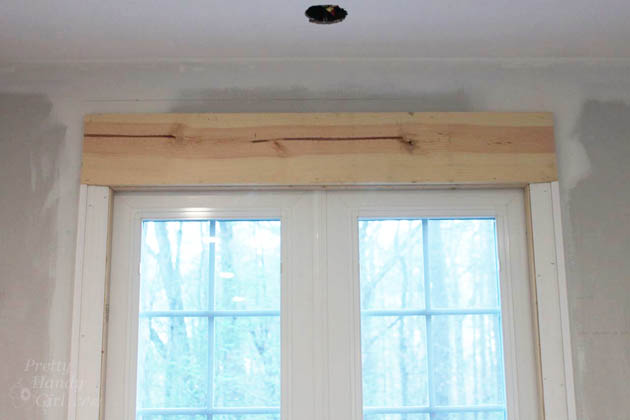
Cut the 1″ x 6″ board to fit even with the outside edges of the casing and backer band. Attach it above the window with more finish nails.
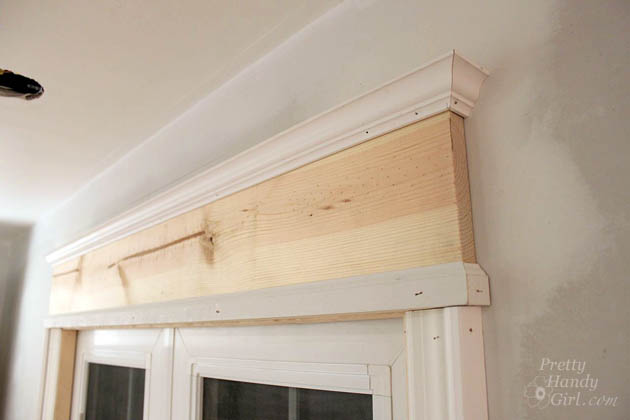
Cut the small cove and the small base trim pieces to fit across the top and bottom of the 1″ x 6″ board. The ends should be mitered where they meet the edges. Cut, two pieces at a 45 degree angle to act as a return for the moulding. Here’s a closer look:
Before securing the returns, add a dab of glue to hold it in place. Then use painter’s tape to hold the returns while they dry. After the glue dries, secure the returns with a finish nail in the center of each.
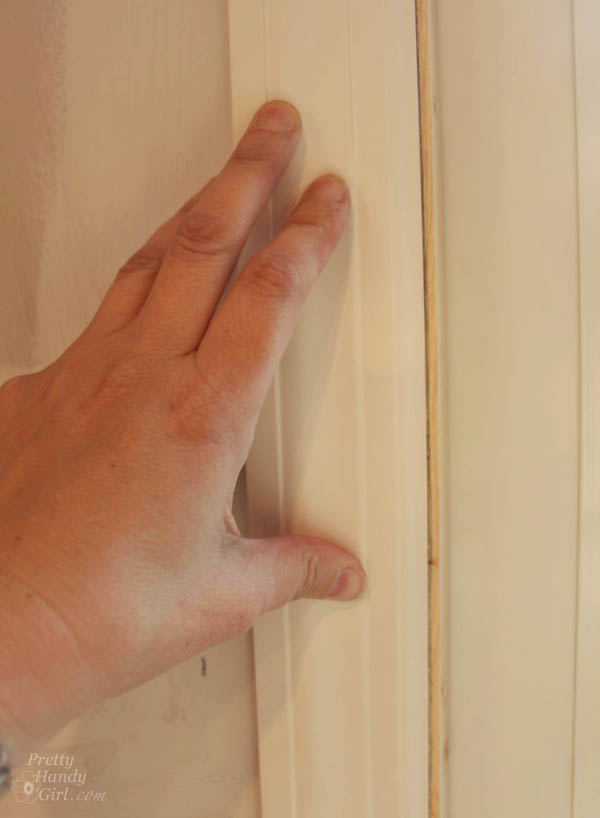
Now the window trim and moulding is finished and it’s time to putty all of the nail holes with wood putty.
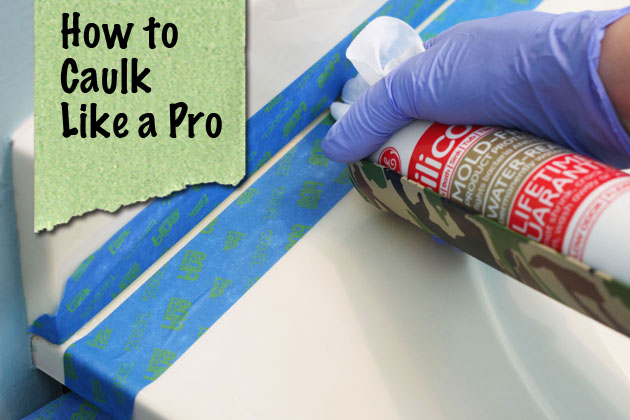
Caulk all the seams where the trim pieces meet each other and the wall and window.
If you need a tutorial for how to caulk like a pro, I’ve got you covered!After the wood putty has dried, sand it smooth using a sanding sponge.
Wipe off any sanding dust off with a damp rag. Prime and paint your window.
And you’ll never see the seams!
Congratulations, you just learned how to install trim and casing moulding.
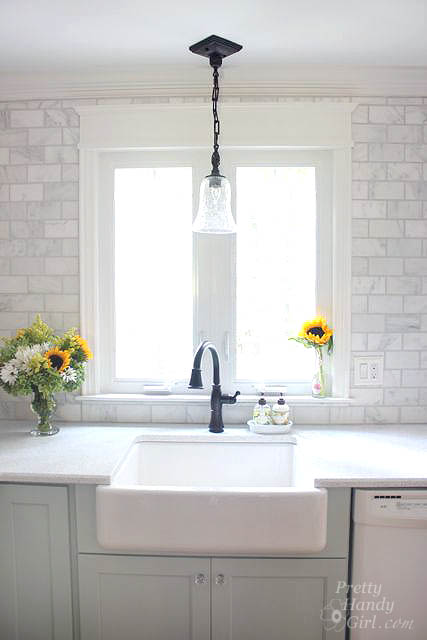
The depth of our sill, it’s just enough to set a vase onto. You may note I decided to forgo the traditional apron, and ended up using pencil edge marble tiles instead.
That seemed relatively easy, don’t you think? Trimming out a window is a personal affair, so be sure to experiment and get creative with your trim moulding. Remember, it’s your house, you can dress it up the way you want!
https://prettyhandygirl.com/wp-content/uploads/2013/09/how-to-install-window-trim-casing-moulding.jpg15001000Brittany Baileyhttps://prettyhandygirl.com/wp-content/uploads/2021/07/PHG-logo-tagline-2020-1030x211-R.jpgBrittany Bailey2025-02-18 12:00:002026-02-17 18:20:26How to Install Trim and Casing Moulding on a Casement Window


