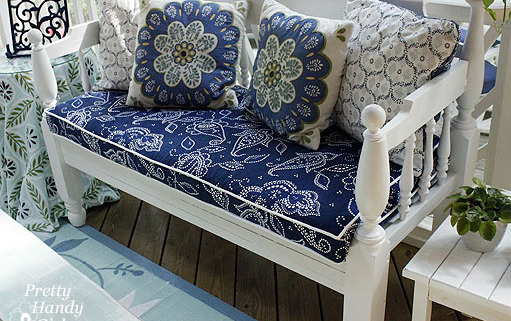
You can sew your own custom DIY bench cushion with piping. I’ll show you how to make your own bench cushion covers with this detail tutorial.
How to Sew a DIY Bench Cushion with Piping
I thought sewing a custom cushion for a was going to be a difficult project to sew.
And, I thought sewing a bench cushion with piping would be next to impossible.
However, once I figured out an easy way to create the box, it was actually very easy!
Let’s get started and I’ll show you how to make custom DIY Bench Cushions with an added detail of piping.
My Fabric Source:
Before we get started I wanted to let you in on a little secret. 🤫
The bench cushion and side table fabrics you see below are actually Target shower curtains!
That’s right, I didn’t use upholstery fabric, instead I used beautiful fabric shower curtains which are just a durable.
Remember this the next time you want to sew a bench cushion, dining bench or window seat cover.
You read that right. Fabric shower curtains are not only inexpensive, but they are durable and can stand up to moisture.
This makes them perfect for outdoor use. I bought both of these at fabric shower curtains at Target for under $20 each!
You could score cute fabric shower curtains on sale and save even more.
Materials:
(I’ve included affiliate links for your convenience. I earn a small commission from a purchase using these links. There is no additional cost to you. You can read more about affiliate links here.)
Once you have all your materials, let’s get sewing.
DIY Bench Cushion Tutorial
Follow these detailed steps to make your own bench seat cushion.
Preparing the Foam Cushion
Measure or lay your foam on top of the bench. Mark line(s) where you need to trim the cushion to fit the length of your bench.
The next step is to use an electric knife to cut through your piece of foam on the long side of the edges of the foam.
Wrap batting around your foam. Then trim the edges down to size.
I had enough to put two layers on top of the foam and one layer on the bottom of the cushion.
This will make for a cushier and less sharp-edged cushion.
Cutting out the pieces
1. Fold your bench fabric in half and lay it out. Place your cushion on top.
Trace around the cushion about 3/4″ wider on each side of the foam to determine the length of the fabric needed.
Cut through the two layers. This will give you a top and bottom panel for your cover.
2. Next let’s cut out four strips of fabric for the sides. First, plan on cutting your lengths 2″ longer than your cushion.
If your foam is 3″ and you use 1-2 layers of batting, you can use these measurements for your strips:
Front: 4.25″ wide by length + 2″
Sides (left and right): 4.25″ wide by length + 2″
*Back: 5.5″ wide by length + 2″
*Back Fold Over Flap: 3.5″ wide by length + 2″
*You may have noticed the back measurement is wider and has two strips. This is because we need to sew an overlapping flap and velcro to allow for the cover to be removable for washing.
Assembling the sides of the DIY bench cushion cover
1. Wrap the 4 strips around your cushion right sides facing in. (Reserve the back fold over piece for later.)
Pin the edges where they meet at your cushion corners. The back strip should line up with the sides on the one edge.
But, the other outside edge will extend 1.25″ taller than the rest.
2. Remove the sides and stitch where the pins are.
When you get to the back strip, fold over the excess so it matches the same height as the rest of the strips.
Then stitch along the back strip’s folded over your piece of fabric to secure it.
Set your sides aside for now. It is time to pin the piping to your cushion top.
1. Lay the top panel right side up on top of the cushion. Pin the long strip of piping on top of the fabric.
Line up the piping with the edges of the cushion. Be sure the raw edge of your piping is facing the raw edge of the fabric.
When you reach a corner, snip into the raw edge of the piping all the way (but not through) the rope piping.
Then turn your piping creating a 90 degree angle and continue pinning.
When you reach the start of your pinned piping, simply overlap the two alittle bit about 2″ and cut off the excess.
Your bench cushion top should look like this:
2. Set the top panel on your sewing machine and sew the piping into place.
Your needle will be very close to the piping, but it shouldn’t stitch into the rope.
This is where a zipper foot really helps get close to the piping and give you professional looking results, especially around the corners of your cushion.
Carefully sew and backstitch over the place where your piping overlaps.
Connecting the top and sides for the DIY bench cushion
1. Lay your top panel onto the cushion. Pick up your sides and begin pinning them to the top of the cushion.
(Note, the raw edge of your back panel should be lined up next to the piping and the hem on the back side should be facing up and away from the piping.)
Position your pins close to the piping but not on top of it. Try to line up the corners of your sides with the 90 degree corners of your piping.
2. Stitch the sides onto the top piece. Again, your needle will be very close to the piping but not over it.
This is a little trickier because you can’t see the piping, but you can feel it.
Just use your fingers to guide you. (Piping shown by the red arrowed line below.)
3. Remove the cushion cover from your sewing machine. Turn your top cover right sides out and test the fit on your cushion.
Hopefully at this point you don’t need a tighter fit and everything is looking good. You see it’s a fairly easy sewing project.
4. Repeat the steps above for “adding the piping” to sew piping onto your bottom cover.
Sewing the cushion back flap
1. Now you can pick up that back fold over strip that has been sitting all by its lonesome.
Fold the edges over twice on three sides (2 short and 1 long) to hem your flap. Press the hem with a hot iron.
Stitch along the folded hem to secure it.
2. Center and pin the flap along the back edge of the bottom panel (right sides together) as shown.
The raw edges should be facing out.
3. Stitch the back flap onto the bottom panel next to the piping. An inch or more of the panel will extend on both ends.
That’s perfectly fine, you want to leave it loose so it can tuck inside the cushion.
3. Turn your top panel and sides wrong sides out and put your cushion inside it. Then lay your bottom panel on top as shown.
Pin the bottom panel to the sides just like you did for the top panel. This time leave the back side unpinned (where your two flaps overlap.)
4. Now is a good time to trim any excess from your previously stitched seams of the entire bench.
(There will be a lot of fabric on the sewing machine, and this is just one less piece that could get caught while stitching.)
Trim off the corners at an angle.
Carefully peel the pinned cover off the cushion.
5. Stitch along the two sides and front of your cover. Leave the back length of the cover open.
Remember, use your fingers to feel for the piping.
6. Turn the cover right side out and slide the cushion into the cover.
Check the fit and make sure you don’t have any stray fabric that might have gotten caught while sewing.
You should have an opening in the back like this.
Adding the velcro closure to the back of the cover
1. Take out your coordinating velcro tape.
Pin the hook and loop velcro tape onto the backside and the back fold over flap.
To save money, I used 4 strips of 3″ velcro evenly spaced along the length of the opening.
But, you can certainly use one long piece of velcro if you wish.
2. Stitch the velcro onto the cushion. You can use a zig-zag stitch for extra strength (if you have destructive little boys like I do!)
Check the fit of the velcro.
3. If everything looks good, you can turn the cover inside out and trim off any excess raw edges.
Then turn the cover right side out and insert your cushion.
And that’s it! You are done and you have a professional-looking bench cushion with piping!
The best part is now you know how easy Sewing a DIY Bench Cushion with Piping can be!
This is such a versatile piece of furniture. It would make a great addition to a living room for extra seating or to use as entryway bench.
Add some pretty throw pillows and the only thing you need to do now is enjoy your beautiful easy sew bench cushion.
Want to see the rest of my screen porch makeover? I spent less than $125, that’s what I call an extreme budget!
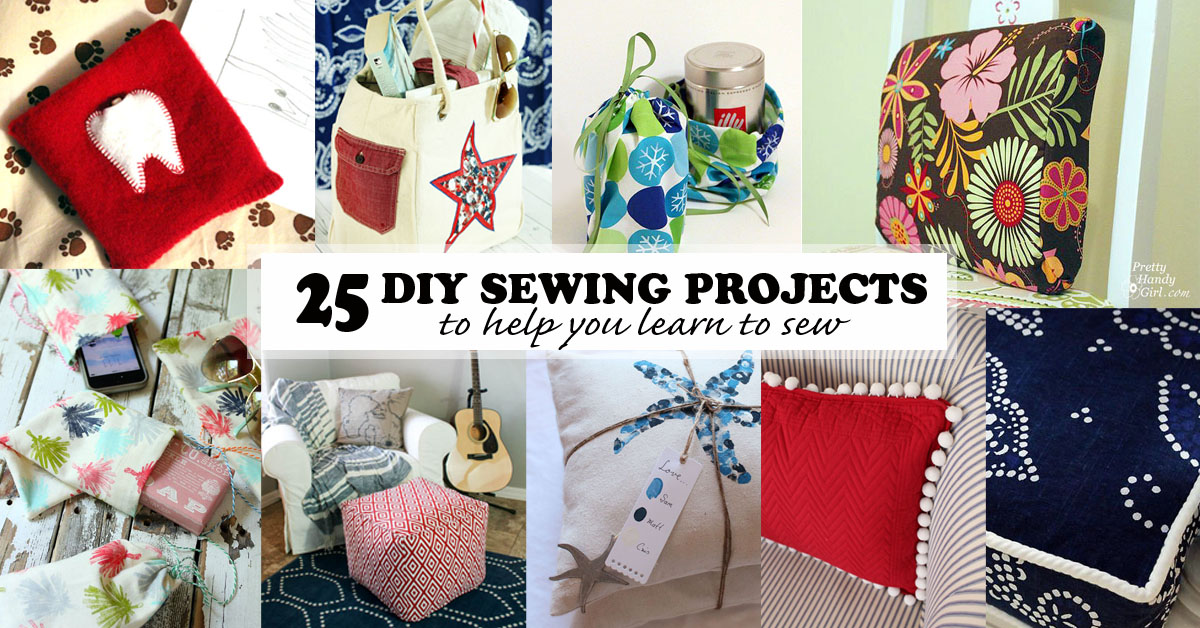
Now that you knocked out a custom diy cushion, why not sew one of these 25 easy sewing projects next!
https://prettyhandygirl.com/wp-content/uploads/2011/07/angled_bench_view.jpg375511Brittany Baileyhttps://prettyhandygirl.com/wp-content/uploads/2021/07/PHG-logo-tagline-2020-1030x211-R.jpgBrittany Bailey2025-03-10 07:00:142025-05-06 15:15:13How to Sew a DIY Bench Cushion with Piping
Have you been following all the Lowe’s Spring Makeovers? There were 10 in all, and each one is truly a miraculous transformation. If you remember, there were 10 bloggers who were sent to 10 different areas that were hardest hit by this past winter. We all combed through hundreds of applications to select 10 homeowners who deserved a fantastic makeover. There were challenges; there were lots of Lowe’s heroes who stepped up to help with those challenges; and there were lots of happy tears in the end. You’ll definitely enjoy reading each story and seeing the reveal!
If you’re ready to start the tour, grab a cold drink and head this way—>>> Read more
https://prettyhandygirl.com/wp-content/uploads/2015/06/pretty-handy-girl-reveal.jpg473630Brittany Baileyhttps://prettyhandygirl.com/wp-content/uploads/2021/07/PHG-logo-tagline-2020-1030x211-R.jpgBrittany Bailey2015-06-16 07:00:002021-07-08 16:17:13Lowe’s Spring Makeover Tour
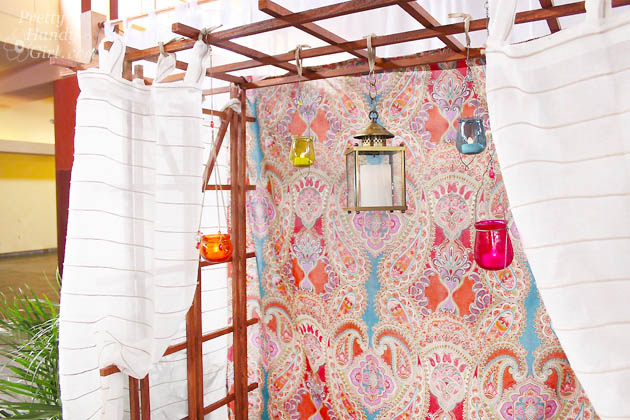
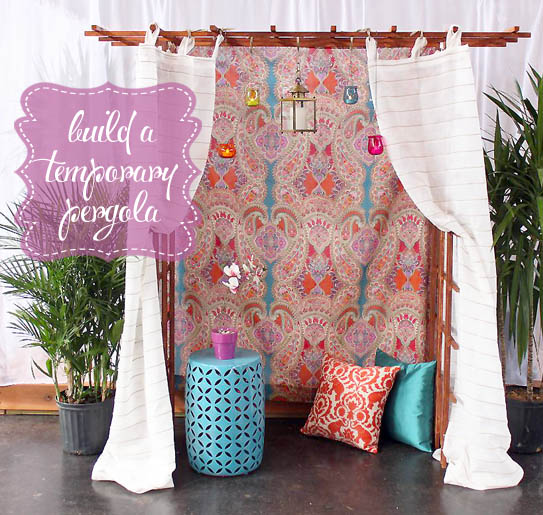
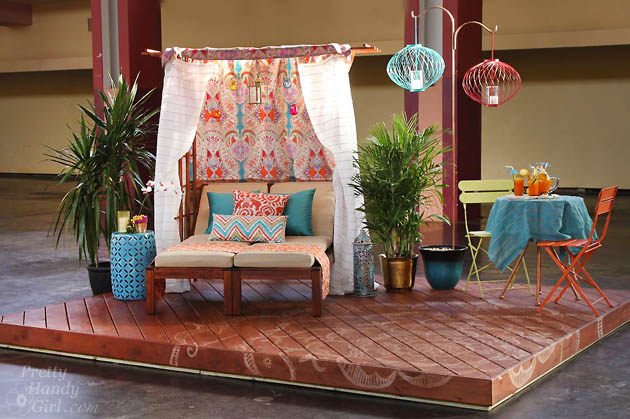
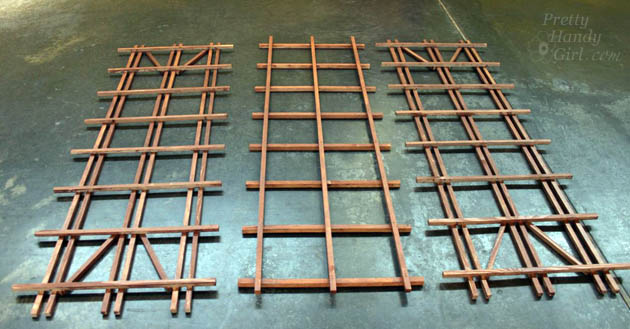
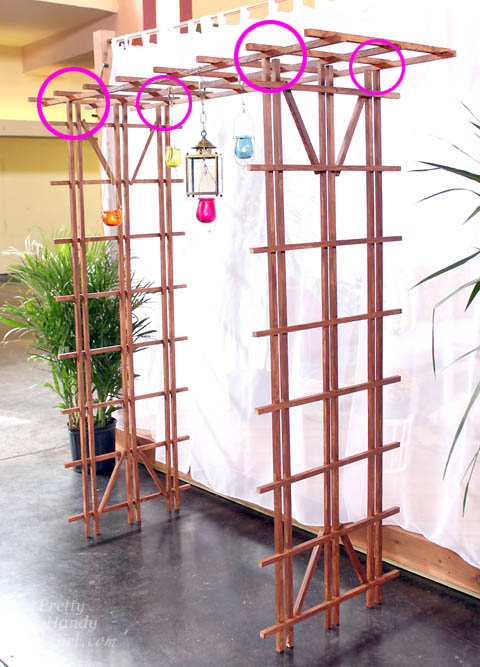
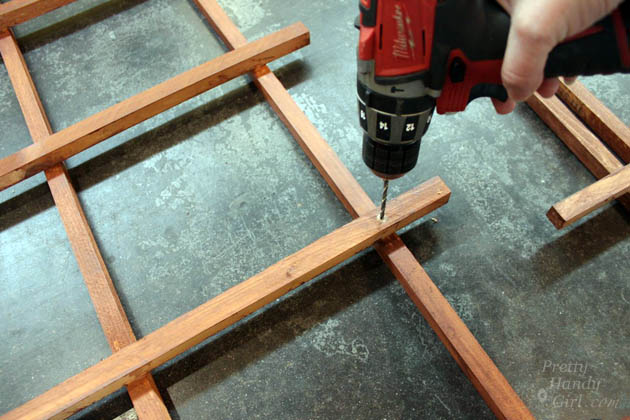
This tutorial to build a temporary pergola is perfect for a wedding, photo shoot, for some shade, or for your garden if you are okay with it not lasting forever.
My sister and I constructed it for our Thompson’s WaterSeal Bali Dream Deck to provide some romance and shade from the hot Bali sun.
https://prettyhandygirl.com/wp-content/uploads/2015/03/hanging-lanterns-onto-trellis.jpg420630Brittany Baileyhttps://prettyhandygirl.com/wp-content/uploads/2021/07/PHG-logo-tagline-2020-1030x211-R.jpgBrittany Bailey2015-03-30 07:00:002021-07-08 16:30:10How to Build a Temporary Pergola
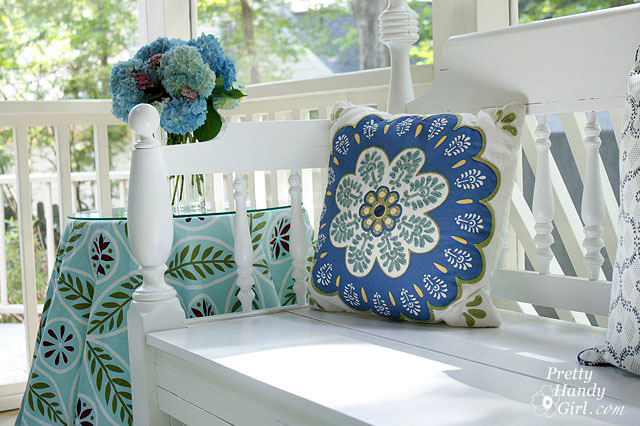
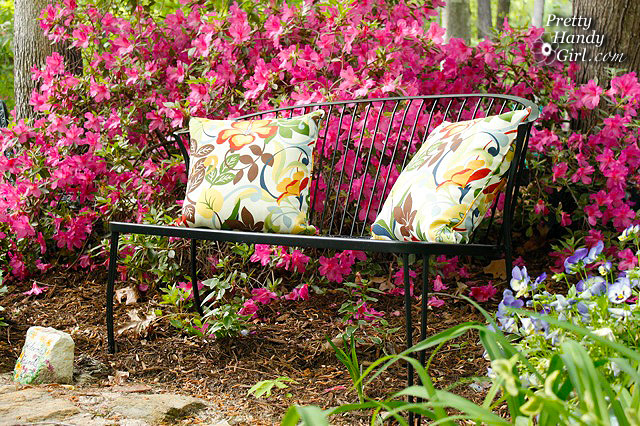
Recently I decided my garden bench that used to be a Craig’s List bed frame, needed to be refinished. I repaired, sanded and repainted the bench before setting it onto our porch where it would get less exposure to the rain.
Well, it wasn’t weathering the elements too nicely. Or maybe I should say it was weathering them poorly. Regardless, I really liked the bench and decided to strip it and start over again. I believe the main problem was that the bed frame was not solid wood, it was glued pieces. Then, if you factor in that I used spray primer and spray paint, the rain and moisture got in easily and caused the wood to swell and some of the glued joints to come undone.
But, the bench was still structurally sound, so we moved it onto the screen porch and I got ready to refinish it.
Refinishing a Weathered Garden Bench
Safey First, (as Meri-K will tell you.) Because I was sanding and scraping the old paint I had to wear eye protection and a dust mask. I also wore ear plugs while sanding and gloves to keep my hands from getting rough.
Materials:
(I’ve included affiliate links for your convenience. I earn a small percentage from a purchase using these links. There is no additional cost to you. You can read more about affiliate links here.)
Begin by using the wire brush to remove any flaking paint and to get into the grooves of the spindles (and other hard to reach places.)
Tip from a Handy Girl: I am about to share with you a helpful time saving trick, so pay attention. If you have a power sander that holds the sandpaper with a clip. You can stack your sandpaper. I put the 220 grit on the bottom, then put the 1oo grit on top of that. After sanding my bench with the 100 grit, I simply tear off the top sheet and expose the finer 220 grit.
Sand down the bench with a rough 100 grit paper first, then follow up with a finer 220 grit sand paper.
Secure any loose pieces of the bench. To use Gorilla Glue, you need to moisten the two pieces that you will secure.
Then put a small amount of Gorilla glue onto one of the pieces.
Clamp the joined pieces and allow to dry overnight. (By the way, don’t waist your money on cheap clamps. That little black & orange number below just bit the dust last weekend. My Irwin clamp is a CHAMP!) Check back after 30 minutes to wipe off any Gorilla glue that has spread out of the seam.
Because the posts on my bench were really falling apart, I decided to remove the ball finials.
Use a saw to cut both finials off.
Patch the hole using toothpicks and wood glue.
After the glue has completely dried, saw off the toothpicks.
Add a curtain rod finial on top of the sawed off posts.
It looks like those finials were there all along!
Clean your bench off with a damp rag to remove any sawdust.
Cover the entire bench with one coat of KILZ Clean Start Primer. Want to know why I use KILZ Clean Start primer for all my projects now? Read how much I love it in this post where I used the same primer for painting a bamboo rug. I’m never buying any other primers (unless I’m priming a tricky surface, then I’ll use BIN 1-2-3 oil based primer. But, I won’t be happy about using that stinky stuff.)
After the primer has dried, use a piece of fine grit sand paper to gently remove any burrs or imperfections.
Then wipe off the bench with another damp wipe. I used Benjamin Moore Impervo Semi Gloss paint for the top coat on my bench. It leaves a really tough coating and will hold up to wear and tear.
Roll on the paint in one area. Then follow up with a brush to even out the paint. Remember to run your brush in the same direction as the grain of the wood.
Lightly sand after the first coat has dried and finish up with a second coat of Benjamin Moore Impervo paint. I didn’t add polyurethane, but if you are really concerned about a piece of furniture that will be exposed to the elements, go ahead and add two or more coats of polyurethane.
My bench should successfully last outside now for three reasons:
I moved it inside the porch and out of the direct sun and rain.
I primed the bench with a good quality brush-on primer (instead of a spray paint type.)
I brushed on two coats of paint making sure I got into all the cracks and crevices of the bench.
With zero VOCs and the quality that is standard in all the KILZ products, this primer is a must have for the DIY painter!
Disclaimer: The products mentioned in this post are products that I use and stand behind. The opinions expressed in this post are authentically mine. I was sent a gallon of KILZ Clean Start Primer and the Irwin Quick Grip clamp to try out, but I was not paid or swayed to write favorable things about the products. If I don’t like a product, I won’t write about it. And I certainly won’t pass it off on my valued readers.
Ahhh, the birds are chirping and the flowers are in full bloom. The azaleas in our yard look like fireworks exploding with color.
I long to open the windows and let in the sounds and the sweet smells.
But, alas, the pollen bomb is still in full dumping mode.
I’m not going to let that get me down. I decided to bring the outdoors in and finished switching out my Valentine’s Day decorating (yup, I like to get the most out of my seasonal décor.)
So, without further ado, here is how I’m celebrating Spring!
I saw the window idea at Classicly Amber (via Pinterest) and had just pulled a few old windows out of a curbside pick up pile. Speaking of Pinterest, if you haven’t tried it yet, you are missing out! It is a great place to “pin” ideas you see and be able to refer back to them easily.
Beth at The Stories of A2Z gave a tutorial on using Pinterest HERE. She’s the one who introduced me in the first place, so I’ll let the master show you the ropes!
I always make it a point to refer back to the original source if I get an idea somewhere else. (Granted, some things are so widespread amongst bloggers, that it is hard to credit the original source.) Pinterest has helped me keep all the ideas together and makes it easier to find the original source. Plus, you can follow other people’s pins and boards. Feel free to sign up and follow mine HERE. Then you can steal my ideas before I blog about it…just kidding!
The striped pedestal holding up the plant is actually a cake stand I made recently using a plate and a candlestick. I’ll be blogging about it later this week, but trust me it is nothing new. You’ve probably seen this trick somewhere else.
This little adorable birdhouse was lovingly painted by my 7 year old son. I always have a stock of $1 birdhouses that they like to decorate on a rainy day. This one brings so much sunshine into my heart.
I love how easy this centerpiece was to create. I rested the ceramic bird into a shredded paper bag nest. Then set the nest on top of a ceiling medallion ($3 at a yard sale) and surrounded the medallion with ivy.
And finally, my favorite: a robin’s egg nest that I made with chicken eggs.
You can view the tutorial for making the eggs and nest at TLC’s Parentables today.
If you struggle with decorating and creating vignettes, you might want to read a few of the guidelines I use when designing groupings and seasonal décor HERE.
Entering this post into the CSI Spring Decor and Vignettes challenge: