DIY-feather-art

DIY Feather Art | Pretty Handy Girl

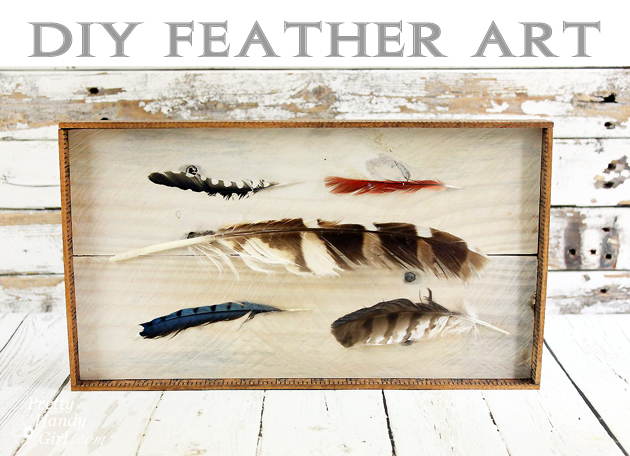
When I needed an extra piece of art for our living room gallery wall I created DIY Feather Art. You can create your own, but please purchase craft feathers, use fake feathers or paper feathers. (Per the Migratory Bird Treaty Act, it is illegal to collect feathers, nests and other anatomical parts of certain migratory birds.)

Materials:

DIY Feather Art | Pretty Handy Girl

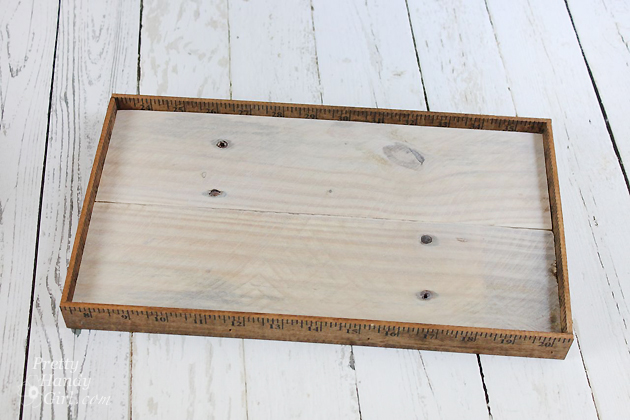
  • Rustic 1×4″ boards (I used pallet wood)
  • Wood yardstick or lattice boards
  • Watered down white paint
  • Paint brush
  • Clamp
  • Scissors
  • Kreg Jig
  • Pocket hole screws (1.25″)
  • Nylon line
  • Small drill bit
  • Drill
  • Staple gun
  • 1″ finish nails
  • Hammer or nailgun
  • Wood glue
  • Feathers
  • Pencil
  • D-ring picture hangers

Instructions:

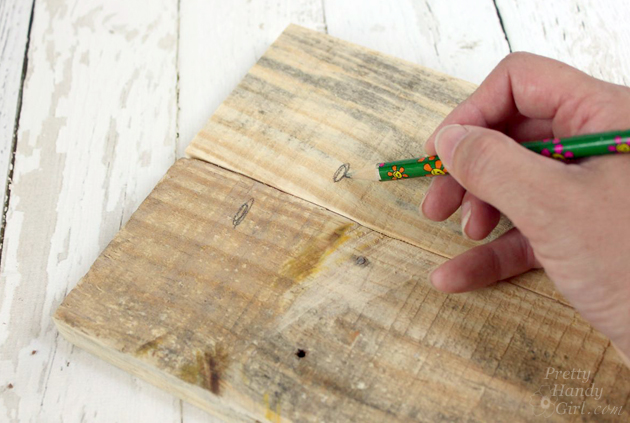
Cut your 1×4″ boards to size (or select one board the size you want for your art background.) To connect the two boards, mark the location to drill pocket holes.

DIY Feather Art | Pretty Handy Girl

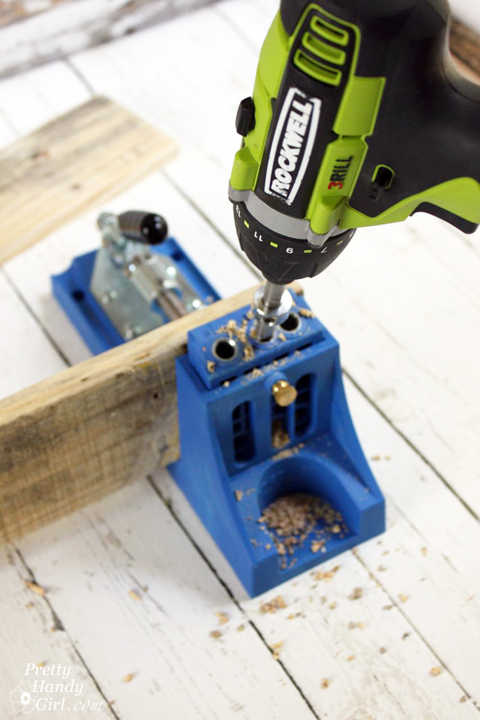
Use the Kreg Jig to drill pocket holes into the back of both boards.

DIY Feather Art | Pretty Handy Girl

Clamp the boards together and join them with 1 1/4″ pocket hole screws.

DIY Feather Art | Pretty Handy Girl

Flip the board over and paint it with watered down white paint for a white-washed look.

DIY Feather Art | Pretty Handy Girl

Mark the width of the white-washed board onto the yardstick. Cut two pieces the same length. Read more

Spring Foyer Vignette | Pretty Handy Girl

Spring Foyer Vignette | Pretty Handy Girl

My blogging friend Melissa Michaels just published a wonderful new book to help you “Love the Home You Have.” She focuses on simple things you can do to embrace the home you live in. With easy suggestions and achievable goals, she breaks down all the barriers you have when it comes to truly loving your home.

Love the Home You Have by Melissa Michaels

To help Melissa promote the book, I agreed to take on a quick little Love Your Home Challenge. Her book has 31 Small Challenges to help you love your home again. Each one is simple, quick and easy.

Love Your Home Challenge | Pretty Handy Girl

I decided to focus my efforts on our foyer. I still loved the little rustic IKEA hack chest, but the mirror was a little to drab. I’d been staring at the pussy willows all winter and needed an infusion of color.

foyer-before

Originally, I chose to work with the Day 30 suggestion to Paint Something. I removed the mirror and within 30 minutes I painted the wood slats with white chalk paint. Then I used some patina Rub ‘n Buff to give the edges an aged metal look.

Spring Foyer Vignette | Pretty Handy Girl

Much better.

Spring Foyer Vignette | Pretty Handy Girl

To continue adding some cheer to the foyer, I incorporated the Day 11 Challenge by Adding Fresh Flowers.

Spring Foyer Vignette | Pretty Handy Girl

I didn’t spend a dime on my flowers or vase. The red bud branches were clipped from our tree. And I slipped a mason jar into the boot for a fun and quirky vase. I think it’s a nod to the saying, “April Showers Bring May Flowers.”

Spring Foyer Vignette | Pretty Handy Girl

A small collected birds nest and feathers add an additional nod to springtime.

Spring Foyer Vignette | Pretty Handy Girl

I also painted an old frame with blue chalk paint and popped a piece of scrapbook paper into the frame for instant art.

Spring Foyer Vignette | Pretty Handy Girl

My total cost was $0! I can honestly say that seeing this springtime foyer vignette has made me happy.

Spring Foyer Vignette | Pretty Handy Girl

Within an hour, I was able to love this corner again. What can you do for $0 in your home? Read more

PB Knock Off Monogrammed Bulletin Board

edited-0510

Hey everyone!  If you remember, last month, I shared with you how I updated my boys’ desk in our den with a wood plank desktop.  The den is just about ready for the big reveal and now I’m just working on adding little details.  This includes these fun personalized bulletin boards I made for each of my boys.  I was searching for desk organization ideas one day and saw these personalized pinboards on Pottery Barn Kids.  I knew they would be perfect for my boys and that I could knock them off pretty easily.  I made two of these pinboards, but my supply list will be for one pinboard.

Materials:

  • 12″ x 12″ wrapped canvas (mine was 3/4″ thick)
  • 12″ adhesive backed cork sheet
  • Adhesive vinyl
  • Transfer paper
  • Die-cutting machine
  • Acrylic aint
  • 2 – 1″ foam paintbrushes
  • 1″ x 2″ x 6′ pine board
  • Wood stain
  • Sander w/ 220 grit sandpaper
  • Miter saw
  • Brad nailer
  • 1″ Brad nails
  • 24″ Bar clamps
  • Hot glue gun

Instructions:

Start by designing your stencil.  To make it look just like the PB Kids version, use the Varsity font.  (FYI, the letters are all capitalized, but when you use the shift key or CAPS lock, it will add the outline.)

Knockoff Personalized Pinboard

Cut your design out on the 12 x 12″ sheet of vinyl and weed the negative pieces out.  Remember that this is a stencil, so make sure to weed out the correct parts of your design.  Place your transfer paper over the design and use a scraping tool or a credit card to get out any air bubbles.

edited-7687

Peel the backing off of your vinyl and very carefully center it onto your cork sheet.  Use the scraping tool or credit card again to firmly adhere the vinyl to the cork sheet.  Carefully peel the transfer paper off. Stencil your design using the acrylic paint and foam brush. Read more

Racing Stripe Mirror Makeover | Pretty Handy Girl

Racing Stripe Mirror Makeover | Pretty Handy Girl

While my sister and I were renovating the Topsail Beach condo we had a strict budget. Finding a large mirror for less than $15 was challenging until I found this mirror with potential. I know my sister was doubtful, but I had a vision. Some red milk paint, lattice and glue would make this racing stripe makeover complete!

Racing Stripe Mirror Makeover | Pretty Handy Girl

To transform the mirror, I disassembled the top and cut off the panel portion using my Dremel MultiMax. I salvaged the top crown moulding and re-attached it to the new top of the mirror with glue and finish nails.

Then it was time to add stripes.

Materials (some links are Amazon affiliate links):

Instructions:

Tape off the edge of the mirror where it meets the frame. Paint two coats of Miss Mustard Seed Tricycle red paint onto the frame. (See this post for painting with milk paint.)

Racing Stripe Mirror Makeover | Pretty Handy Girl

After the paint dries, wax it or leave it unfinished. Mark the center of the frame at the top and bottom of the mirror.

Racing Stripe Mirror Makeover | Pretty Handy Girl

Cut pieces of lattice to fit the mirror frame width. (I used three pieces of lattice and cut a fourth piece in half for the outer stripes.) Pre-paint the lattice pieces ironstone (white) and let dry.

Wet the frame and the back of the lattice. Apply a small amount of Gorilla Glue to the backs of the lattice.

Racing Stripe Mirror Makeover | Pretty Handy Girl

Line up the center lattice piece with the pencil mark. Attach it and the other two pieces beside the middle lattice.

Racing Stripe Mirror Makeover | Pretty Handy Girl

Use a ruler to create a space between the middle stripe and the outer small lattice piece. Glue the outer pieces in place.

Racing Stripe Mirror Makeover | Pretty Handy Girl

Set a weight (or paint can) on top of a scrap board and the lattice pieces while the glue dries.

Racing Stripe Mirror Makeover | Pretty Handy Girl

Remove the weight. Paint the top and bottom edge of the mirror frame white to create the illusion that the stripe continues around the frame edges. Distress the lattice pieces with sandpaper if you want a rustic look.

Racing Stripe Mirror Makeover | Pretty Handy Girl

Hang your mirror on the wall and admire! Not bad for $15, two coats of paint, and some scrap lattice!

Some red milk paint, lattice and glue transform this $15 find into a charming racing stripe mirror perfect for a boys' room! | thrift store makeover | DIY mirror | mirror tutorial | #prettyhandygirl #DIY #tutorial

The mirror hangs happily in the twin bedroom at the Topsail Beach Condo. Click here to see the rest of the condo!

Some red milk paint, lattice and glue transform this $15 find into a charming racing stripe mirror perfect for a boys' room! | thrift store makeover | DIY mirror | mirror tutorial | #prettyhandygirl #DIY #tutorial

Hope you never turn down a $15 mirror again ;-).

PHGFancySign


Pin for later!


wood-block-picture-frames

Wood Block Floating Picture Frames | Pretty Handy Girl

We are days away from Christmas and I’m sure there is someone on your list that you just can’t figure out what to get for them. I have the perfect solution! Make them a wood block floating picture frame using scrap 2×4″ lumber and plexiglass.

If you don’t have scrap 2×4’s lying around, you can purchase a 2x4x8 foot stud for less than $4! You could make 16 photo frames out of that one board! (Granted, you’ll need to buy the plexiglass for each.)

Materials:

  • 2 – 2 x 4s (cut to 6″ lengths)
  • 4 – 6″ x 9″ pieces of plexiglass (3/32″ thickness)
  • Ipswich Pine Stain
  • gel stain or Minwax Express color
  • small detail paint brush
  • pencil or pen
  • photos
  • tape
  • rag
  • optional: scrapbook paper, double stick tape

Tools:

Instructions:

Set your table saw to a 10 degree bevel.

Wood Block Floating Picture Frames | Pretty Handy Girl

Set the saw blade to a depth halfway through your block (about 7/8″ deep.) Set the fence to 2″ from the blade.

Wood Block Floating Picture Frames | Pretty Handy Girl

Use your GRR-RIPPER to safely guide the 2×4 over the saw blade. Check to see if two pieces of plexiglass will fit in the groove created by the saw blade.

Wood Block Floating Picture Frames | Pretty Handy Girl

If not, nudge the fence over slightly and make a second pass over the blade. Check to see if the plexiglass will fit now. If not, repeat the process until they fit snugly. Read more