No Solicitors Sign

We live on a quiet street in a peaceful neighborhood in Raleigh. Unfortunately, every so often, my son’s peaceful naps were interrupted by: DING DONG! And when I answered the door, this is who greeted me.

ARRGGGHHH!

I finally decided to halt the door-to-door salespeople in their tracks. Especially after a neighbor informed me that sometimes these so-called salespeople aren’t actually selling anything. There have been a few incidents of burglary in our neighborhood, and one of the burglars had actually knocked on doors the day before. Apparently he was casing the home to see what homes were empty at what times. Plus, it offered them an opportunity  to peek inside and see if there were any valuable items inside. Scary! Especially when I’m home alone with the little ones.

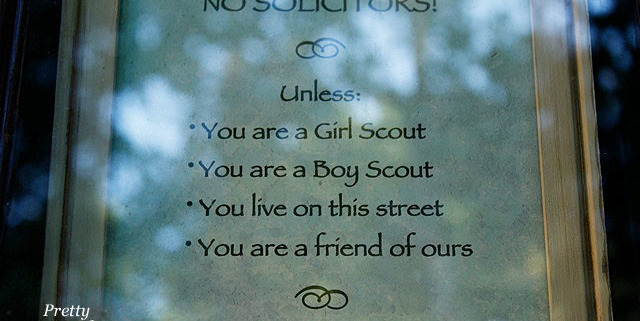
I decided to take matters into my own hands and create a No Solicitor Sign.

While at Goodwill, I searched for two small picture frames.  The frames I bought were in good shape, but I added some new paint and glaze to give them a fresh look.

I printed out a simple message on decorative paper and inserted it into the frames.

No Solicitors! Unless:

  • You are a Girl Scout.
  • You are a Boy Scout.
  • You live on this street
  • You are a friend of ours

This message seemed to cover all the bases and still allow for the kids selling muchies!

I hung one sign by our side door.

And put a second one inside the storm door of our front door.

I can honestly say that we have not had a single unwanted salesperson knock or ring our doorbell since I hung the signs.

I’m not the only one who can’t stand solicitors, Becca from Blue Cricket Design cut some vinyl for her side light by her front door. I can’t help but smile every time I see it. 😉

Blue Cricket Design’s Sign

Want your own No Solicitor Sign? Download it HERE!

Writing Name in Sand Art | Pretty Handy Girl
This is a fun project to do with your kids (or by yourself) while you are at the beach.

Collect some cool shells, beach glass or driftwood. Use a broken shell with a sharp edge to write your name or message in the sand. Decorate your scene with the shells, etc. Take oodles of pictures. Try different angles and different distances.

When you get home pick out your favorite. And then you can use your favorite photo editing software or one of these great free websites Picnik or Sumo Paint– to make color corrections, cropping, etc.

Print your picture out and put it in a cute frame.

I debated whether or not to add shells and sea glass to the outside of the frame. The kids voted and we decided to add them with hot glue (or you could use E-6000) to the frame.

Then hang your sign on a door or set it up on your desk. You be the boss!

Sunprints | Pretty Handy Girl

A few years ago while I was trying to entertain my toddler, we made sun prints on a hot summer day.

What! You’ve never heard of sunprints? Well, you really need to get your crafty hands on this hot product. Visit the Sunprints.org website to see all the details, plus a gallery of sunprint artwork!

Okay, don’t feel bad. I never saw it either until I happened upon this pack at our art museum gift shop. I bought some in the hopes of filling an hour of some weekday while waiting patiently for my hubby to come home.

As nature lovers, we collected grass, leaves, and even weeds from our yard. Then we had a blast laying the leaves on top of the sunprint paper. After 2-5 minutes of exposure, we dipped the paper in cold water. It was fun watching the paper turn blue and the silhouetted images appear before our eyes. (Okay, I won’t pretend that we didn’t enjoy playing in the bucket of cool water too!)

Several of them turned out so nice that I decided to frame them as art. Not only did I like the graphic look of the images, but the soft blue colors really appealed to me. I became so attached to the colors in the artwork that we painted our whole master bedroom the light color of the sunprints.


 Mimosa tree


Clover


Some weed in our garden

I found it a bit difficult to find the perfect square floating frames. Instead, I found regular square frames at Target for $19.99 a piece, and decided to buy them on the spot.  When I got home I had a brilliant idea on how to fake the floating glass frame look.

After we painted the room, I took some mat board and rolled the wall color on the mats. (It works best to use a mat that is somewhat close to the color of your walls.)

When the boards dried, I used my logan mat cutter and created custom mats.

Can you tell they are matted vs. floating? Maybe if you look close, otherwise, they appear to float in the frame!

So, you are accomplished at hanging three pictures so they are equal distance and the same height, right? If not, check back for my post on how to hang pictures to perfection.