4 image collage diy outdoor builds

Upgrade your outdoor space with these must-try DIY outdoor woodworking projects! From privacy fences to storage sheds and cozy seating — these builds add style and function to any backyard.4 image collage diy outdoor builds

DIY Outdoor Builds

Looking to add some charm and functionality to your outdoor space?  Get ready to roll up your sleeves with 30+ amazing DIY outdoor woodworking projects!

From stylish planter boxes and cozy fire pits to beautiful patio furniture and benches, these DIY projects are perfect for those with beginner woodworking skills and seasoned woodworkers alike.

Whether you’re upgrading your backyard, porch, or garden, these budget-friendly and creative ideas will help you build something stunning with your own two hands.

Grab your tools, some wood, and let’s build some outdoor projects!

outdoor privacy fence with lattice

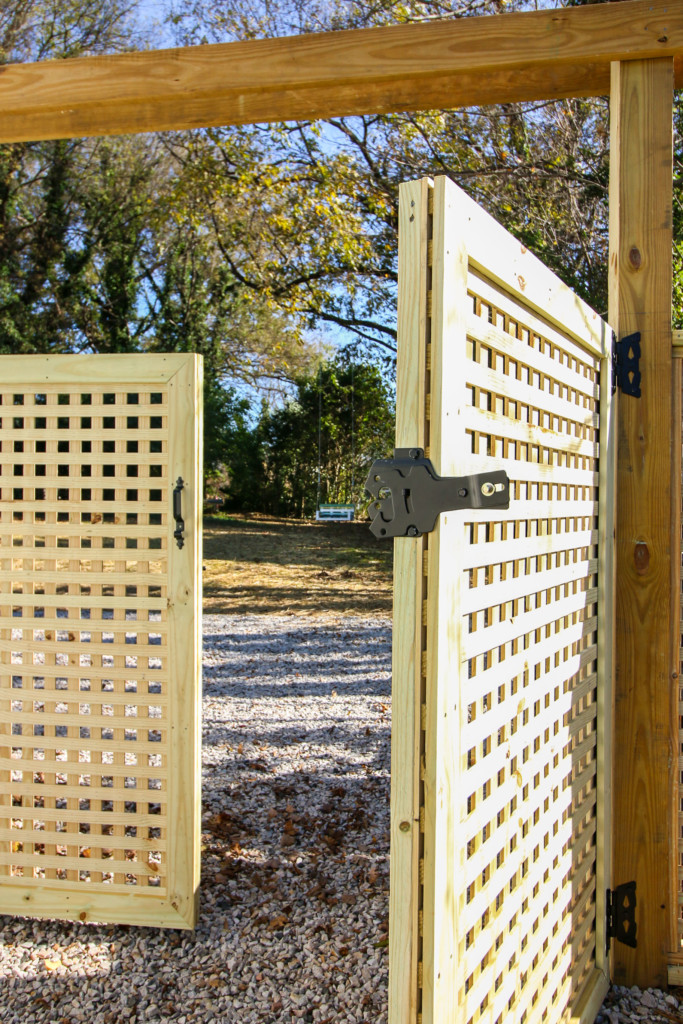
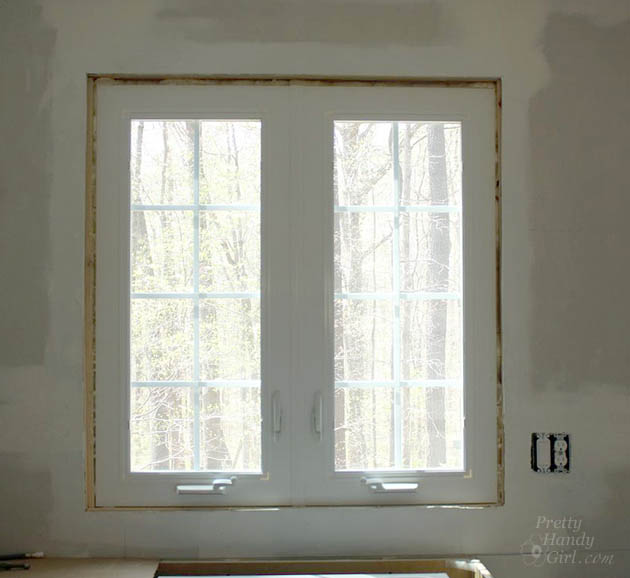
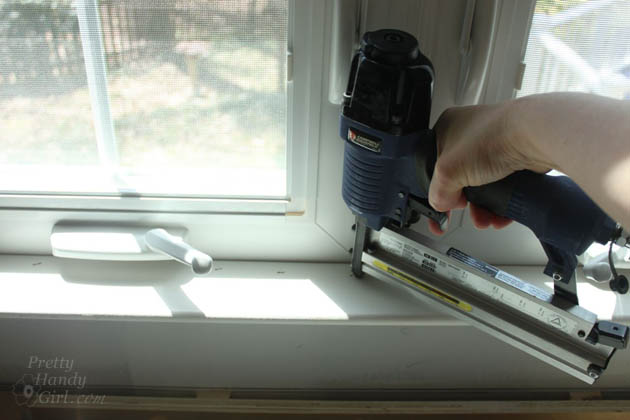
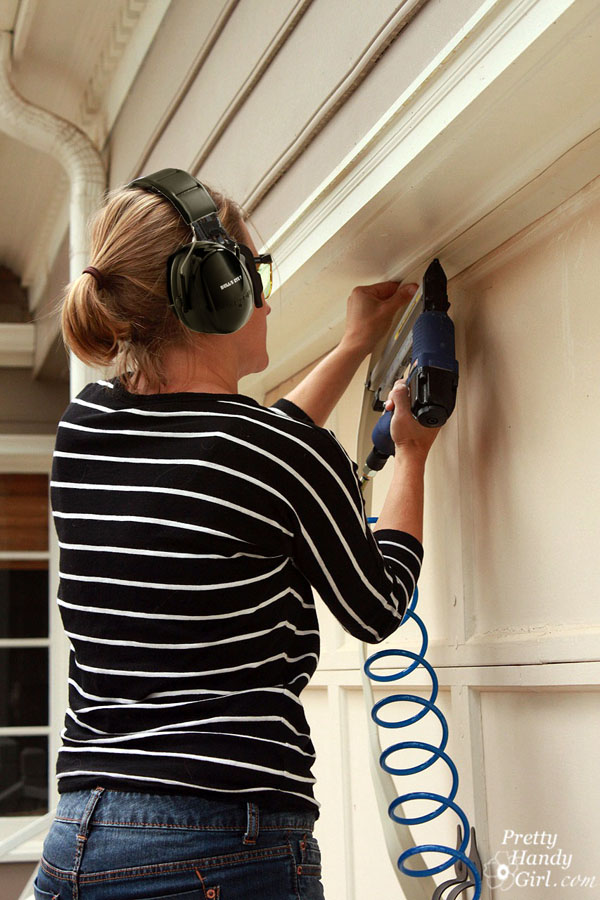
How to Build a Window Pane Lattice Privacy Fence by Pretty Handy Girl

This tutorial is your go-to guide for putting together a window pane lattice privacy fence and gate. It’s super simple and easy to follow! DIY wood projects, such as this, are the perfect way to add a unique touch to your outdoor space.

diy lattice planter

Creating an Outdoor Oasis by Frugal with a Flourish

Transform your backyard into your personal oasis by putting up some DIY lattice panels with planter boxes! This is a surprisingly simple project that makes a huge difference. It’s perfect for small spaces and rentals.

Build a Wood Storage Shed | Pretty Handy Girl

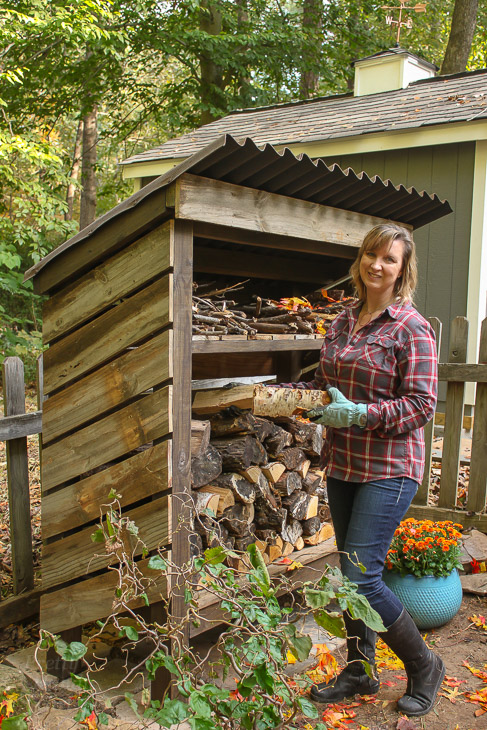
How to Build a Wood Storage Shed by Pretty Handy Girl

This project will definitely spruce up your fire pit space or give you a cool place to keep and protect your firewood at home. Check out how to make your own wood shed with these detailed plans.

diy hose planter

DIY Hose Hiding Planter by Jaime Costiglio

Having an outdoor hose is super handy for plenty of reasons. But let’s be real, we don’t always want it just sitting out in the open when we’re not using it. So why not create a DIY planter to keep it tucked away and out of sight? Let’s check out this handy DIY.

outdoor fire pit benches

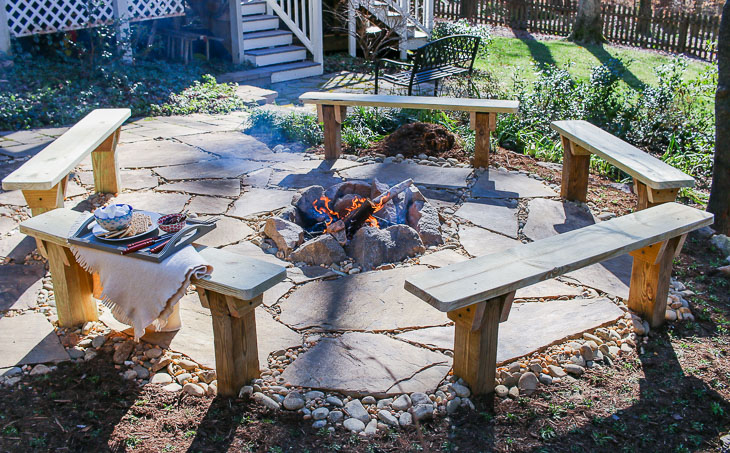
Built-In Fire Pit Benches by Pretty Handy Girl

These easy-to-make built-in fire pit benches are both stylish and straightforward. You won’t need to spend much on materials, and you don’t need to be a pro to pull it off. By the time the weekend wraps up, you could have these permanent benches set up around your fire pit.

Building a dining bench with 2x4s and wood glue

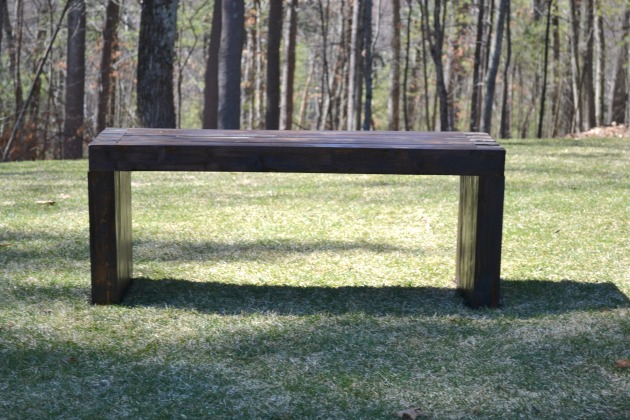
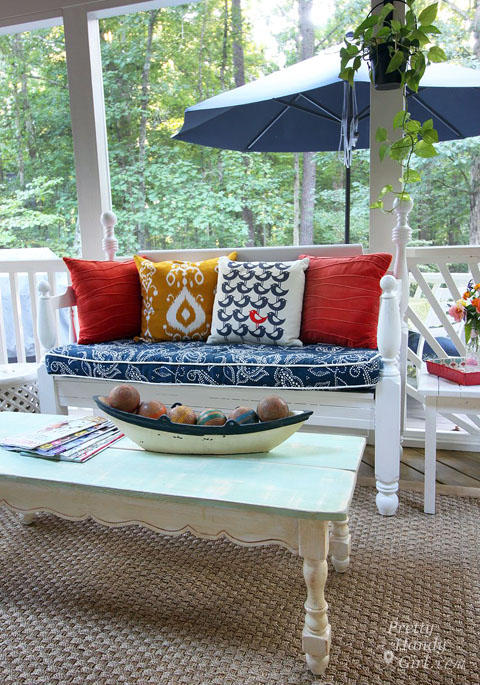
Indoor Outdoor Dining Bench by Jillian Grennon for Pretty Handy Girl

If you’re looking for an outdoor furniture garden bench, this one measures 47” x 19”, but the best part is that you can totally customize it! Make it fit your style and space however you like. That’s what makes DIY so enjoyable!

How to Build a Rot-Resistant Raised Planter Bed | Pretty Handy Girl

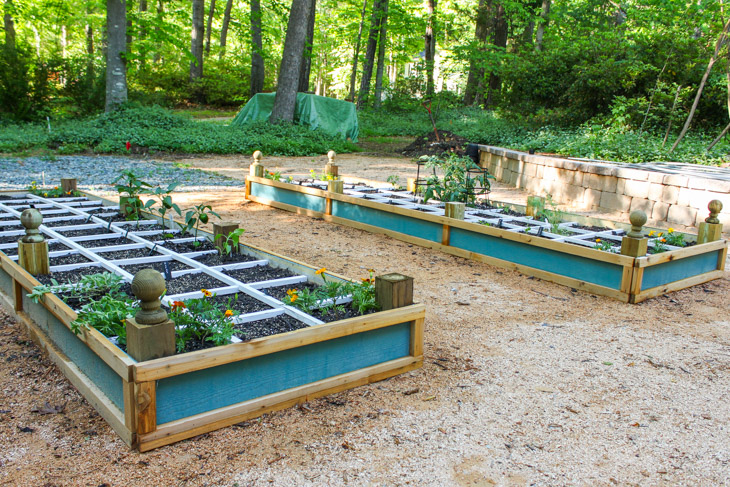
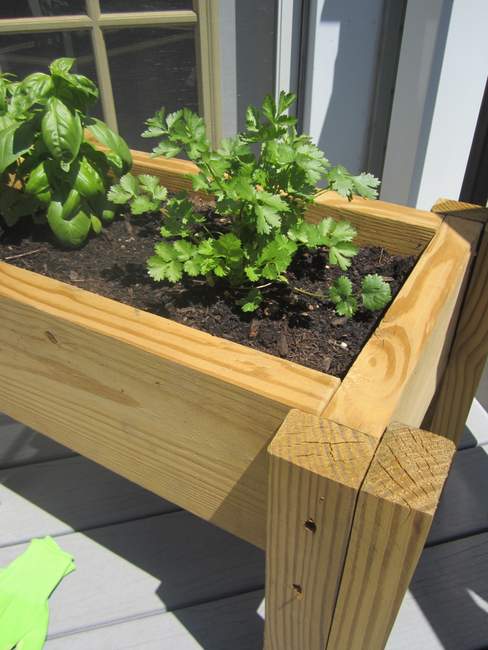
How to Build a Rot Resistant Raised Garden Bed by Pretty Handy Girl

I’ve been wanting to add a raised garden bed to my yard for a few years and finally made it happen. These garden beds won’t rot on you as they are made with fiber-cement siding, also known as Hardi-Plank. To give it a nice touch, I added some lovely cedar trim around the edges.

Weave your vines through the fence trellis to create a living wall!

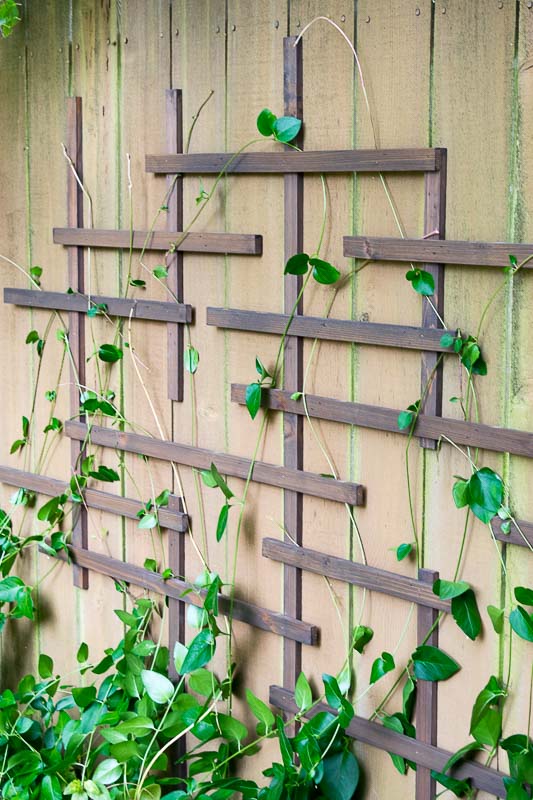
DIY Fence Trellis by The Handyman’s Daughter

Let me walk you through making this super simple DIY fence trellis. It’s a great way to spice up a dull, flat fence during the winter and provides a nice spot for vines to flourish come summer!

DIY Marble Toss Game | Pretty Handy Girl

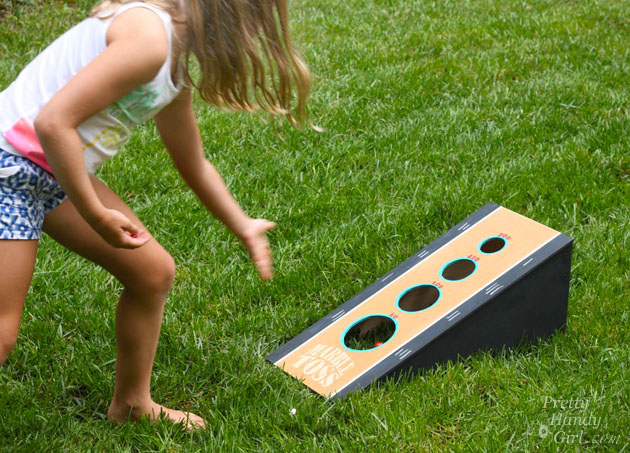
How to Build a DIY Marble Toss Game by Pretty Handy Girl

I whipped up a cool marble toss game to entertain my kids during summer break. It was super simple to put together, and I just used some leftover wood I had hanging out in my workshop. This is a super fun family game that everyone can enjoy.

diy adirondack chair

How to Build Adirondack Chairs by Just the Woods

Adirondack chairs can be pricey, so why not make your own? Kandice from Just the Woods built some Adirondack chairs from the ground up. Luckily, she stumbled upon some free plans online, which totally simplified the whole process! Get all the details to build your own.

DIY Washer Toss Game

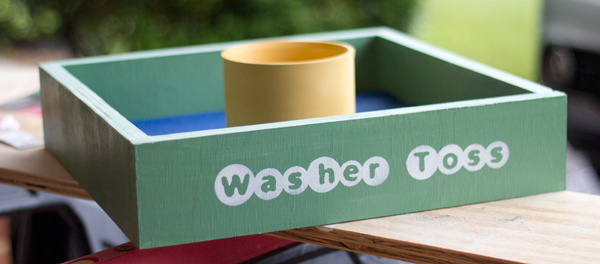
DIY Washer Toss Game by Pretty Handy Girl

Here is a super simple guide on creating your own washer toss game at home! We decided to add a personal touch with a custom vinyl stencil to make ours stand out. You can customize your game however you like.

tall fence planter diy

$10 Tall Picket Fence Planter by Jaime Costiglio

Here’s a fun project for you: create a stylish tall planter using affordable fence pickets and pressure-treated wood balusters! Check out these free plans to craft a chic tapered planter that’ll spruce up your outdoor area.

How to make yard dice | Outdoor Games | Pretty Handy Girl

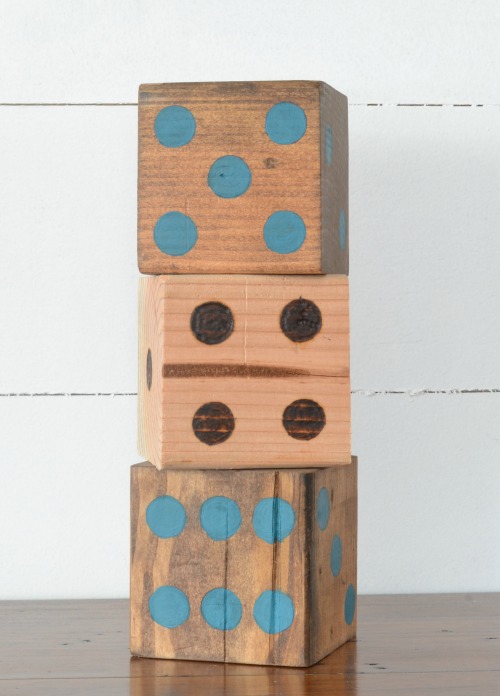
DIY Yard Dice by Jillian

I really enjoy planning fun activities for my family when we’re out enjoying the sunshine and fresh air. I spotted a set of yard dice while out shopping one day and immediately thought, “I’ve got to make these!” They ended up being super easy to make with basic tools.

Screen Porch Decorated for Fall | Pretty Handy Girl

Turning a Bed Frame into a Garden Bench by Pretty Handy Girl

I totally fell for this bench crafted from a vintage bed frame, but that $350 price was just way too steep for my wallet. Luckily, I stumbled upon a full-sized cannonball bed frame on Craigslist for just $40! Let me walk you through how I turned that bed into a sweet bench.

DIY Firepit and Seating | Pretty Handy Girl

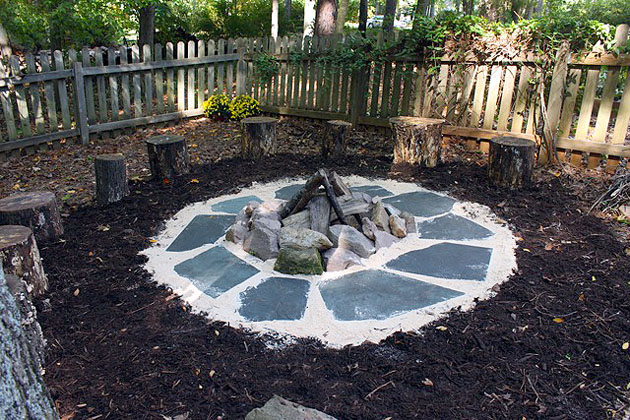
DIY Firepit and Seating by Pretty Handy Girl

After we had a bunch of hardwood trees removed from our yard, I asked the tree guy to chop up some of the trunk pieces into 18″ chunks so I could use them as stumps for sitting. Then, I got to work on building a DIY firepit and some seating in the backyard. You can make your own with this tutorial!

outdoor hanging swing

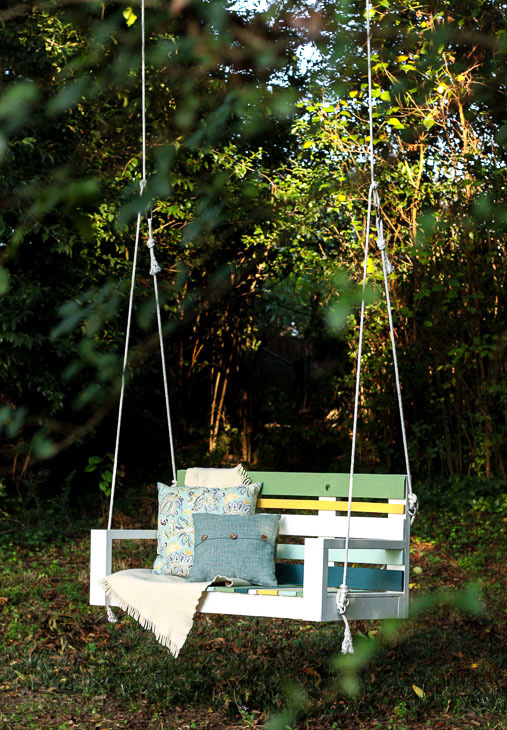
Building a Striped Porch Swing by Pretty Handy Girl

Discover how to create your very own striped porch swing with pallet wood! Just follow the step-by-step guide along with the cut list provided.

Create a Living Wall Lattice Privacy Screen | Pretty Handy Girl

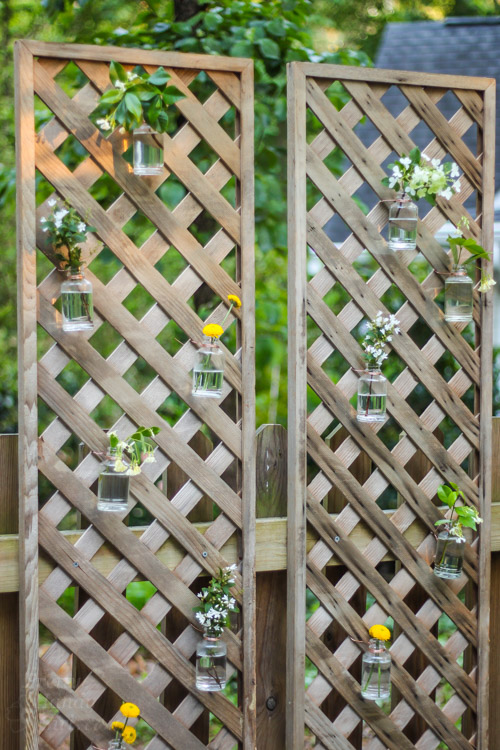
Create a Living Wall Lattice Privacy Screen by Pretty Handy Girl

Let me show you how to build a living wall lattice privacy screen for your outdoor space. It will take only a few minutes and is the perfect way to add a little more privacy while creating a cozy intimate feeling. For an extra special touch, I added hanging glass bottles for flowers. This takes the privacy screen to the next level!

raised garden bed with cucumber trellis

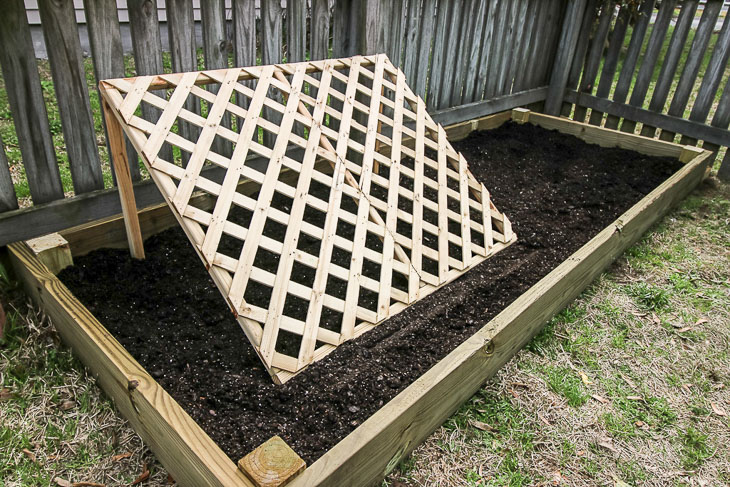
How to Build a Raised Garden Bed with a Cucumber Trellis by Charleston Crafted

Get ready to set up your raised garden bed, with or without a cucumber trellis, and dive into gardening tomorrow! Honestly, can you think of anything better than harvesting veggies right from your own backyard?

Step-by-Step Plans to Build a Raised Garden Bed with Arched Trellis (plus, how to make your garden self-watering)
by Pretty Handy Girl

How to Make an Air Conditioner Screen from Pallets

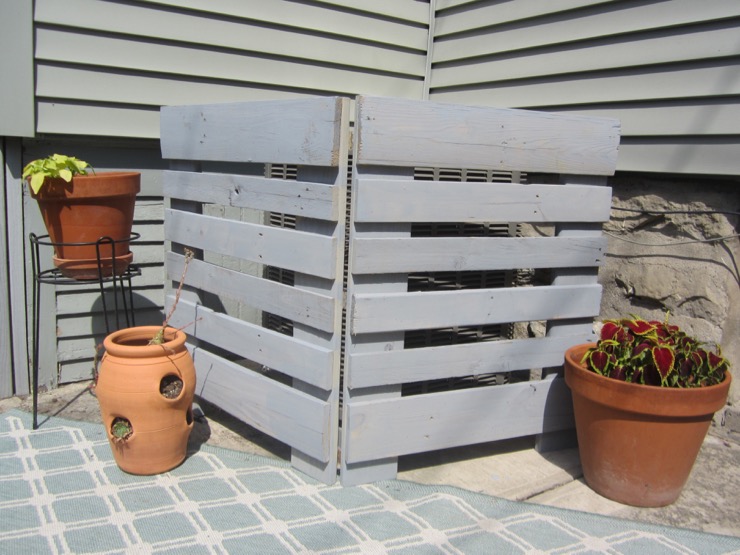
How to Make an Air Conditioner Screen from Pallets by Decor Adventures

Here is a simple DIY project to spruce up your yard! Why not whip up a screen for your air conditioner? It’ll hide the unit and turn your back patio into a more inviting spot for chilling out.

How to Tile a Small Table Top

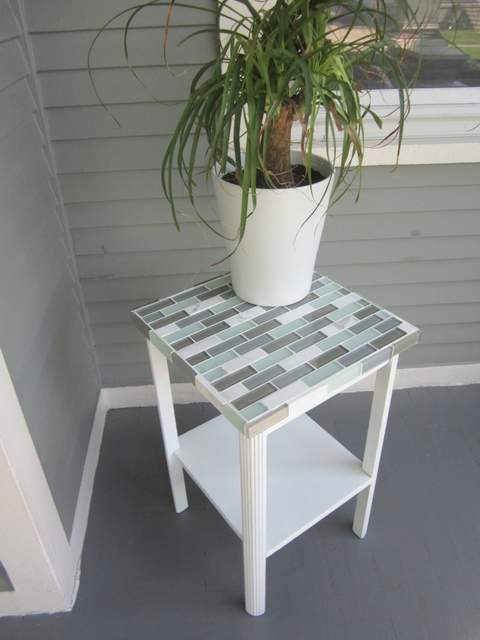
How to Tile a Small Table Top by Decor Adventures

This step-by-step tutorial will walk you through the process of tiling a tiny table top. It’s a lot simpler than it seems, and it’s great for outdoor use as well!

How to make a Concrete and Wood Planter | Pretty Handy Girl

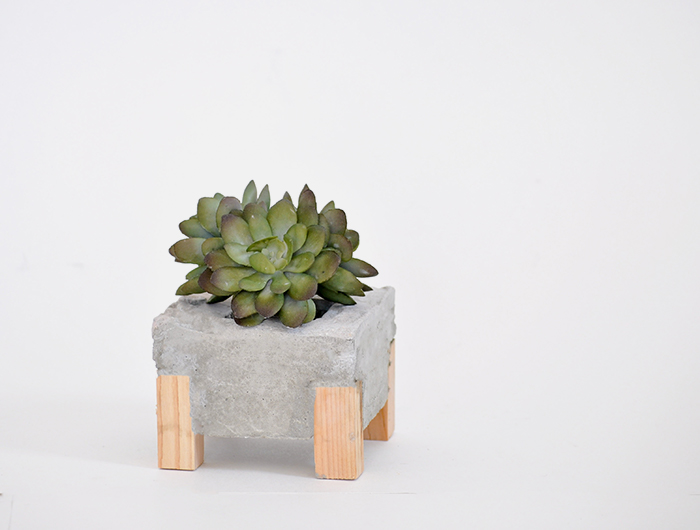
DIY Concrete Wood Planter by Anika’s DIY Life

Concrete planters are super trendy at the moment, and making them is a breeze! Check out this simple project given a unique look with some cute little wooden legs.

Scrap-wood-plater-Herb-Garden-Box

Scrap Wood Planter Box by Decor Adventures

Turn those leftover bits of wood into a cool planter box for your plants or herbs. It’s super simple to repurpose what you’ve got, and it won’t break the bank. Here’s a quick guide on how to whip up a planter box using scrap wood.

milk jug side table

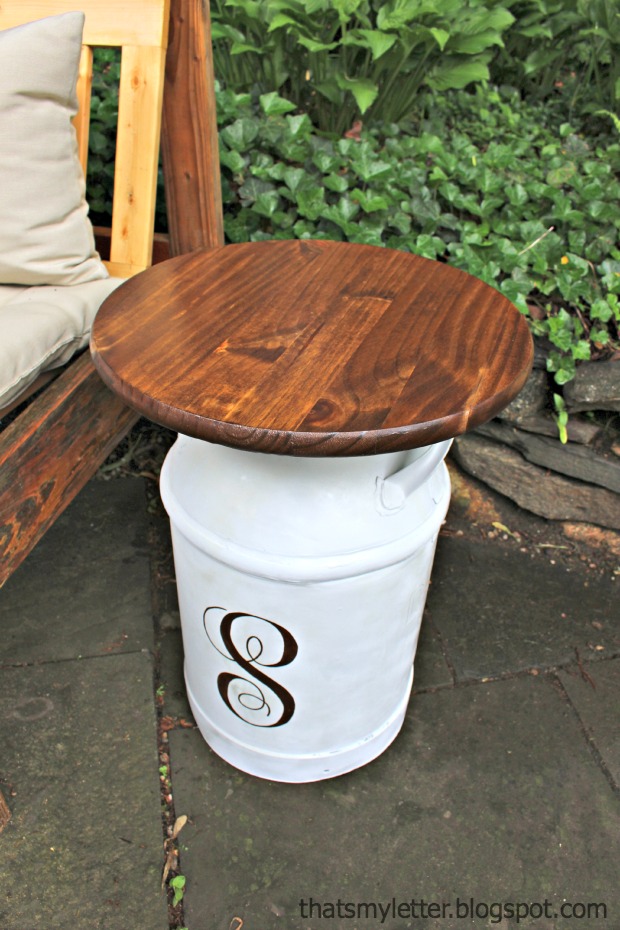
Repurposed Vintage Milk Jug Side Tables by Jaime Costiglio

Check out this awesome DIY repurpose project that’s perfect for both indoors and outdoors! It starts with an old, weathered milk jug that is given a fresh look with a splash of paint and a wooden top. Create stylish and functional pieces of furniture that you’ll actually want to use!

Building a Rock Solid Gate | Pretty Handy Girl

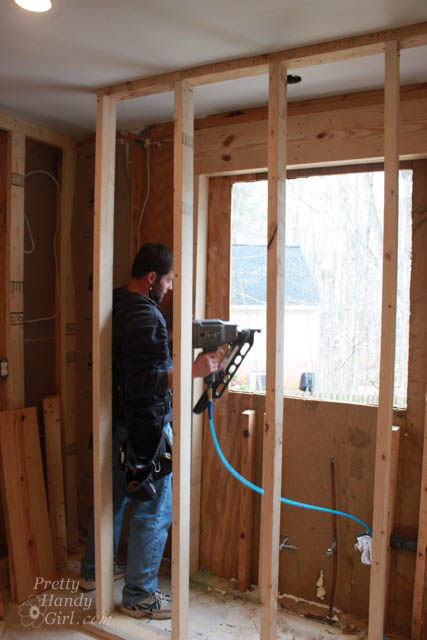
How to Build a Rock Solid Gate by Pretty Handy Girl

Do you have a saggy old gate that needs replacing? Here’s how to craft a sturdy gate the easy way. The frame is tailored to fit the size you need perfectly, thanks to the length of the 2″x4″ boards. Plus, the hinges are built right into the frame, which makes this one of the fastest and toughest gate kits I’ve ever put together. This is definitely a keeper!

Grown Up Swing Set | Pretty Handy Girl

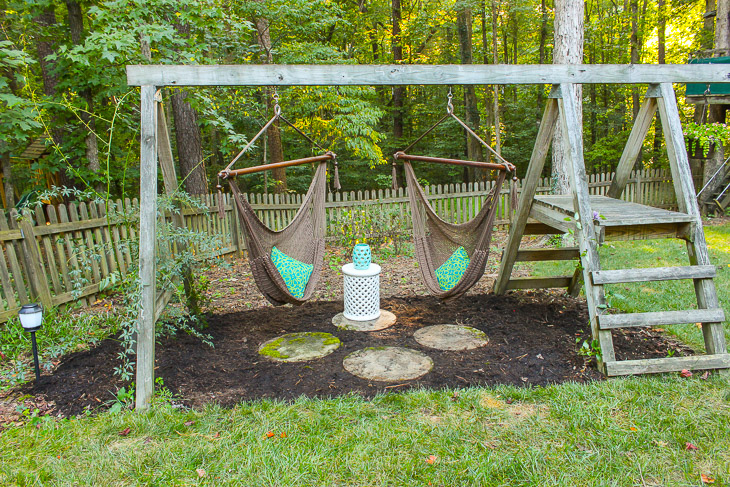
Grown Up Swing Set by Pretty Handy Girl

Are your kids still playing on that ancient swing set in the backyard, or have they moved on from it ages ago? We had one in our yard that was such an eyesore, totally ruining the view. So, we turned it into a unique and creative swing set for adults! This is such a fun project.

Build a Pergola with Trellis to Screen Your Trash Cans | Pretty Handy Girl

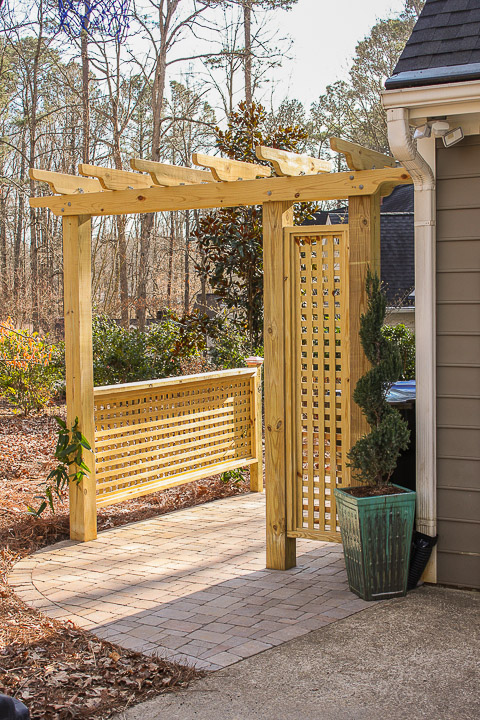
Building a Pergola with Trellis Screens by Pretty Handy Girl

We wanted to hide our trash cans to add some curb appeal to our home. We decided to build a pergola with trellis screens after seeing one in a magazine.It’s a DIY job that’s going to need a bit of extra strength for certain parts. Make sure to grab a buddy to help with the heavy lifting. The good news is there are detailed instructions with woodworking plans to help make it a bit easier.

How to make an easy solar light stand

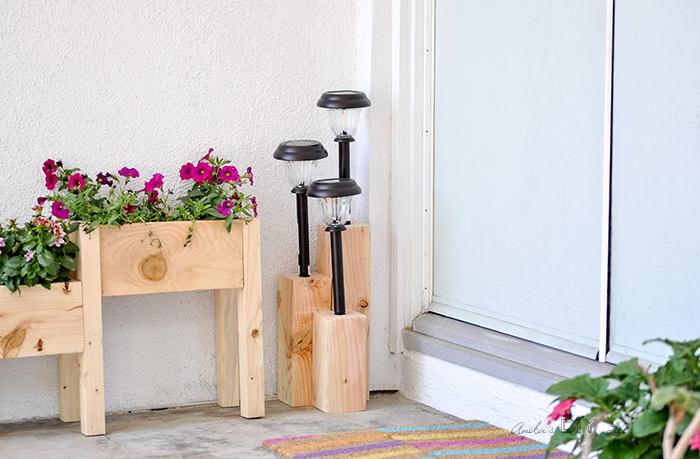
Easy Solar Light Stand by Anika’s DIY Life

Here’s a super simple and fast guide to elevate your outdoor decor using basic solar lights. This solar light stand is the perfect addition to your front porch or backyard.

How to Build this Cute Garden Shed

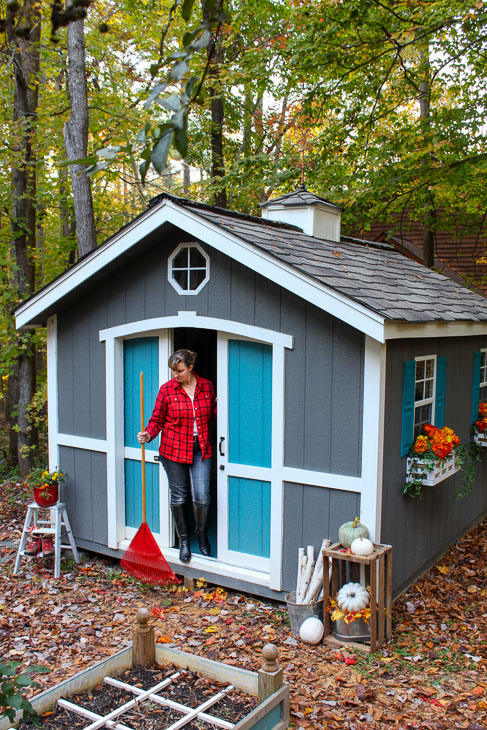
How to Build a Garden Shed by Pretty Handy Girl

Want to put together an adorable garden shed? I’m sharing an easy way to do just that using a kit. Most of the parts are already cut to size for you, and it even includes detailed diagrams. This shed is just the right size to hold a lawn mower, shovels, garden tools or any other supplies that you want to keep handy.


DIY-Rolling-Plant-Caddy-by-Brittany-Goldwyn-8

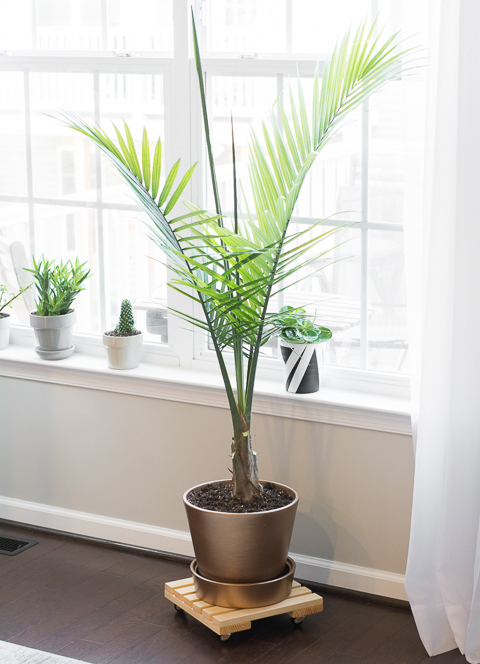
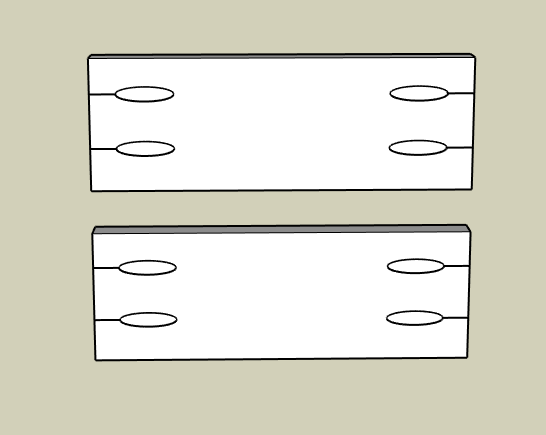
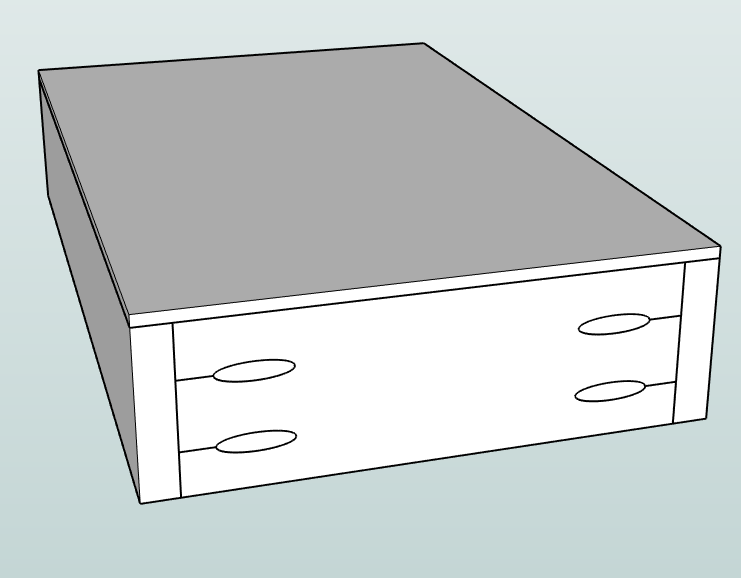
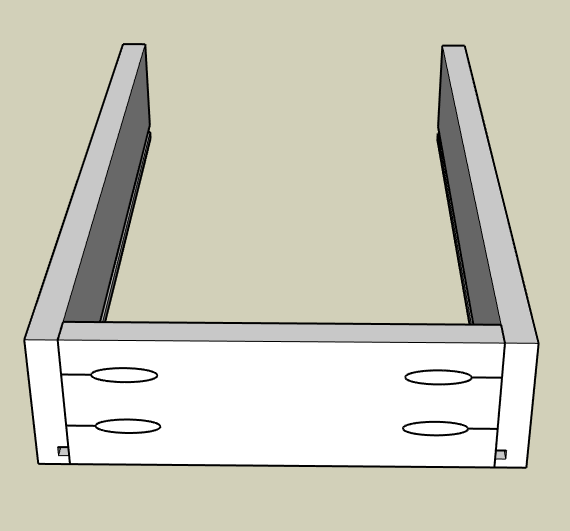
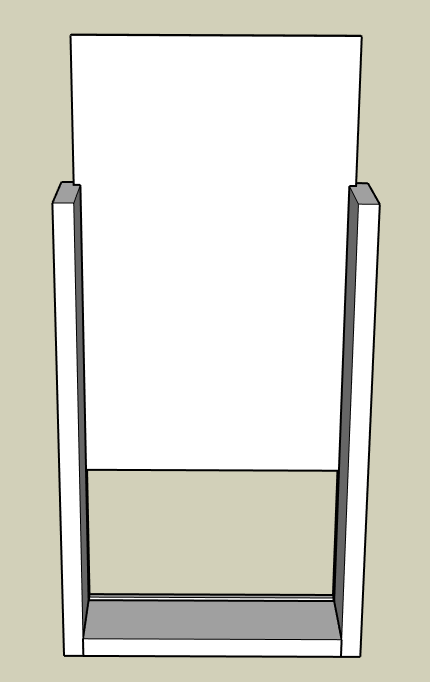
DIY Rolling Plant Caddy Tutorial by by Brittany Goldwyn

Creating a plant caddy is a game changer when it comes to handling those big plants. Moving them around can be a real hassle! But here’s the good news: making a rolling plant caddy is super simple. This was made using some leftover scrap wood from other projects.

flat sawn balusters

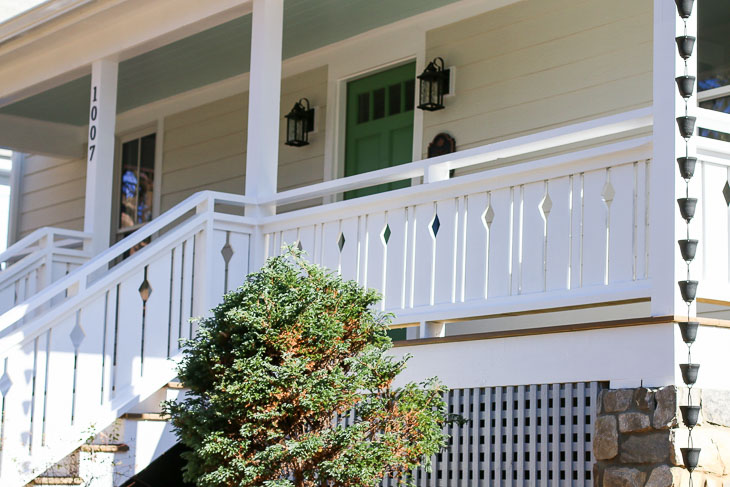
How to Build Flat Sawn Baluster Railing by Pretty Handy Girl

Here’s how to make flat sawn baluster railings featuring a classic diamond cut that gives off that genuine Victorian vibe. I’m including step-by-step instructions on how to create fancy cuts that bring a wow factor.

collage with 12 outdoor woodworking projects

I hope these DIY outdoor woodworking projects inspire you to build a unique piece for your outdoor space. If you’re feeling overwhelmed, start with a small project, you’ll be sure to gain the skills to tackle one of the larger projects soon. I hope you enjoy some relaxing outdoor relaxation while the warm breezes move in!

signature

If you are looking for a bit of spring and summer curb appeal, check out these DIY front door wreaths.

Dozens of creative DIY spring and summer wreaths you can make yourself.

Pin collage diy side tables

Looking for DIY side table ideas? Add a personal touch to any room in your home with these easy and budget-friendly projects.

Whether you decorate in a farmhouse style, or prefer a more modern look, we have a great collection of side table ideas to get you started.

Pin collage diy side tables

DIY Side Table Ideas

Today is all about side table projects that you can make yourself. Why settle for a boring store-bought table when you can create something truly one-of-a-kind? Take a look at these stylish side tables and get inspired to make one for your own home.

With just a few supplies and a bit of elbow grease, you have yourself a conversation starter in the form of a unique side table that shows off your creativity.

So get ready to create and enjoy the satisfaction of furnishing your home with personalized pieces that showcase your individual style.


xtable plans


Learn how to make a gorgeous DIY x-base side table that will look great in any space. It makes a perfect nightstand with plenty of room for your favorite book and charging station.

farmhouse table


This fabulous farmhouse style side table adds a touch of elegance to this living room. Follow the step-by-step tutorial to make your own!

log side table

If you are looking to add a touch of nature to your home, you will love this DIY tree stump side table. It’s such a unique piece that will add that wow factor!

small wood side table


You can never have enough storage in your home, so this DIY nightstand with extra storage is perfect for small space living, apartments, or even a dorm room.


diy wood table


Get all the details for this outdoor side table DIY in a warm and rich wood finish.

small wood table


This simple side table DIY project is a surprisingly easy build perfect for a bedroom, living room or anywhere you need a spot to set down a drink or hold a couple of books.

stacked side table


Make a statement piece of furniture for your home with a stacked side table DIY. This is such a gorgeous table!

gray painted side table


Create your own stylish and functional DIY sofa end table. Learn how to make a custom piece that compliments your living room decor.


yellow painted table


Looking to spruce up your living space? Create a colorful side table build with this step-by-step guide.


blue painted table


Build your dream side table with these free build plans.  Whether you’re a beginner or experienced builder, plans will help you succeed!


modern boho side table


Looking for a trendy and functional addition to your space? Check out this tutorial for a modern Boho side table – the perfect mix of style and utility!


small wood side table


Complete your room with a versatile and practical solution. This simple wooden side table combine elegance and functionality for any space.


Knock off Partridge Garden Table Tutorial


Get the designer look for less with this unique knock-off garden table. You can make your own adorable table in no time! It will make the perfect addition to your outdoor space.


concrete side table


Create a super cool DIY concrete side table with this tutorial. Perfect for adding a modern touch to any space. Get started today!


wood table with hair pin legs


Looking for a unique DIY project? Discover how to create your own upcycled DIY side table and add a touch of creativity to your space.


outdoor table on water


Enhance your patio with an easy-to-build outdoor umbrella side table. Create a functional and stylish addition to your outdoor furniture collection.


modern side table


Upgrade your living space with this trendy modern side table DIY tutorial. It makes a personalized accent piece for any room.

white painted end table


Get creative and save money by building your own DIY nightstand. This is a beginner-friendly project that has plenty of room for basket storage too!


upcycled side table


Learn how to make a budget-friendly accent table with just a few inexpensive pieces. This Target repurpose was made for just $12!


decoupage side table


Check out thrift stores for unexpected materials that you can turn into tables. This round side table update was a $2 thrift store find updated with a decoupage technique!


modern stacked table


Get ready to impress your guests with a gorgeous DIY fluted side table. Follow these steps for a beautiful addition to your space.

So what do you think? Are you ready to build your own DIY side table? Let me know in the comments below if you give any of these ideas a try. As always, thanks for reading!

Please remember to share on Pinterest to inspire others as well!

pin collage with text overlay side tables

Here are even more DIY table ideas:

How to Install Window Trim & Casing
After installing a new casement window in our kitchen,I chose to install a beautiful decorative window moulding. Today I’m going to show you how easy it is to Install Trim and Casing Moulding! How to Install Window Trim & Casing

How to Install Trim and Casing Moulding

I’m excited to be sharing more tutorials from the kitchen renovation. I hope you’ll excuse me as we jump back and forth in the renovation process. I’ve been trying to get the most relevant tutorials to you as soon as I can. Speaking of relevant, I understand there are a lot of under-dressed windows out there that need trim or could use a little more “WOW Factor”!  Is that your  case—ment? (Sorry, I couldn’t resist.) Let’s go over the details for installing window trim and casing on a casement window. Have no fear if you have a double hung window or other, these techniques will work for those windows too. Replacement vs. New Construction Windows: handyman_installing_window But, let’s back up for a minute. I wanted to share with you a little snafu that happened with our casement window. When I ordered it, the guy taking the order asked me a few questions and somewhere there was a translation breakdown. He thought I needed a replacement window because I was replacing an existing window. What he didn’t realize is that I was increasing the size of the window opening and therefore needed a new construction window. In the end, I was stuck with the replacement window, but my handman and I used as many weather-stripping, caulking, and water barrier techniques we could think of to keep it water tight. This is what you need to know when ordering a new window: If you are removing the old and putting in a new window into the same frame, you can order a replacement window. If you are expanding or changing the size of your window opening (or you want to start with a full window replacement that you can flash on the exterior and add insulation around the rough opening) you will order a new construction window. But, let’s learn how to install trim and casing moulding on a window. Materials: (I’ve included affiliate links for your convenience. I earn a small percentage from a purchase using these links. There is no additional cost to you. You can read more about affiliate links here.)

Instructions for Installing Trim, Casing and Moulding on a Window:

The window has been installed. Use this opportunity to use an expanding foam to seal around the window frame while it’s exposed. This will cut down on drafts. Allow the foam to cure and trim off any excess that would interfere with the casing installation. How to Frame and Install Window Casing and Trim by Pretty Handy Girl Find the center of your actual window (not the rough opening) and make a pencil mark under the window. Use this mark as your guide for the stool and the window trim. How to Frame and Install Window Casing and Trim by Pretty Handy Girl First measure and cut the window stool. You can use a jigsaw, coping saw or hand saw to cut out the edges of the stool so it fits snug against the window and has a reveal over the sides of the window. Take into consideration the width of the window casing and trim on each side and add an inch for the stool to extend beyond the trim. (see photo below to visualize the end product.) How to Frame and Install Window Casing and Trim by Pretty Handy Girl With your stool dry fit in place, check the level of the stool and use wood shims to level if necessary. How to Frame and Install Window Casing and Trim by Pretty Handy Girl Add a bead of construction glue and set the stool on top. Secure the stool moulding to the window sill with nails. How to Frame and Install Window Casing and Trim by Pretty Handy Girl Safety note: When using a finish nailer be sure to wear eye protection and hearing protection. Don’t worry, you’ll look totally cool in your snazzy safety gear. It’s better than the missing eyeball look.

3M_Tekk_protection_with_finish_nailer

You may need to build out the window frame by cutting a 2×2″ board for the top of the window. Level the top with shims and secure it with finish nails. How to Frame and Install Window Casing and Trim by Pretty Handy Girl Cut two more pieces of 2×2 for the sides. Make sure you have the same reveal on the window for each side (refer back to your center mark.) How to Frame and Install Window Casing and Trim by Pretty Handy Girl Make sure the sides are plumb. Secure the sides with finish nails and break the shims off by scoring them with a utility knife and breaking them with your hand. (You don’t have to sing the Kung Fu Fighting song when doing this, but I do.) How to Frame and Install Window Casing and Trim by Pretty Handy Girl Time to add the side pieces of casing and backer board. The backer board is not necessary, but I like to beef up the trim on my doors and windows. It’s an easy process, and makes your home look more custom and less builder-grade. Decide what amount reveal you want showing on the window stop. Mark this depth on the 2×2″ window stops. Typically 1/8″ to 1/4″ is used.

How to Frame and Install Window Casing and Trim by Pretty Handy Girl

Measure and cut your window casing to meet the 1/8″ reveal. Be sure you have a consistent reveal from top to bottom and then secure the window casing with finish nails. How to Frame and Install Window Casing and Trim by Pretty Handy Girl Measure and cut the backer band to the same height. Set it tight against the casing and secure with finish nails. How to Frame and Install Window Casing and Trim by Pretty Handy Girl Your window should look like this at this point with the two side pieces of casing installed. How to Frame and Install Window Casing and Trim by Pretty Handy Girl Cut the 1″ x 6″ board to fit even with the outside edges of the casing and backer band. Attach it above the window with more finish nails. How to Frame and Install Window Casing and Trim by Pretty Handy Girl Cut the small cove and the small base trim pieces to fit across the top and bottom of the 1″ x 6″ board. The ends should be mitered where they meet the edges. Cut, two pieces at a 45 degree angle to act as a return for the moulding. Here’s a closer look: How to Frame and Install Window Casing and Trim by Pretty Handy Girl Before securing the returns, add a dab of glue to hold it in place. Then use painter’s tape to hold the returns while they dry.  After the glue dries, secure the returns with a finish nail in the center of each. How to Frame and Install Window Casing and Trim by Pretty Handy Girl Now the window trim and moulding is finished and it’s time to putty all of the nail holes with wood putty. How to Frame and Install Window Casing and Trim by Pretty Handy Girl Caulk all the seams where the trim pieces meet each other and the wall and window. If you need a tutorial for how to caulk like a pro, I’ve got you covered!How to Caulk Like a ProAfter the wood putty has dried, sand it smooth using a sanding sponge. Wipe off any sanding dust off with a damp rag. Prime and paint your window. And you’ll never see the seams! How to Frame and Install Window Casing and Trim by Pretty Handy Girl Congratulations, you just learned how to install trim and casing moulding. How to Frame and Install Window Casing and Trim by Pretty Handy Girl The depth of our sill, it’s just enough to set a vase onto. You may note I decided to forgo the traditional apron, and ended up using pencil edge marble tiles instead. How to Frame and Install Window Casing and Trim by Pretty Handy Girl

That seemed relatively easy, don’t you think? Trimming out a window is a personal affair, so be sure to experiment and get creative with your trim moulding. Remember, it’s your house, you can dress it up the way you want!

Here is another great trim tutorials:

How to Install Window Trim by Remodelando la Casa

More Window Resources:

How to Install a New Construction Window How to Add Privacy Film to Any Window How to Clean Your Windows Like a Pro Things to Consider When Choosing New Windows Stop! Don’t Replace Your Windows Before Reading This

PHGFancySignPin this image to save for later!

How to Frame and Install Window Casing and Trim by Pretty Handy Girl
Turning a Mid-Century Modern Dresser into a Bathroom Vanity

Do you love the mid-century modern style, but find the selection for bathroom vanities severely lacking? Today I’ll show you how to turn a modern dresser into a vanity including how to alter those drawers to work around the plumbing.

Turning a Mid-Century Modern Dresser into a Bathroom Vanity

Turning a Mid-Century Modern Dresser into a Bathroom Vanity

Hello out there, is anyone still listening? I’ve been a bit delayed on getting the Millie’s Remodel updates and tutorials live on the site. (I shared why I’ve been offline here.) Today I have the much asked for tutorial and I’m excited to share how to turn a mid-century modern dresser into a bathroom vanity.

(I’ve included affiliate links for your convenience. I earn a small percentage from a purchase using these links. There is no additional cost to you. You can read more about affiliate links here.)

While working on the Millie’s Remodel project, I looked everywhere for a vanity for the main bathroom. Unfortunately, I didn’t like any of the options available. They were either too expensive or they looked cheaply made. So, I ordered a dresser very similar to this one:

Turning a Mid-Century Modern Dresser into a Bathroom Vanity

(The actual dresser I ordered is no longer in stock, but this one is a good look-a-like.) When it arrived, I was incredibly happy with the mid-century modern style look I was craving, but I knew I needed to make some modifications for it to accept a sink and the plumbing underneath. Luckily, I’d been “looking under the hood” of a lot of bathroom vanities and taking notes on how to modify the drawers to fit around the plumbing.

Turning a Mid-Century Modern Dresser into a Bathroom Vanity

Average Height for a Bathroom Vanity:

Back in the day, bathroom vanities were 30 – 32 inches tall. Today, as our average height is growing, most people prefer 34 – 36 inches for a bathroom vanity height. If you’ve ever seen vanities that are shorter than 30 inches, it’s usually because the floor was laid and/or built up around the vanity instead of the vanity being set on top of the tile. In fact, Millie’s bathroom vanity was a mere 28 inches tall. It was ridiculously short.

When shopping for your vanity dresser, keep the final height in mind looking at the dresser height. Don’t forget to account for the countertop thickness if you will be adding a new top. Typically countertops are 1.25 inches thick.

Modifications to Turn a Dresser Into Bath Vanity:

  • Remove the legs (if the vanity will be taller than 36 inches once the countertop is added)
  • Secure the top drawer face (or use hardware to create a tilt out cubby)
  • Modify the second (and possibly third drawer) for the plumbing
  • Choose a countertop
  • Install a faucet
  • Add a sink

Countertop Options for Dresser Turned into Sink Vanity:

Turning a Mid-Century Modern Dresser into a Bathroom Vanity

The sky is the limit when it comes to countertop options for your dresser. Granite, quartzite, or other stone materials provide an attractive and long lasting surface for your vanity. Keep in mind Marble, soap stone, concrete, and other soft stone materials may etch and require more upkeep. Cultured marble, granite, or quartz would provide a more durability surface. Laminate countertops are a very affordable option for your new sink vanity. Any countertop you use in the kitchen can be used in your bathroom. I’ve seen many people keep the original dresser top and cut a hole for a sink or set a bowl sink on top. A word of caution, if you’re using the original wood dresser top, protect the wood with several layers of a marine varnish or other strong topcoat. Also, try to wipe up any water droplets from the surface immediately. (Using the existing top of the dresser means a lot more maintenance to protect from scratches and water damage.) You could rationalize a more expensive countertop by comparing the time and energy used to maintain each top.

How to Turn a Dresser into a Bathroom Vanity:

It’s time to take that dresser and turn it into a beautiful and functional bathroom sink vanity. Let’s gather a few supplies first.

Materials:

(I’ve included affiliate links for your convenience. I earn a small percentage from a purchase using these links. There is no additional cost to you. You can read more about affiliate links here.)

Optional: Table Saw

Electrician’s Plyers

Video: How to Convert a Modern Dresser into a Sink Vanity

I made a video tutorial to show you exactly how I converted a mid-century modern dresser into a modern bathroom sink vanity. (Of course, I also tried to insert some humor into the video, so I hope you get a few laughs.)

Instructions:

  1. Determine the final height of your vanity. Subtract for your countertop. Determine if you need to remove or alter the legs to achieve the desired height.
  2. Remove the top drawer. Next, remove the drawer slides for the top drawer because these can be saved for another project. Save the drawer face. (You may need to remove the drawer knobs to disconnect the drawer face from the box.)
  3. Secure the drawer face to the face frame of the cabinet with screws. If your cabinet doesn’t have a face frame, add some blocking inside the opening for securing the drawer face to.
  4. Measure the location of your plumbing pipes (height off the ground, depth from the wall, side to side measurements from the side walls, and finally how wide are the pipes). Don’t forget to account for the drain, p-trap, and shut-off handles if your plumbing is new and simply stubbed out of the wall or floor.
  5. Remove the second drawer. Transfer the measurements for the plumbing onto the bottom of the drawer.
  6. Cut a hole in the drawer for the drain and plumbing pipes.
  7. Measure the cutout and create new sides, using plywood, to close the cutout back up.
  8. Secure the new sides with glue and finish nails. You may need clamps to hold the sides as you attach them.
  9. Paint the new sides and/or finish with a protective topcoat to protect the drawer from water.
  10. Cut out the top of the dresser to make room for the sink and faucet (unless you are opting to use the dresser top as is.)
  11. Re-insert the second drawer. Install the vanity in the bathroom.
  12. Install the countertop, sink, and faucet.

Waterproofing Your Vanity:

Depending on the finish of your dresser, you may want to paint or seal it to protect the new vanity from water damage. To protect the legs of the vanity, you may want to add nail-in floor protectors to the bottom of the feet. This will lift the dresser off the ground should any water spill or puddle under the vanity.

Turning a Mid-Century Modern Dresser into a Bathroom Vanity

Final Result:

I found a remnant of granite at my local countertop fabricator. It’s honed Negresco granite and I love the dark black color on the wood vanity. It has a similar look to soapstone, but much more durable.

Turning a Mid-Century Modern Dresser into a Bathroom Vanity

The faucet I used is the Moen Align faucet in brushed gold. I created a backsplash using a few leftover tiles from tiling the tub surround. For a beautiful finished edge, I used a Schluter satin brass jolly profile to frame the tiles.

Turning a Mid-Century Modern Dresser into a Bathroom Vanity

The drawers hold a decent amount of toiletries and fit around the plumbing without any issues.

Turning a Mid-Century Modern Dresser into a Bathroom Vanity

The lighting was provided by Kichler, one of the Millie’s Remodel sponsors. The minimalist Ryame lighted mirror is perfect for applying makeup or just giving the perfect amount of soft lighting. And the Jasper 3 light wall fixture has all the mid-century modern style this house needs. Fun fact, you can hang this light facing up or down. Your choice!

Turning a Mid-Century Modern Dresser into a Bathroom Vanity

Can you believe this is the same bathroom? I love how it turned out.

How to Convert a Dresser into a Bathroom Vanity

Before:

After:

Before:

After:

Stay tuned for the next Millie’s Remodel update. I’ll be giving you the full tour of the house and it will be filled with loads of before and after pictures!

Do you enjoy the videos I’ve been sharing? Are you subscribed to my YouTube channel? This is one simple way you can thank me for sharing this content with you for free. Click here to subscribe to my channel.

Psst, if you really want to follow my daily adventures, you can follow me on Instagram. I share most of the projects I’m working on in real-time there.

Take care and see you soon.

Pin this post to share with a friend!

Learn the simplest and most accurate way to build drawer boxes with this easy tutorial.

Drawer Box Build

Welcome back, this is Kristen from In Her Garage Woodworking here with another build plan for you.  When I first began my DIY woodworking journey over 5 years ago I was most intimidated by building drawers. I avoided them because I thought there were too many measurements and too much room for error. But, with a simple plan and a lot of practice, I now make drawers consistently and accurately.  These are the exact plans I use to this day to make drawer boxes for all of my commissioned furniture pieces because when you’re able to make something quickly and easily that is solid and looks great, why would you ever change it?

Materials

(I’ve included affiliate links for your convenience. I earn a small percentage from a purchase using these links. There is no additional cost to you. You can read more about affiliate links here.)

Tools

Instructions:

Your drawer can be any depth you wish, but before building the drawers, rip your 3/4″ material to the drawer height you desire (if you are using plywood or if your 3/4″ material is wider than your finished drawer.

Step #1: Cut drawer box sides

Using your miter or circular saw, cut two identical 3/4” boards to the same length of the drawer slides you’ll be using.

Step #2: Cut drawer box front and back

Cut two pieces of the 3/4 inch material for the front and back of the drawer box.  If you’re using ¾” material to build the drawer box then the length of the front and back can be calculated as follows (see equation and picture below):

Width of drawer box – 1½” = width of front and back drawer box boards

Drawer Box Diagram

Step #3: Add groove for drawer bottom (optional)

Taking all four 3/4″ boards to the table saw cut a groove 1/4” from the bottom of all sides that is 1/4” deep. Run the 3/4 board through one time, then adjust the fence (or your saw) to cut another groove next to the first. (A standard saw blade is 1/8” wide so you will need to make two passes in each board to achieve a 1/4″ groove for the 1/4″ drawer bottom material.

Dry-fit the plywood to check for fit.


Step #4: Create pocket-holes

Using your Kreg jig make 2 pocket-holes at either end of the front and back boards on the opposite side as the plywood bottom groove if you chose to do this step. Be sure to avoid the groove.

Step #5: Assembly

If you DID NOT cut a groove to accept the plywood bottom, then you can assemble the drawer box using wood glue and 1 ¼” pocket screws.

Then, you will cut your bottom 1/4″ panel to the length and width of the drawer box and simply glue and nail it to the bottom of the drawer box

If you DID create a groove for the bottom panel assemble the front and both sides using wood glue and 1 ¼” pocket screws.

Next, cut the ¼” plywood to fit into the bottom of the drawer box groove dry fitting the back panel to check for fit.

Once you have the correct size for the plywood bottom then slide it into the groove and attached the back piece of the drawer box using wood glue and 1 ¼” pocket screws.  There is no need to apply glue into the panel groove.  The plywood bottom will “float” in place.

No need to worry about filling the pocket-holes because you will be applying a drawer face directly over them.

Be sure to check for square by measuring both diagonals of the drawer box.  If one measurement is longer simply squeeze the longer diagonal until both are the same.

Allow drawer box to dry.

That is the basic drawer box build that I use and it is strong and easy to put together. I hope this tutorial gives you the confidence to tackle that project you’ve been putting off.  Next, I will teach you my favorite method for installing drawers and how I troubleshoot drawer boxes that just aren’t quite the right fit!

Finishing Tips:

If you are making your drawer boxes out of plywood then check out Brittany’s Edge Banding Tutorial and learn how to cover that unsightly plywood edge.

Wondering how, or if, you should apply a protective finish to the drawer box? If I am working with solid wood for the drawer sides then I will give the material a quick finish sanding and that’s it. But, for plywood, I typically do one of two things, depending upon what I have on hand at that time.

  • Option 1: Apply 1 or 2 coats of sanding sealer to raise the grain of plywood and sand smooth. Sanding sealer is clear, easy to apply, and dries quickly. If I have the time and patience I may also apply a quick spray of clear, semi-gloss, water-based topcoat to give it a little shine but it isn’t necessary.
  • Option 2: Apply 2 to 3 coats of spray shellac to seal the plywood.  Spray shellac dries quickly and won’t leave any chemical smell behind. But be aware that it will give the plywood a slight amber tone which typically isn’t big deal.  Remember to lightly sand between coats.

Hi! I’m Kristen, from In Her Garage, and I am a self-taught woodworker and DIY fanatic from Minnesota where I live with my husband and our two daughters. Between being a wife, mom and, registered nurse, I try to make as much time for DIY as possible. My love for building came after our family built our current home in 2015. After we moved in, we needed furniture and instead of spending massive amounts of money to order the pieces we wanted I decided that I would build them myself. I started with a buffet table plan from the fabulous Ana-white and quickly set out to remodel my entire home office.

Since then I have started a side business building furniture for the people in my community. I love hearing my clients talk about the pieces they wish they had whether it be a rustic buffet table, a one drawer side table, or a toy box, and then making it a reality for them. While starting my small business it made perfect sense that I would document my building journey so I simultaneously launched the In Her Garage blog and I love sharing my plans, tips, and tricks.

Making something beautiful with your own two hands through a little preparation and determination is an amazing feeling and I hope to bring inspiration and know-how to those looking to tackle a big or small project.

I am so glad that you found me here and please feel free to connect with me on PinterestInstagram, and Facebook to see what I am working on right now. And check out the brand new In Her Garage Etsy shop for other plans or to have a furniture item made especially for you!