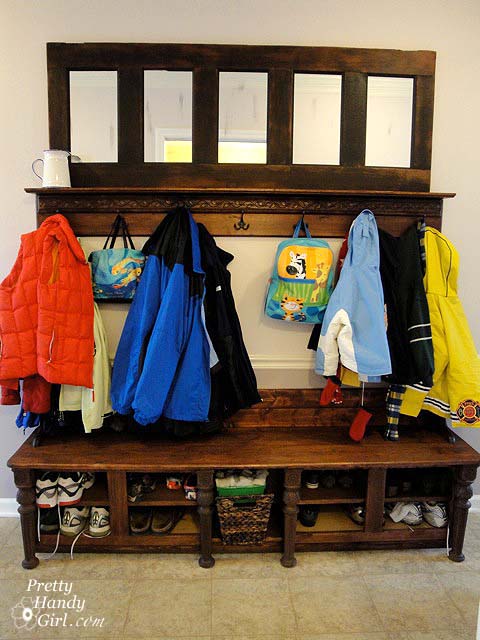
diy bench from cabinets

Welcome! If you are a friend, you know that all our friends and family enter through our mudroom. This door is the closest to our driveway. Only the door-to-door salesmen go to our front door (heh, heh, heh!)
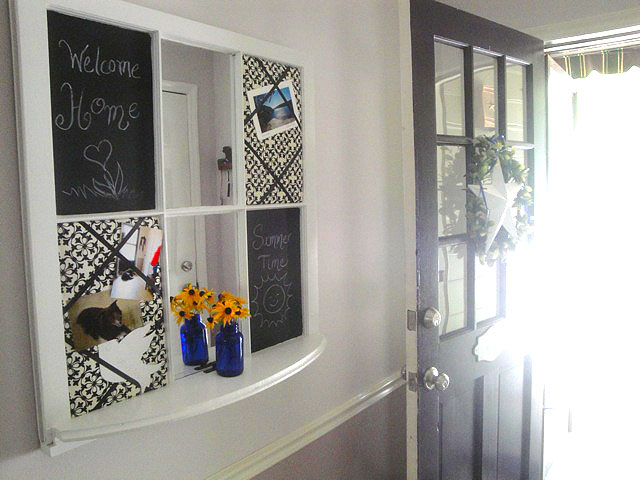
Come on in! This blackboard, mirror and memory board used to be a discarded window.
Make one of your own! Tutorial here.
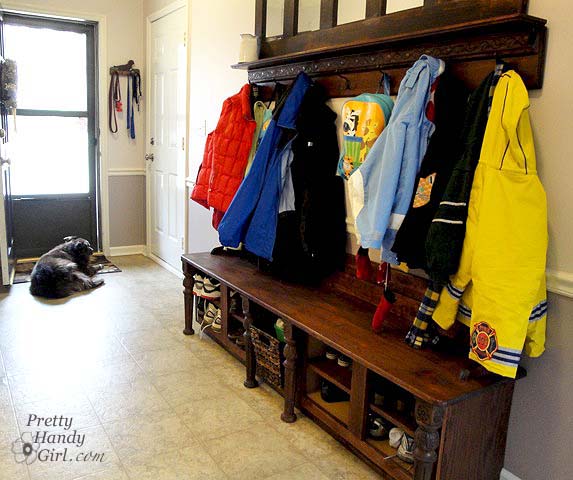

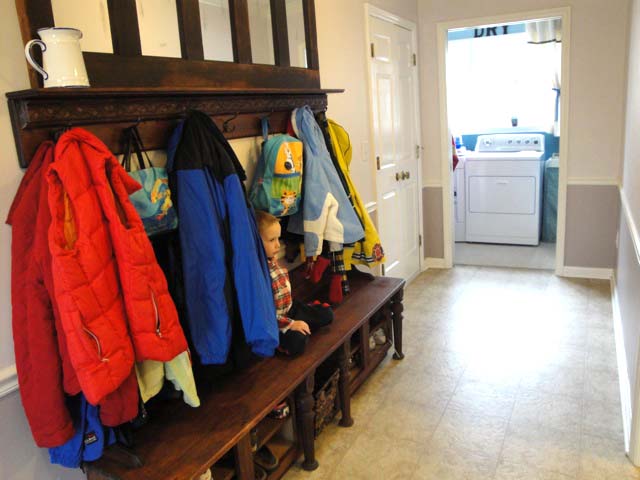
This is my pride and joy! My mudroom bench and coat rack. Yes, I made it myself.
And no, I didn’t have any help from my husband. I am the handywoman of our home.


I’ll give you a little background about how this bench came to be. I really loved having a mudroom to begin with. But, the piles of shoes and coats that accumulated behind the door were making me nuts! Who knew that a flip flop could double as a door stop, not allowing me to enter my own house!

My son tried to help out by piling all the shoes on top of the coat rack. Better, right?!
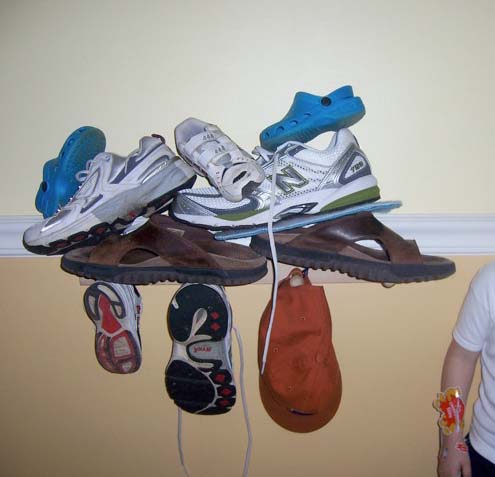

Sure, I could have hopped over to Pottery Barn and bought a mudroom bench and shelf, but I balked at the price tag. So, I continued to ponder a solution. I dreamed of having a perfect storage solution to streamline my mornings of getting two little boys out the door to preschool. A bench to perch the kids on while putting on their shoes. (A task I know someday I will miss doing, but for now I can’t wait for them to learn to tie their own shoes.)  Everyone’s socks and shoes would be at hand but not in the way. And a place for every jacket, book bag, and hat. The final product was beyond my dreams. I love it more than any other piece of furniture in my house. It is my sanity saver!

My dreams began to form when I stumbled across some kitchen wall cabinets on clearance at Lowe’s. These are the short cabinets that mount over your fridge. They were marked down to $45 each.

The wheels in my brain began to turn. I started to see how I could use these cabinets to solve our shoe dilemma.

I bought some lumber. I also had some salvage pieces that had been collecting dust in our attic. An old door with recessed panels, four ornate old coffee table legs, and some shelf brackets from a yard sale.
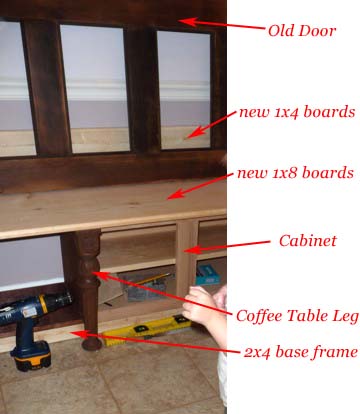
After a few days of distressing and staining boards, cutting lumber, rounding some edges, hammering, nailing, driving screws and sweating, this is what I ended up with!
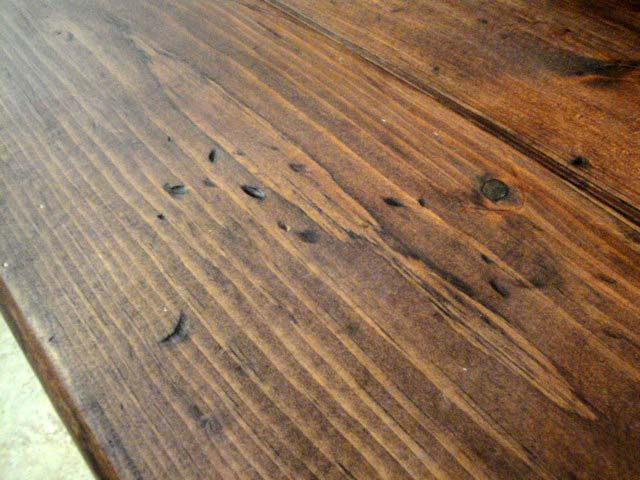
Chain throwing and hammer marks add a distressed look to new wood.
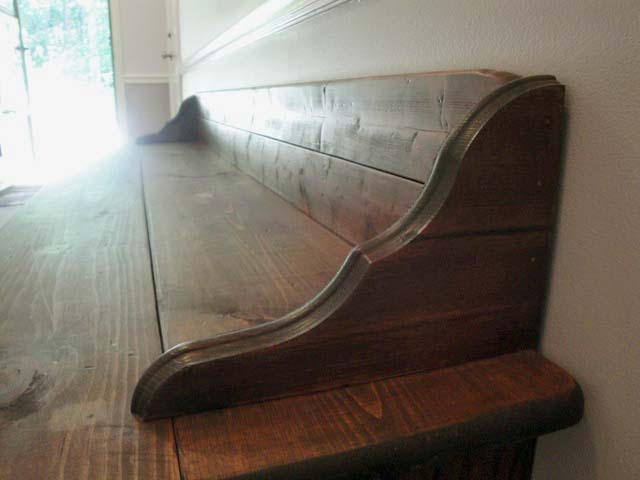
Decorative shelf brackets add nice character to the back rest.
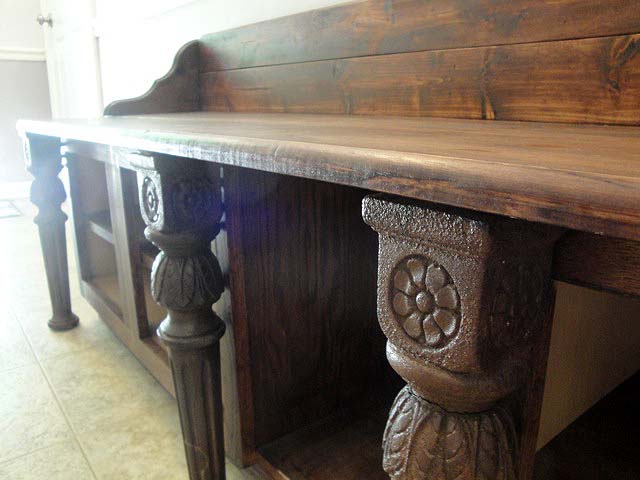
Salvage coffee table legs add that much needed detail.
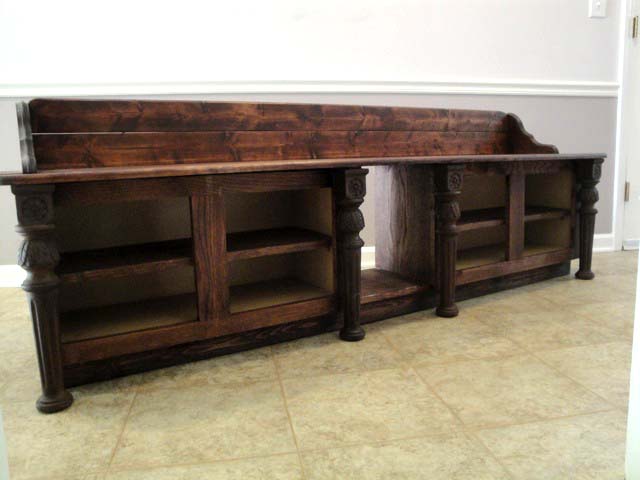
The finished bench (the only time it was ever empty.)

diy bench from cabinets
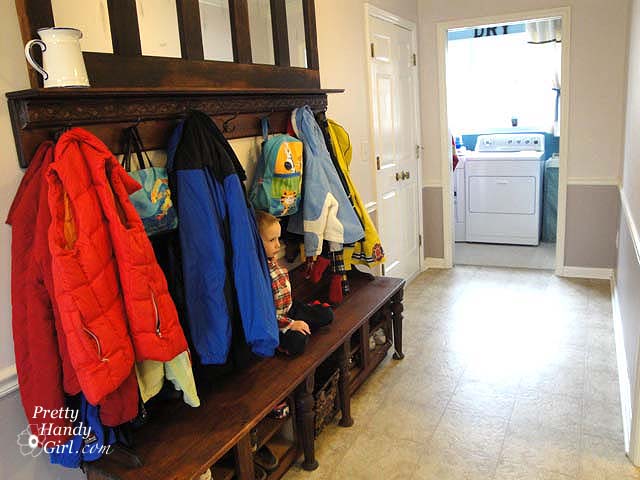
Loaded with shoes and with the salvage door on top as a coat rack. A mudroom bench with shoe storage and a clear floor! My sanity has returned.

If you are intrigued as to how I constructed this bench – keep reading. If not, thanks for stopping by. I hope you will come back again soon. And, the tutorial for the coat rack is here!


Building the Shoe Storage Bench (the Tutorial)
I have to apologize up front for not having the usual step-by-step tutorial for this bench. But, I built it pre-blogging days when I didn’t have to stop and start after every step to take a photograph. I hope you’ll forgive me. And now the abbreviated tutorial:

Here is the bench flipped on its back to show you the base construction:
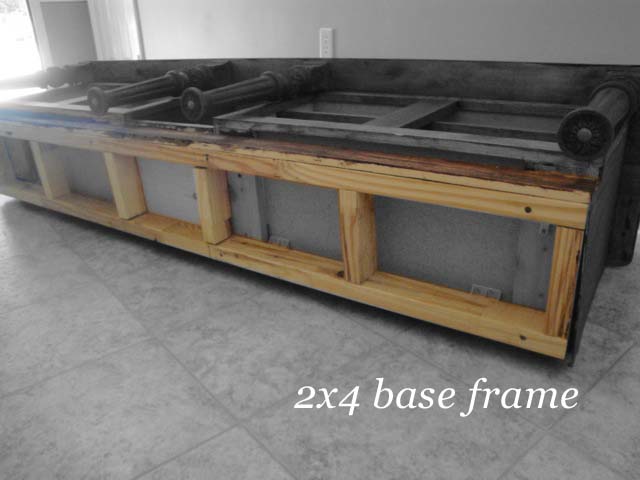
I built the base frame by nailing 2x4s together.

Added a 1×4 board (toe kick) to hide the cheap 2×4’s. Then finish nailed the toe kick to the base frame.
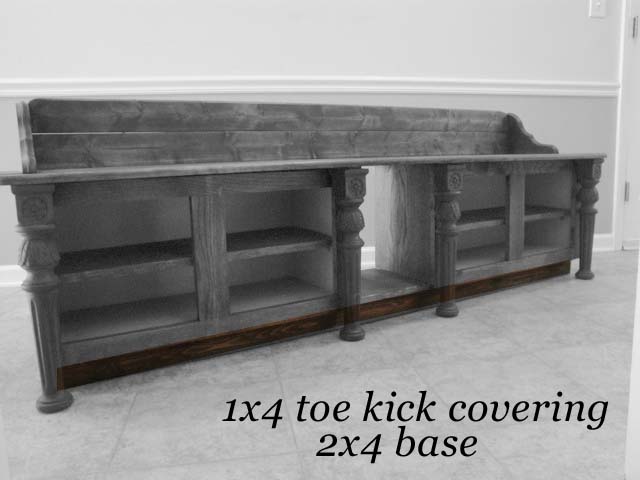
Now the upright view to show you the bench construction:

I attached the two wall cabinets to the base frame with screws.

Added a 1″ thick pine board cut to size to fit between the two cabinets. This board also hides the base frame.
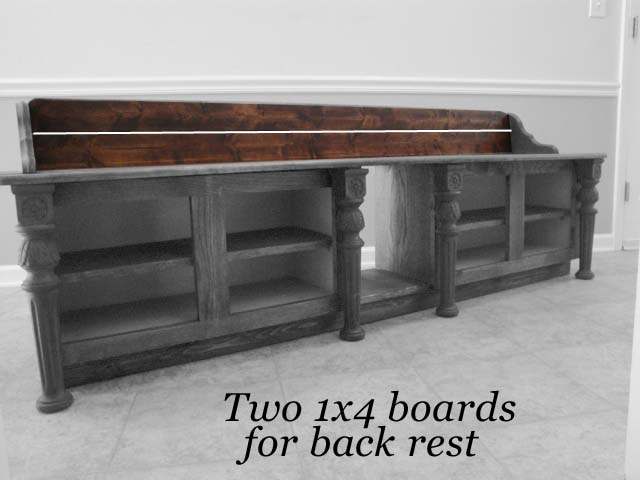
Used two 1×4 pine boards with rounded top corners for the back rest.
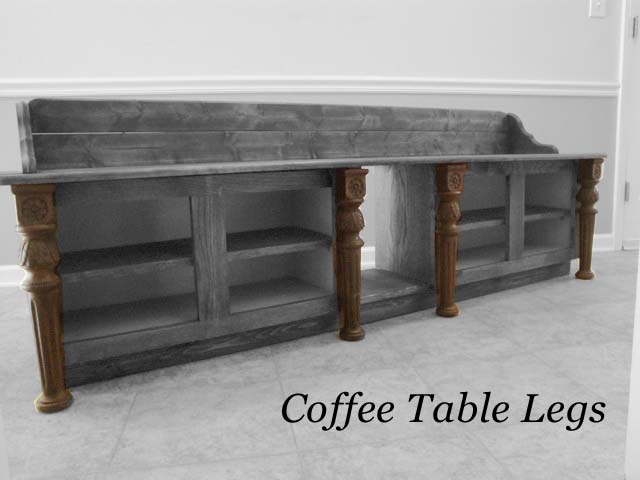
Mounted decorative coffee table legs by driving a screw down through the bench seat.

From the back, the bench looks like this (not pretty, but no one sees it.):
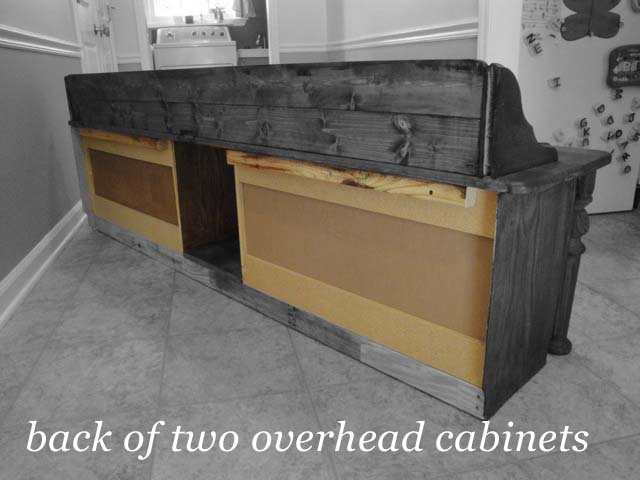
You can see the two wall cabinets from the back side.
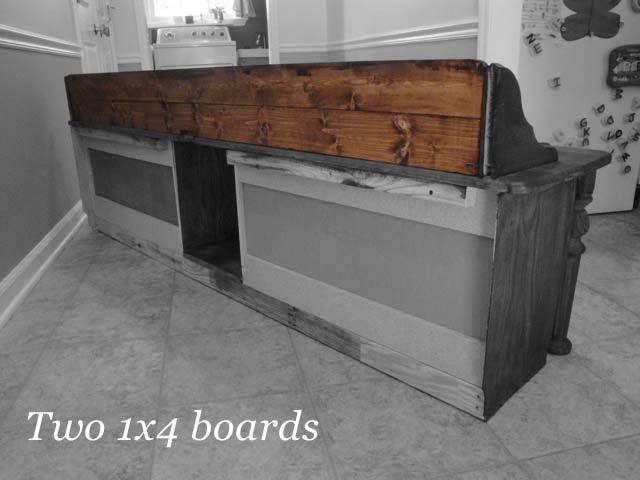
Another view of the two 1×4 back rest boards.
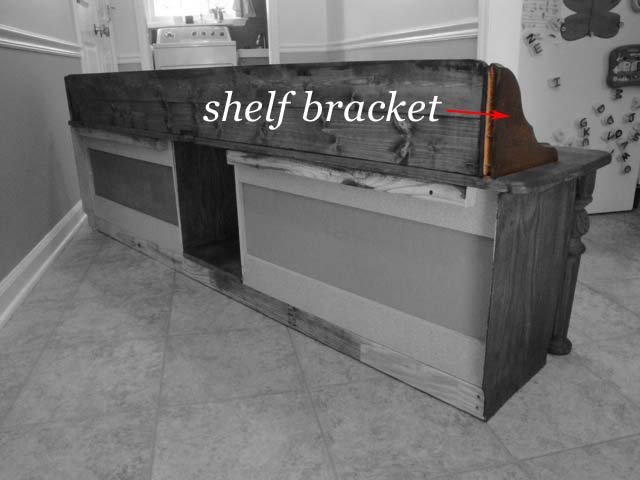
Shelf brackets were used to mount the back rest to the bench seat.
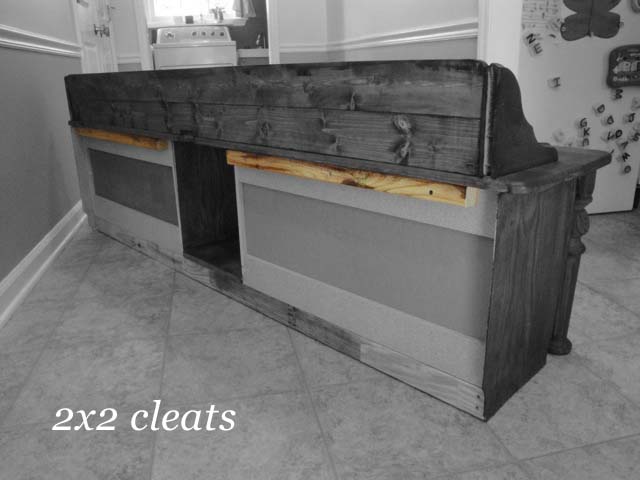
Screwed 2×2 cleats to back of cabinets, then attached the bench seat by driving a screw down through the seat and into cleats.

Now to show you how the pieces were attached, the close up below is a view of the shelf bracket and corner section:

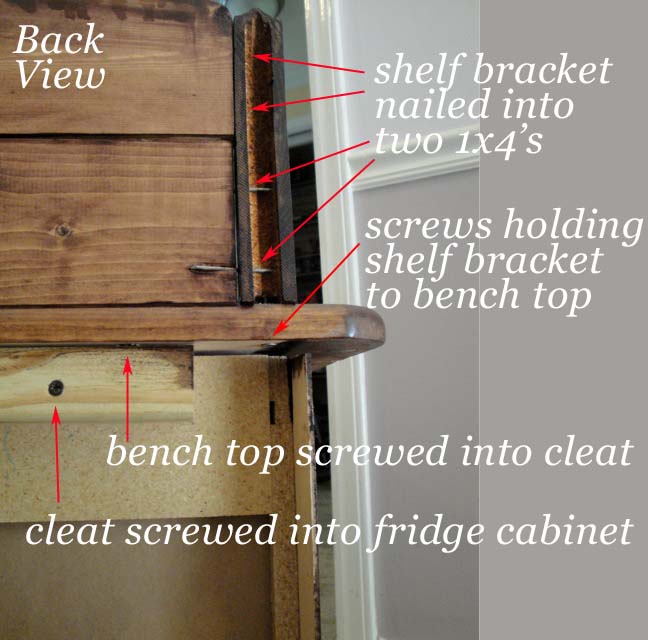
This corner shows how I used screws and nails to attach the parts (definitely ignore my sloppy nailing skills. I’m still working on perfection y’all.)

Base cabinets had particle board construction, so I added veneer end caps.
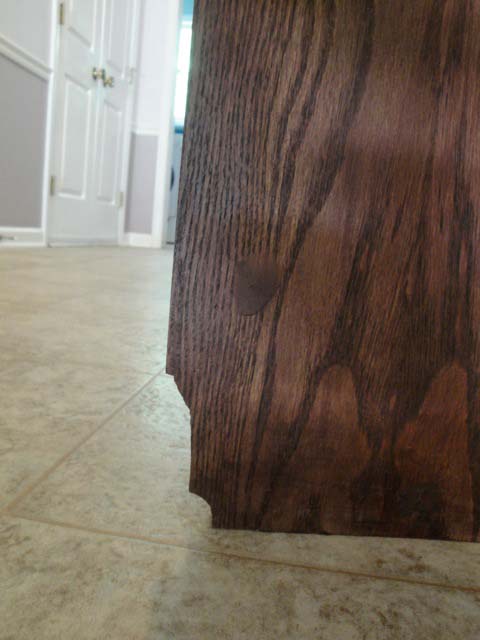
Close up of end cap veneer with base moulding profile cut out.
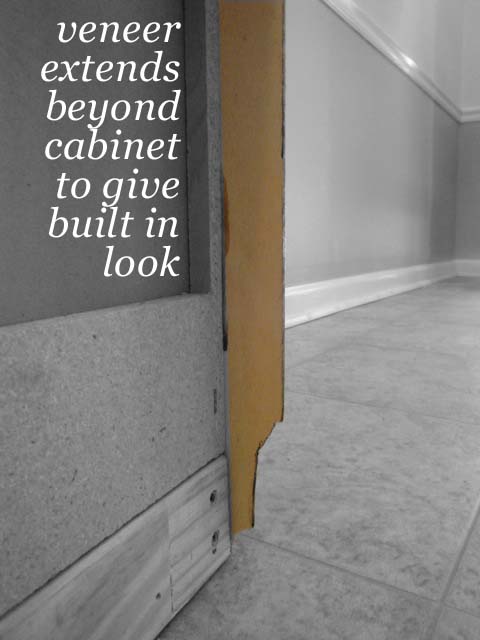
Read more about scribing and cutting a profile here.
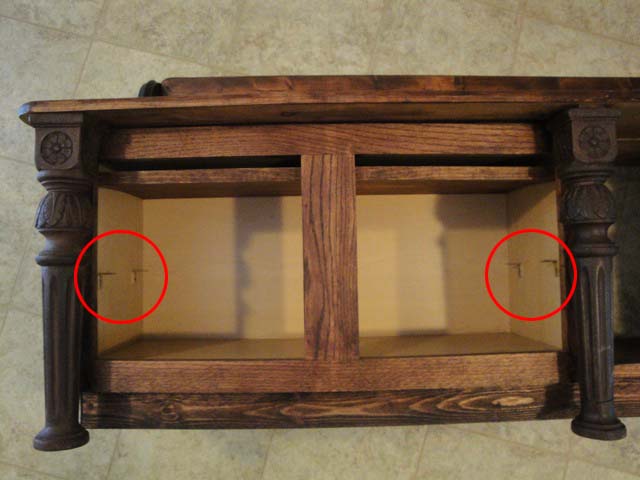

Then I added L brackets inside the cabinets to support a shelf.
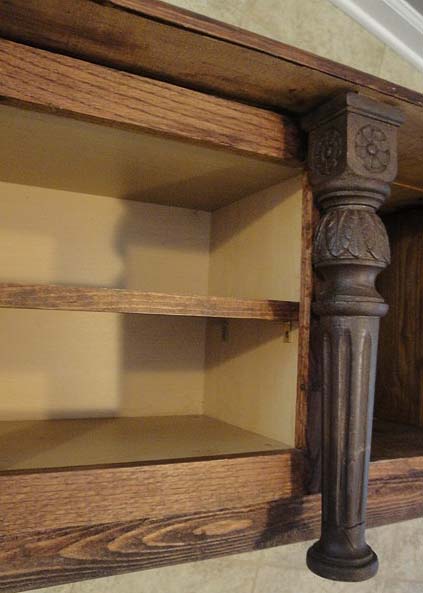
Add the shelf and you’ve got double the shoe storage.

Hmmm, but if you have shoes, you need to have sock storage as well. I purchased one magazine basket at Target.
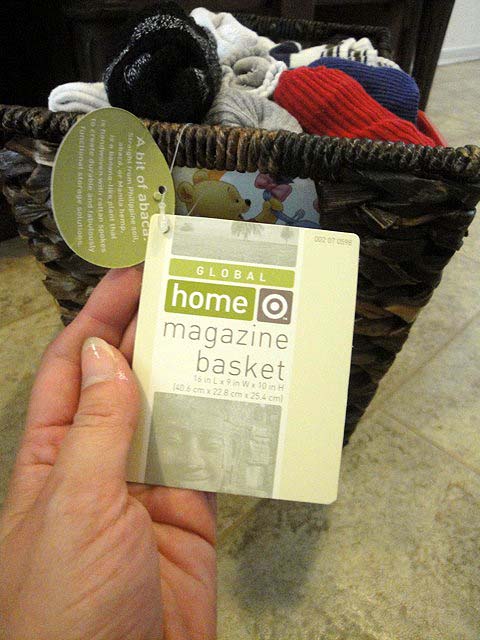
And filled it with our socks. Old baby wipe containers are used to divide the socks for each of my sons.


And voila, I have an efficient sock storage spot.

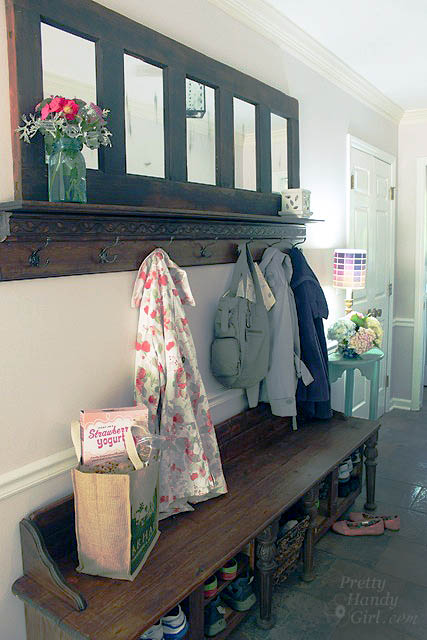
Here is the final result loaded with socks, shoes and coats! The coat rack is made from an old door, antique hooks, and yard sale shelves.
Coat rack tutorial is here!

Not bad for about $200 in materials! I love my mudroom bench and get oodles of compliments on it.

See y’all later.

Sharing this organizational project with:

If you liked this tutorial you might want to follow me on some more DIY adventures, complete with step-by-step tutorials!

Or follow me on TwitterFacebook, or Pinterest so you can be the first to know what I’m working on next!

We have a great mudroom area in our house, but when we moved in we didn’t have anywhere to store our shoes, and all we had to hang our coats on were a few peg hooks behind the door. Not very efficient or attractive in my opinion. (Especially when my toddler filled the pegs with shoes. Do you think he was trying to tell me something? Let’s talk about this Coat Rack made from an Old Door.

But, soon, we had more storage for coats and shoes! Let’s take a look at how I built this beauty:

I started planning out the storage bench and coat rack at the same time. The coat rack was definitely the less involved project. Below is a picture as I was laying out the project.

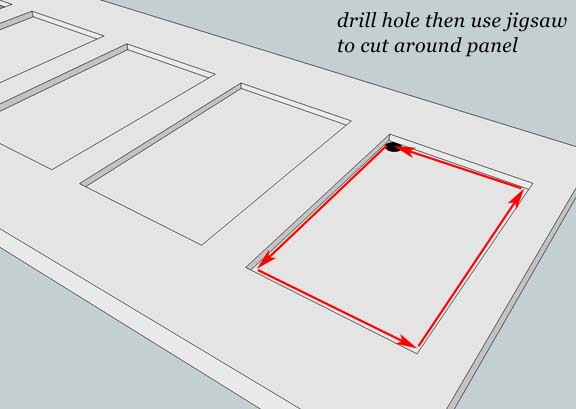
I started with a beautiful old antique door that had recessed panels. I cut the panels out with my jigsaw (if you have never cut out an interior shape, you always start by drilling a hole large enough to fit your jig saw blade in. Drill your hole in a corner, then insert your jigsaw and cut the rest of your shape.

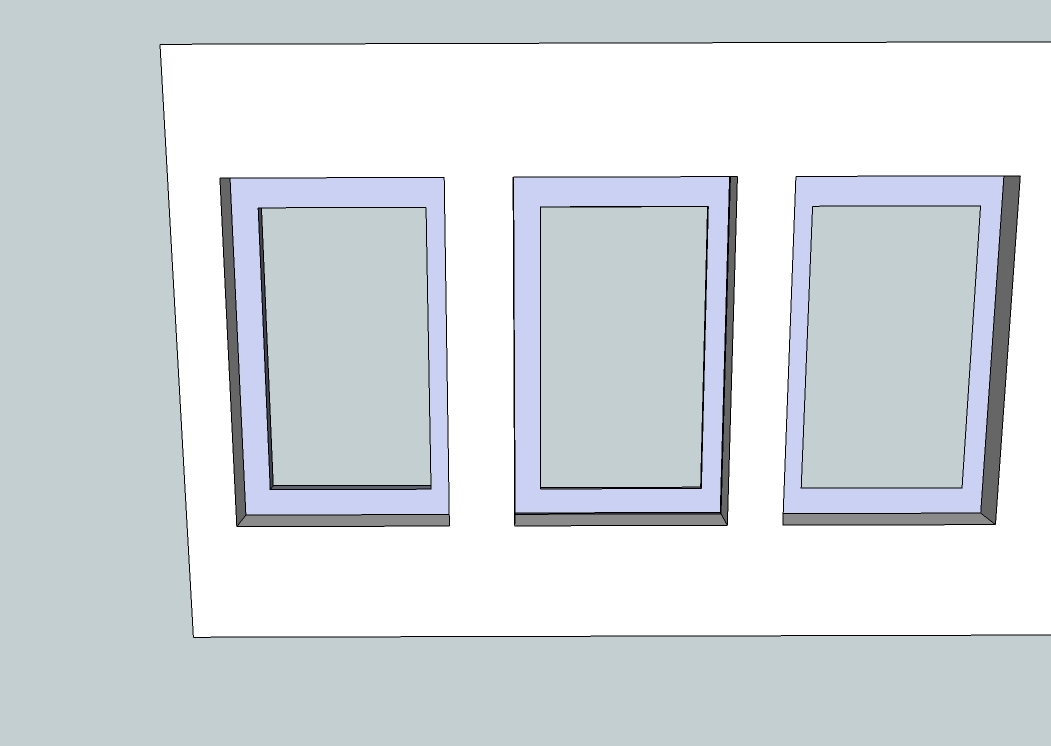
Next, I used my router to get rid of the edge of the recessed panels on the back side. As you can see in the Sketch Up drawing below, I left the edge on the front side to support the mirror.

Then I could measure my opening and cut the mirror pieces to fit into the panels. I have a great resource for inexpensive mirror glass. I buy those cheap full length mirrors at discount stores like Target, Kmart or Walmart. Then I rip off the thin plastic frame and the paper backing. Use a glass cutter to score the front of the mirror and then snap the mirror in two pieces.  Then continue to cut until it is down to the size needed.

If you have never cut glass before, here is a short 1 minute video tutorial:

Next I sanded some of the silver off the back of the mirror to try to distress it. It took a while to do, and I’m not exactly thrilled with the distressing. Recently I stumbled across a few posts where paint stripper was used to distress mirrors. I would definitely use this route next time.

After all the mirror panels were cut to size, I laid them in the recess panel holes from the back and then used a thick bead of caulk around the edges to hold the mirror in place.

Next I had to build the shelf that the door would rest on. I recently bought two wall shelfs and brackets from a yard sale. I used one 7″ deep shelf for the vertical edge (or backer board for the hooks to attach to.) I ripped the other shelf down to 5″ inches (on a table saw) and used that to rest on top of the other shelf. To attach the two I simply screwed down through the horizontal shelf and into the backer board every 2 feet or more.

Then I added some decorative moulding using finish nails to secure them. You can see the different pieces on the edge.

I scoured eBay for a week until I found the perfect antique coat hooks. They are adorable and can hold many coats with the three prongs.

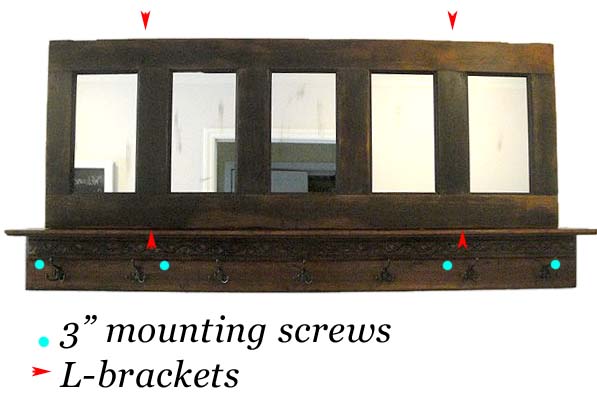
After everything was assembled, I located the studs in our mudroom wall and drilled holes into the backer board, then drove 3″ screws into the wall studs.

The antique door rests slightly on the shelf, but it is also held secure by four L brackets that are mounted on the top and bottom.

Be sure that your coat rack is safely secured to the wall for safety reasons.
For this project I don’t recommend using wall anchors.
Take the time to find the studs, you will thank me four years from now when your coat rack is still holding up to children who can and will climb on anything!

I used Minwax Brazillian Rosewood gel stain to stain the bench and shelves. This was the stain color that matched the color of the antique door.

And there you have it! An antique coat rack to match my shoe storage bench.

I just love these eBay hooks! And the detailed moulding makes me happy.
Plus, they allow space for decorating during the holidays!
Holiday Home Tour 2016 | Pretty Handy Girl

Plenty of storage for coats for a family of four or more!

Learn how to build the mudroom shoe storage bench here.


My best friend from elementary school will be flying in today from New York. I have a sweet little retreat all made up for her in our guest room. I promise to post pictures of the whole room in the near future (when the sun – and sons – cooperate with me.)
 
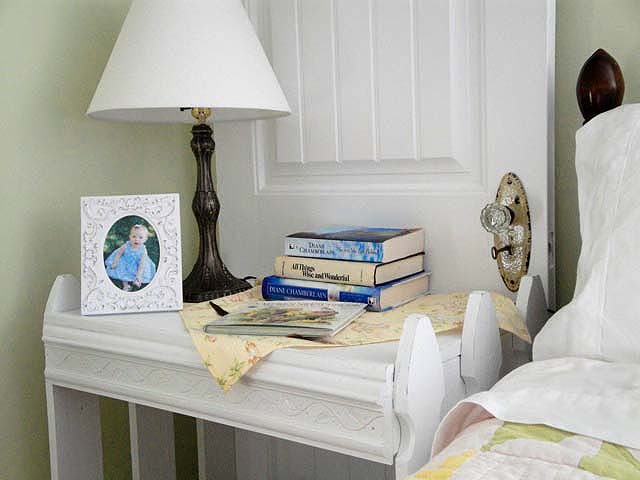
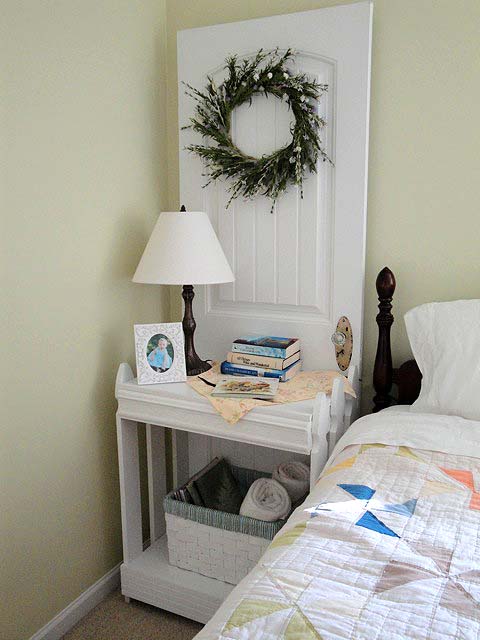
Our guest room is full of discarded treasures: a rebuilt curbside chair, an upholstered bench, a full size bed, and a little curved desk. But, one of the focal pieces in the guest room is a night stand made from a discarded door and leftover picket fence pieces.

 Isn’t it fabulous?!

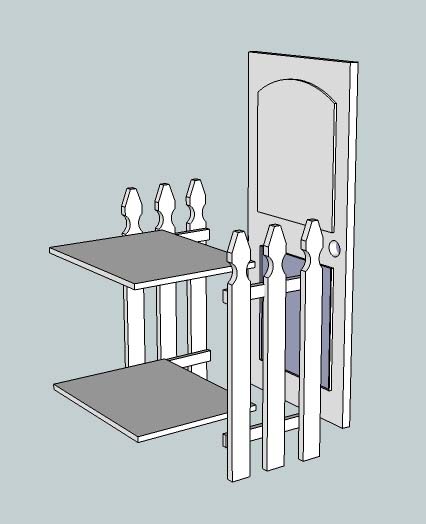
So, here is the tutorial for you. I hope you will excuse my first attempt at using Google Sketch Up. These sketches should give you a pretty good idea how to construct the night stand.

I started by cutting two boards for the shelves. They were cut to the width of the door and the depth of the picket fence sections.

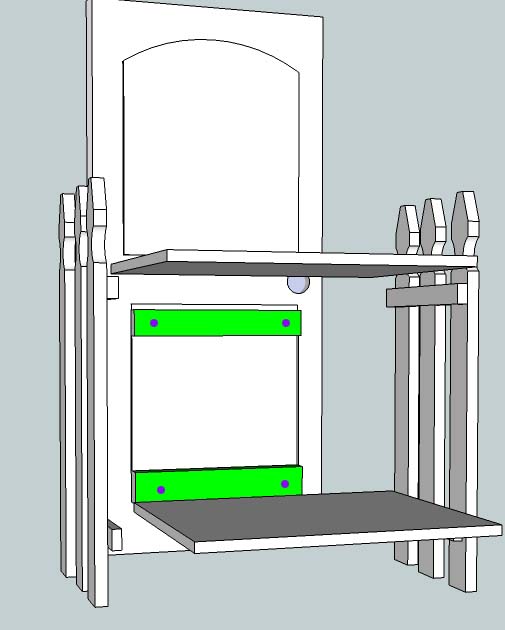
I cut two cleats out of 2″ x 4″ boards (shown in green).

And screwed them to the door (purple circles), making sure that the top of the cleats were level with the top of the horizontal cross boards on the picket fence.

I braced the picket fence pieces to the door using L-brackets.

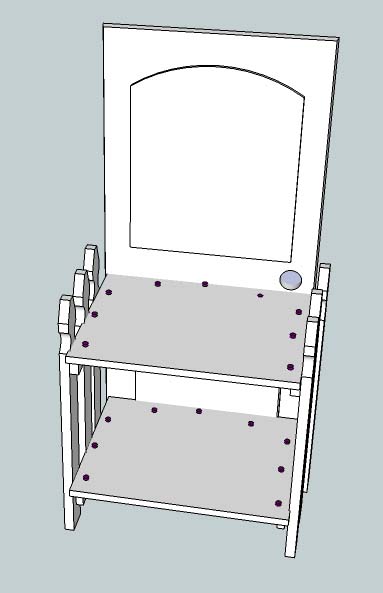
I laid the two shelves on top of the cleats and cross boards. And drove screws down to hold it in place (purple circles).

Next, I cut some face boards (shown in aqua below) to the same width as the nightstand front.

I used finish nails to nail them to the front, then added some decorative moulding to the face boards.

I used wood putty to fill all the screw and nail holes, and caulk to smooth the seams of the moulding (see here for more details on caulking and filling nail holes.)

Then I painted the nightstand white and accessorized it. I’m still deciding whether I should distress and glaze the nightstand. Feel free to give me your opinion. I am all ears.

Here is my door & picket fence nightstand, all ready for our first guest since re-decorating the guest room.

Glass knob and door plate was purchased at NoFo in Raleigh.
If you are ever in the Raleigh, NC area, you MUST eat at NoFo,
then shop upstairs after your meal. 
 
Some books written by my favorite author, Diane Chamberlain.
A goodwill lamp and a picture of my niece who lives too far away!*

*(bold comment solely for the purpose of guilting my sister into moving closer.)
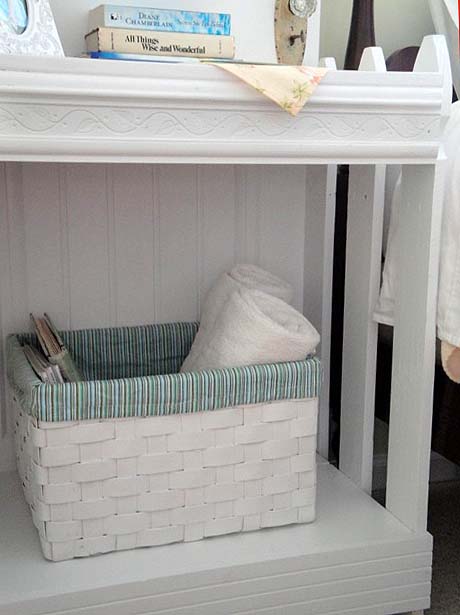
Fresh towels and my Country Living magazines.

All beautified and ready for our visitor!

Sharing with the CSI Project White Challenge:

Visit thecsiproject.com

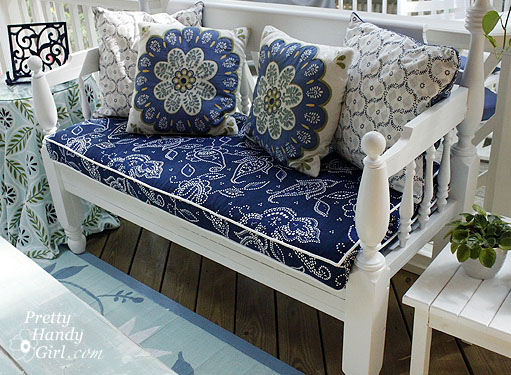
Fall Accessories for the Screen Porch | Pretty Handy GirlHow to Turn a Craig’s List Bed Frame into a Garden Bench

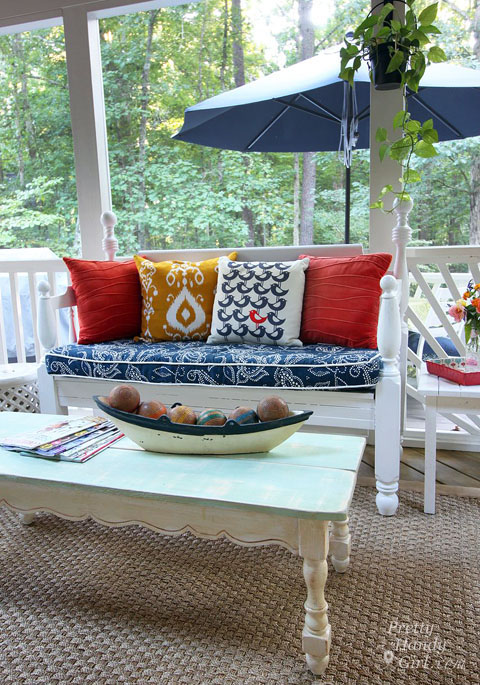
While visiting one of Raleigh’s local shabby chic boutiques, I fell in love with a sweet bench made from an old bed frame. But, the $350 price tag meant that our relationship was not meant to be. I began scouring Craig’s List for the perfect bed frame to make into a bench in our front yard. Finally, I found a full sized cannonball bed frame that looked very similar to this one:

The bed was in good shape. It was made from real wood and it had wooden side rails. Best of all, the price was $40 (and I didn’t have to drive more than 3 miles to buy it!)

After researching the web for ideas on how I wanted my bench to look, I found this site: https://www.robomargo.com/bench.html which has many photos of bed frames turned into benches.

Then I stumbled across Karla’s bed over at: https://itsthelittlethingsthatmakeahouseahome.blogspot.com

Her husband had declared the bed frame a piece of junk when she asked him to turn it into a bench. I can’t help giggling now that I’ve seen the finished project:

Isn’t this bench A-DOR-ABLE!

Here is my best effort at directing you through the transformation from a bed to bench (I neglected to photograph the process on this project since it was a pre-blog project.)

Begin with the headboard and footboard, and set the side rails aside for now.

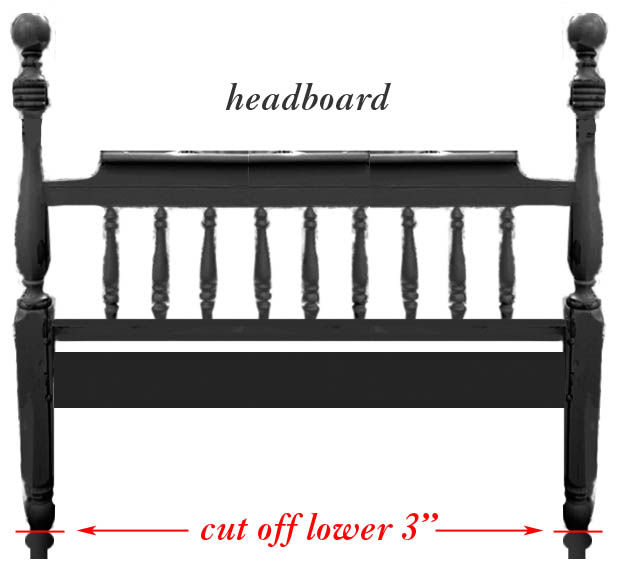
I pre-measured another bench and determined that I preferred a 18″ seat height. Luckily the footboard worked perfectly in my plans. But, I needed to trim 3″ off the bottom of my headboard legs.

Then determine the depth of your bench. I wanted mine to be 18″. (This is a little deeper than a chair (15 – 16″), but it allowed for pillows behind our backs and a more substantial size.

Your footboard needs to be cut in half so it can become your arm rests. You might have to trim more from the center as I did to achieve your desired bed depth.

What you are left with is two sides for your bench:

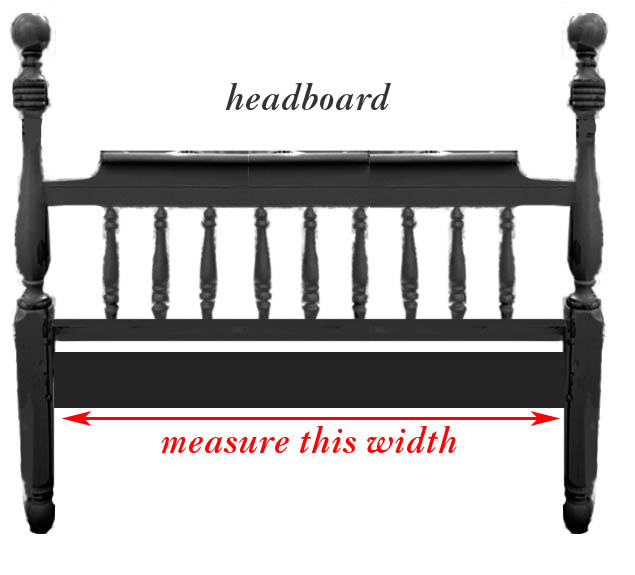
Now you need to grab one of your side rails and cut it down to size for the front skirt of your bench. Simply measure the distance of your headboard from post to post:

Then cut your side rail to this exact width. (Or if your bed frame came with metal sides, you can use a 1″ x 6″ x 8′ pine board instead.)

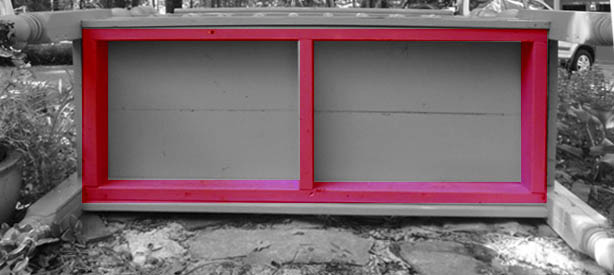
Now you will need to build a frame of 2″ x 4″ boards for stability. This frame needs to be able to fit between the front skirt piece (side rail cut to size) and the back of your bench (the headboard).

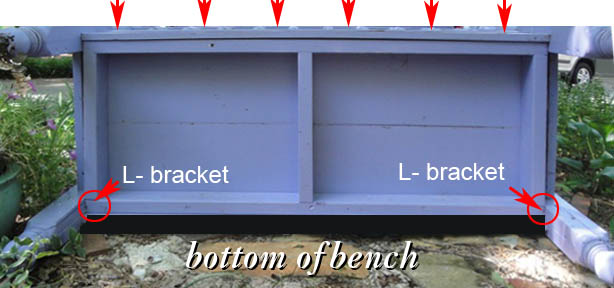
This is a picture of my bench tipped over so you can see the base support structure built of 2 x 4’s (in red).

Now you have all the components to construct your bench frame.

Attach the arm rest to the back of your bench (used to be the headboard) by pre-drilling holes through the bedposts and then screwing in 3″ long wood screws through the post and into the arm rest. Be sure that the arm rests are securely attached.

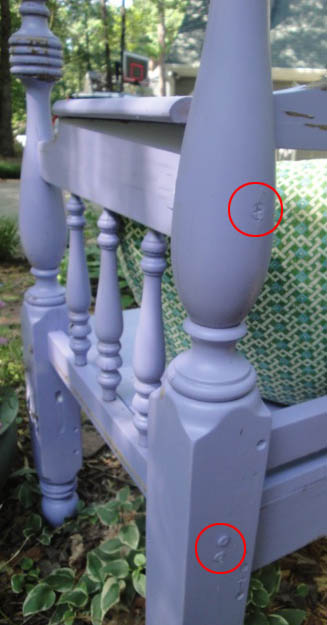
Here is a picture showing the screws from the back of my bench. and how the arm rest looks when attached.

Next you will attach your 2″ x 4″ frame to the back and sides of your bench. You can use screws, nails, and/or L-brackets to attach it.

Then, you can attach the front skirt piece (cut down side rail of bed) to the 2″ x 4″ support base using small nails or brads.

You are almost done with the construction! Time to cut some wood for the seat of your bench. I used two 1″ x 10″ boards cut down to size. Then cut out notches to fit around the corners of the bed posts.

Then use small nails or brads to nail your seat to the bench 2″ x 4″ frame.

After assembling my bench, I added wood putty to fill my nail holes and then caulked all the seams to keep water out of them.

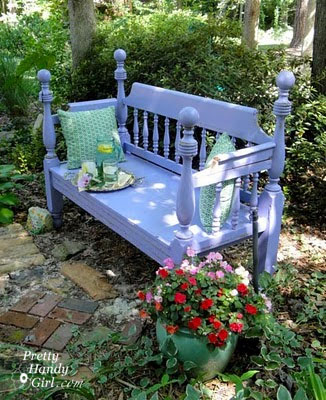
I finished off my bench with one coat of spray primer and 2 coats of Rustoleum French Lilac spray paint (the color my boys picked out!)

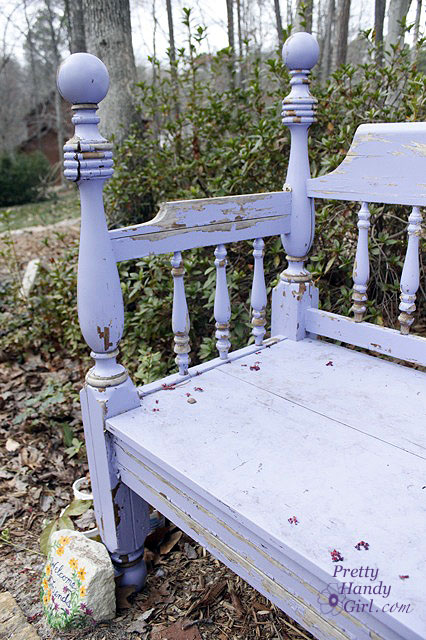
Unfortunately, I neglected to coat my bench with polyurethane, so you will notice that the paint has chipped in places. After a few rain storms, I realized that my bed frame was made from several layers of wood that was glued together. So, you will also see some gaps in the wood.

After some time, I repaired and re-painted the bench. To prevent further splitting, my bench spends its days on our screen porch.

Fall Accessories for the Screen Porch | Pretty Handy Girl

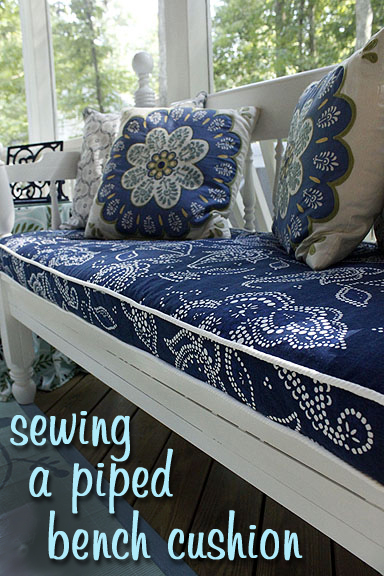
If you want to learn how to make a custom piped bench cushion, head on over to this tutorial:

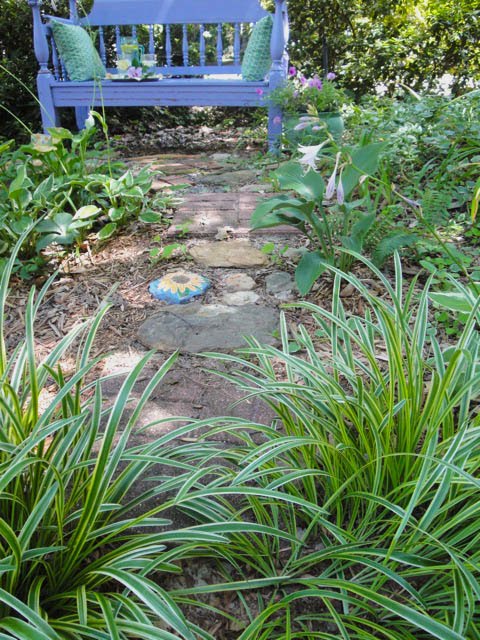
But, in the meantime, won’t you come join me for some cool lemonade in the shade?

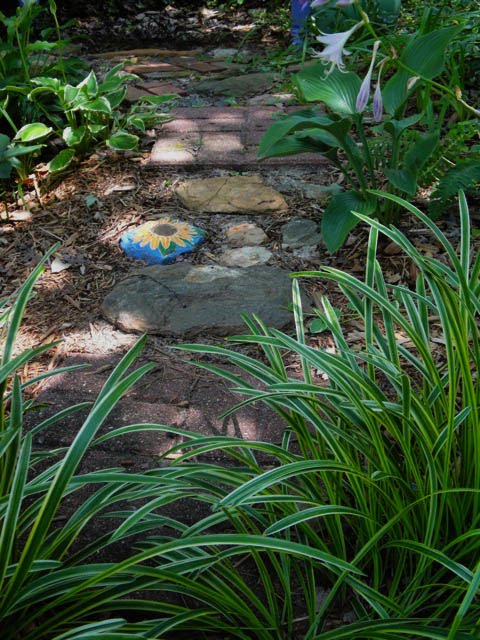
Step right this way.
Did you spot the blooming hostas and hellebores?
 Oh, you were too busy staring at this lavender beauty?
Won’t you sit down in the cool shade…
…and sip some nice cold lemonade with me?
If you want to learn how to grow a beautiful thriving flower garden for your bench to sit in, here’s my Landscaping 101 tutorial on how to grow beautiful garden beds.
beautiful flowering bushes and flowers in front of a green door and gray shuttered house
Happy Spring to you!
signature
Closet Reading Nook | Pretty Handy Girl

Come see this Closet Reading Nook Transformation! Learn how I turned this closet into a Reading Nook in a weekend. This area could also become a built-in desk area at a later date.


Boy's Red, White & Blue Themed Room | Pretty Handy Girl

When is a Closet not a Closet? Reading Nook Transformation!

Have you seen all those cute closets on Pinterest? The ones that were closets but are now a new space like a reading nook or a home office? Well, today I’ll show you how you can give your closet a makeover by turning it into a reading nook!

Boy's Red, White & Blue Themed Room | Pretty Handy Girl

The Back Story:

My husband took the boys camping! Translation: A free weekend – by myself – peace and quiet!

{insert sound of hammers, jigsaw, table saw, and more hammering}

Well, forget the quiet part, I decided to tackle another DIY project I have been thinking about for almost two years. My son’s closet!

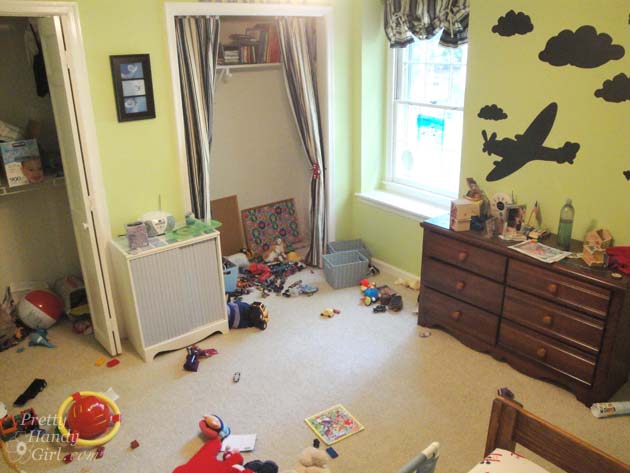
My three year old has two full-size closets in his room. And, yet, his toys were always strewn around the room. Here is the “keeping it real” BEFORE picture:

Boy's Room Before | Pretty Handy Girl

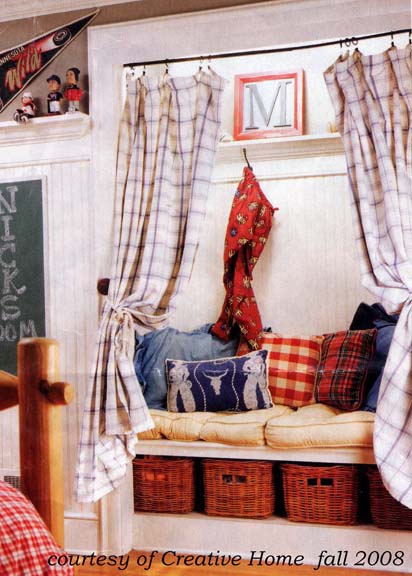
Last year I took the doors off one of the closets and put up some curtains so he could have a little hideaway. That was an easy task, but I wanted to give him more storage and a fun spot to sit and read books during quiet time. When I saw this picture in a magazine, I knew I had the perfect solution.

Kym, the homeowner, turned her son’s closet into a private nook. I thought, no problem, I’d complete this project in an easy 2 days. After all, how long can it take to renovate one 6′ x 2′ closet? During stopping points I could squeeze in a pedicure, swim some laps and possibly have a friend over for wine and some chat one evening.  Truth be told, it ended up taking a full 3 days (and nights). If I had a helper, I probably could have knocked it out in a day and a half.

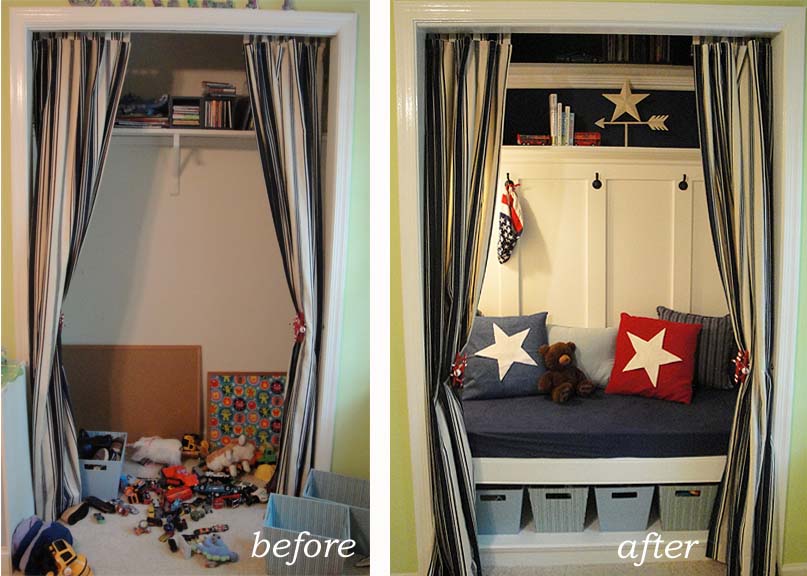
Before and After:

Ready to see how I transformed a standard 2′ x 6′ closet into a multi-functioning reading nook, toy storage, sleepover bed, and creative play space?

How to Turn a Closet Into a Reading Nook:

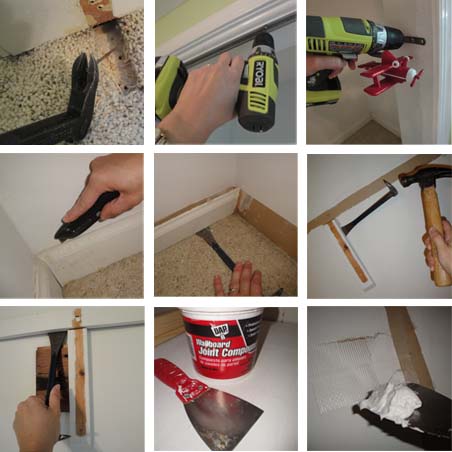
First (after cleaning up all those toys, of course), is removing hardware, base molding, and patching holes. (This is where I found I didn’t know my own strength and ended up having to patch a larger drywall hole after trying to remove the closet cleats.)

Once the closet is empty it’s time to build!

Materials:

(I’ve included affiliate links for your convenience. I earn a small percentage from a purchase using these links. There is no additional cost to you. You can read more about affiliate links here.)

Optional: trim molding & shelving

Home Office Desk Option:

If you want a home office in your closest, skip the base and only build the framing for the bench, but install it at 29 inches (standard desk height).

Measure and Cut Lumber:

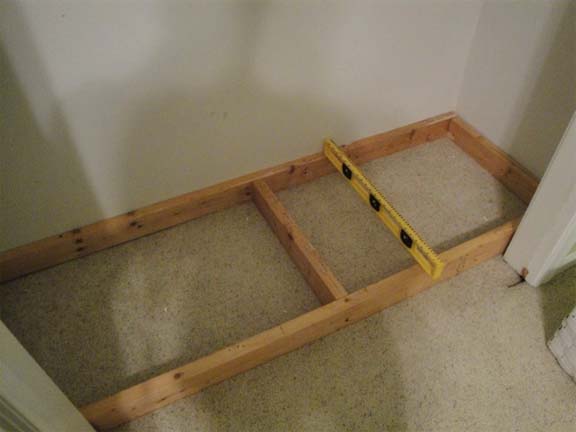
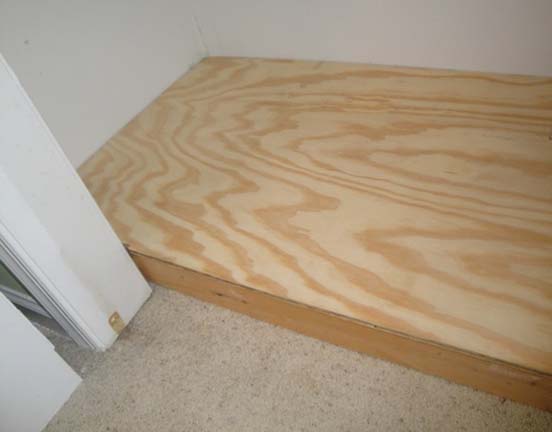
Measure the floor of your closet to determine the size for your base and bench.

Cut all your lumber to size, then build two frames. One for the base and one for the bench.


Your base frame only has to have one center support because it doesn’t have to hold much weight. The bench seat frame needs two center supports at 2′ intervals.

Find and mark the studs in the wall. (Here are 5 different ways to locate studs without a stud finder.) Then secure the base frame to the studs using a few screws.

Cut your finish grade plywood to top the base and bench frames.

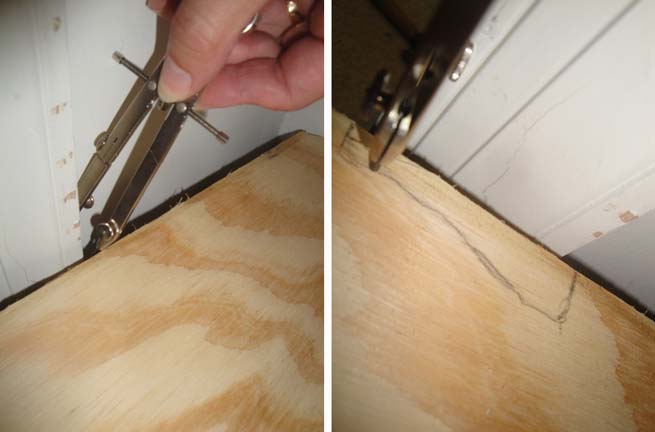
Scribing Around Molding:

Here is a little trick for scribing the profile of trim or other obstacles onto your board. Use a compass and set the width to the same distance from the wall to the outside of my door casing. Then draw a line around the casing being careful to keep the compass perpendicular to the casing. Then you can cut out the profile with a jigsaw.


Set the plywood on top of the base. Secure the plywood to the base with a few screws (or wood glue and trim nails.)

Next build the second frame the same way (but add two center supports for the bench.)

To simplify things, you may want to prime as much of the framing as you can before nailing it into place. It is easier to prime wood on sawhorses.

Installing the Bench:

If you have a helper, this process will go easier. If not, you need to temporarily hold the framing before securing it. Cut some scrap blocks to hold the bench or temporarily drive in a few screws.

Measure up 18″ from the floor. This is standard bench height.

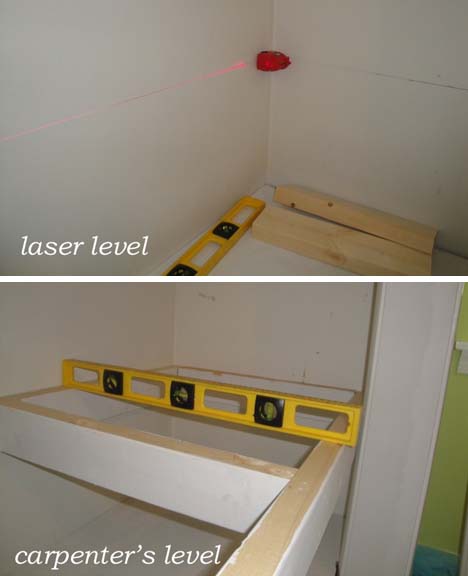
Use a level (both a carpenter’s level and laser level if you have them) and level the bench platform before screwing it into the studs. Use at least two screws on each side and several into the back and one on either side of the door frame to secure the bench in place. Set the plywood on top of the bench framing. Secure it with a few screws or wood glue and  trim nails.


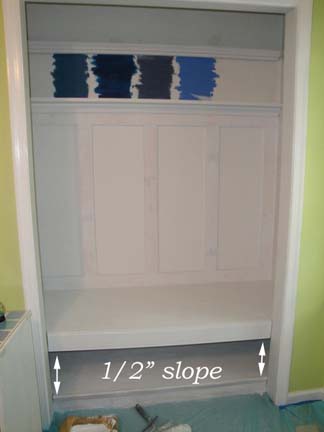
Remeber that note about having a helper? I wish I had one because at some point the right hand side of my bench shifted while I was securing it, which resulted in a slight slope. Seriously, I really did level it! I even have the pictures to prove it! Shhhh, don’t tell anyone! My lesson learned is that next time I will either screw the frame in place to hold it or put a brace underneath to keep it from slipping.


Bench Cushion:
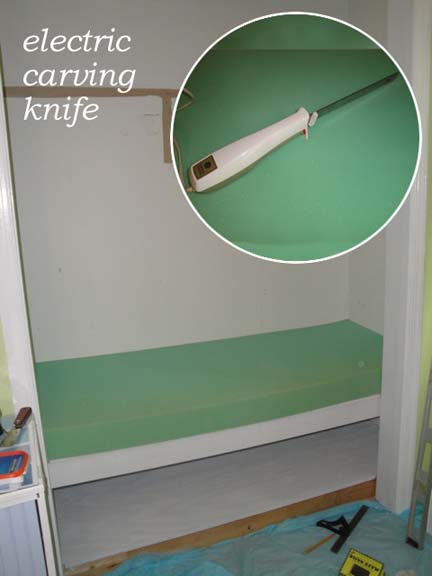
Cut the foam cushion for the bench seat. If you haven’t heard, the best way to cut foam is with an electric carving knife! (Huge thank you to my friend and neighbor Karen for the use of her 1970’s electric carving knife.)

You can sew a bench cushion later to cover it. Here’s how to sew a simple bench cushion with piping.
angled bench view

Decorative Molding:

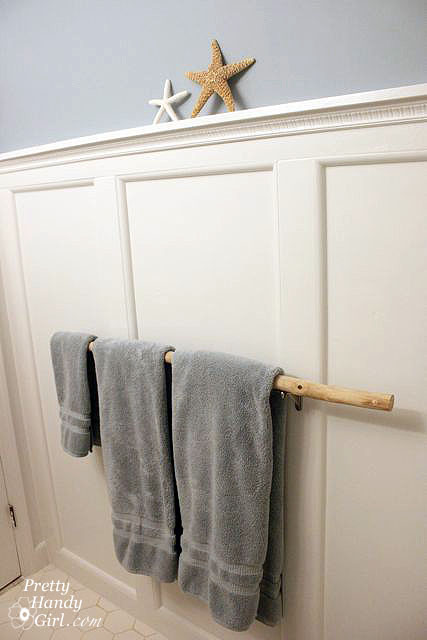
Sewing will have to wait, for now we’re going to finish off this closet reading nook with some decorative molding. This is a personal preference, but I chose to install board and batten molding for the back like I did in this bathroom.

But, if you don’t want to use board and batten, you may like the DIY shiplap look instead.

Then I added decorative molding under the shelves. Did you know that some of the molding in your home, especially crown molding, is made up of several different molding profiles? You can make molding more decorative by using several different pieces and then caulk seams to hide the edges?

Painting Prep:

Before priming all your wood, caulk all the seams and let it dry.


This is the Pretty Handy Girl’s tried-and-true caulking method:

  1. Squeeze out your bead of caulk with a caulk gun.
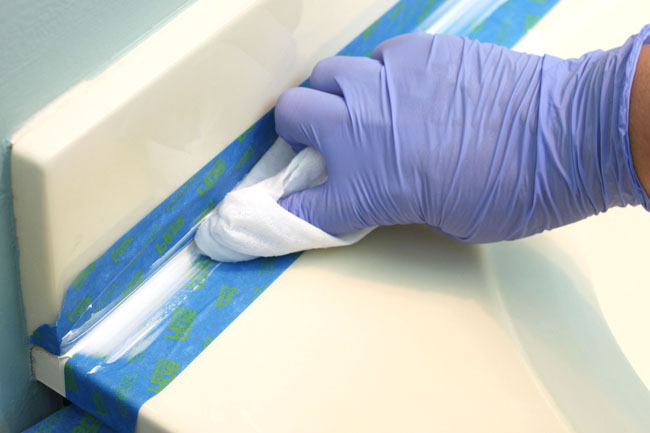
  2. Keep your finger at the front of the tip of the caulk and use a baby wipe smooth the caulk as it’s dispensed.
  3. Follow up with a clean baby wipe if necessary to smooth any spots.

It’s easy to caulk like a pro if you follow my tutorial.

Once the caulk dries, prime all the wood and trim. Let it dry.

How to Tint Primer:

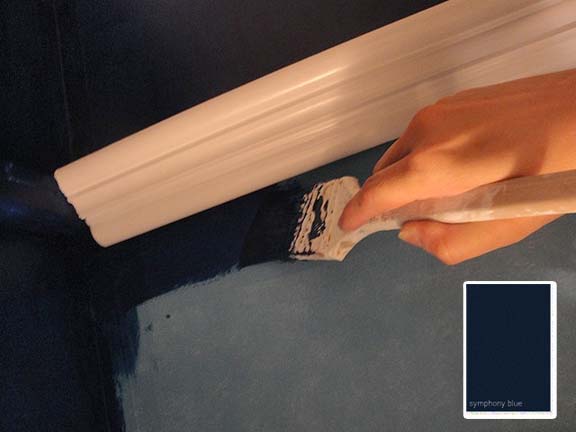
After trying some Benjamin Moore paint swatches, I settled on a deep navy blue called “Symphony Blue”. I knew I’d need to use some tinted primer before trying to paint such a dark color on the light walls. You can save money by tinting your primer. Simply add 1 part paint to 3 parts primer.


Isn’t the marble effect pretty! Mix well.

Painting:

Always use at least two coats of paint. This makes it easier to clean the walls and eliminates any missed spots.

Paint the trim first. Then cut in around trim with a good quality angled brush.

Use a paint roller to paint in between your cut in lines.

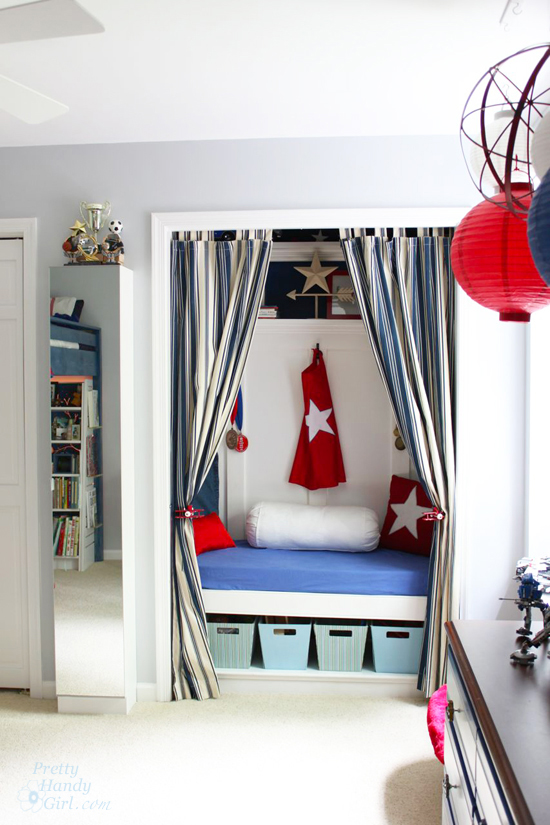
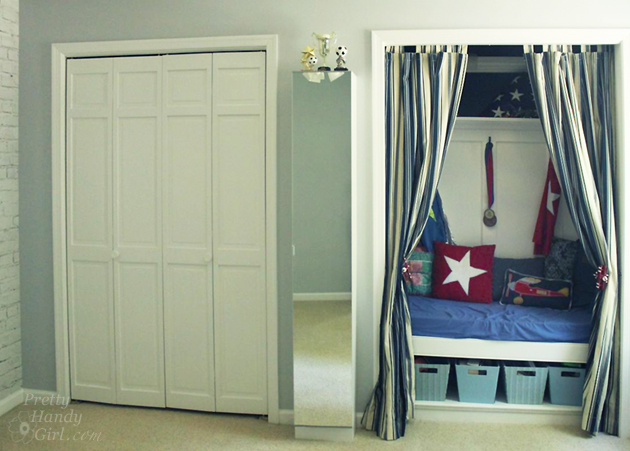
So, are you ready to see this Closet Turned Reading Nook?? The drumroll please…

Boy's Red, White & Blue Themed Room | Pretty Handy Girl
Can’t you hear the Symphonic Chords playing?


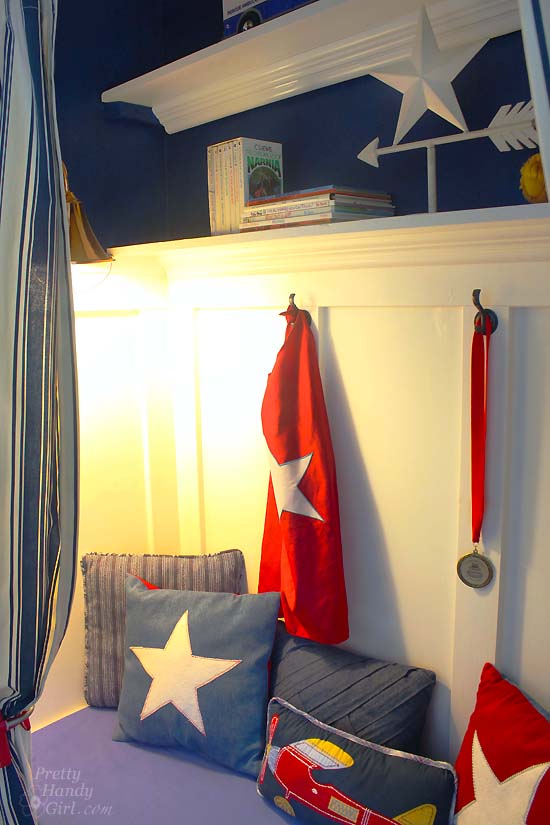
The copper wall sconce was also from the Habitat for Humanity ReStore. I scored that gem for only $5! It has a cord that I snaked around the molding and then plugged into the outlet just outside the closet. Click Here to Learn How to Add a switch to a Hard-Wire Light.


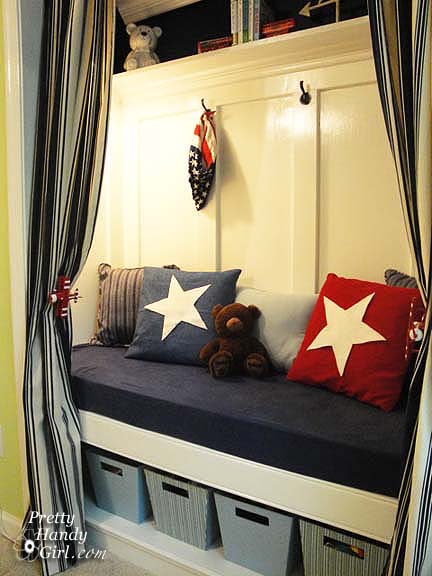
Plenty of storage bins for all the toys a three-year-old can hoard.


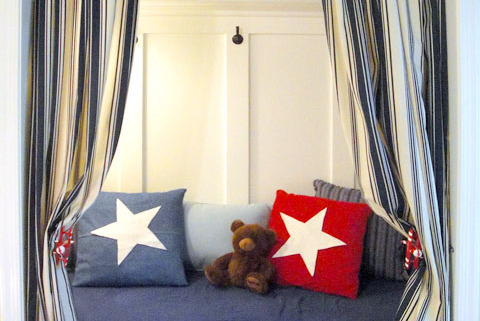
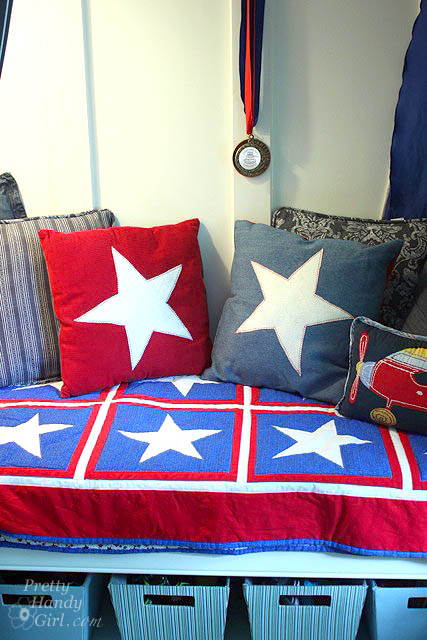
Star pillows were super easy to make with cloth napkins and fabric I had on hand.


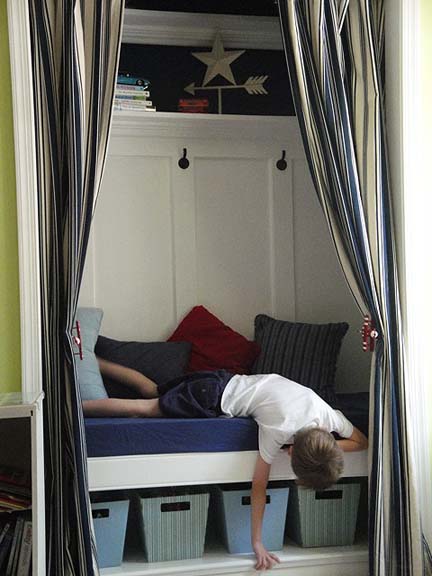
Finally, a nook built for reading, sleepovers…


…or just hanging with big brother.

Wall-mounted IKEA LILLÅNGEN Mirrored Cabinet turned Stuffed Animal Storage | Pretty Handy Girl
Boy's Red, White & Blue Themed Room | Pretty Handy Girl

Boy's Red, White & Blue Themed Room | Pretty Handy Girl
That’s all folks! Bye-bye!

Did you like this transformation? If so, you’ll love more custom spaces in my home!