
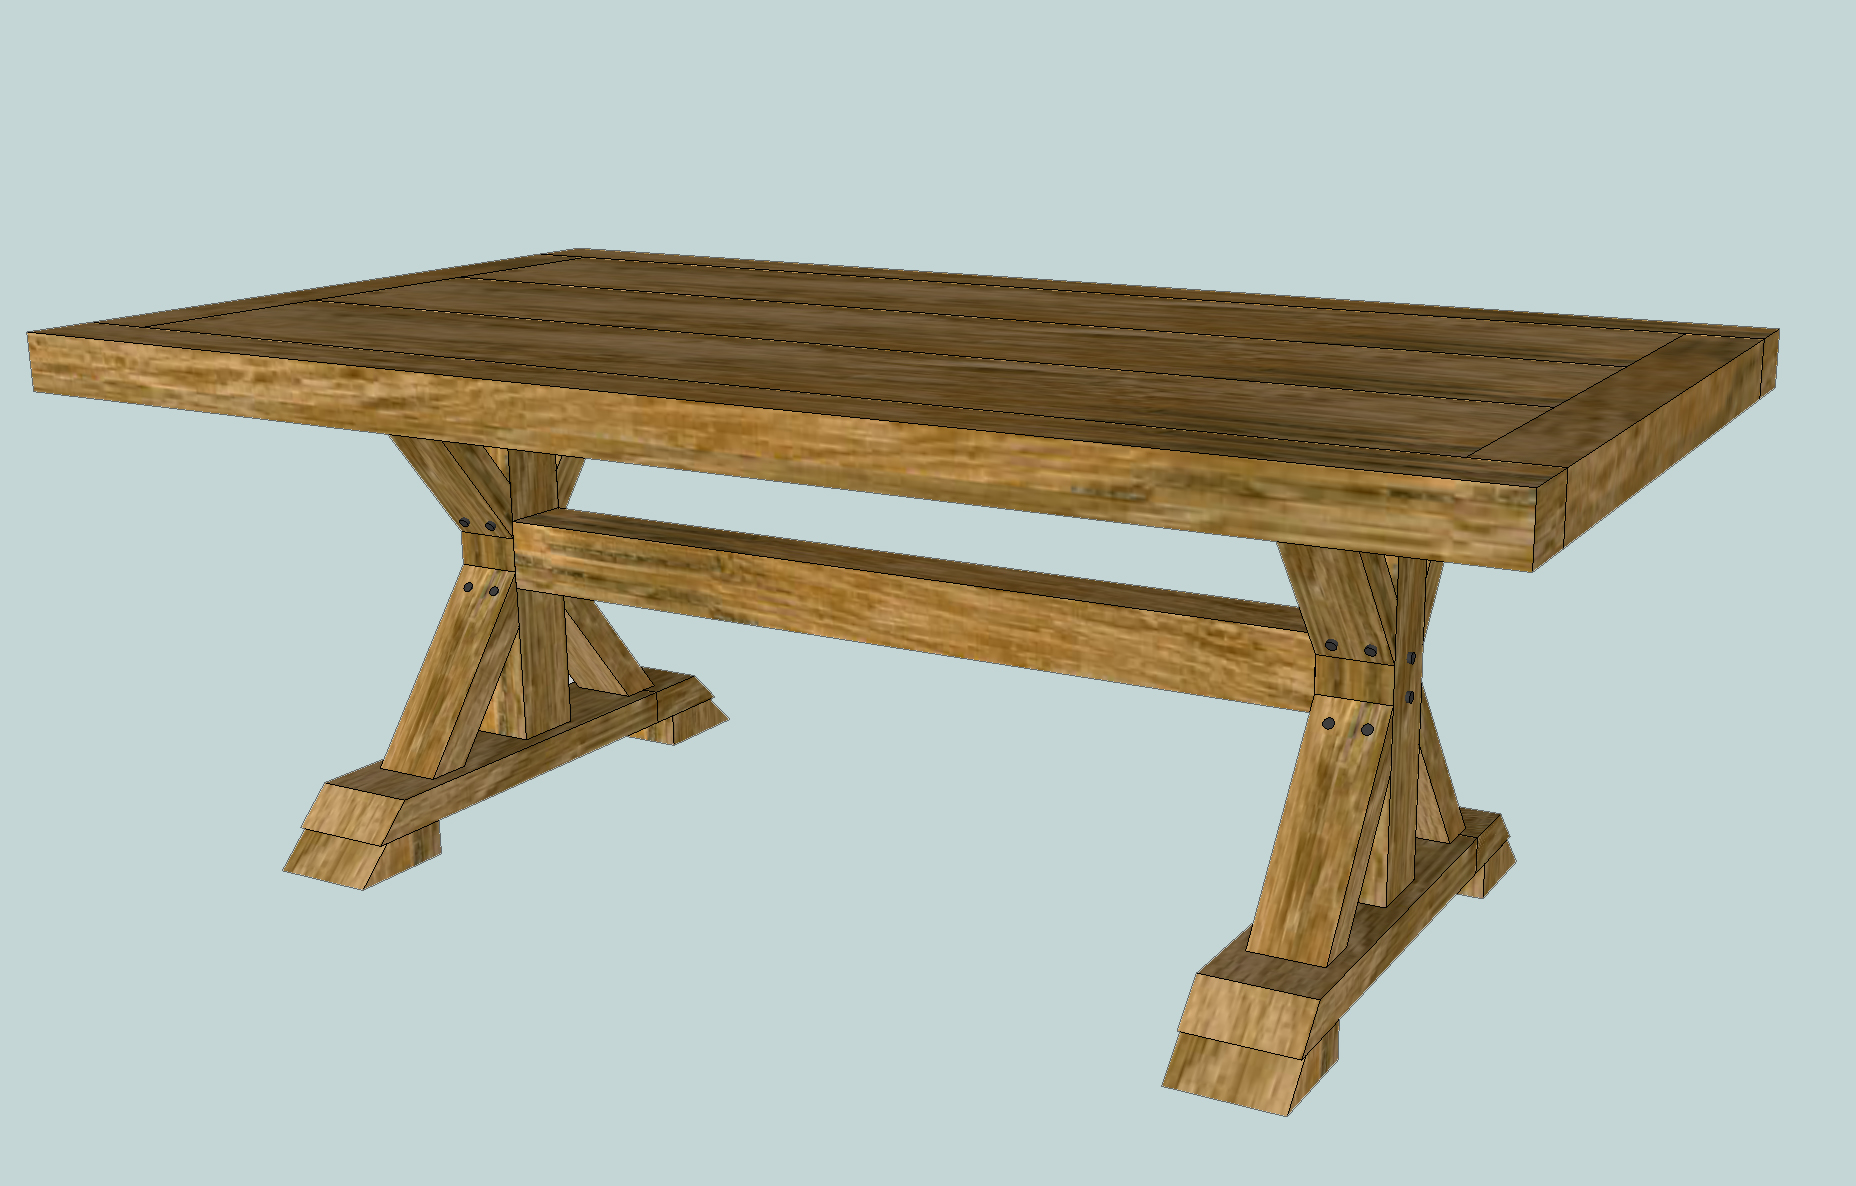
How to Build a Chunky X Farmhouse Table
 How to Build a Chunky X Farmhouse Table
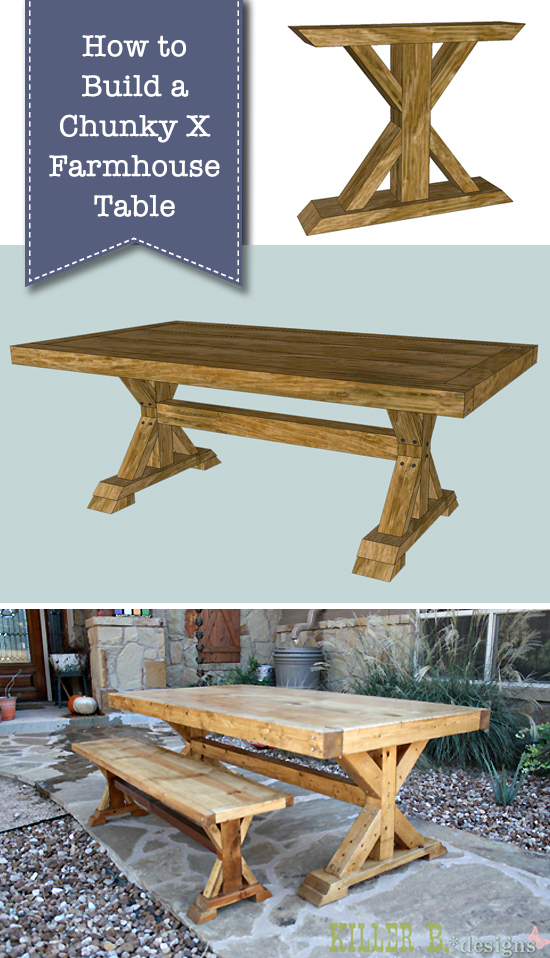
There’s something about 4×4 lumber that makes furniture look amazing. Maybe it’s the sturdiness, maybe it’s the shape. Whatever it is, I love it! A friend of mine recently asked me to build her a new dining table, and I was happy to oblige. She liked the X-Base Pedestal table I built my sister, but wanted a rectangular shape with a heftier top. So I edited the plans a bit to make two straight bases with a stretcher, and used some posts around planked 1×12’s for a beautiful, solid table. It’s certainly heavy enough to last a lifetime! In this post we are gonna learn How to Build a Chunky X Farmhouse Table.

Recently Jeff shared his farmhouse table he built using these plans. I love how it turned out. I especially love the black stained legs and he used a simple top of tongue and groove boards without a border. This is a great example of altering plans to make them your own.
A few notes about my build: The base uses the same measurements from Ana’s plan. I decided to use 2×6’s for the top and bottom to make it even more sturdy looking.
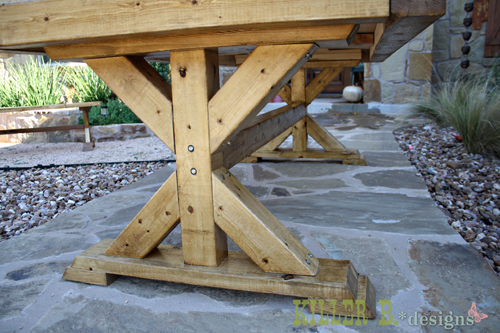
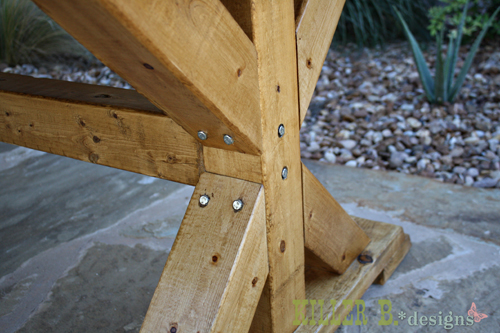
Another nice change this time was splurging on pretty hardware. I used 5″ lag screws instead of screws, and it really does lend the table a professional feel.
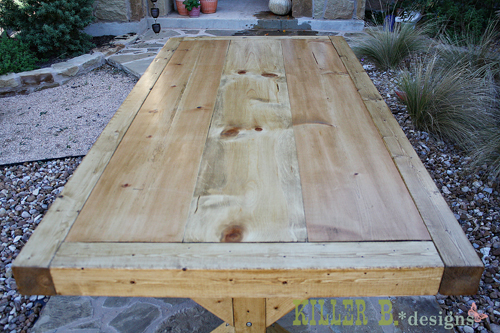
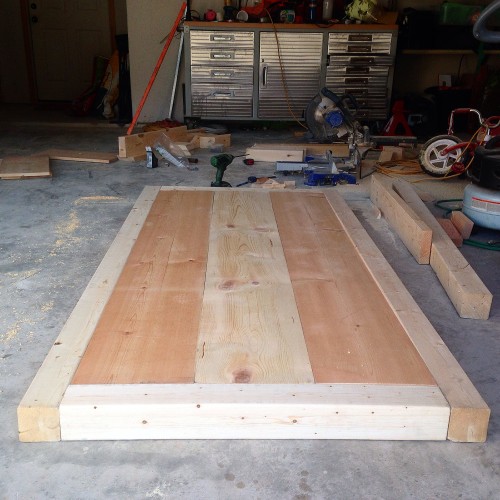
The top was quick and easy to put together. I just have three 1×12’s planked together with kreg pocket holes, and used the same pocket holes to attach the posts. Then a few more carriage bolts on the sides help keep the posts together.
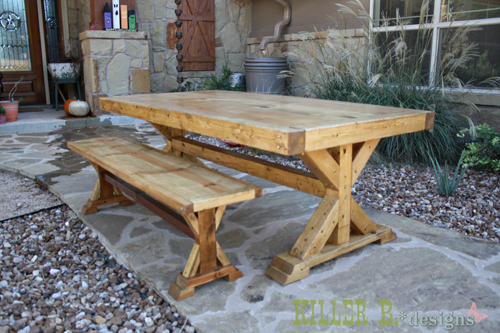
This is such a gorgeous set, and may be one I have to re-create for my own dining room! I was happy to build for a friend, and love that it will have a good life in its new home.
You may want to construct the table top and the legs, then move the table into place before connecting the legs to the top. This table will be large and heavy.
Now, let’s get busy building your Chunky X Farmhouse table!
Materials you’ll need to build your own Chunky X Base Table:
Please note, using nominal US lumber (i.e. 2×6’s = actual 1.5″ x 5.5″), the finished size of this table should be 41 1/2″ wide x 80″ long x 28″ tall.
(I’ve included affiliate links for your convenience. I earn a small percentage from a purchase using these links. There is no additional cost to you. You can read more about affiliate links here.)
Lumber:
- 3 – 2x6x8′
- 5 – 4x4x8′
- 3 – 1x12x8′
- 2 – 1x3x8′
Hardware:
- 44 – 1/4″ x 5″ lag screws
- Box of 1 ¼” pocket screws
- Box of 2½” wood screws (to assemble bases)
- Wood glue
Tools:
Cut List:
- 4 – 2×6 @ 30″ cut at a 30 degree angle (top and bottom of table leg bases)
- 2 – 2×6 @ 30″ cut at normal 90 degrees (spacers for on top of table leg bases)
- 4 – 2×6 @ 6″ cut at a 45 degree angle (feet)
- 8 – 4×4 @ 13″ cut at a 45 degree angle (cross bracing for the X shape)
- 2 – 4×4 @ 21 ¼” (center upright support of the table legs)
- 3 – 1×12 @73″ (table top)
- 3 – 1×3 @ 34 ½″(cut this after your 1×12’s are attached to be sure of measurement as 1×12’s can be 11 ¼” to 11 ½”)
- 2 – 4×4 @ 80″ (long border pieces for table top)
- 2 – 4×4 @ 34 ½″ (cut this after your 1×12’s are attached to be sure of measurement)
- 1 – 4×4 @ 61″ (stretcher to connect table legs. Cut after legs and table top are built later in instructions).
Instructions:
Important Note: I highly recommend pre-drilling all holes before driving lag bolts or screws. Choose drill bits that are slightly smaller than your screws and lag bolts. This will prevent the wood from splitting.
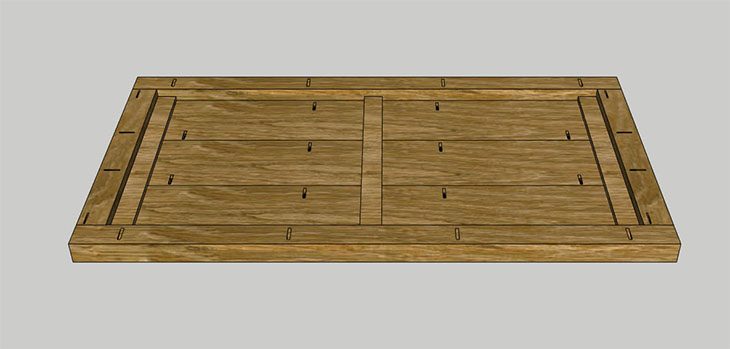
Table-Top:
Lay the 1×12’s on a flat surface.
Connect three 1” x 12” x 73” with several pocket screws (adding wood glue at the joints) as roughly shown below.
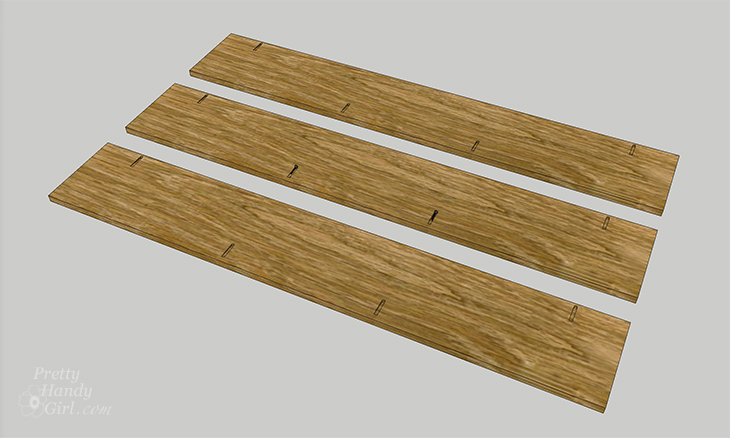
Add additional pocket screws along the perimeter of this table top surface for connecting to the 4×4 border lumber.
Cut two 4×4’s to the same width as your 1×12’s now that they are joined. The measurement should be close to 34 ½”. Cut your three 1×3 cross pieces to the same width.
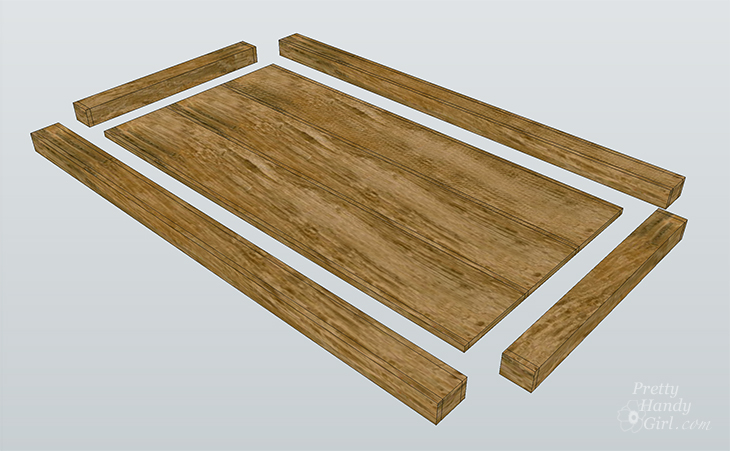
Drive two lag screws through the corners of the 4″ x 4″ x 80″ lumber into the two 4x4s you just cut. Then secure the three 1×3 cross pieces (using wood glue and/or the 1 ¼” screws) you just cut to the underside of the 1″ x 12″ boards. Space them evenly for the best support, but leave space on the outer edges of your table top for connecting the legs later.
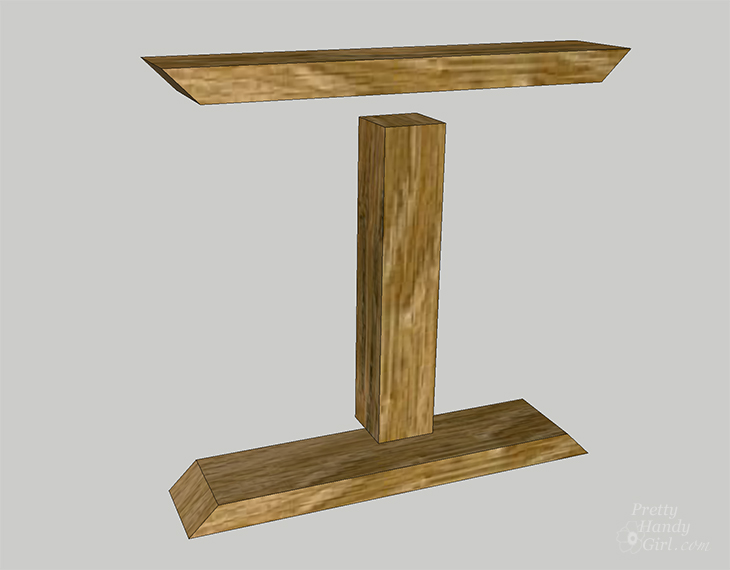
Legs:
Use four 2 ½” wood screws driven through the 2″ x 6″ x 30″ top and bottom pieces to connect to the 4″ x 4″ x 21 ¼” upright support.
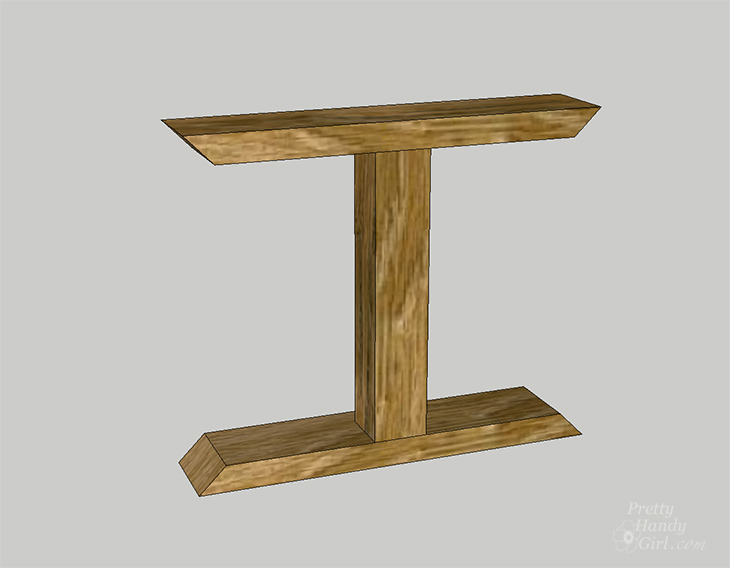
Attach the 4″ x 4″ x 13″ angled pieces to the top and bottom 2″ x 6″s and the upright supports using lag screws (two into the top and bottom of each 4″ x 4″ angled into the 2″ x 6″ pieces.)
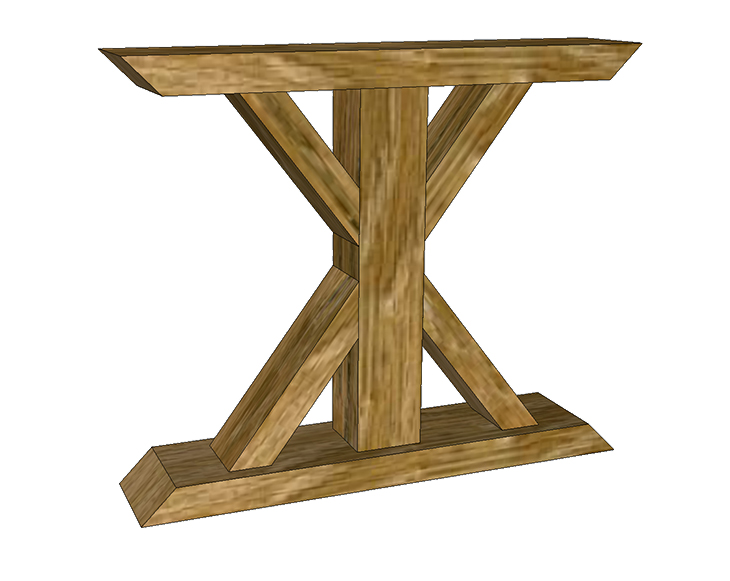
Attach the 2″ x 6″ x 6″ feet to the bottom of the table legs with four 2 ½” wood screws on each foot.
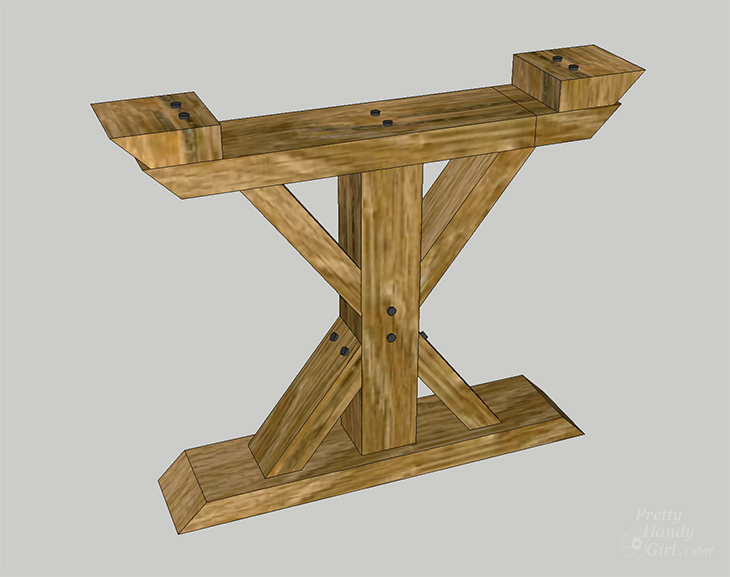
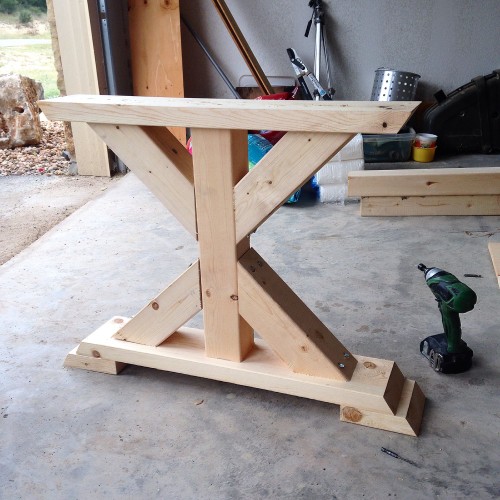
Repeat for the other table legs. Your table legs should look like this:
Attaching Table-Top to Legs:
Use 2 ½” wood screws to attach the 2×6 @ 30″ spacers to the underside of the table top where the legs will eventually attach. (This will elevate the table top so you can see all of the table leg as shown when the table top is secured.)
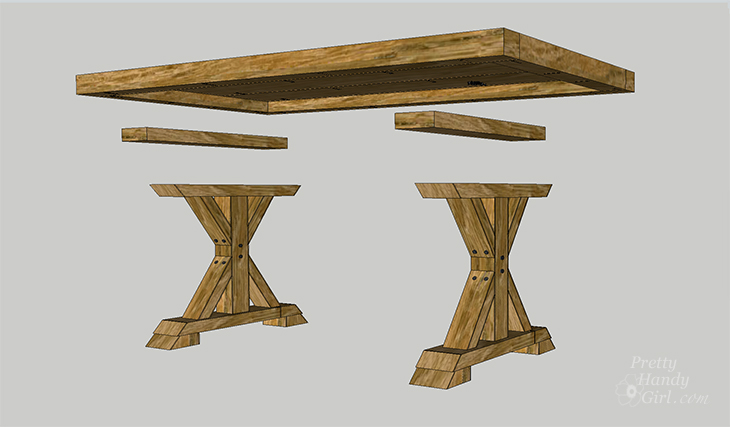
Measure the inside dimension of the table top from one spacer to the other. Cut the last 4×4 to this length (should be approximately 62″.) Attach the two table legs to the 4″ x 4″ x 62″ stretcher and two lag bolts through each leg and into the stretcher as shown below.
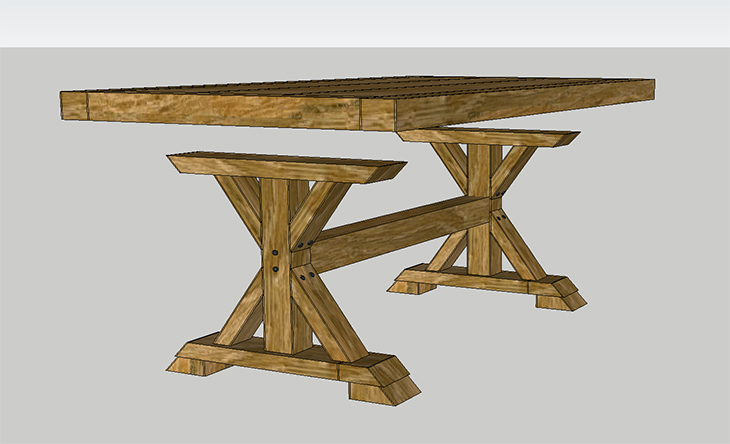
Add the table top and secure the legs to the spacers with 2 ½” wood screws through each leg top into the spacer.
And your table is built!
Wrap-Up:
To build benches for your table, you can follow Shanty 2 Chic’s X farmhouse benches which are the same style.
I hope you liked this tutorial for How to Build a Chunky X Farmhouse Table. Be sure to have a helper on hand to help you move this beast! It is definitely made rock solid.

~ Read more of Brooke’s Tutorials ~
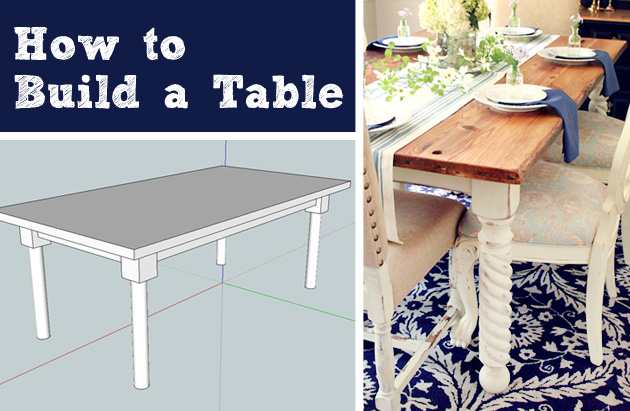
If you liked this tutorial, you’ll love the instructions to build your own farmhouse table.
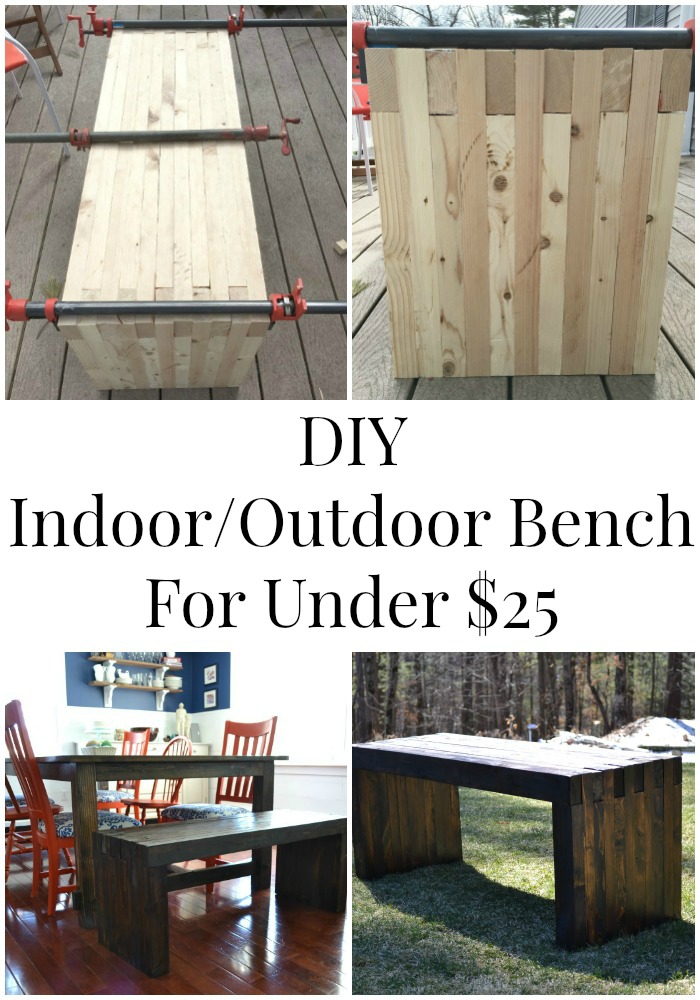
Or How to Build an Indoor/Outdoor Modern Bench:

Used your plans as a starting point. Thank you! Build was 11.6’ long. 39” wide. 3 supports. I also raised the table height a bit because I already have 12 chairs and wanted a more standard height. I added a treated 1×6 to the base to keep water from wicking. I also lengthened your 45deg supports to bring the x to meet closer together. And I widened the top and bottom of the support to gain the max amount of stability- It’s a big table. I’d send you a pic, but the site doesn’t seem to want that. Thanks for the ideas for a simple inexpensive build.
Jeff, I’d love to see your table. You can email the pictures to me at [email protected]. Thanks!
Can you tell us how to put the 4×4 together with the 1×12 tops? That’s kinda confusing
Hello, for the length of the 2×6 @30″ and at a 30°, is the 30″ in reference to the shorter side or the long side of where the 30° cut is?
Thank you 🙂
Did you use treated 4×4 or what??
you can if you are keeping it outside, but you can also use regular wood but seal it with an exterior stain.
Do you screw into the table top to secure it to the legs from the top going down? I got all the way thru the build and got stuck there
From the bottom so the screws are hidden.
How do you recommend applying stain? Disassemble to stain and seal or do it when it is together?
Thank you!
I’d stain it when it’s complete then seal it with a polycrylic or polyurethane top coat.
Do you have any recommendations on staining and sealing? Specifically the legs. Should I assemble then disassemble the leg to stain and seal, then reassemble? Stain and seal before assembly or after assembly?
I like to stain after building. Then seal with a polycrylic topcoat. But, you may want to seal it with an outdoor sealer if the table will be kept outside.
Is there a printable version of this? Im old school and like to have printed plans on hand during construction.
Sorry, there isn’t.
We made the table, the 2 1/2 inch screws did go through the top. >:( So we had to wood putty and switched to 2 inch screws.
at what angle did you cut the wood for the leg bottoms thanks
45 degrees
28 inches high is there a reason it’s so short?
When making I checked the 2 1/2 inch screws for attaching the spacers to the tabletop and they look like they will poke through the top And if I don’t screw in all the way the leg won’t sit flat on them
When doing the angle cuts are you measuring the long or short edge? For the legs.
What finish did you use? It looks amazing!!
This looks beautiful! Do you have plans for a kids’ version?
Do you have measurements for the bench?
No I don’t.
Hi there. Is there a video walking you through all the steps required to build this amazing looking table? I would love to build this table but would feel more comfortable actually watching someone perform all the steps. Thank you
No video available.
Awesome! No words. You always go one step beyond.
There is so much great, useful information here. Thank you! Thank you! Thank you!
Thanks again 🙂
We actually had to make changes to this. Because going off these instructions the table top was going to do low so we had to add extra wood with the legs to raise it up
I have built this table and absolutely love it!!!! But I also want to build the bench to go with it but I can’t find the instructions for it. Can you share them?
I want to make this table 32″ tall,what would I need to do to make the “x” on the legs works with the additional height….
Did you add screws to the to of the table leg? Connecting the 4×4 to the 2×6 that would be the under side of the table
Yes, as directed in this instruction line: Attach the two table legs to the 4″ x 4″ x 62″ stretcher and two lag bolts through each leg and into the stretcher as shown below.
What is the height of this table when complete ?
28″
What kind of wood de you recommend to use for the table top?
That depends on what you like. Pine will be easier to work with but is softer and dents easily.
what size is the table after finished?
Using nominal US lumber (i.e. 2×6’s = actual 1.5″ x 5.5″), the finished size of this table should be 41 1/2″ wide x 80″ long x 28″ tall.
I am in love with this table. Thanks so much for the tutorial. I can’t wait to make it. I’m wondering if there’s an alternative to the pocket screws or kreg jig? I have everything else and know how to do it except for pocket screws?
You could use wood glue and screws. Then fill the holes with putty.
Love the table plans! My wife wants me to build one like this, but larger to accommodate 12 people. I plan on adding a third X-frame leg and an additional 1×12. This would make the dimensions roughly 103” long and 53” wide. My question is do you think we can use same dimensions and angles for the legs? Or will the top be too heavy for the existing design? Thanks so much!
If you are adding another leg, I think you should be fine.
Hi I was interested to see if you have posted the list and plans for the benches to match this table
Sorry, I did link to a similar bench.
I. Having trouble figuring out the distance to place the 1x3s and the legs to the table. Are the legs flush with the 4×4 or offset? Thanks and I cant wait to make this for the family!
You should offset them a little to allow leg room if sitting at the ends of the table.
Hey! Currently building this but stuck at the tabletop…we have perimeter pocket screws to attach to 4×4 border and have the lag bolts screwed in each corner…we are just worried that it wont all stay together…. the screws around the perimeter do not look promising that they will hold the 4×4 around the border and we don’t want it falling apart … are we missing something:) thanks!
How long are your pocket screws? They should be enough to hold the 1×12’s to the perimeter. (But, I see your concern, as there aren’t many pocket holes shown on the rendering. I’d add a few more to each side.)
Are your measurements long edge to long edge on the angle cuts?
What color did you use for the stain?
Hi, great project!! Curious to know how exactly you screwed in the carriage bolts in the corners of the table tops without nuts on the end…should this just be lag bolts? Thanks for the info
Jordan, good catch. Sorry about the confusion. Use lag screws not bolts.
Did you find any? I know Home Depot carries then where I live.
Also looking forward to doing this table. Just finished the benches from Ana’s site.
Do you have an estimated cost for this project?
Sorry I don’t. You should be able to get a cost by going online to your local home improvement center.
Hey Brittany,
Where did you find untreated 4X4 posts?
Thanks
You’ll have to shop at a wooodworkers supply shop like a Woodcraft or a lumber yard. And you might need to cut it down.
What kind of lumber did you use? I am having a hell of a time finding 4x4s hardwood in the area I live and I want to make sure this table stands the test of time. I was looking for a hard maple or white oak but with no luck.
Thanks!
If you are really struggling to find 4×4’s you can sandwich and secure 2×4’s together. Otherwise, look in a woodworking supply or true lumber yard (not your home improvement super store.)
How did you fasten the table top, did you put screws through the top of the table?
“Add the table top and secure the legs to the spacers (on the bottom of the table top) with 2 ½” wood screws through each leg top into the spacer.”
Hello, You said you used Pine for the table, was that pine everywhere? I can find pine 4x4s anywhere….
How old is your oldest table like this? Just wondering how it handles expansion and contraction with changes in humidity over time.
What type of wood did you use to build your table?
Pine
Are there plans out there for the matching bench in the photo above?
what wood do you use for this?
What are the actual table measurements? Length, width and height? Thank you!!!
Also curious to what stain.
Building this table today! And the legs seem awfully short?? I just want to make sure that it really is 21”
If you feel like it’s too short, measure another table and see what it measures. Then be sure you add in the height of the feet and 2 by lumber under the “x” and on top of it.
in the cut list and directions you mention a 1×3 but a 1×3 is not mention in the lumber list. is something missing or wrong?
Dan, thanks for pointing this out. I just added it to the lumber list.
When building the legs did you use washers on the lag bolts?
How does this table deals with wood expansion and contraction?
If used outside, the wood will expand and contract. I recommend sealing it with a good exterior finish.
We are building this table today, did you use a clear varnish or stain? Can’t wait to finish this project!
I’m not sure what Brooke used. But, I’d recommend using a stain or clear top coat based on the look you want.
What is the measurements of this table? Height, width, and length? How many can it sit with chairs vs benches? Thank you!
Do you happen to have the lengths and sizes for the lumber used on the benches?
No, you should go to Shanty2Chic’s site to view their tutorial for the benches.
Just started building this table today. Mine is 7’x53”. This thing is huge but looks so nice and I’m not even finished!
Beautiful table and nice design but may want to edit the lumber list. Looks like we bought the 2×4 for s’s and g’s…
Josh, I apologize for the errors you mention. This was a tutorial written by a contributor. I trusted that she gave the correct dimensions. I’ll have someone look into the correct sizes.
Josh, thanks for pointing that out. The 2×4 has been removed and the tutorial has been edited.
I love this table base design. Where can I find 4×4’s that are not pressure treated?
Try a local lumber yard or Woodworking supply shop (not your home improvement store)
So pretty!! What kind of stain did you use??
I’m considering building this table at a 12ft length. Are there any considerations/changes I will need to make for the larger version? Thanks.
Keith, you may need an additional support in the center.
What angle did you cut the x support beams on the base?
The angles are listed in the cut list. They were cut at 45 degrees.
Great to see other woman in the industry! My husband and I make tables from salvaged Toronto trees and I’m building and finishing all the time!
This is a perfect table! Strong enough for anything! Thank you for those tips!
Love this table! And the matching bench makes it even more perfect 🙂
Best,
Kelly
That is just beautiful, is it hard for a beginner to do?
You definitely need to have some familiarity with power tools and cutting angles before building this table. But, sometimes the best way to learn is by trying. Go for it!