Rustic Pallet Serving Tray | Pretty Handy Girl

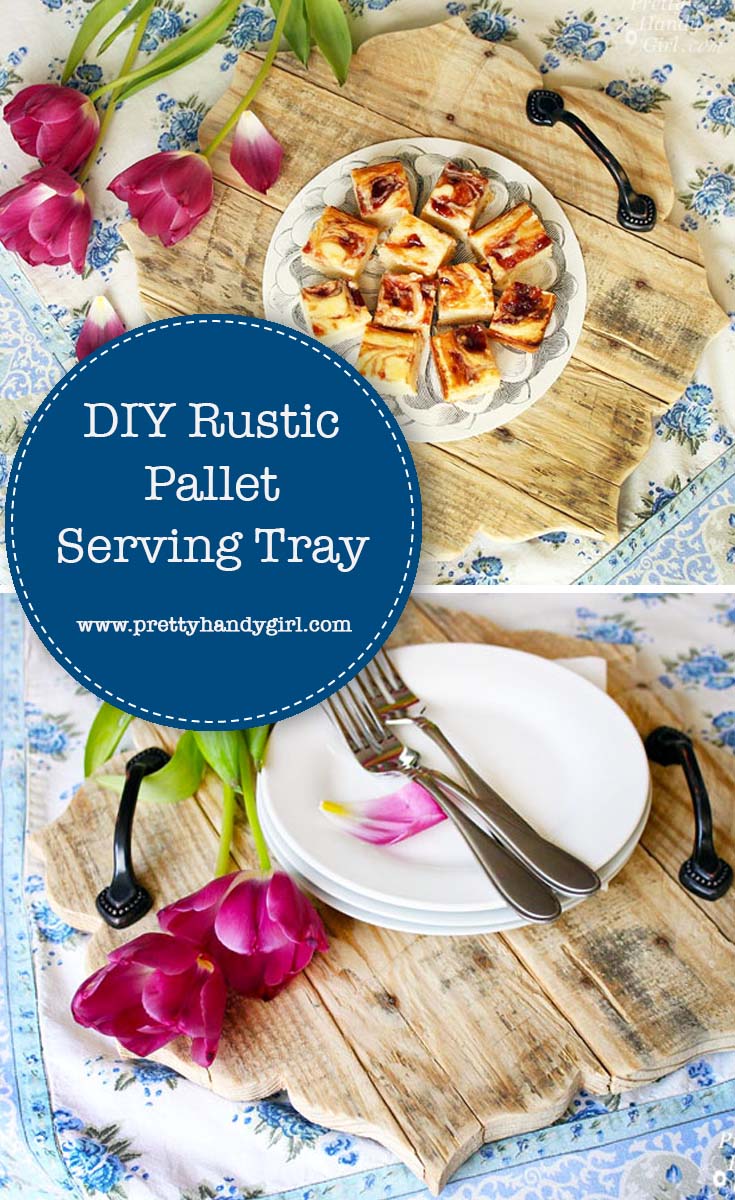
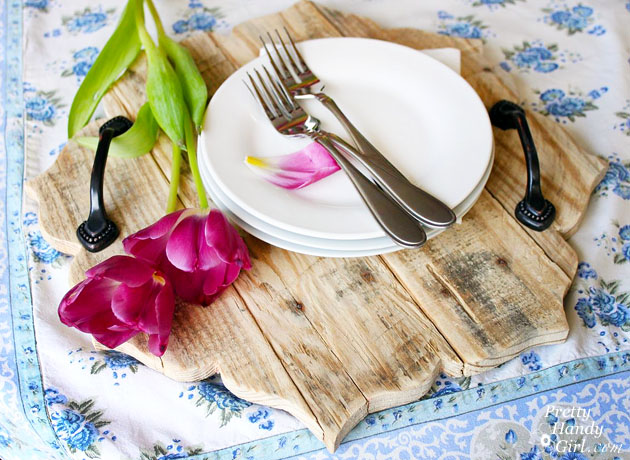
It’s amazing how serving food on a rustic tray can elevate your standard meal or dessert into an elegant occasion. This simple decorative rustic pallet serving tray is a simple project anyone can do!

Rustic Pallet Serving Tray | Pretty Handy Girl

Rustic Pallet Serving Tray

When I worked on a deck makeover with my sister, Caitlin (of Symmetry Designs), we shopped for a lot of the accessories ahead of time. She wanted me to find the perfect Bali-esque tray. Unfortunately I was coming up empty-handed. But, sometimes, you just have to DIY it! This Rustic Pallet Serving Tray was the brainchild of my sister, but I took her idea and ran with it.

Here’s how to make one for yourself.

Materials:

(I’ve included affiliate links for your convenience. I earn a small percentage from a purchase using these links. There is no additional cost to you. You can read more about affiliate links here.)

Instructions:

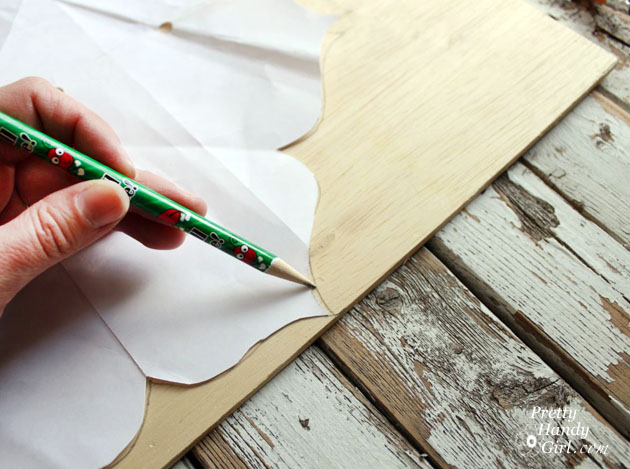
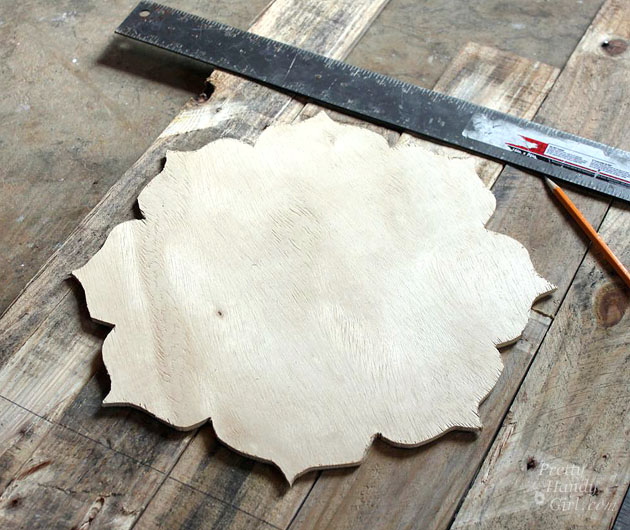
Fold a piece of paper into eights. Cut a design along the edge. (I used a simple scallop shape like this “}”.)

Rustic Pallet Serving Tray | Pretty Handy Girl

When you unfold the paper, you should have a paper template to use for tracing.

Rustic Pallet Serving Tray | Pretty Handy Girl

Trace the template onto a piece of thin plywood.

Rustic Pallet Serving Tray | Pretty Handy Girl

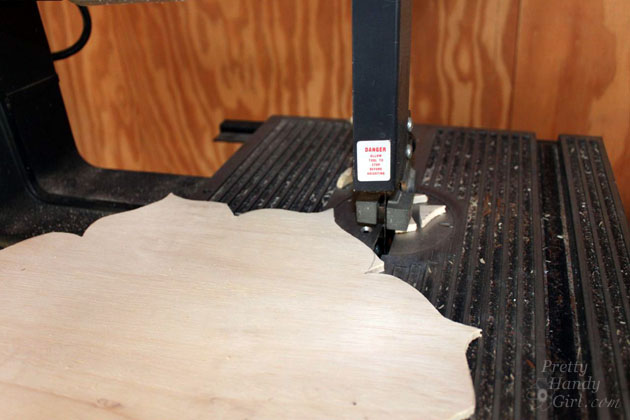
Use a jigsaw or band saw to cut out the shape. You might find this tutorial helpful for cutting out intricate shapes.

Rustic Pallet Serving Tray | Pretty Handy Girl

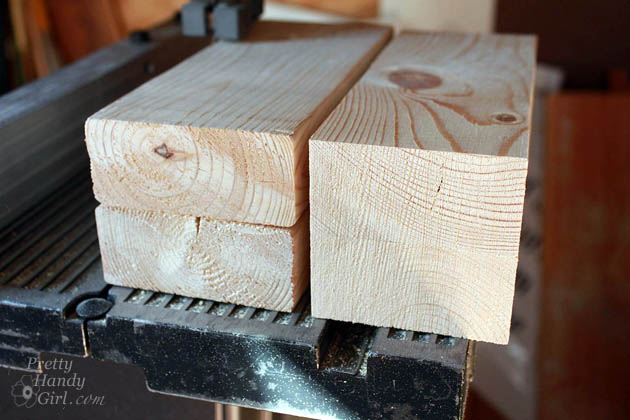
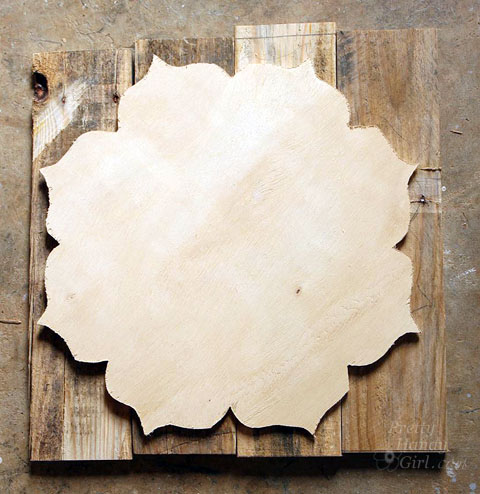
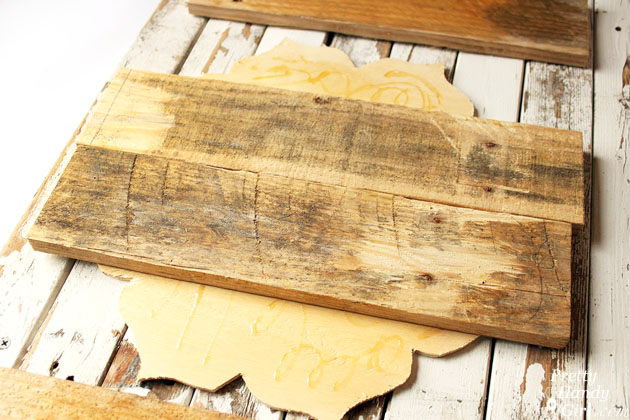
Lay your plywood shape on top of the rustic boards. Move the boards around until you like the sections that will make up the tray. Mark a square around the shape with a ruler.

Rustic Pallet Serving Tray | Pretty Handy Girl

Cut the boards down to size using the pencil mark as a guide.

Rustic Pallet Serving Tray | Pretty Handy Girl

Dry fit the boards together on the plywood shape.

Rustic Pallet Serving Tray | Pretty Handy Girl

Wet both the plywood shape and the boards with a damp rag.

Rustic Pallet Serving Tray | Pretty Handy Girl

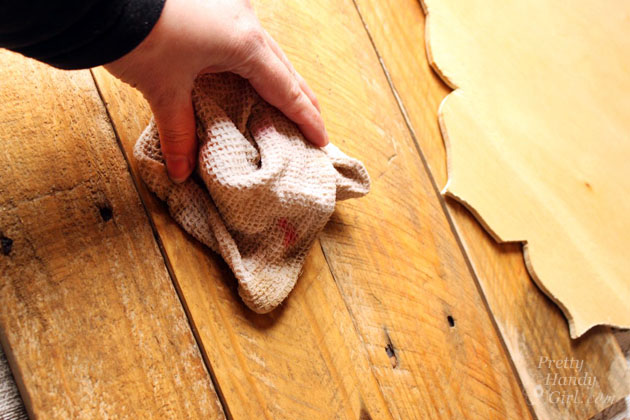
Apply Gorilla Glue to the plywood shape.

Rustic Pallet Serving Tray | Pretty Handy Girl

Set the rustic boards into the glue on the plywood shape.

Rustic Pallet Serving Tray | Pretty Handy Girl

Weigh the boards down with weights or heavy books.

Rustic Pallet Serving Tray | Pretty Handy Girl

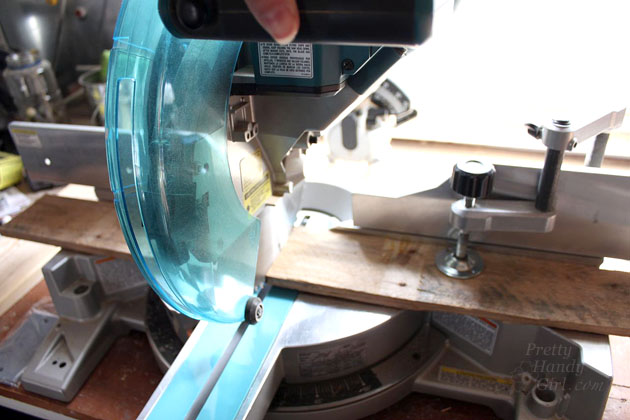
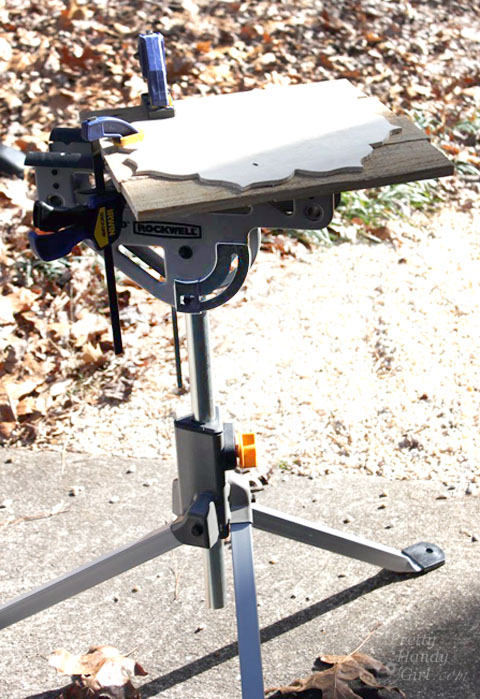
Allow to dry for at least an hour. Remove the weights and clamp the boards onto a work surface (with the area needing to be cut hanging over the edge. Make sure there is clearance for the jig saw blade. You’ll need to cut half the boards and then turn and re-clamp to cut the entire circumference. The Rockwell JawStand works beautifully for this task.

Rustic Pallet Serving Tray | Pretty Handy Girl

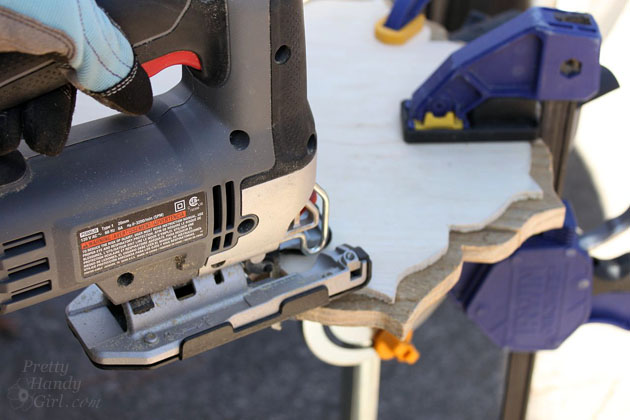
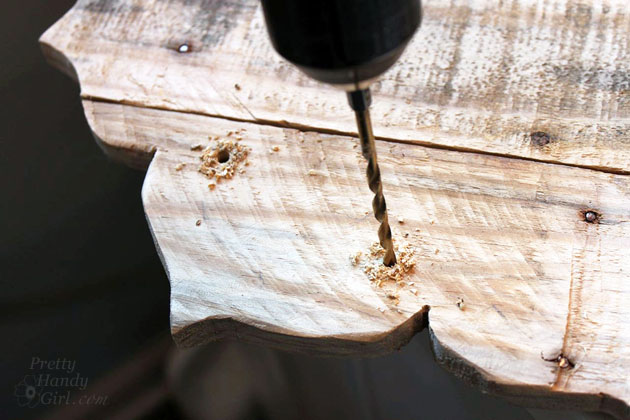
Draw a pencil line 1 inch out from the plywood shape. Cut around the pencil line with a jig saw.

Rustic Pallet Serving Tray | Pretty Handy Girl

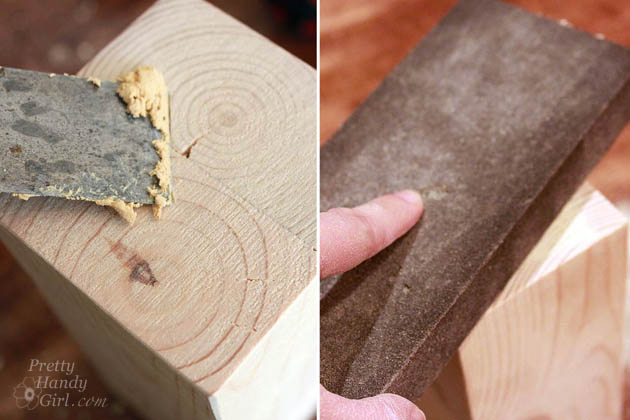
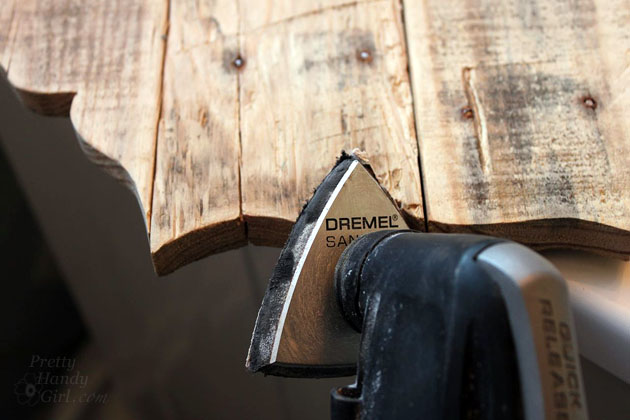
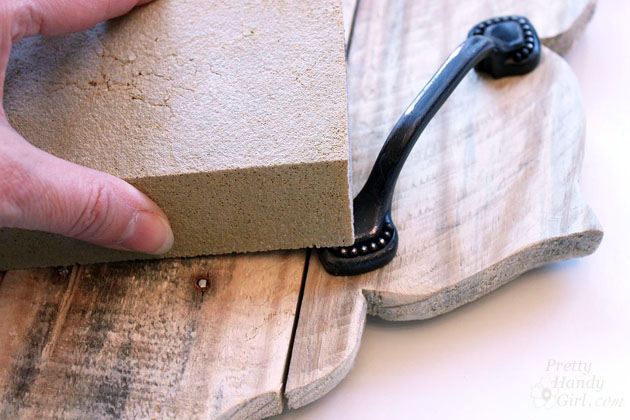
Sand edges and grooves with sandpaper or Dremel Multi-Max.

Rustic Pallet Serving Tray | Pretty Handy Girl

Measure and mark the location of the handles on the tray.

Rustic Pallet Serving Tray | Pretty Handy Girl

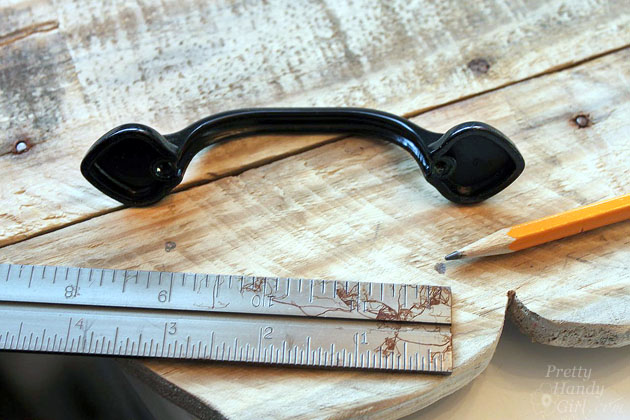
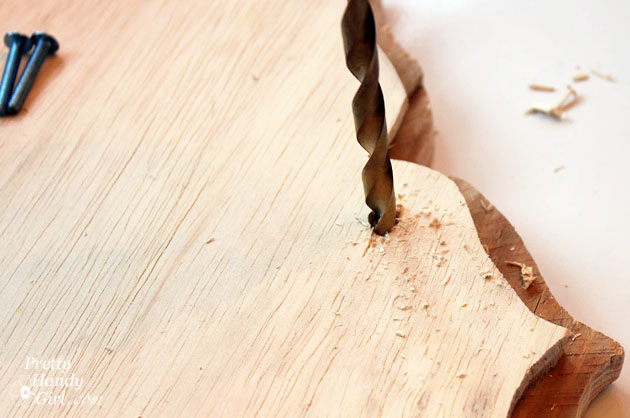
Pre-drill holes using a bit that is the same size as the handle screws.

Rustic Pallet Serving Tray | Pretty Handy Girl

Flip the tray over and drill countersink holes with a larger drill bit.

Rustic Pallet Serving Tray | Pretty Handy Girl

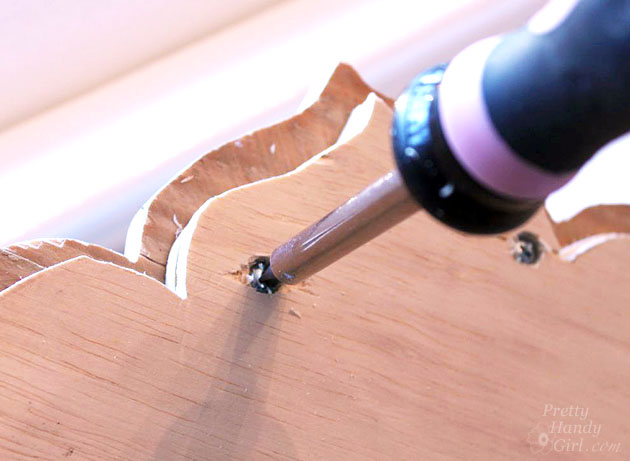
Attach the handles with the screws. The screw heads should sink into the plywood.

Rustic Pallet Serving Tray | Pretty Handy Girl

If you want a truly rustic look, lightly sand your handles.

Rustic Pallet Serving Tray | Pretty Handy Girl

If you are going to use your tray for food, use a plate or doily under the food.

Rustic Pallet Serving Tray | Pretty Handy Girl

What do you think? Do you like this beautiful rustic tray? Think you could make one? I bet you could!

Rustic Pallet Serving Tray | Pretty Handy Girl

You can see this tray and our Bali-inspired deck makeover here.

PHGFancySign

Pin for later!

This DIY Rustic Pallet Serving Tray is easy to create with a cutout pattern | Plank serving tray | Pretty Handy Girl #DIY #woodworking #DIYtray #servingtray #rustichomedecor

Farmhouse Painted (chalk like paint) Jar Vases | Pretty Handy Girl

This is by far one of my favorite gift crafts. Grab a few recycled jars or bottles and use your favorite chalk paint to create simple chalk-painted jars!

DIY Chalk Paint Mason Jar Flower Vase

Simple Chalk-Painted Jars

Two weeks ago I spent less than 20 minutes whipping up some really cute vases using recycled jars painted with Farmhouse Paint. Wait…What is this paint?

Farmhouse Painted (chalk like paint) Jar Vases | Pretty Handy Girl

Well, it’s a one-step furniture paint (previously known as chalk paint.) I was sent a few jars to try. But, you can use any chalk paint you already have or make your own using this tutorial to make any color chalk paint.

Farmhouse Painted (chalk like paint) Jar Vases | Pretty Handy Girl

The key material is recycled jars, I like to keep a fair amount on hand.

Farmhouse Painted (chalk like paint) Jar Vases | Pretty Handy Girl

All you have to do is wash the jars well. Remove the labels and any glue residue. Here’s a great tutorial for easily removing glue from bottles.

Dry the jars thoroughly then coat with two coats of chalk paint. I’m in love with the Farmhouse paint. The colors are vibrant and you don’t need to wax after painting. Just a light sanding with fine-grit sandpaper and it gives you the same soft sheen as waxing would.

Farmhouse Painted (chalk like paint) Jar Vases | Pretty Handy Girl

After the paint has dried, sand some areas (especially on any writing) to distress them.

Farmhouse Painted (chalk like paint) Jar Vases | Pretty Handy Girl

Finally, add some fresh cut flowers from the yard and tie a string around the neck with a personal message.

Farmhouse Painted (chalk like paint) Jar Vases | Pretty Handy Girl

These little vases were adorable. They were cute and they seriously took me less than half an hour to put together (20 minutes to paint and a few more minutes cutting flowers in the yard.)

In the past, I made these little chalk painted vases for teacher gifts. This year, sadly we never got to say goodbye to my sons’ teachers. For all you teachers out there, we appreciate you more than you can imagine. Especially as we do our best to homeschool our children during the COVID-19 outbreak.

Farmhouse Painted (chalk like paint) Jar Vases | Pretty Handy Girl

What do you say? Why not whip up a little chalk-painted vase to appreciate a friend, a loved one, an essential worker, or just to brighten your day!

PHGFancySign

P.s. Did you like the chippy paint board backdrop I used? It’s not real wood, it is actually a vinyl backdrop made by my good friend Leen the Graphics Queen. It rolls up and stores neatly away. She should be selling them soon.

Pin for later!

DIY Chalk Paint Mason Jar Flower Vase

Upcycled Magnetic Chalkboard Frame | Pretty Handy Girl

I’m a serial upcycler. When I can find relatively free materials and turn them into something worth displaying, I’m thrilled! This Magnetic Chalkboard frame is one of those upcycled projects I am proud of.

Upcycled Magnetic Chalkboard Frame | Pretty Handy Girl

Upcycled Magnetic Chalkboard Frame

Earlier in the week, I showed you the changes I made in my oldest son’s bedroom. One of the switches I made was to replace his bedroom door because the old one had cracked after one too many slammings. Ugh, cheap hollow door.

In an effort to keep my son from taping all types of signs to his new door, I found an ugly old frame and married it with some scrap metal from a junky set of shelving a neighbor was throwing away.

bookcase in love with ugly frame

That’s not real wood, it’s metal…fake wood metal. Yuck. Wait until you see how they were transformed. You won’t believe your eyes, so watch closely how I made this Upcycled Magnetic Chalkboard Frame.

Before you leave this tutorial thinking you can’t possibly make this project because you’ll never be able to find cheap faux wood shelves, let me share with you some alternate materials you can use!

(I’ve included affiliate links for your convenience. I earn a small percentage from a purchase using these links. There is no additional cost to you. You can read more about affiliate links here.)

Magnetic Material:

Non-Magnetic Material for Chalkboard:

Now that you have some additional material options, let’s get busy making a Magnetic Framed Chalkboard (or just a framed chalkboard).

Materials:

Upcycled Magnetic Chalkboard Frame | Pretty Handy Girl

Optional: You may need some Goo Gone, a scraper, and rag to eliminate any glue on the back of the frame.

Instructions:

Begin by cutting your metal (or backing) to fit into the back of the frame.

Upcycled Magnetic Chalkboard Frame | Pretty Handy Girl

Paint one side of the metal with chalkboard paint. Let it dry. Apply a second coat of chalkboard paint. Let it dry.

Upcycled Magnetic Chalkboard Frame | Pretty Handy Girl

While the chalkboard paint is drying, time to work on the frame.

If your frame has paper on the back, peel it off and use Goo Gone, a scraper, and sander to remove any of the glue residue.

Upcycled Magnetic Chalkboard Frame | Pretty Handy Girl


When the chalkboard paint has dried, insert it into the frame, chalkboard side up from the backside of the frame (are you seeing where I’m going with this?)

Upcycled Magnetic Chalkboard Frame | Pretty Handy Girl

The back of the frame is much prettier than the front, but in order to hold the chalkboard in place, we need to cut some picture molding. Cut the end of your molding at a 45 degree angle. Fit it into the frame and mark where to make your second cut.

Upcycled Magnetic Chalkboard Frame | Pretty Handy Girl

Continue fitting and cutting molding around your frame.

Upcycled Magnetic Chalkboard Frame | Pretty Handy Girl

Once all four pieces of molding fit, you are ready to secure them.

Upcycled Magnetic Chalkboard Frame | Pretty Handy Girl

Apply a bead of wood glue along the inside edge of the back of the frame.

Upcycled Magnetic Chalkboard Frame | Pretty Handy Girl

Set the molding pieces in place and wipe up any glue that squeezes out.

Upcycled Magnetic Chalkboard Frame | Pretty Handy Girl

Clamp the molding pieces and the frame. Allow the glue to dry for at least an hour.

Upcycled Magnetic Chalkboard Frame | Pretty Handy Girl

When the glue has dried. Attach two D-rings to the back of the frame.

Upcycled Magnetic Chalkboard Frame | Pretty Handy Girl

Season the chalkboard with the side of a piece of chalk. Then use a dry rag to buff it off.

Time to hang it up! (In my case, I hung it on my son’s door.

Upcycled Magnetic Chalkboard Frame | Pretty Handy Girl

To keep the frame from bouncing any time the door is opened or closed, I put a 3M Command velcro strip between the bottom of the frame and the door.

Now my son can put up pictures, messages, and more without damaging the door.

Upcycled Magnetic Chalkboard Frame | Pretty Handy Girl

Pretty cool huh?! Would you ever guess the back of an ugly frame and metal shelves could look this beautiful?

Upcycled Magnetic Chalkboard Frame | Pretty Handy Girl

I especially like the little metal fasteners showing in the corners of the frame.

Tell me, do you have an ugly frame hanging around your house? Have you ever looked at the back and found it more beautiful than the front?

PHGFancySign


Pin for later!

wine bottle vases

Are you a wine drinker? Nope? Well how about a beer drinker? Either way you can stop throwing away those pretty bottles and cut them to use as glasses, containers —or my favorite—flower vases!

don't throw away wine bottles. Cut them in Half

Don’t Pitch Bottles! Cut Them in Half!

About a year ago I bought a bottle cutter off Amazon. I had grandiose plans to make vases and drinking glasses galore. Instead the glass bottle cutter sat in the box. Recently I decided to take the leap and try it out. (Especially because my yard is overflowing with flowers to share.) I figured this was a great way to upcycle wine bottles and use them as free vases for friends and neighbors. Ready to learn how to make wine bottle vases, or drinking glasses, glass containers, or votive holders?

We’ll need a few tools to make this magic happen.  

Materials:

(I’ve included affiliate links for your convenience. I earn a small percentage from a purchase using these links. There is no additional cost to you. You can read more about affiliate links here.)

Feel free to watch the video or keep reading to learn how to cut glass bottles easily and safely.

Instructions:

Before cutting your bottle, you’ll need to remove the label. Here’s another tutorial to easily remove labels from bottles

Make a small mark at the bottom of your bottle. This is where you will start and stop your cut.

mark bottom of wine bottle with white paint pen

Adjust the glass cutting wheel to where you want to make your cut. Release the glass cutting wheel on the cutting jig. Slowly rotate the bottle until you have completed one full rotation.

turning bottle to cut

Remove the bottle and check that your bottle has been scored the full way around.

pointing out scored cut line on wine bottle

Time to move into the kitchen. Make sure you are wearing those safety glasses.

Have a pot of hot water on the stove almost to boiling. Next to this have a container with ice water ready.

Dip the wine bottle into the hot water, making sure to submerge the bottle to the cut line. Hold it there for 15-20 seconds.

wine bottle in hot water

Then immediately immerse the bottle into the ice water. Try to separate the bottle (if it doesn’t separate on its own.)

wine bottle in ice cold water

If it won’t break, resubmerge into the hot water and then the ice water again. 

cut wine bottle in half

Once the bottle has separated, the edges need to be filed. For even smoother edges, sand the rim with progressively finer sandpaper. I started with 150 grit and worked up to 600 grit. 

file cut glass smooth

Be sure to clean up your glass shavings, take care because they can cut you.

Now you can use your newly cut bottles as containers, drinking glasses, or vases!

Fill them with water and flowers to give as a gift. 

wine bottle vases

Now promise me you’ll never throw away glass bottles again. They are too pretty not to re-use. Especially once you have a bottle cutter.

signature

If you liked this tutorial, you’ll love learning how to make these gold leaf decorated vases:

DIY Gold Leaf Vases from Recycled Bottles | Pretty Handy Girl

Need a quick gift using scrap wood? A Creative Block Desk & Art Utensil Holder is an easy and fun gift to make and certainly a project that you can customize to meet your needs. Best of all, the kids can help with the painting step!

create_art_block_holders_sm

Creative Block Desk & Art Utensil Holder

Mother’s Day is this coming weekend! Have you decided how to show her your appreciation and love?! I did! My mother is a professional artist. She creates amazing paintings that inspire others and brightens their homes. For Mother’s Day I wanted to brighten her studio with these art utensil holders. I call them “Creative Blocks.”

Go ahead and raid your scrap pile and join us as we make these colorful and fun Creative Block Desk & Art Utensil Holders.

Materials:

(I’ve included affiliate links for your convenience. I earn a small percentage from a purchase using these links. There is no additional cost to you. You can read more about affiliate links here.)

materials_wood_blocks_sm

Instructions:

1. Block assembly: Select two 2×4″ scraps cut to the same length. Spread glue on one board and sandwich them together.

glue_blocks_together_sm

Clamp the wood together and drill two small holes to countersink the heads of the screws. Drive two screws into the bottom of the wood to hold the pieces together.

drill_blocks_together_sm

Use a band saw, jigsaw, or table saw to trim off the rounded edges of the wood so you have a square block of wood with straight corners.

square_off_2x4s_bandsaw_sm

Putty any cracks or holes. Sand until smooth.

putty_and_sand_blocks_sm

2. Creating the mask:

If you have a craft cutter (Silhouette or Cricut) you can create a mask in vinyl easily. But, if you don’t you can use the computer to print out your words. Lay the print out on top of a strip of Painter’s Tape. Use a few pieces of tape to secure the corners.

create_art_printout

Trace around the words with the X-acto knife (be sure to have a few fresh blades on hand.) Transfer the resulting cut-out tape onto the block of wood. Press the edges of the tape mask to secure the tape.

add_scotch_blue_tape_letters

3. Painting the block: Paint a base color onto the block. Then use a brush and/or palette knife to dab thick paint over the block (minus the base.) Use the X-acto knife to gently peel off the tape mask. Let the paint dry thoroughly overnight.

lift_tape_up

4. Drilling Holes:  After the paint has dried completely, mark the location of the utensil holes with a pencil. Put a piece of painter’s tape on the drill bit to mark the depth of your holes. Clamp the block and drill holes at each pencil mark.

drill_holes

Dump sawdust out of the holes.

Wrap up the blocks in gift wrap and enjoy the look of joy as your Mom opens her Creative Block Mother’s Day gift!

create_pencil_holder_sm

art_brush_holder

You know, as an artist myself, I almost loved these too much to give them away. But, my Mom is worth it. (And I can make another set if I want ;-).)

create_art_block_holders_sm

For more last-minute Mother’s Day gift ideas and many other creative projects, check out the Gift Ideas section here on the blog.

PHGFancySignIf you liked this project, you’ll love these floating picture frames using more 2×4 scrap wood.

wood-block-picture-frames