How to Add Panels to Flat Hollow Core Door | Pretty Handy Girl

How to Add Panels to Flat Hollow Core Door | Pretty Handy Girl

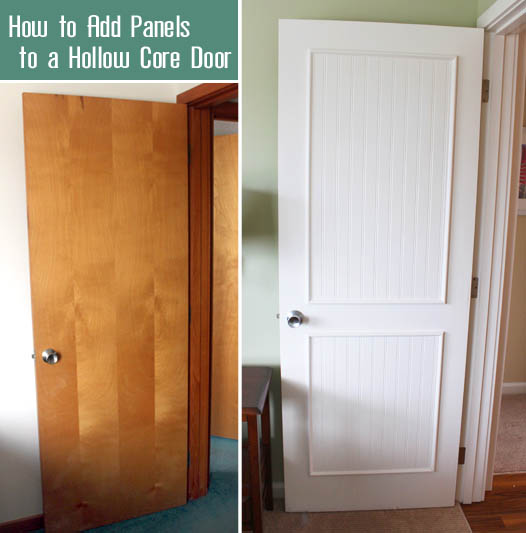
When my sister brought me on to the Topsail Beach condo renovation, she had a laundry list of DIY projects she wanted me to complete. One of them was dressing up the hollow flat doors with moulding panels. She showed me a pin that led to One Life to Love’s DIY beadboard panel doors. After seeing the photo, I knew it would be a great DIY upgrade to make. But, we decided to use real beadboard (instead of beadboard wallpaper) because it had to hold up to the stress of being a rental.

To Begin:

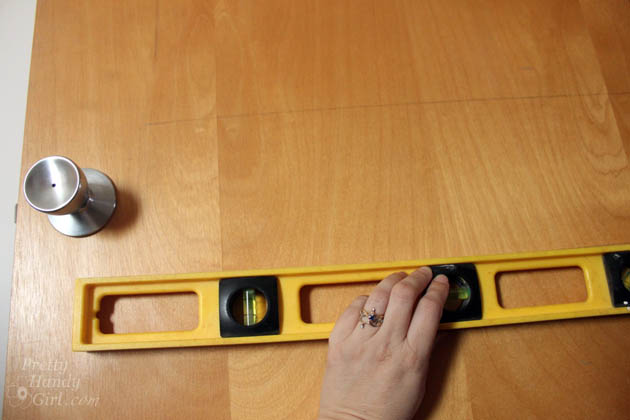
Start by measuring and marking the doors to determine the size of your panels.

How to Add Panels to Flat Hollow Core Door | Pretty Handy Girl

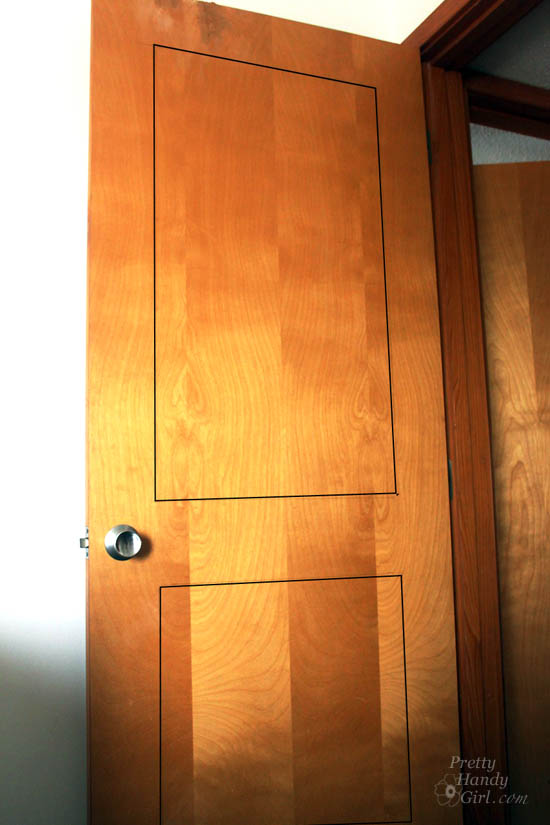
Draw lines 5″ in from the top and two sides of your door.  Draw the bottom line  6″ up from the bottom. Finally, leave 5″ between the top and bottom panels.

How to Add Panels to Flat Hollow Core Door | Pretty Handy Girl

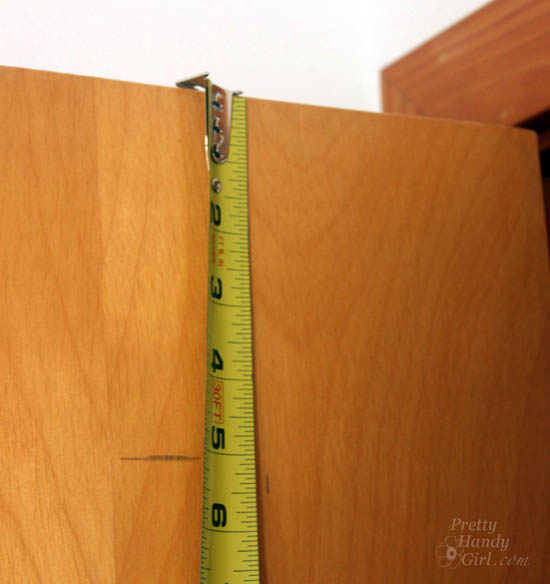
When marking your doors, use a pencil and level to draw your lines.

How to Add Panels to Flat Hollow Core Door | Pretty Handy Girl

After we had our panel measurements, Caitlin and I headed to Lowe’s. But, she refused to push me in the cart (party pooper!)

DIY Add Molding Panels Flat Door

We pulled some 4′ x 8′ beadboard panels and took them to the lumber cutting area. We gave the Lowe’s employer our measurements and asked him to cut the boards for us. While he cut our beadboard, Caitlin and I gathered the rest of our supplies.

Materials: Read more

Make a Tray from a Cabinet Door | Pretty Handy Girl

Make a Tray from a Cabinet Door | Pretty Handy Girl

One of my favorite places to thrift shop is the Habitat ReStore. I mean, where else can you find cool $2 cabinet doors?

Make a Tray from a Cabinet Door | Pretty Handy Girl

This fine cast off door is just screaming to be upcycled into a beautiful tray. Especially when the same thrifting adventure yielded VERY COOL door hardware! Simply combine the two and you have yourself a unique serving tray to give as a gift (or keep for yourself.)

Make a Tray from a Cabinet Door | Pretty Handy Girl

Materials:

  • Cabinet door
  • Door handle or cabinet handle
  • Wood putty
  • Putty knife
  • Ruler
  • Pencil
  • Drill
  • Drill bits
  • Screwdriver bit
  • Rubber bumpers

Optional: Rub n’ Buff Gold Leaf

The steps are super simple. Read more

Reinforcing You Door is Easy

Reinforce an Entry Door

Burglar proofing your home is easy. Especially f you have a gazillion dollars to hire security guards, attack dogs and a web of lasers. Ahh, to dream a dream. But, for those of us who actually have a budget there’s a quick solution. And it’ll help you sleep a lot easier at night.

Having a home invasion is nerve wracking to say the least (yes, I’ve experienced this), I understand the fear many homeowners face:

A  passionate desire to keep our family safe from all the badness in the world.

Think about this, in many instances the only things stopping a robber from kicking open your front door are 1/2 inch screws, some thin metal (in the form of hinges and  strike plates), and at best a wimpy 1 inch piece of wood called your door jamb. Um, I think my 74 year old dad could kick open most people’s doors.

Today I’ll walk you through the installation of EZ Armor (affiliate link). And How to Reinforce an Entry Door and Make it Burglar Proof!

EZ Armor is a door reinforcement kit you can buy for $69. You need limited tools and 15 minutes.

Here’s a supply list to help you get started:

(I’ve included affiliate links for your convenience. I earn a small percentage from a purchase using these links. There is no additional cost to you. You can read more about affiliate links here.)

I promise you’ll boost your home’s safety by leaps and bounds by using EZ Armor. It only take a few minutes to understand why.

The EZ Armor kit I bought came with the following accessories:

  • Jamb shield (1)
  • Hinge shields (2)
  • Door shields (2)
  • 2 1/2 inch screws (4)
  • 3 1/2 inch screws (17)

Reinforce an Entry Door and Make it Burglar Proof

Okay, if you’re an excitable DIYer like me you might dive right into the installation. You can watch the video or read the photo tutorial below:

Read more

Trim a door with a power planer

Trim a door with a power planerDoors that rub the floor or jamb are flat out annoying. This problem is typically fixed by tightening or shimming hinges. But sometimes the door just needs to be shaved down a tiny bit and this can be accomplished by using a power planer. The Ryobi planer used in this tutorial is cheaper than pair of Nikes. You can find a factory reconditioned one on Amazon for $35 (buying factory reconditioned tools is a great way to save a ton of money :-)).

Today you’ll learn how to trim the bottom or top of your door. It’s simple, straight forward, and will save you at least $50-$75 (the cost a carpenter or handyman would probably charge).

Here are the supplies you’ll need to trim any wood door (hollow or solid core): Read more

How to Install Window Trim

Hi everyone, I’m Cristina from Remodelando la Casa, and I’m beyond excited to join the team of Pretty Handy gals and guys!  I’m still pinching myself at such a wonderful opportunity.

Today I’m going to show you a fairly easy way to transform your builder grade windows from plain and boring to beautiful with loads of character and with a more finished appearance.

trimmed left window lg

Right now I’m working on updating my bedroom, where I have a couple of these windows.

small window sills lg

 They look  like they are wearing skirts, but forgot to put on the tops! 🙂  Yeap, naked!

plain builder's windows lg

Let’s change that by dressing up those windows! Read more