Birch Tree Pillow

Birch Tree Pillow

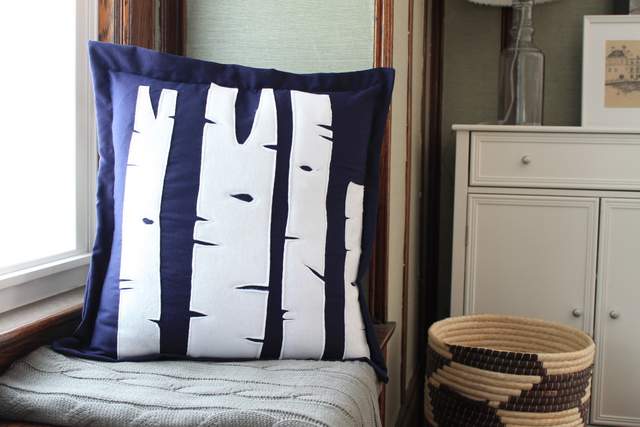
One thing that gets me ready for the fall season is to bring natural elements into my home. Although, they don’t actually have to be real, you can create them with some fabric and a little sewing. I’ve wanted to change up the pillows in our living room for a while, and these birch tree pillows are the perfect touch for fall. They are super easy to make, without any special tools!

I made these with fabric I had on hand and 20″ pillow forms, however you can adjust the size based on pillow forms you have. I also made them with a 1″ “trim” around the edges as an envelope cover (meaning the pillow form slips inside the cover without the use of a zipper.)

Materials

  • Fabric in your choice of color for the pillow base
  • White felt for the trees
  • Measuring tape
  • Scissors
  • Pencil
  • Fabric glue, optional
  • Sewing machine
  • 20″ pillow form

Instructions

1. Prepare the fabric to sew it into a pillow cover by cutting a piece that is 21 1/2″ x 45″ long. This shape will make up the front of the pillow and overlap in the back to form the envelope. Iron the cut piece to remove any wrinkles.

Birch Tree Pillow

2. Sew a hem on both of the shortest 21 1/2″ ends so you have a nice finished seam on each. You will see one of these from the back of the pillow.  Set this piece aside for the moment.

Read more

Benjamin Moore Yellow Highlighter Painted Interior Doors | Pretty Handy Girl

Benjamin Moore Yellow Highlighter Painted Interior Doors | Pretty Handy Girl

I painted my interior front doors Benjamin Moore’s Yellow Highlighter. It’s my way to start my day off on the right foot. When I get up in the morning and head downstairs, I see my front doors and immediately Good Day Sunshine starts to play in my head!

Let me tell you how this happened. Remember when I was in the middle of the DIY project from HELL?! I tried to paint our front doors on the outside and the paint was peeling off. I wanted to curl up in a ball and cry. I wanted to run down the street screaming. Instead, what did I do? I decided to create a cheerful view when I go downstairs every morning. I put stripping the outside of the doors on hold for a day or two and focused my efforts inside.

Benjamin Moore Yellow Highlighter Painted Interior Doors | Pretty Handy Girl

The solid wood doors are original to our house and had cracks in them.

Benjamin Moore Yellow Highlighter Painted Interior Doors | Pretty Handy Girl

Instead of replacing the doors, I fixed them by scraping the edges until they were smooth and devoid of bumps. Read more

interior cedar shutters

Hello Pretty Handy friends, Jaime from That’s My Letter here today to share how to build functional interior cedar shutters using inexpensive AND readily available hardware.

I have been itching to build some cedar shutters for our living room for quite some time now.  I had two requirements: 1) they had to be completely functional to block out the hot summer sun (which also makes them great for privacy) and 2) use no fancy hardware.  I didn’t want to special order any shutter hardware and I like to build using readily available supplies.

interior cedar shutters partial open

You can find the cedar planks and hardware at your local home improvement store.  Ready to learn how to build the shutters and install these beauties?

interior cedar shutters closed 1

You can see just how much light the shutters will block out once closed.  I plan to keep the shutters open except during the extremely hot summer days.

interior cedar shutters front view

Interior cedar shutters make a great alternative window treatment if you’re not into fabric panels.  They truly are a statement piece (and hopefully distract from the fact that my windows don’t match!).  I also built the sliding door console last Spring, a link to all the details on that piece is in this post.

Materials:

  • cedar boards (1×6 and 1×4)
  • saw
  • nail gun
  • 1 1/4″ finish nails
  • 1×2 pine board
  • 2″ wood screws
  • drill & bits
  • pencil
  • measuring tape
  • wood putty
  • sandpaper
  • paint
  • hinges (pictured below) & screws

interior cedar shutters hardware

Hardware: (for one pair of shutters)

  • 2 – 2 1/2″ hinge (spray painted oil rubbed bronze) & 12 screws
  • 2 – 4″ decorative tee hinge & 12 screws

Instructions:

MEASURE YOUR INTERIOR WINDOW SPACE.  MEASURE IT AGAIN.  MEASURE IT AGAIN. The top of the window may vary from the bottom. Read more

How to Build Custom Rustic Crates | Pretty Handy Girl

How to Build Custom Rustic Box Crates | Pretty Handy Girl

Making custom rustic wooden box crates is super easy. You can build your crates to fit in a book case or use them as drawers in a cabinet. When I was giving my IKEA cabinet a makeover, I chose to remove a door and build custom box drawers instead.

How to Build Custom Rustic Crates | Pretty Handy Girl

Here’s the super easy tutorial so you can build your own:

Materials:
(some links are affiliate links)

Tools:

Instructions:

Begin by cutting the 1/2″ plywood into four pieces the size you want for your crate sides.

How to Build Custom Rustic Crates | Pretty Handy Girl

Test fit the sides together. Add a line of glue to the ends of the plywood. Read more

Rustic IKEA Hack Cabinet Transformation | Pretty Handy Girl

Rustic IKEA Hack Cabinet Transformation | Pretty Handy Girl

Rustic is not usually a word used to describe IKEA. IKEA is better know for their modern furniture, simple lines, meatballs and funny Swedish words. Today I’m going to change how you perceive IKEA furniture forever! Are you ready for this? Well, hang onto your hästes (Swedish for horses) because you’re going to see a transformation nothing short of amazing! You too can customize your plain jane furniture by adding legs and cladding the exterior with reclaimed picket fence wood.

This tale starts with a hunter green stained IKEA storage chest that I bought for our first apartment and stained myself (can you tell what decade it was? Hint: hunter green, honey pine, throw some burgundy in there and I’m sure you’ll be guessing no more.) It moved from room to room each time we settled into a new home. But, it never really fit in.

ikea chest in guest room

The cabinet was short and not very deep. Plus, it bore the mark of the popular 90’s hunter green. It was ugly. Why didn’t I get rid of it years ago? Maybe I was attached to it because it was the first piece of furniture I ever stained myself. And it brought back fond memories of calling the fire department because I smelled gas. Turns out you aren’t supposed to use an oil-based stain indoors, especially if you have a gas stove. Lesson learned.

Rustic IKEA Hack Cabinet Transformation | Pretty Handy Girl

Fast forward two decades and it’s still hanging around. The other day as I was lamented the fact that our foyer is too small to fit a cute dresser, I found myself looking at this sad little IKEA chest. I picked it up and put it in our foyer. The fit was perfect in the small space behind the front door! But, it was short and let’s not mention the hunter green again. Plus, it just wasn’t cute. And it doesn’t reflect my warm and weathered style. But, you know me, I wasn’t deterred.

I did some mental gymnastics and began to hatch a plan to create a marriage that would last longer than two decades.

Old picket fence pieces

It began with some pieces of old picket fence that I found by a dumpster. They were perfectly chippy and rustic! Luckily the 3M Lead Check results were perfectly negative. I carefully took the fence apart and removed all the nails.

Lead check picket fence paint

Ready to see how I convinced the two polar opposites that they belonged together — rustic and modern — to create a match made in heaven? Let’s explore this couples’ counseling further:

Read more