Hang Stockings Without a Mantel

Hang Stockings Without a Mantel

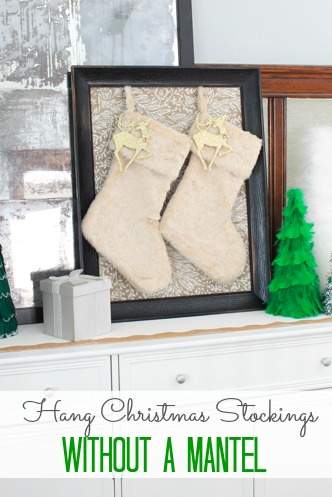
Hello, it’s Jessica here from Decor Adventures, back this month with a simple solution for holiday decorating. These days we see all kinds of lovely homes with Christmas stockings hung beautifully from the mantel or staircase. But what if you don’t have either in your home? I’ve come up with an easy way to display stockings that you can put together in less than an hour. Here is how to hang stockings without a mantel – frame them!

Materials:

Hang Stockings Without a Mantel

  • Large empty picture frame
  • Foam board
  • Fabric
  • Chicken wire
  • Wire snips or sharp scissors
  • Gloves
  • Paint (optional)
  • S-hooks
  • Glazier’s points and tool (or a wide flat head screwdriver)
  • S hooks
  • Stockings

Instructions:

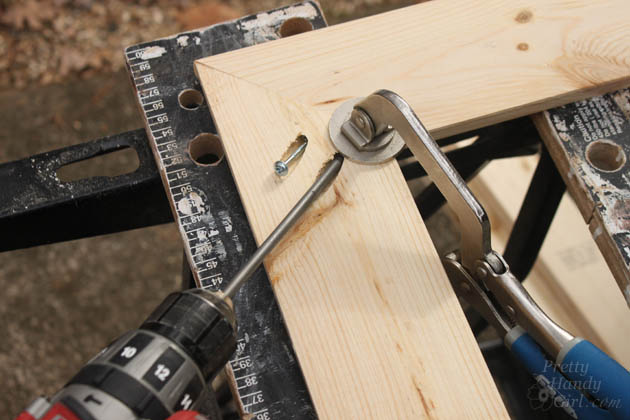
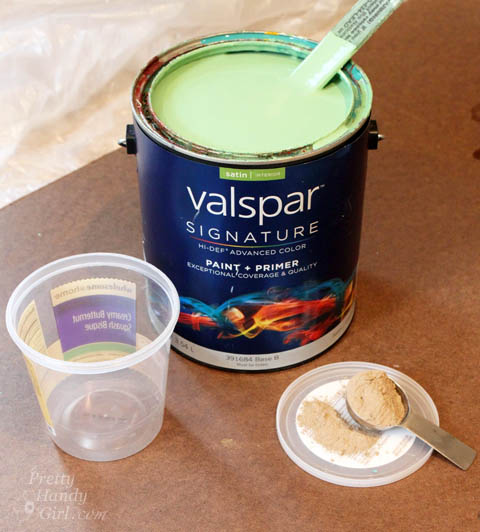
1. For this project you’ll use a large empty picture frame that doesn’t have glass. You can find them at thrift stores, craft stores, or just reuse one of your own. You can paint or stain the frame to your liking, but that is optional depending on your style.

2. Cut a piece of chicken wire one inch larger on all sides than the inside of your frame where the glass would rest. Make sure to wear gloves for this part as the wire can be sharp. Most chicken wire comes with natural lines where the wire is twisted. You can use those as your edges. If you want to spray paint the wire to blend in, that would create a nice look too.

Hang Stockings Without a Mantel

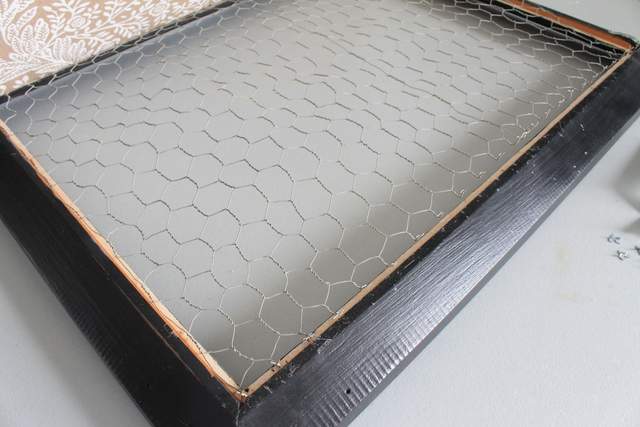
3. Place the frame front side face down on a table and insert the wire into the back of the frame. Set that aside for the moment. Read more

Build Your Own Giant Chalkboard | Pretty Handy Girl

Build Your Own Giant Chalkboard | Pretty Handy Girl

Have you scoured antique stores or Craig’s List looking for a big giant vintage chalkboard? Those vintage school green chalkboards are highly sought after. But, hard to find. I have good news for you! You can build a Giant Chalkboard any size you want! (Although, typically you’ll be restricted to 4′ x 8′ if you want to use a sheet of masonite.) And you can mix your own chalkboard paint in any color.

Take out your notebooks, your pencils, and get ready to take notes.

Materials:

  • Masonite sheet cut to desired size (mine is 22″ x 48″)
  • 1×4″ pine boards for frame
  • 1 cup flat latex paint in color you desire
  • 2 tbsp. of unsanded grout
  • Pencil
  • Stain
  • White paint
  • Paint brush
  • Sanding block
  • Container to mix paint in
  • Kreg Jig
  • Drill
  • 1 1/4 inch pocket screws
  • Staplegun
  • 1/2″ staples

Instructions:

Build Your Own Giant Chalkboard | Pretty Handy Girl

Pour 2 tbsp. of unsanded grout into your empty container. Add 1 cup of flat latex paint and stir well. (Yes, I used satin and it still worked.)

Build Your Own Giant Chalkboard | Pretty Handy Girl

Paint the masonite with the chalkboard paint. Pull your brush in one direction. Then smooth out the paint by dragging the brush in a perpendicular direction.

Build Your Own Giant Chalkboard | Pretty Handy Girl

Let the paint dry. Lightly sand and add a second coat of chalkboard paint.

Build Your Own Giant Chalkboard | Pretty Handy Girl

Let that coat dry and sand smooth.

Assembling the chalkboard frame: Read more

snowglobe ornament

Jaime here today from That’s My Letter and it’s officially holiday prep time!  Today I’m sharing a DIY snow globe ornament with a wood base that makes a perfect gift for anyone big or small.

This snow globe ornament is constructed on a wood base where all the interior pieces can be glued to the base and then the clear globe is placed over the scene.  The globe is plastic and the entire ornament is very lightweight so it won’t weigh down your tree branches!

snowglobe ornament 4

You can put nearly anything inside the snow globe as long as it fits under the dome.  I used bottle brush trees, wire candy canes and a wood dowel sign with the family name printed on cardstock.  Add a little faux snow and you have the cutest little winter scene.

snowglobe ornament 2

The faux snow will cover any unsightly hot glue and adds just that tiny bit of sparkle.

snowglobe ornament 3

Add a small wood ball on top to compliment the wood base with a string for hanging and you have a keepsake ornament that will look beautiful on or off the tree.

snowglobe ornament 1

Materials:

snowglobe ornaments supplies

  • 3″ clear plastic craft ornament
  • 2″ circle (cut from cardstock, only used as a template)
  • 3″ wood square (1/4″ plywood)
  • mini pom poms
  • mini wire candy canes
  • mini bottle brush tress
  • 1/8″ dowel
  • small wood balls with hole in center
  • red string
  • white glue
  • paint brush
  • faux snow
  • x-acto knife
  • sandpaper
  • hot glue gun & glue sticks
  • scissors
  • pencil
  • black sharpie marker

Instructions:

Step 1: Using an x-acto knife cut around the ornament opening enough to remove the neck portion.  Don’t worry about being neat here the goal is to remove the neck and have a wide enough opening for scissors. Read more

Screen Porch Decorated for Fall | Pretty Handy Girl

Fall Accessories for the Screen Porch | Pretty Handy Girl

This fall I’ve spent a lot more time on our screen porch.  It all started with a new ceiling fan. We call it the trickle down effect in our house. You bring something new, nice and beautiful into a room and all of the sudden everything else looks old, dated and ugly. I often find myself wanting to give the whole room a new look. It’s a true “If You Give a Blogger a Cookie” problem.

Screen Porch Decorated for Fall | Pretty Handy Girl

Then I built a folding writing desk so I could work outside.  Now my family knows I’m most likely on the porch when they can’t find me in the house.

Folding Laptop Writing Desk | Pretty Handy Girl

Because Autumn had arrived, I decided to add some new colorful accents to the existing blue and white palette. A Target herringbone throw and feather pillow are a cozy invitation to kick up your feet and relax.

Screen Porch Decorated for Fall | Pretty Handy Girl

I rolled up the painted bamboo rug and replaced it with a simple sisal rug.

Screen Porch Decorated for Fall | Pretty Handy Girl

All the new pillows are from Target:

Screen Porch Decorated for Fall | Pretty Handy Girl

To play up the colorful accents, I filled a wooden vessel with colorful antique croquet balls.

Screen Porch Decorated for Fall | Pretty Handy Girl

This is definitely the spot to sit while the weather is still warm.

Screen Porch Decorated for Fall | Pretty Handy Girl

Unfortunately, we’re supposed to get an Arctic blast next week. You know I’m spending as much time this weekend soaking up the last of our North Carolina warm weather.

Screen Porch Decorated for Fall | Pretty Handy Girl

I hope your weather continues to be nice and you are enjoying being outside.

PHGFancySign

Make Your Own Mosaic Tile Lampshade | Pretty Handy Girl

Make Your Own Mosaic Tile Lampshade | Pretty Handy Girl

Want to make a lamp shade that will bring some style and bling to your home? All you need are a few mosaic tile sheets, a lamp shade top piece, and some thread. In no time you’ll have a beautiful Mosaic Tile Lamp Shade!

Materials:

(I’ve included affiliate links for your convenience. I earn a small percentage from a purchase using these links. There is no additional cost to you. You can read more about affiliate links here.)

Instructions:

Cut up the lamp shade to expose the top ring.

Make Your Own Mosaic Tile Lampshade | Pretty Handy Girl

This is what you should be left with:

Make Your Own Mosaic Tile Lampshade | Pretty Handy Girl

Lay out your mosaic tile sheets. Cut the mesh to the height you desire for your lamp shade. The lamp shade I created was small, therefore I only needed a 6 inch height to cover the lamp bulb.

Make Your Own Mosaic Tile Lampshade | Pretty Handy Girl

Lay two sheets of the tiles side by side and stitch the two sheets together at the seam from the mesh side.

Make Your Own Mosaic Tile Lampshade | Pretty Handy Girl

Wrap the tile sheet around the lamp shade top ring and trim the excess tiles off.

Make Your Own Mosaic Tile Lampshade | Pretty Handy Girl

Stitch the open ends together. I found it easiest to slip a paper towel roll into the center to support all the tiles while stitching it.

Make Your Own Mosaic Tile Lampshade | Pretty Handy Girl

Stitch the lamp shade ring to the top of the mosaic tile tube. Loop the thread through the tile mesh and the lamp shade ring around the entire circumference.

Make Your Own Mosaic Tile Lampshade | Pretty Handy Girl

Your lamp shade should look something like this:

Make Your Own Mosaic Tile Lampshade | Pretty Handy Girl

Attach your lamp shade to the lamp and admire!

Make Your Own Mosaic Tile Lampshade | Pretty Handy Girl

Lights out…

Make Your Own Mosaic Tile Lampshade | Pretty Handy Girl

…and lights on. I love the shadows cast by the tile lampshade.

Make Your Own Mosaic Tile Lampshade | Pretty Handy Girl

Enjoy a unique and beautiful lamp shade in your home. The mosaic tile lamp shade adds a touch of class and bling to our mudroom.

Make Your Own Mosaic Tile Lampshade | Pretty Handy Girl

page_break_2

Want more creative lighting ideas?  Subscribe to the Lowe’s Creative Ideas magazine:

Fall14-Blogger-Subscribe-Banner-392x140

Or view more creative ideas from the Lowe’s Creative Idea bloggers !

There’s also a magazine app so you can have inspiration on the go! And, don’t forget to follow Lowe’s on Pinterest or on Instagram!

PHGFancySignDisclosure: As a #LowesCreator, I was provided with a Lowe’s gift card to purchase supplies for this post. I was not told what to write. All ideas and words are my own.