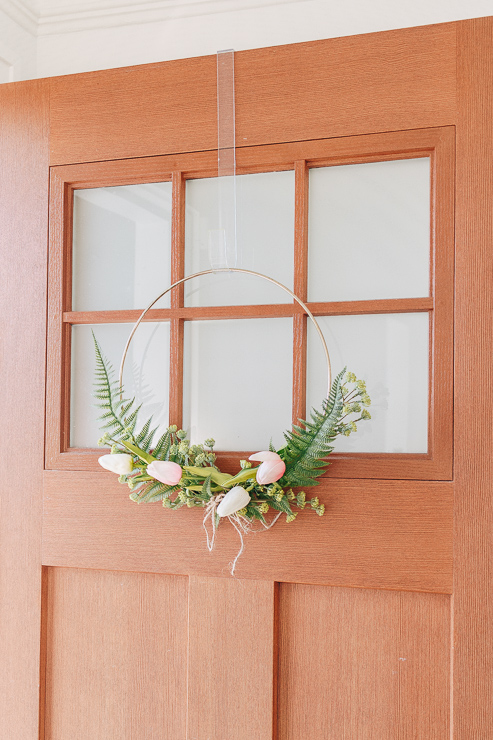
Hello! I’m so excited to be here to show you how to bring a little Spring into your home. I’m betting we all need a little Spring at this point in the year. After two back-to-back snowstorms and weeks of frigid temps here in Seattle — I’m so ready for it! A great way to bring beautiful spring vibes into your home is with this DIY modern hoop wreath.
I love creating modern hoop wreaths because they are so fun to create and one of my favorite DIY projects ever! Not only do they look beautiful – they are easy on your wallet since you don’t need much to assemble one. Hoop wreaths can be made for any season or holiday, so let your imagination run wild with ideas!
Today I’m going to show you how to make a floral version of a modern hoop wreath —perfect for Spring. Let’s get started!
Materials :
(I’ve included affiliate links for your convenience. I earn a small percentage from a purchase using these links. There is no additional cost to you. You can read more about affiliate links here.)
Faux Greenery and Flowers – I used tulips, ferns and Queen Anne’s lace (Michael’s, Target, Joann Fabrics, Amazon and Afloral.com are good sources)
How to Choose Your Faux Greens and Flowers:
Before we begin, here are a few tips for choosing greens and flowers for the wreath. Hoop wreaths are particularly beautiful if either one main floral/greenery is used or when a collection of three different flowers are used together.
For this wreath, I used the rule of threes.
Assembling Hoop Wreaths:
First add greenery as a base on the hoop. Then add a secondary green or floral. Finally add your main florals on top for the true showstoppers. For example, this is the order we’ll assemble the Modern Spring Hoop Wreath:
A base of greenery – ferns
Secondary accent of greens or flowers: Queen Anne’s Lace
Main Florals – Pink and White Tulips
I find Michael’s and Afloral.com have the best selection and most realistic looking faux flowers and greenery. However, Target is also stepping up their game lately. These faux ferns and Queen Anne’s Lace were from Target’s Hearth and Hand collection and are very pretty and semi-realistic looking. (I tend to be super picky about my faux flowers!)
Instructions :
Step 1: Cut the leaves and flowers from your faux plants (if needed).
Snip off a few pieces of fern while leaving a little stem to attach to your hoop. It’s usually easier to snip off the individual leaves which will give you the most flexibility when designing your wreath.
Step 2: Arrange your greens on the hoop until you like the layout.
Step 3: Snip off a piece of wire and use floral wire to attach your fern/greenery to the hoop.
Bend and train the greenery as you wrap it with wire. Luckily the wire is thin and can be easily hidden with the greens and/or flowers. But, you will need to wrap it fairly tight to keep the greenery from moving when the wreath is hung up.
Step 4: Repeat Steps 2-3 again, using the secondary flowers or greenery.
Tuck the Queen Anne’s lace around and on top of the ferns. It’s really coming together now!
Step 5: Add the main florals – these beautiful spring tulips!
Use your floral wire to attach the stems to the hoop wreath, and then use the greenery you attached earlier to hide the wires. It works perfectly every time. You may have to play with it a bit until the wires are hidden, but no one will notice once you do.
Step 6: Tie a little bow of jute twine around the center for a sweet rustic finishing touch.
The jute bow helped hide more of the floral wire and gives the wreath some extra holding power.
That’s all there is to it!
Tips for Hanging and Displaying your New Wreath :
Modern hoop wreaths can be hung with the flowers on the side or at the bottom. You can use a wreath hanger or a Command light clip. The light clips hold these hoops perfectly and are clear, so you can’t see them. You can also use a suction cup hook or a magnetic hook if you have a metal door. Or tie a pretty ribbon to these wreaths and hang them from the ribbon. I purchased a clear wreath hanger from Amazon that hooks over the door. These wreaths look beautiful not only on your front door but also on your interior walls, closet doors, hutches, over mirrors etc.
Feel free to get creative with placement and add some spring to all parts of your home!
When you are ready for a change, simply snip off the wire and reuse your greenery and florals for another project. These modern hook wreaths end up being a very cost effective decor project.
I hope you all enjoyed this tutorial. I’m looking forward to connecting with you again next month!
Hello! I’m Karen, the creator of the Home Decor and DIY Blog: Decor Hint . I’m a Native of the East Coast, but I currently live in beautiful Seattle with my hubby, our two wonderful children and our spunky wheaten terrier.
You can usually find me with some sort of craft in one hand and a coffee in the other. And I’m always rearranging furniture or moving lamps from room to room. I have a passion (read: obsession) for decorating, DIY, and gardening. In short, I love making my house into a home.
Like many, I’m inspired by what I see in home decor magazines, but I’m not so inspired by the price tags. Consequently, I love finding and creating beautiful budget-friendly home decor items. In a head to head competition, I bet you’d never know the difference between the designer items and my DIY creations! Many of my DIY projects focus on sewing, crafting, upcycling and organizing. Some of my favorite projects have been making pretty wreaths , sewing my own tassel hand towels, and crafting these trendy wood bead garlands . I can’t wait to inspire you and spark your creativity through my DIY projects.
https://prettyhandygirl.com/wp-content/uploads/2019/03/Modern-DIY-Hoop-Wreath.jpg740493Karen Decor Hinthttps://prettyhandygirl.com/wp-content/uploads/2021/07/PHG-logo-tagline-2020-1030x211-R.jpgKaren Decor Hint2019-03-27 07:00:212019-03-26 21:54:24DIY Modern Hoop Wreath for Spring
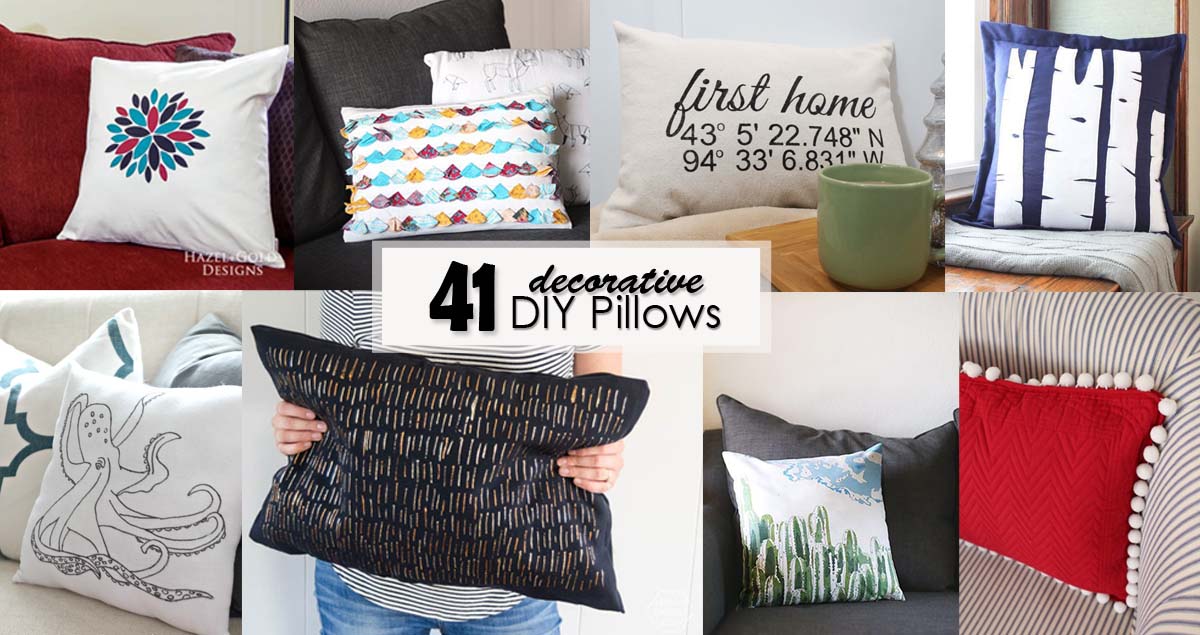
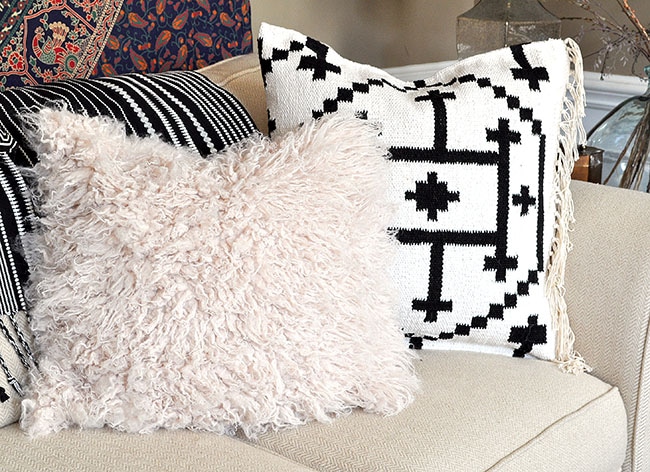
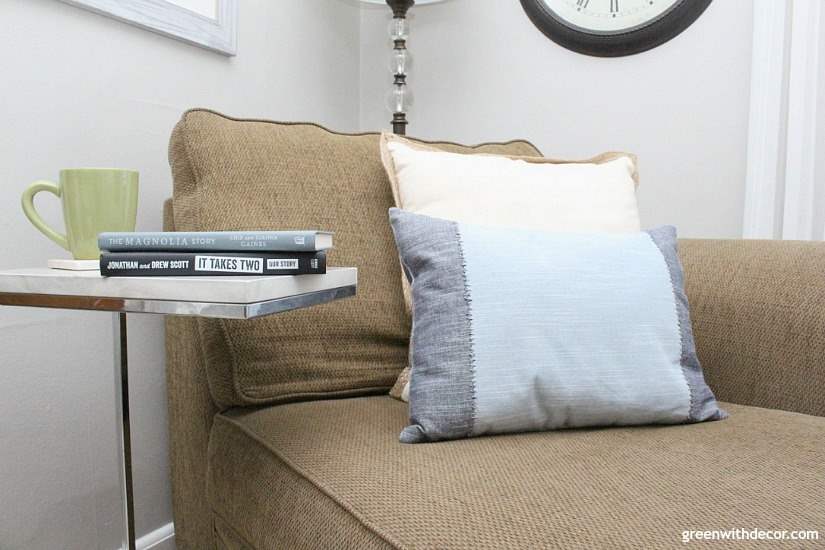
If you are looking for a quick and easy way to update any room in your house, change out your pillows! Pillows are easy to add, move, re-cover, or take to another room. They are used for adding texture, pattern, and warmth to your space (and let’s not forget comfort). Here are 41 Decorative DIY Pillows that will inspire you to make some beautiful pillows for your home.
I hope you were able to find some inspiration for making custom and fun DIY pillows for your home. It’s a great change to make a big impact in a room without spending a lot of time or money. if you like this collection, please share on Pinterest by pinning this image:
Thanks so much for reading! I’d love to hear what you think or what kind of pillow you’d like to try to make!
Hi, I’m Sheri from Hazel + Gold Designs. Here are a few fun stats about me: I like love chocolate and peanut butter (together of course.) If you like stats, I have been crocheting for about 16 years, crafting for 20, and woodworking for about 4 years. I found a passion in making and being creative and began documenting my projects online at Hazel + Gold Designs.
When not working on projects, I enjoy spending time with my husband, four children, perfect dog, and ornery cat. You can find me on Facebook, Pinterest, Instagram and Twitter.
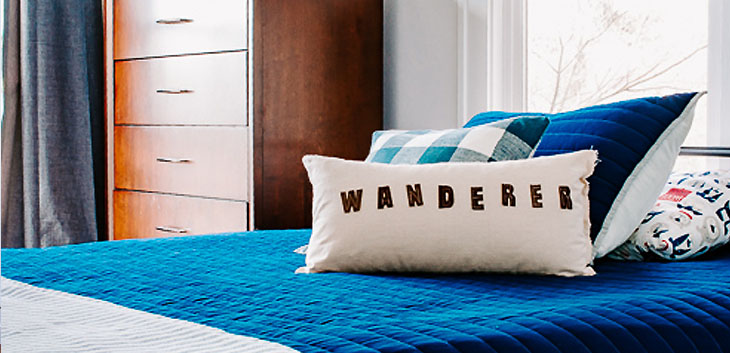
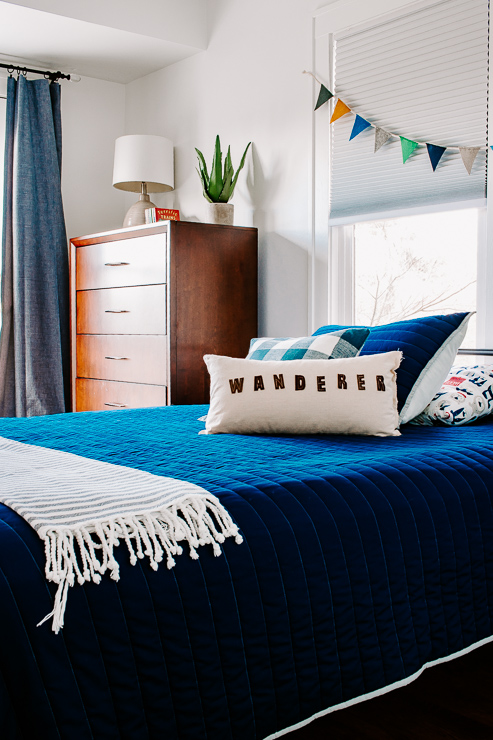
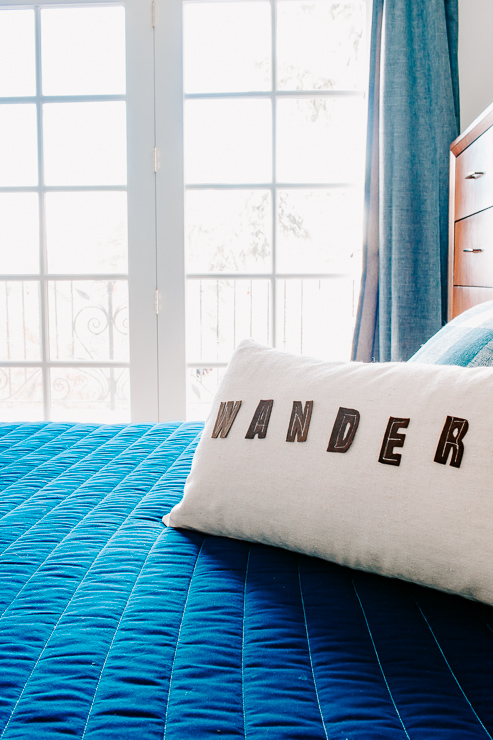
Friends! I’m so excited to be back today with a new project for you, a DIY felt letter pillow cover. One of my favorite things to do is to scour home decor stores for inspiration for my kids’ rooms. I love trying to recreate trendy looks for my home, but on a budget. Today’s project accomplishes this goal! I’ve seen some really cute letter pillow covers and I knew I could DIY one myself. Originally I made one for my son’s room. It turned out so well that my daughter requested one for her room too. Lucky for you, a sewing machine is optional – so this project is for truly for anyone who wants to make their own Felt Letter Pillow Cover.
Let’s get started!
Materials:
(I’ve included affiliate links for your convenience. I earn a small percentage from a purchase using these links. There is no additional cost to you. You can read more about affiliate links here.)
Step 1: It’s helpful to type up and print out a word template for this project or use letter stencils. It’s not totally necessary, but when tracing your letters onto the felt it helps keep all the letters relatively uniform.
Making Your Word Template:
Open up Word or Google Docs and type out the word you want. Add a space between the letters. (I used the Impact font at font size 150pt for this project.)
You can make your letters bigger or smaller. Just be aware, it gets a little tricky to cut out smaller letters. Cut your letters out of your template and let’s move on to the next step.
Tip: If your word contains more than one of the same letter – you only need to cut that letter once. For instance – WANDERER has two E’s and two R’s, but I only needed one template for each letter because I could use the same one to trace two letters. This should save you a few minutes.
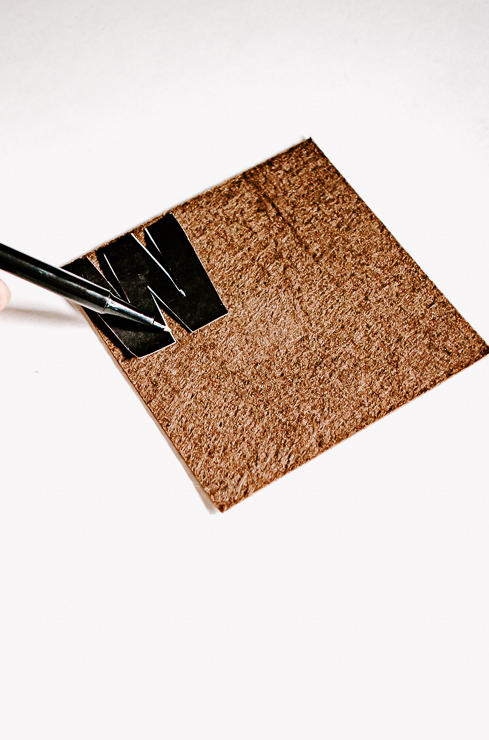
Step 2: Trace your letters onto the felt using your stencil or cut out letters (or draw them freehand if not using a template).
You can use pen, chalk, or pencil to trace. Just make sure you can see the lines so you can cut them out.
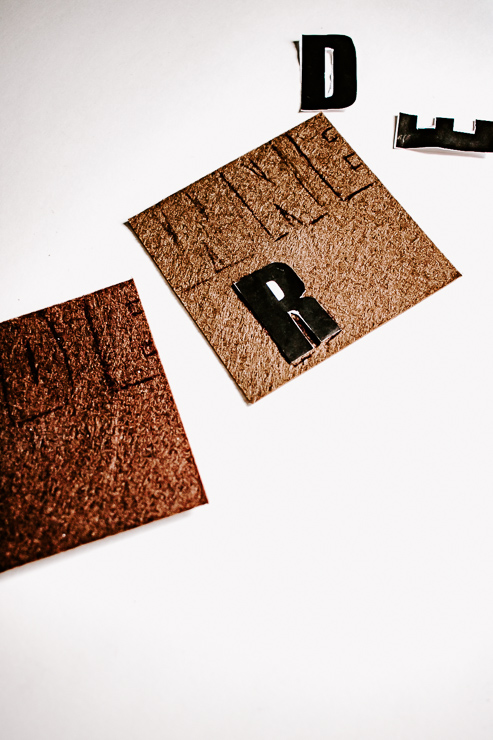
Step 3: Cut out your letters using scissors.
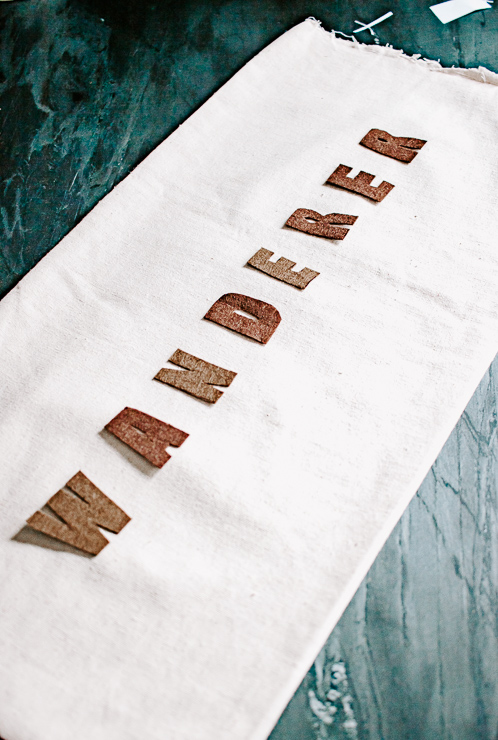
Step 4: Space your felt letters onto your pillow cover. (I made a lumbar pillow cover from canvas drop cloth for this project, but you can also buy a plain cover.) It’s helpful to play with the placement and see where you want to start the word on your pillow cover.
Attaching the Letters:
Sewing – Pin your first letter to the pillow cover. Hand sew or use your sewing machine to sew the letter onto the cover. You can use matching thread or a different color to give it more of a rustic vibe. My thread was white on brown felt.
Fabric Glue – Glue your felt letter to your pillow cover.
Step 5: Continue to sew or glue the rest of your letters onto your pillow cover.
Step 6 : After you finish sewing on the letters, cut off any loose strings. If you used fabric glue, you want to let this dry for 24 hours before attempting to wash it. (Please refer to the instructions on your specific fabric glue. )
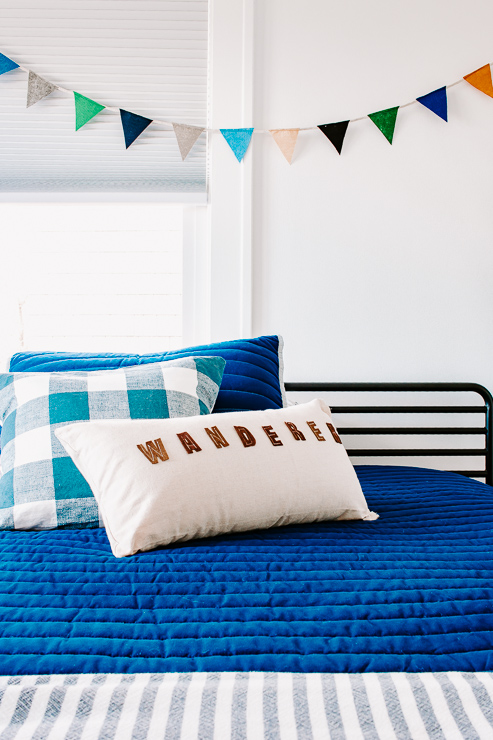
Step 7 : Insert your pillow form into your new cover.
All done! This looks fantastic, don’t you agree?!
I have seen these letter pillow covers in stores for over $25! Yet, I was able to make this knock off for less than $5 with a simple DIY canvas pillow cover and some inexpensive felt.
I love the way this pillow turned out. As I mentioned, my daughter requested one for her room. (Although she’s having a little trouble choosing which word she wants!) So far she’s come up with: Cupcake, Ice Cream, Unicorns – she can’t decide.
This project would also be cute as a personalized pillow cover. Or make it as a gift for someone who has young children. It’s the perfect touch for a nursery or kids room.
Another idea would be to create one for each holiday: Halloween, Thanksgiving and Christmas are great occasions to display a felt letter pillow.
I hope you guys enjoyed this tutorial for a DIY felt letter pillow cover. You might also like to learn how to sew a rope basket at Decor Hint (where I blog regularly).
Hello! I’m Karen, the creator of the Home Decor and DIY Blog: Decor Hint . I’m a Native of the East Coast, but I currently live in beautiful Seattle with my hubby, our two wonderful children and our spunky wheaten terrier.
You can usually find me with some sort of craft in one hand and a coffee in the other. And I’m always rearranging furniture or moving lamps from room to room. I have a passion (read: obsession) for decorating, DIY, and gardening. In short, I love making my house into a home.
Like many, I’m inspired by what I see in home decor magazines, but I’m not so inspired by the price tags. Consequently, I love finding and creating beautiful budget-friendly home decor items. In a head to head competition, I bet you’d never know the difference between the designer items and my DIY creations! Many of my DIY projects focus on sewing, crafting, upcycling and organizing. Some of my favorite projects have been making pretty wreaths , sewing my own tassel hand towels, and crafting these trendy wood bead garlands . I can’t wait to inspire you and spark your creativity through my DIY projects.
https://prettyhandygirl.com/wp-content/uploads/2019/02/wanderer-felt-pillow-feature.jpg353730Karen Decor Hinthttps://prettyhandygirl.com/wp-content/uploads/2021/07/PHG-logo-tagline-2020-1030x211-R.jpgKaren Decor Hint2019-02-27 07:00:472019-02-26 14:39:53How to Make a Felt Letter Pillow Cover
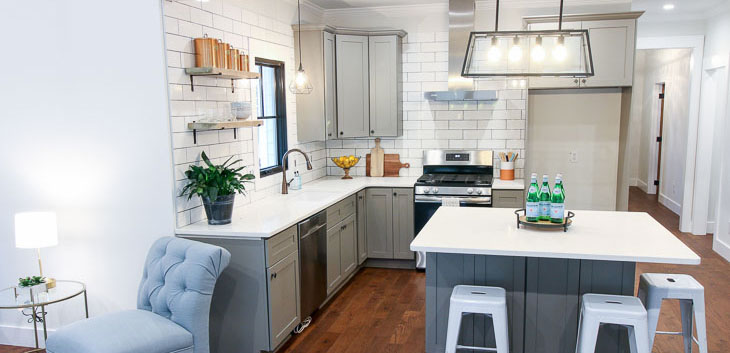
Thank you all so much for your patience with me as I put together the final Saving Etta updates. I have more to come, but for now I know you’re anxious to see the Saving Etta kitchen reveal. Get settled down with a nice cup of coffee or hot chocolate because there are many photos coming your way!
Before I show you this beautiful modern farmhouse kitchen, I want to thank the Saving Etta sponsors who made it all possible!
Plygem, Broan-Nutone, Impressions Hardwood Collection, Leviton, Ask for Purple Drywall, Wood It’s Real, STIHL, Schlage, Duluth Trading Company, Magnolia Home Paint, KILZ, Jeffrey Court Tile, The Builder Depot, Wilkinson Supply Co., Designer Drains, Liberty Hardware, and Ferguson Bath, Kitchen & Lighting Gallery
My Big Fat Crazy Push to Finish
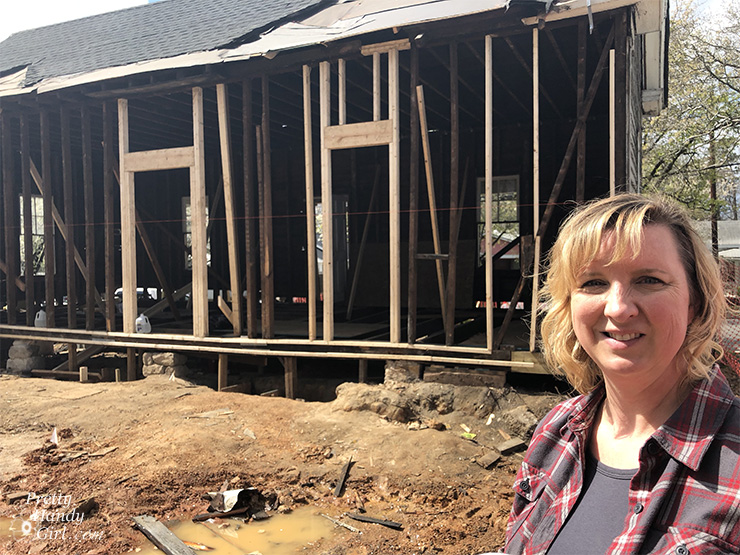
Remember when I told you I was on a tight deadline? In early October, I had an inkling that I needed to get the house finished and listed for sale within 6 weeks. My husband thought I was crazy (and in hindsight I probably was). Market strategists had been predicting a downturn in the fourth quarter of 2018 and I could tell things were starting to get inflated near downtown Raleigh. Surrounding homes were selling for more and more since I bought Etta in May of 2017. I felt a strong need to get the house on the market before things slowed down for the holidays. This meant a final push and a self imposed crazy work schedule for me.
My day started at 5am to shower, eat, and get my sons out the door. We’d leave the house at 6:45 to drive my eldest to school. After dropping him off I’d head downtown. By 7:30am I’d arrive at the house and get straight to work planning out the tasks for the day. My subcontractors usually showed up at 8:30 or 9 am. They took a break for lunch but then got back to work until about five o’clock. By then, it was solidly dark and my subs headed home to their families. I usually worked until about 8 or 9 pm and grabbed dinner at one of several fast food restaurants on my way home.
Once home I had just enough time to answer emails and throw some tools and materials in the truck for the next day. The good part about my crazy schedule was I usually fell asleep easily after a long day’s work. The bad part was I packed on about ten pounds eating mostly fast food (even though I rarely sat still all day).
Lest you think I was working inside a cozy climate controlled house, I wasn’t. It was early November and the cold weather had set in. I bundled up and warmed myself in front of the space heater from time to time. I even bought a little used Keurig single serve maker to be able to drink warm coffee and tea. We didn’t get the gas meter hooked up and approval to run the heat until the day before the open house (almost a month after tiling the backsplash.)
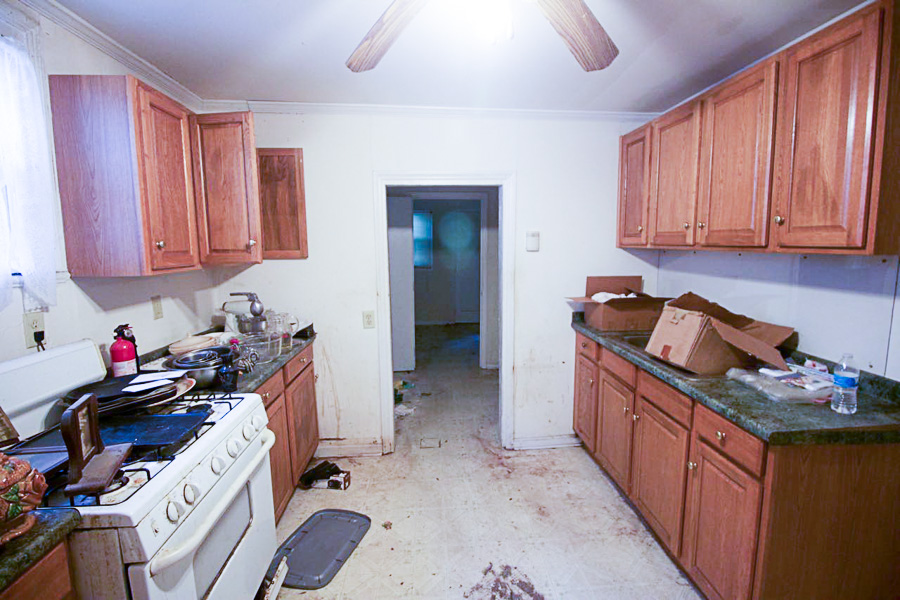
Was it all worth it? Absolutely! The house turned out amazing and I was pleased with the final results. And just a little reminder of what the kitchen looked like when I bought the house (you can see more progress shots in this kitchen update post):
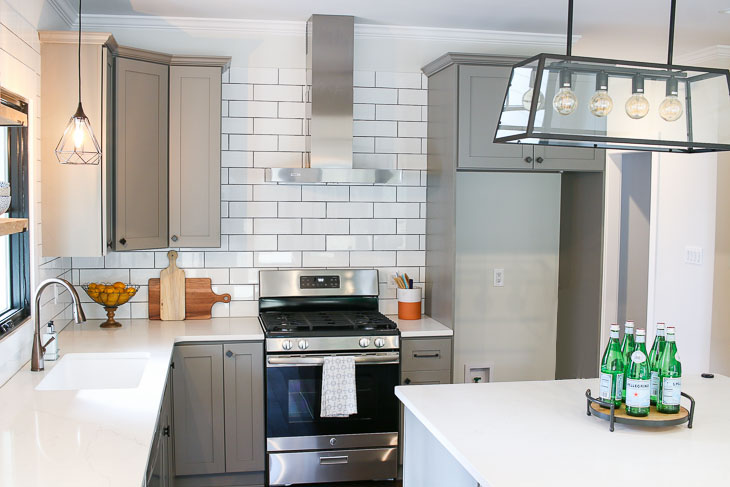
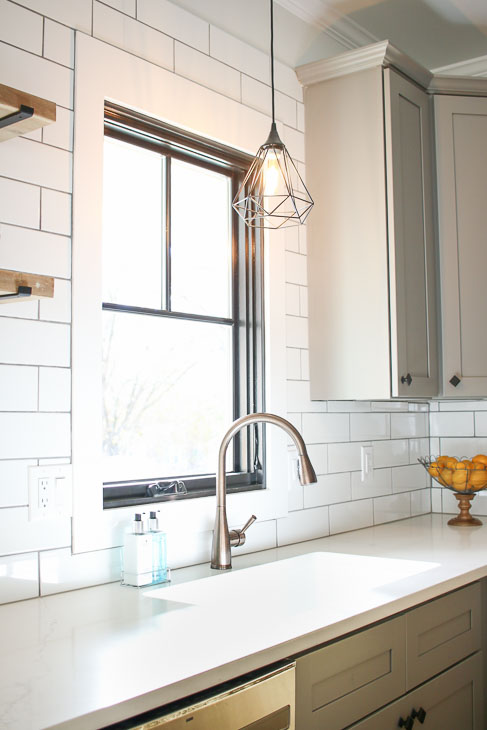
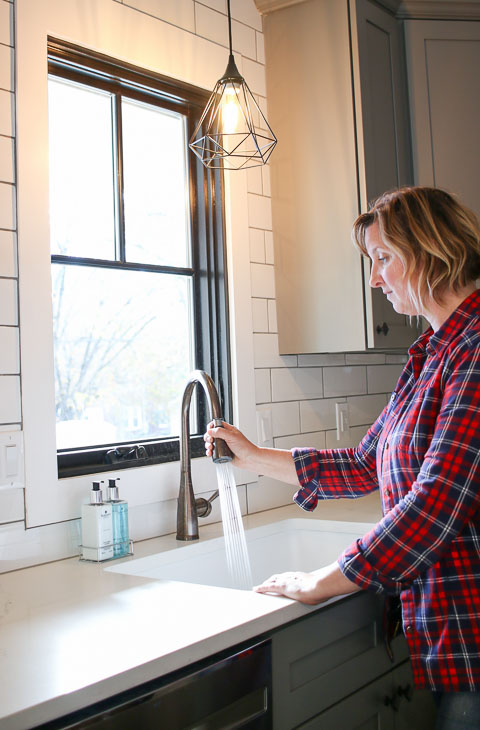
This kitchen sink, faucet, pendant light, and the window brought me joy, partly because they all lined up perfectly! Anyone who does kitchen renovations knows it can be hard to center all these elements with each other during the rough in stage without the cabinets or countertops in.
As I mentioned the other day, the pendant light was a swap I made after the first light wouldn’t cooperate. I took down the first pendant light and replaced it with this modern geometric pendant and pendant light kit from Lowe’s. I really like the open cage, no glass shade to clean!
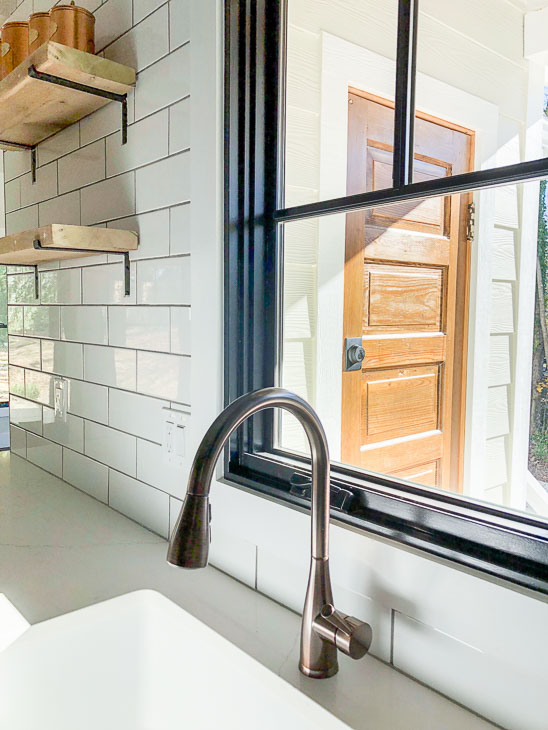
Just outside the window is one of the reclaimed doors I saved from a series of 1890-1920 houses that were slated for demolition. Behind the door is a little shed off the side porch. It’s nice being able to gaze on that gorgeous wood door while at the sink. Plus, the homeowners can see anyone pulling in the driveway from here.
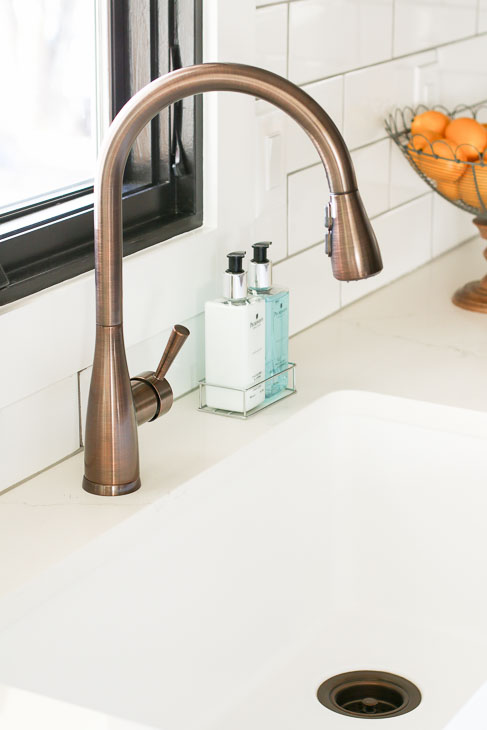
You may have noticed that beautiful faucet! It’s a: Mirabelle Calverton Pull Down Faucet in oil rubbed bronze. The finish on this faucet is beautiful and unlike anything I’ve seen before. Ferguson Bath, Kitchen, & Lighting Gallery stocks the Mirabelle line of kitchen and bath products (and provided the faucet and sink for the Saving Etta kitchen). If you’ve never been to a Ferguson showroom, you have to go! Especially if you are getting ready to remodel your kitchen, bathroom, or build a new house.
The sink is a Mirabelle Totten Single Bowl Granite Composite Sink (also available from Ferguson Bath, Kitchen, & Lighting Gallery). The granite composite is definitely a material I wasn’t familiar with. It has a very slight texture but looks like a cast iron farmhouse sink. Luckily it’s not as hard or as heavy as cast iron. Which makes it easier to install and more forgiving if you drop a glass or dish in the sink.
When I was finishing up the house, I was going to forgo staging and save some money. But, after seeing how pretty this kitchen was and how empty everything felt, I opted to hire a local stager. I discovered Minted Spaces on Instagram and immediately fell in love with Aryn’s design style. I knew her staging would appeal to a wide variety of buyers. In the end, they did a phenomenal job staging the Saving Etta house.
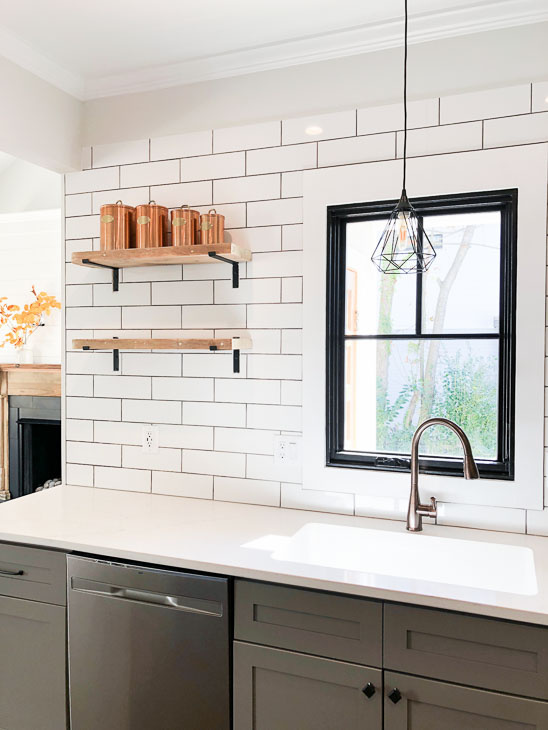
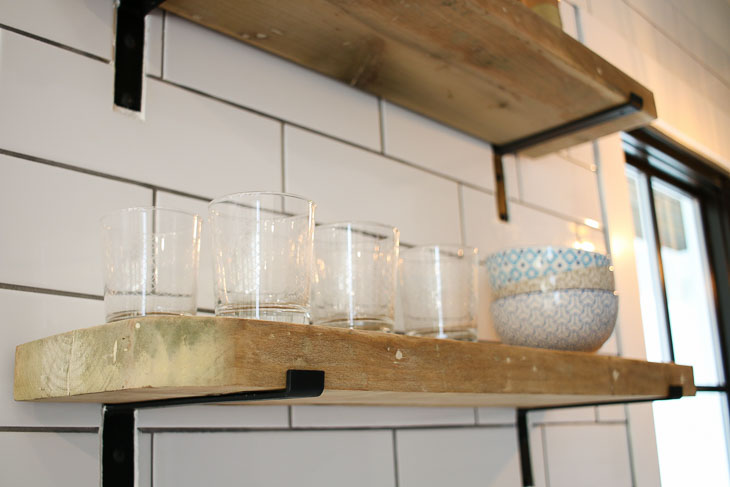
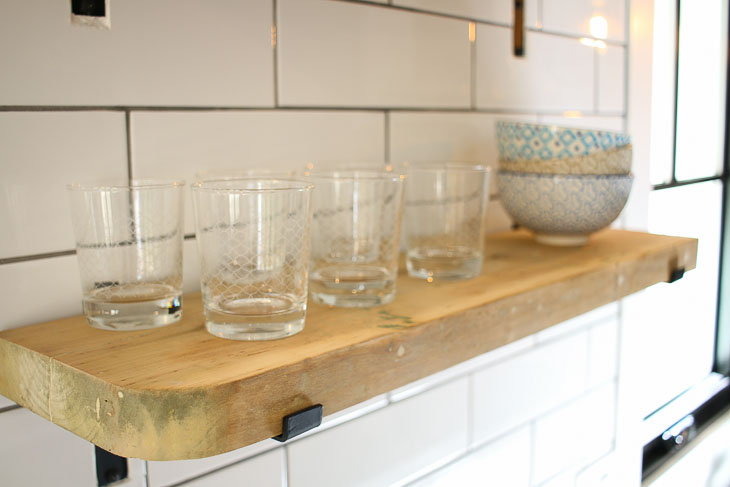
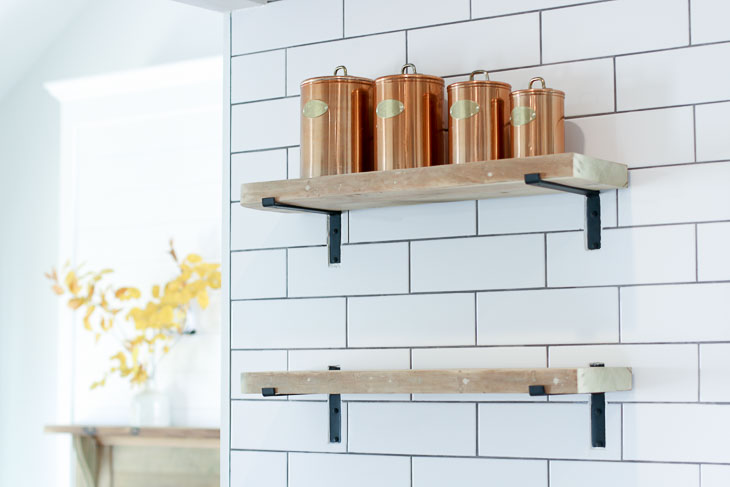
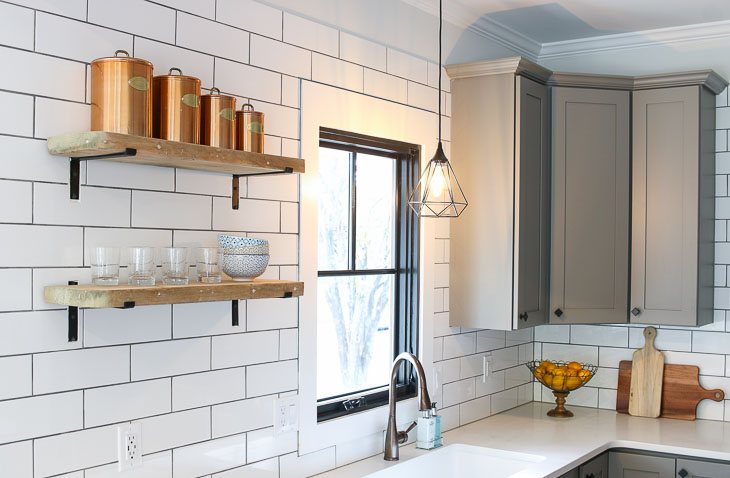
These open shelves aren’t just your random reclaimed lumber. Nay, they were made from the original mantel shelf! When I decided to salvage and re-use the 1900 mantle from one of the front rooms, I didn’t think about trying to purchase gas logs to fit inside the old mantel. Unfortunately once the fireplace was installed, I realized I needed to widen the legs to make it work.
Luckily I work with a local salvage company who found some longer lumber to match the old mantel shelf. After we rebuilt the new fireplace mantel surround, I wasn’t sure what to do with the old shelf until I realized I could cut it in half and use it for the open shelving. At first I was going to round the cut ends, but decided to leave it because it helps tell the story of it’s origin. (You can see the re-built mantel in the background below.)
All together, I’m so happy with this area of the kitchen. It has the perfect blend of modern and aged rustic elements.
The Pantry
For some reason, I came up with the idea to paint the interior of the pantry black. It might have stemmed from my desire to do something different in there. Originally I thought about wallpaper, but I knew patterns are a personal preference, and one pattern may be loved by one person and hated by another.
When I saw photos of Blackboard from the new Magnolia Home paint line, I envisioned how the food labels and packaging would look in front of a dark background. The colors would stand out for certain! Although Magnolia Home partnered with me as the paint sponsor for the Saving Etta house, my last minute decision on the pantry color lead me to my local Ace Hardware to purchase a gallon of blackboard.
That’s how I found myself painting this little pantry Blackboard by Magnolia Home Paint. One concern I had was how durable the paint would be in the pantry. After cleaning off dirty finger prints and dings on the rest of the walls, I knew this paint could withstand a fair amount of scrubbing. But, I didn’t expect it to perform like this!
You may recognize that wood door as a twin of outside shed door. It was salvaged from the same house being demolished. For some reason this door has a much more unique wood grain on the panels than the shed door. At first I thought about covering up the grain, but the more I saw it the more I fell in love with the uniqueness of the lines.
We can’t forget the beautiful glass door knob. Did you think it was an antique knob salvaged from an old house? What would you say if I told you it’s brand new and you can buy these knobs for your house! Schlage was also a sponsor of the Saving Etta house and they provided me with those beautiful Schlage Hobson Glass Knobs with Century Trim.
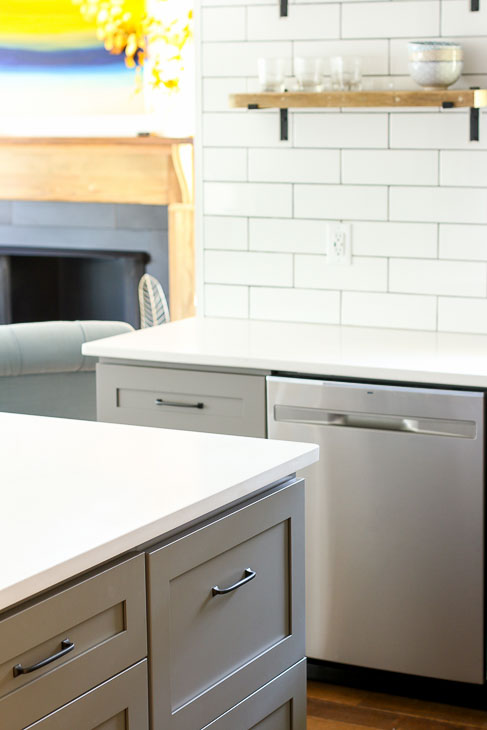
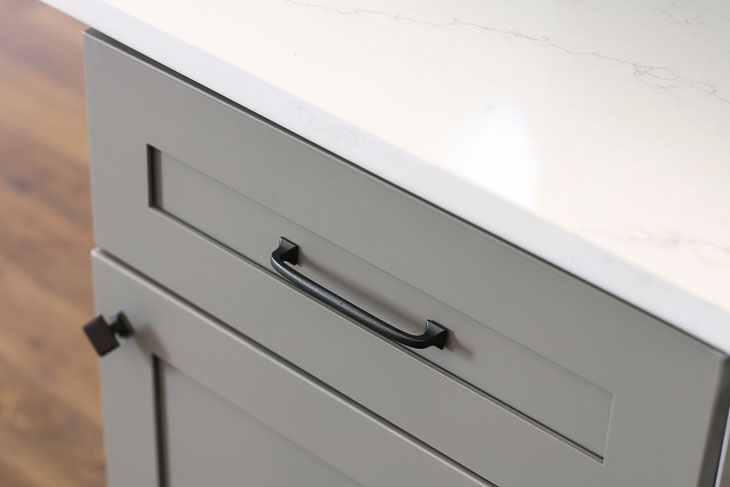
The huge island in the kitchen was a must for this space. (And because I wish we had the room in our kitchen for a big island!) The side closest to the refrigerator has two cabinets with five drawers total.
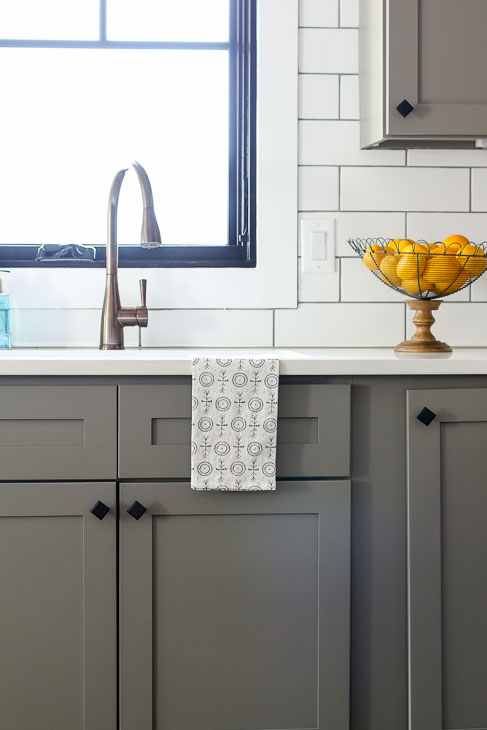
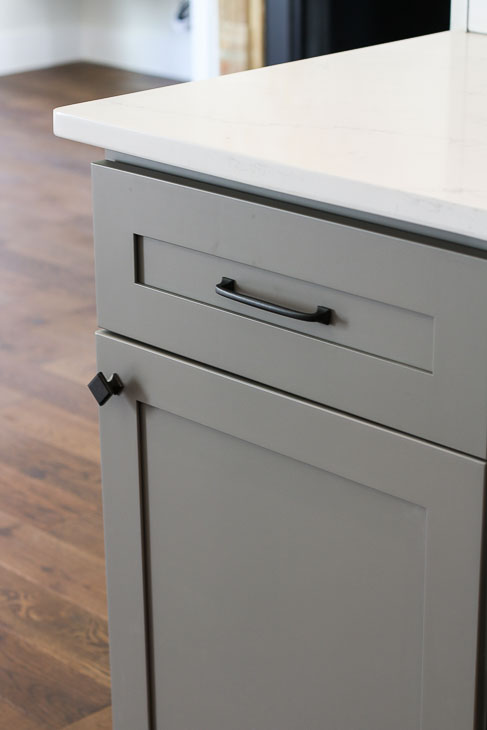
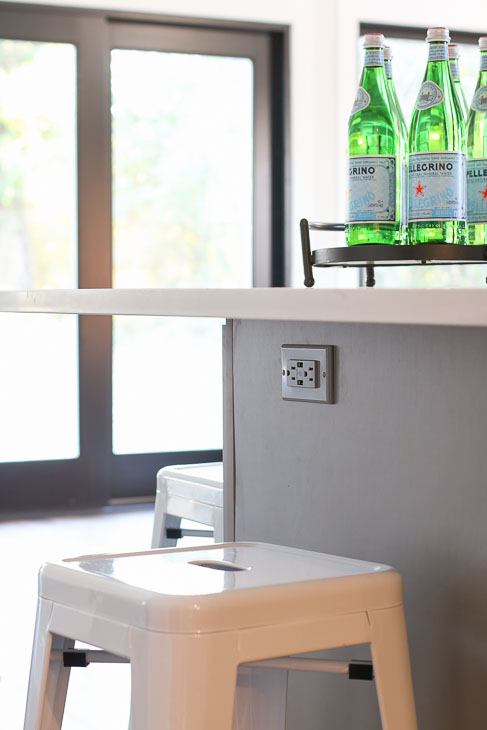
The other side of the islands has two more cabinets with shelves inside for extra storage. This side also has a one foot overhang for extra seating. I bought these cute Liberty Brand Acrylic Faceted Knob with oil-rubbed bronze and copperfor a change from the rest of the cabinet hardware.
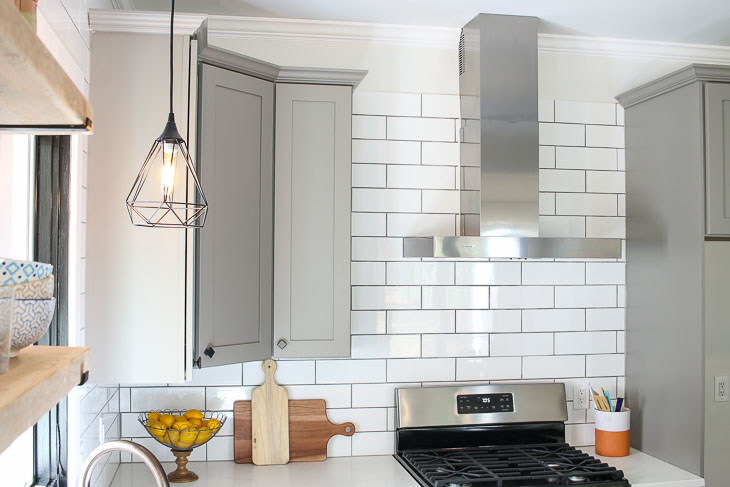
The countertops are Carrara Venatino Quartz from Cosmos. I love the look and how similar it looks to marble without the softness of real stone.
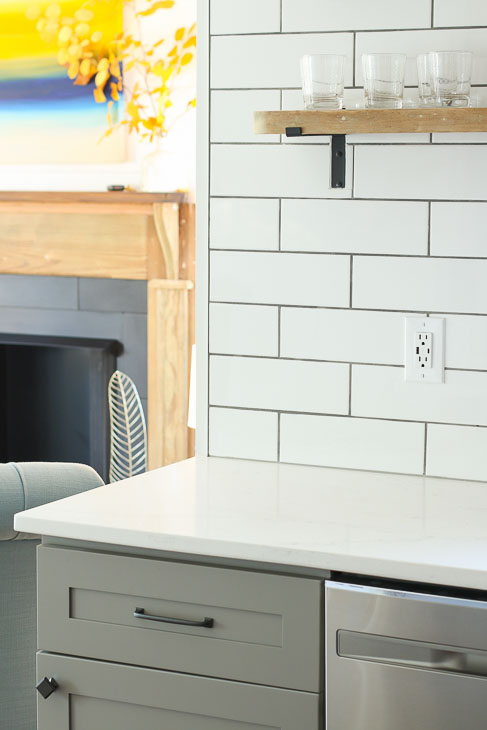
The larger scale Jeffrey Court 4 x 12 Subway Tile backsplash really makes this space in my opinion. They are classic but also modern. The white tiles provide a nice contrast against the gray cabinets.
The light fixture over the island is from Houzz. I’m not going to link to it, because frankly I’m not very pleased with the quality and it was a pain to install (remember I had to go hunt for the parts.)
I am proud of how the kitchen turned out. I poured a lot of thought and effort into the design and tried to envision how the kitchen would function for future homeowners.
I hope the kitchen reveal was worth the wait. What did you think? Do you like the fixtures I chose or if not what would you do differently?
A huge shout out to all the brands who sponsored the Saving Etta project and helped me turn this ugly duckling…
…into a beautiful swan again.
I hope you will consider using some of the sponsoring brands when you are ready to take on a new kitchen, bath, or renovation project in your home.
Which were your favorite elements in this beautiful kitchen?
Disclosure: I received materials and/or compensation from the sponsors of the Saving Etta project. These were the kitchen sponsors: Plygem, Broan-Nutone, Impressions Hardwood Collection, Leviton, Schlage, Magnolia Home Paint, KILZ, Jeffrey Court Tile, Liberty Hardware, and Ferguson Bath, Kitchen & Lighting Gallery. I was not told what to write. All opinions and words are my own. As always, I will notify you if you are reading as sponsored post or if I was compensated. Rest assured I am very particular about the brands I work with. Only brands I use in my own home or that I’ve had a positive experience with will be showcased on this blog.
Saving Etta: Kitchen Update & Installing the Range Hood
This kitchen was a big deal for me. It was one of those projects I knew would make or break this house. It was also the first time I’ve taken the reins on kitchen design and installed cabinets. As the project was in the home stretch, I spent many hours and late nights working on the kitchen. Today I’m thrilled to give you another update on the kitchen and show you the installation of the range hood (complete with all the mishaps involved). Speaking of mishaps, I have some tips to help you avoid a potentially dangerous and costly mistake when selecting a range hood.
Before we begin, I’d like to say thank you to all my wonderful sponsors on the Saving Etta project. I could not have saved Etta without their help. When you are looking for products that last and perform well, you can rest assured that I hand-selected these sponsors to represent the Saving Etta project.
Where It Started:
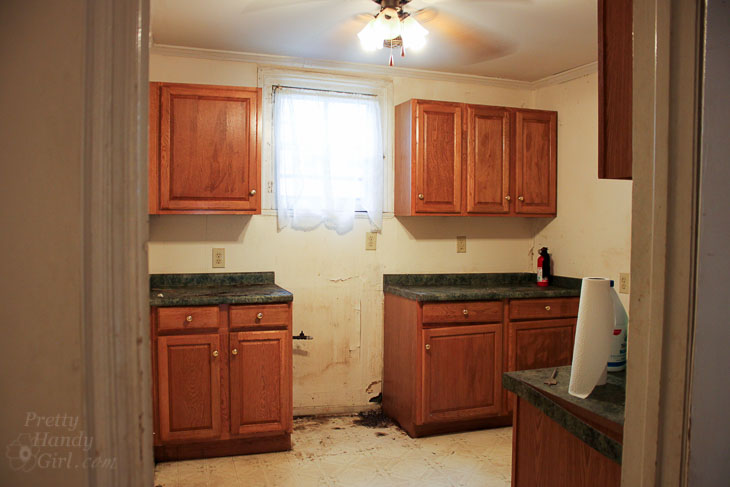
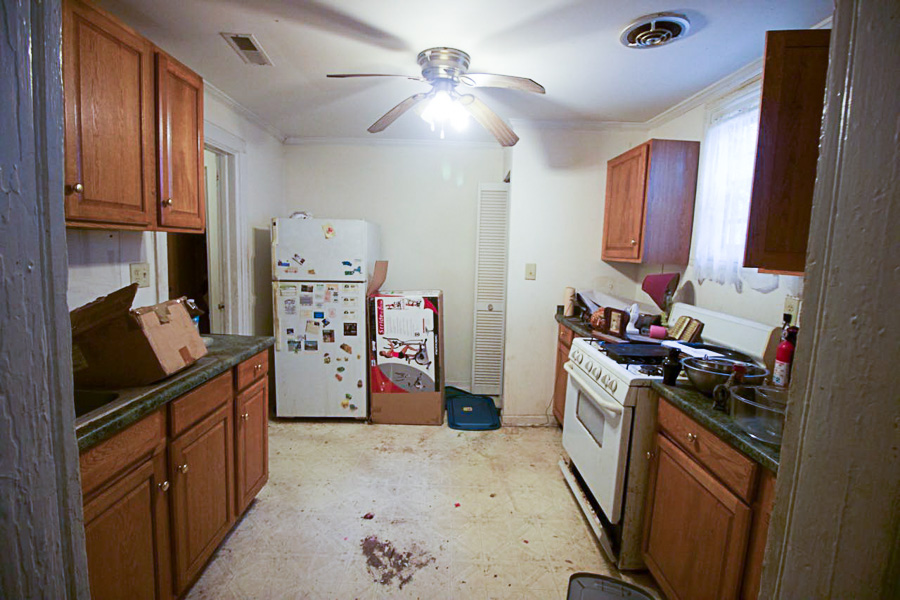
If you’ve been along for the entire Saving Etta journey, you may remember the kitchen in the house when I bought it. Then again, you might be like me and need a little memory refresher once in a while. Here’s the kitchen before:
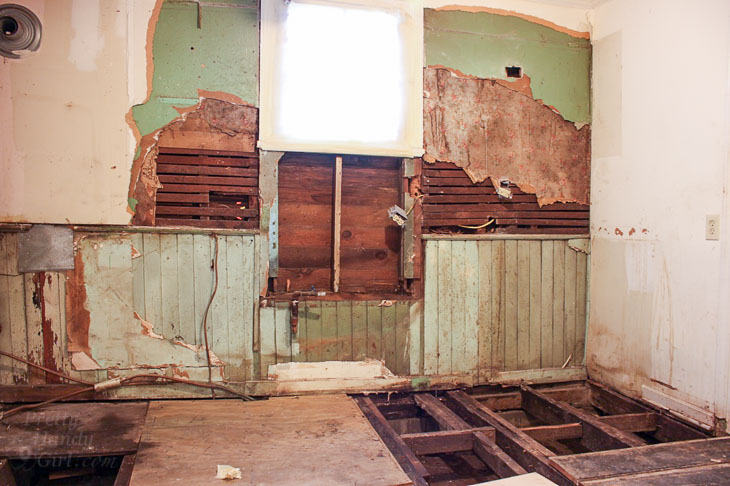
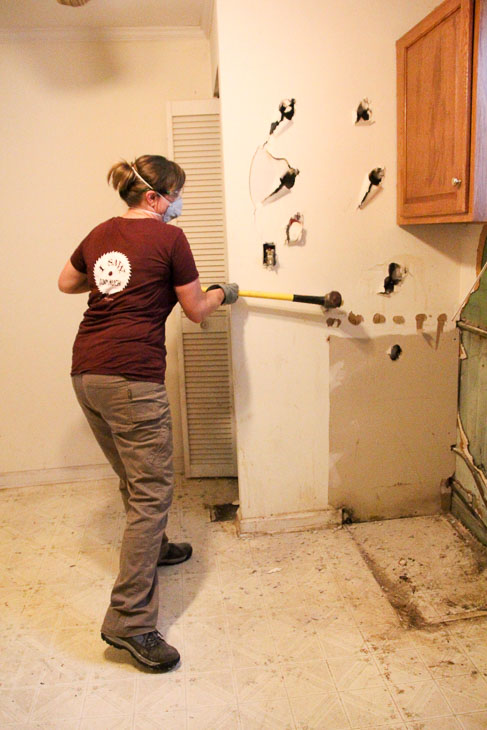
There were only a few base cabinets and five upper cabinets. Lucky thing because it made demolition of the kitchen easier. The first week after purchasing the property, I hauled all the cabinets to the dumpster and started peeling away the layers in the kitchen. It was a lot of work, but so much fun seeing through the decades and discovering old bead board beneath.
The water heater was walled into a little closet in the corner of the kitchen. It was a blast taking a sledge hammer to the wall. Who needs therapy when you can release pent up frustration through demolition?
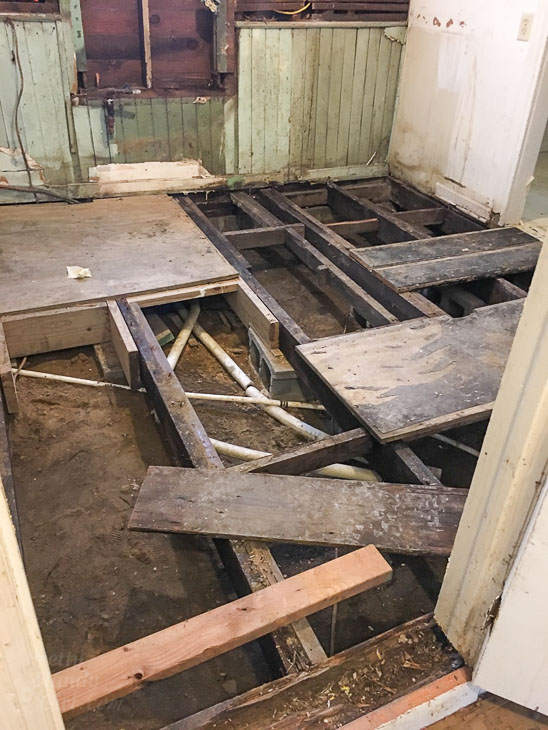
You might remember asbestos tiles were discovered on the floor and they had to be removed. What was left was a maze of floor joists and pipes where the floor used to be.
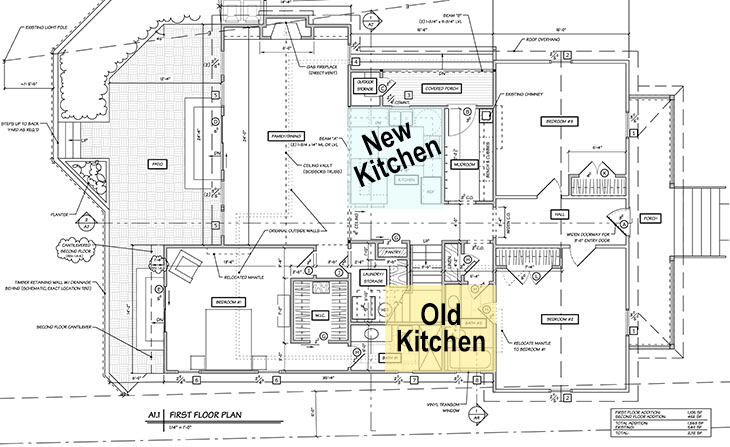
I originally hoped to save this room from demolition because it was part of the 1900 structure, but after assessing the lack of crawlspace and a severed structural beam with my architect, we decided it had to be removed.
The picture below is shortly after demolition. The doorway on the right is where the original kitchen entrance was. But, it had been walled off a long time ago to provide space for the refrigerator.
The new kitchen was moved to the other side of the house, as shown in the plans below:
Obviously, after demo, a lot of progress happened to get us to the new kitchen installation. If you want to read the previous updates, here’s what you missed:
(I’ve included affiliate links for your convenience. I earn a small percentage from a purchase using these links. There is no additional cost to you. You can read more about affiliate links here.)
To protect the wood floors, we laid Surface Shield Builder Boards on the floor. They worked perfectly to protect the floor from spills, dropped tools, and lots of tracked in mud and dirt. It’s amazing how much dirt got tracked into the house. But, when the ground is scraped clean of any landscaping, things are bound to get messy. I eventually purchased two dirt trapper rubber mats and put them by each entrance. This helped limit much of the dirt from coming inside.
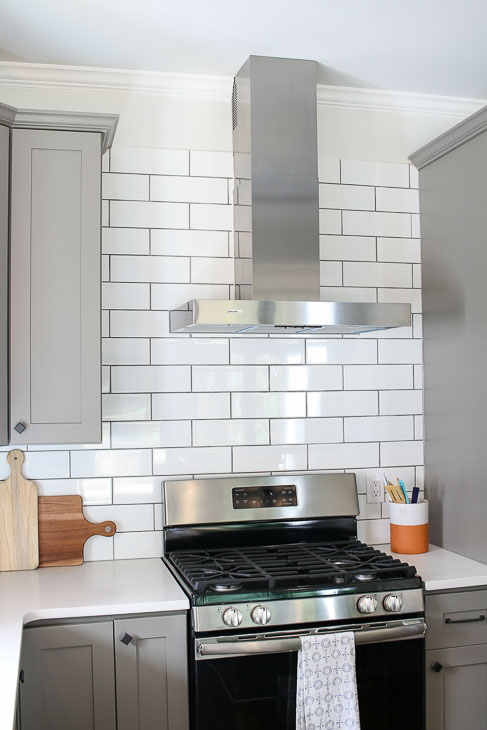
Selecting the Range Hood:
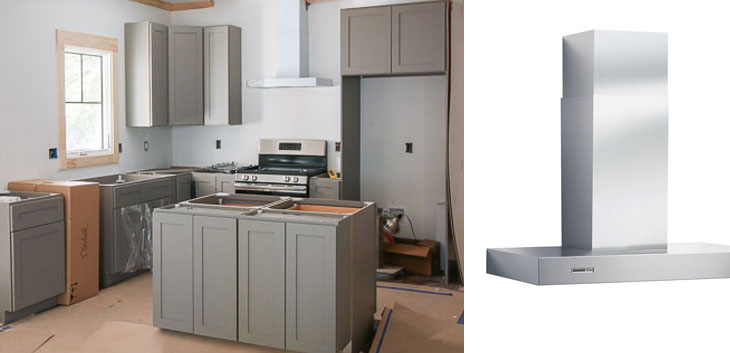
Choosing a range hood for the kitchen proved to be difficult because I liked so many of the Broan options. (Broan is one of the Saving Etta sponsors and provided the range hood for this project.)
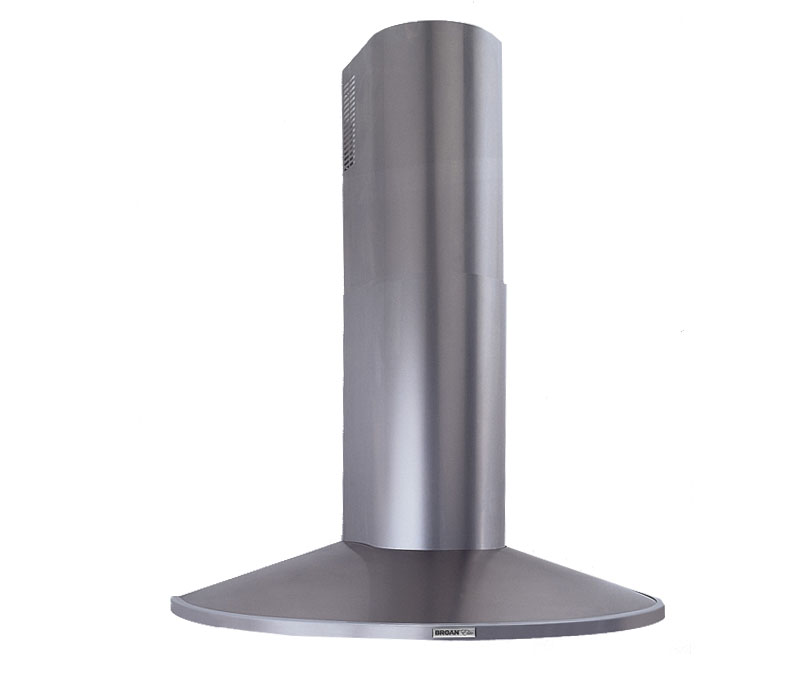
The style definitely appealed to me because it was different, but the width of the hood is 36″. I was concerned it might look too big in a small kitchen. Ultimately, I think the hood would have worked, but I had already moved on. (I will keep this range hood in mind for future kitchen renovations, because I still think it looks kind of sexy.)
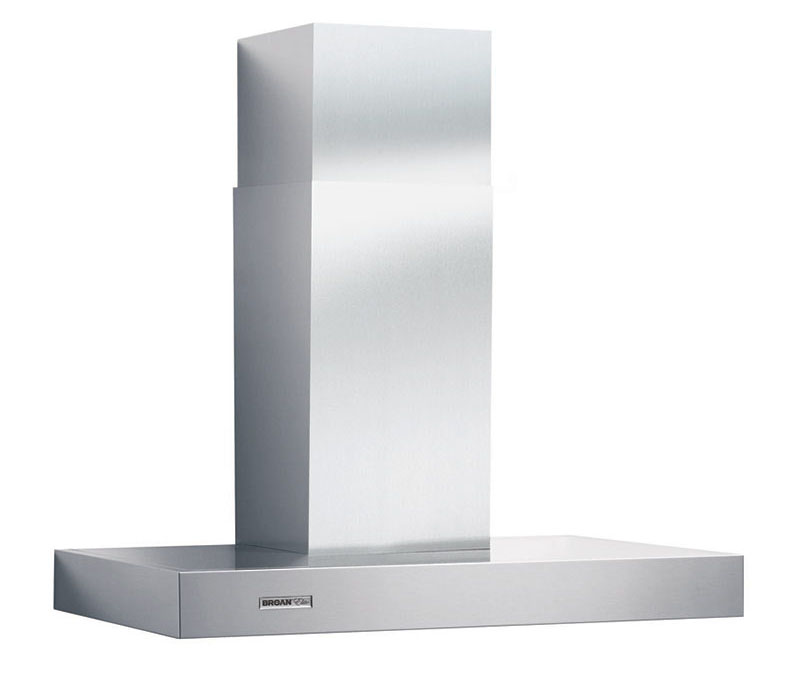
Next I stumbled upon the the B5630SS Broan range hood. It had some curves, but more of a box shape. And the glass hood added some elegance.
Ultimately I decided against this range hood because I worried the glass would show dust or grease between cleanings. In hindsight, I’m glad I didn’t choose this range hood, because I would have been hit with an unexpected expense. Right before installing the new range hood, my mechanical contractor asked how many CFMs the range hood pulled. “CF-what?,” I said.
What is CFM and Do You Need Make Up Air for Your Range Hood?
CFM is short for cubic feet per minute and it describes the amount of air flow an exhaust fan can pull. Believe it or not, this is one of the most important specifications (besides dimensions) you need to know when considering a range hood. One would think the higher the CFM the better, because it sucks up more cooking odors and steam, right? Not necessarily. Typically 200-300 CFM is adequate for a range hood in a residential kitchen. If you have a commercial stove, or the range hood is mounted further away from the stove top, you may need something stronger. If you need a range hood with a stronger fan (over 400 CFM), you’re required to install a make up air device with an automatic damper. This will add to your expense and requires a licensed HVAC contractor to install it.
For reference, this is the code for exhaust hoods in residential construction:
International Residential Code: M1503.4: “Exhaust hood systems capable of exhausting in excess of 400 cfm shall be provided with makeup air at a rate approximately equal to the exhaust air rate. Such makeup air systems shall be equipped with a means of closure and shall be automatically controlled to start and operate simultaneously with the exhaust system.”
What happens if I don’t add make up air for my range hood?
Stronger exhaust fans can depressurize a house. Resulting in doors slamming shut, air pulled from any cracks or openings in the building envelope, or noise. Some unsuspecting homeowners have turned on their exhaust fan to find it pulls ashes from their chimney. If you don’t have make up air it could create a dangerous back draft situation in the home. This is why it’s important to know what the CFM is for the range hood you want to install. (This article does a good job of explaining the issues with stronger range hoods.)
No glass to clean and the width is 30″. Plus, the CFM is 370, sufficiently low enough to not need make up air, but strong enough to exhaust cooking steam and odors. This made me happy, especially after all the make up air vents we had to install in the laundry room.)
Installing the Range Hood:
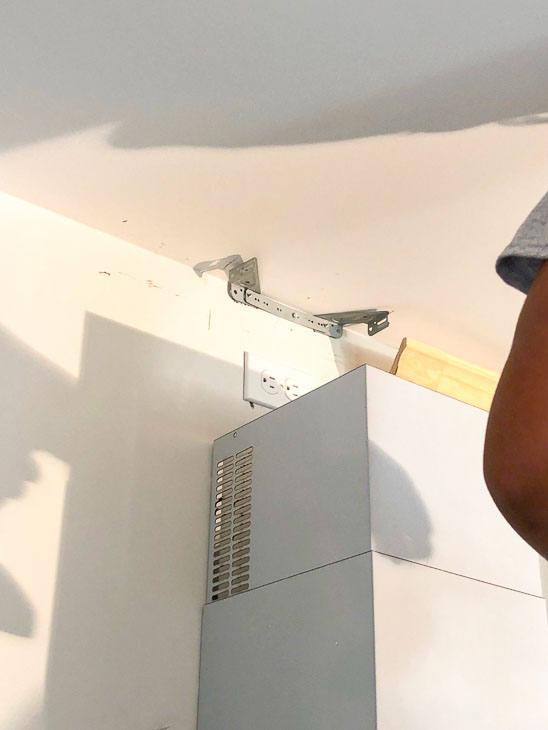
As with many installs at the house, I had to pick and choose which ones to assign to my subcontractors. The range hood was already slated to be installed by my mechanical contractors, so I let them take over installation. I was busy working on another project, but when I came into the kitchen I knew I had to step in and “help.” As before, things were not going smoothly. The first indication that the install may get screwed up was when I found the instructions folded up in the bottom of the product box. I pulled them out and quickly scanned the directions. The second clue was when I found a bracket in the box as well. The guys were trying to figure out how to attach the chimney to the wall (had I not arrived when I did, I’m sure they would have finagled some unattractive solution.) Without an invitation, I took over the role of supervisor and pointed out how the chimney needed to attach to the wall via the bracket in the box. I’m not sure if the guys were relieved or annoyed, but they put up with my directions (thank goodness!)
About Working with Contractors:
Before we go on, I want to point out the fact that these were the so called “professionals”. But, obviously they didn’t know how to install this particular range hood. I chalk this up to lack of experience with this model, not necessarily lack of experience as a mechanical contractor. BUT, they should have been reading the instructions. I want to leave you with this important message:
When you hire a professional, make sure you read the instructions for how the project should be completed. Do your homework and research online so you understand the steps in the project. Speak up if you see something amiss. Just because someone is a professional doesn’t mean they won’t make mistakes.
At the end of the day, the contractors go home. If something is installed incorrectly you’ll be the one who has to live with it. And, unless you are working with stellar contractors, it might be difficult to get them back to your house. (Then again, stellar contractors are oftentimes extremely busy. You’ll need to wait to get back on their schedule.)
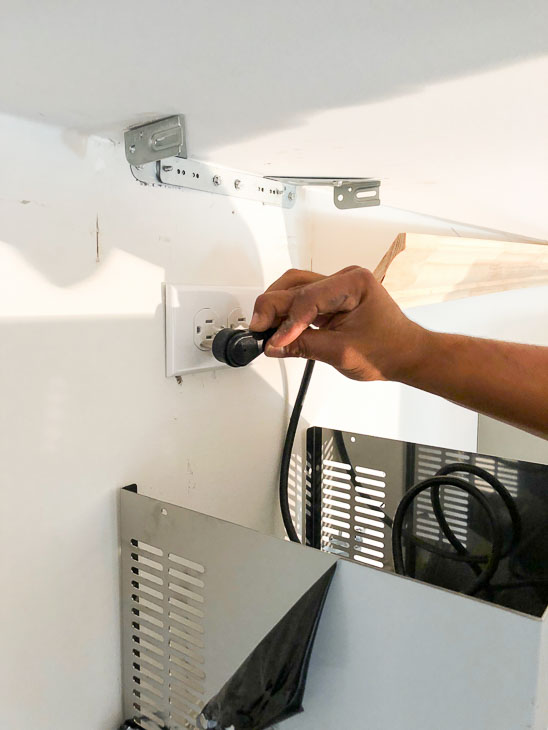
We worked together to hang the range hood chimney. The guys had already hooked up the ductwork and painted mastic over the seams (also required by code). The fan motor was plugged into the outlet above the duct.
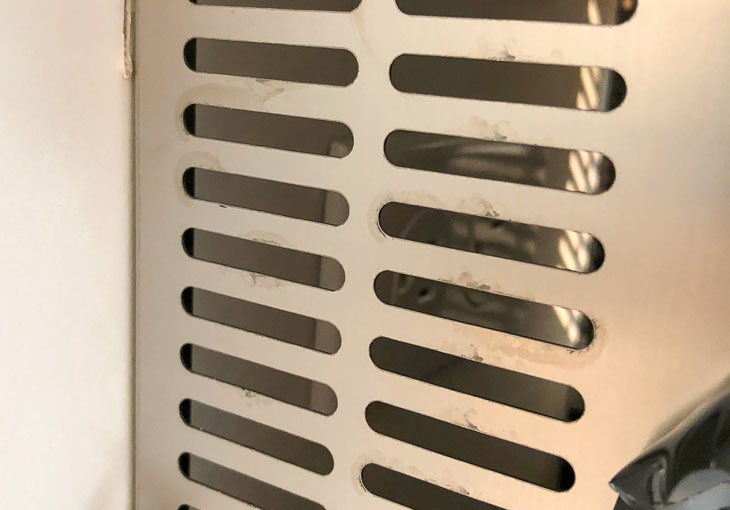
The hanging bracket was attached to the wall, and then the upper chimney was slid into place over the bracket. Securing the chimney to the bracket was a little tricky because the hole on the chimney has to line up with holes on the bracket. Plus, it was difficult maneuvering a drill against the ceiling. Ultimately, the chimney and range hood were installed. The power was turned on to the hood and…NOTHING! We scratched our heads until I climbed back onto a step ladder and peeked into the chimney. See the problem?
Doh! Somewhere along the way we unplugged the fan and forgot to plug it back in. Luckily we all had a collective laugh about it and then slid the chimney back down to plug it in, then re-attached the chimney to the bracket. My words of wisdom: “Always make sure it’s plugged in!” LOL.
We left the protective film on the range hood, and I’m glad I did because it was easier to clean and protect while tiling. Stay tuned for more updates and the kitchen reveal soon! Next up is tiling the backsplash.
Disclosure: This is a sponsored post for Broan. I was compensated for my time and efforts to promote the Broan products. However, all ideas and opinions are my own. I will always let you know when you are reading a sponsored post. You should also note that I’m very particular about the brands I work with.


 Hello! I’m Karen, the creator of the Home Decor and DIY Blog: Decor Hint . I’m a Native of the East Coast, but I currently live in beautiful Seattle with my hubby, our two wonderful children and our spunky wheaten terrier.
 Repurpose a skirt into a pretty rectangular pillow


 Make a beautiful Shabby Chic Throw Pillow Cover
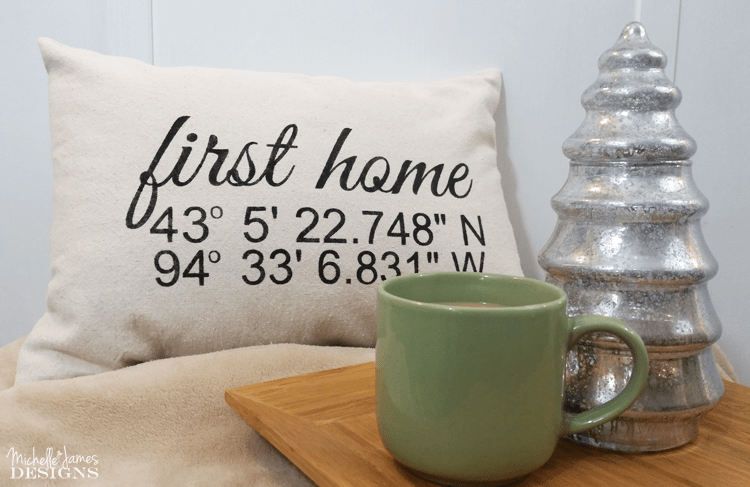 A Map Coordinates Throw Pillow
 Repurpose cloth dinner napkins
  Make a St. Patrick’s day pillow
 This adorable DIY Mermaid Pillow
 Create Striped Euro Shams
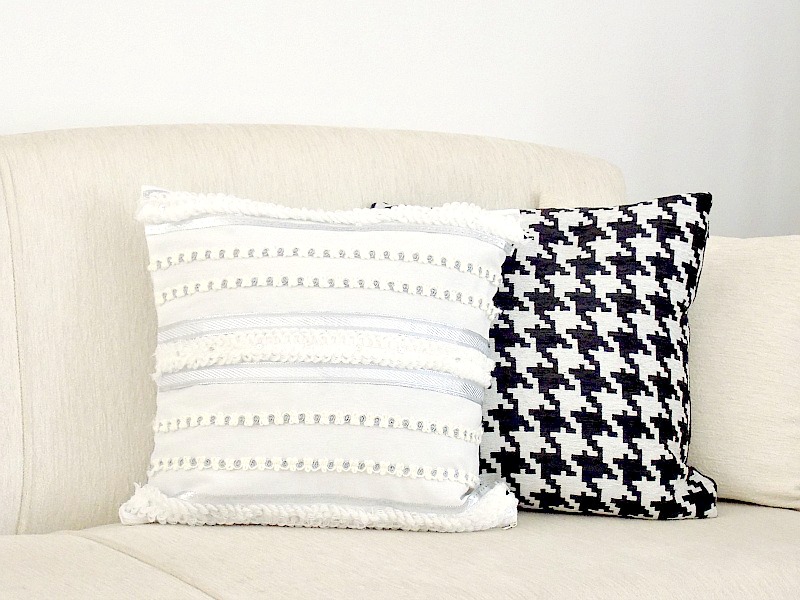
 DIY Outdoor pillows
 Use Fingerprints in stars
 Design these Birch Tree Pillows
 Make a Modern Flower pillowcase
 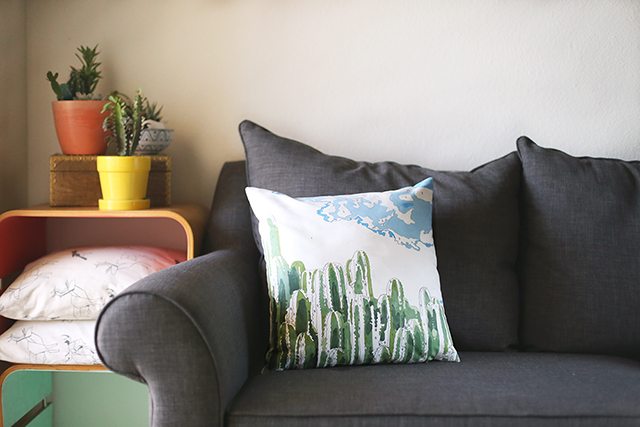 Use Paint by Number skills
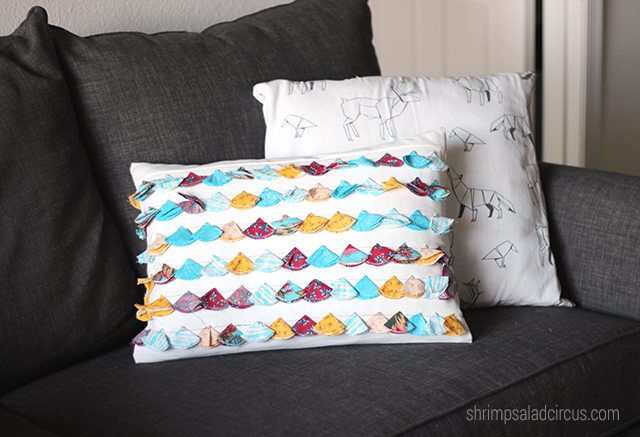 Make a Beautiful Tasseled Pillow
 Use Curtain Panels
 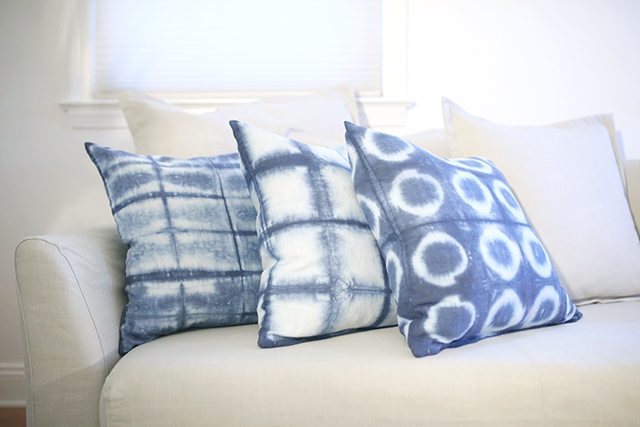 Try out Shibori Dyeing
 This DIY Anthro-inspired Octopus Pillow
 Make your own Back Pillow
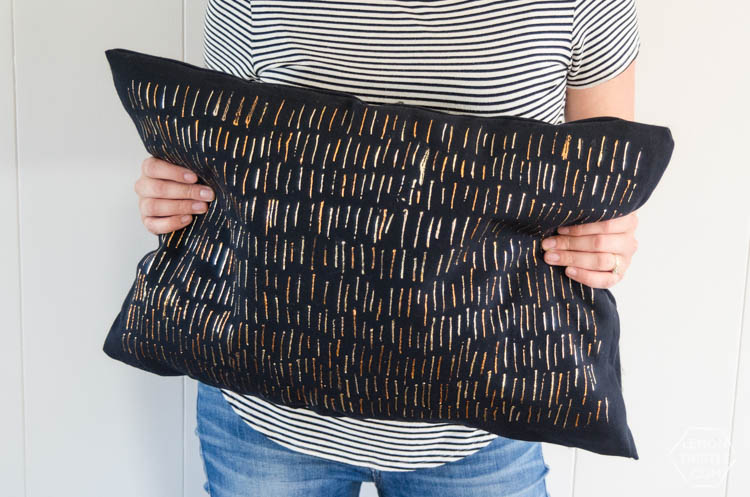
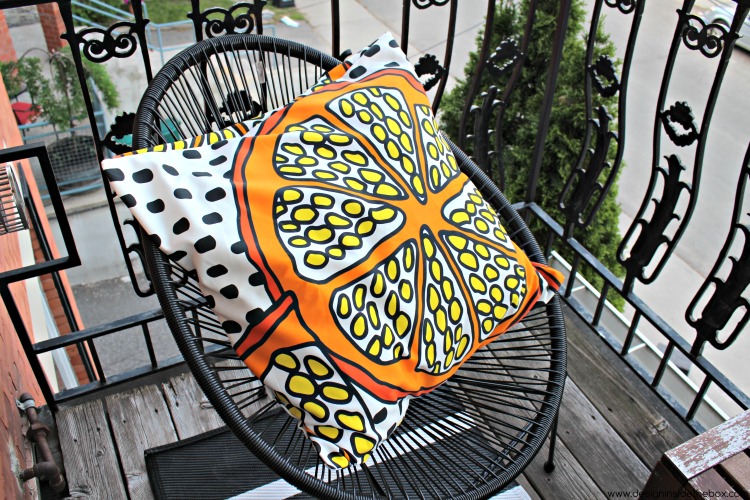 Make this bright and bold pillow
 Turn a drop cloth into a pillow

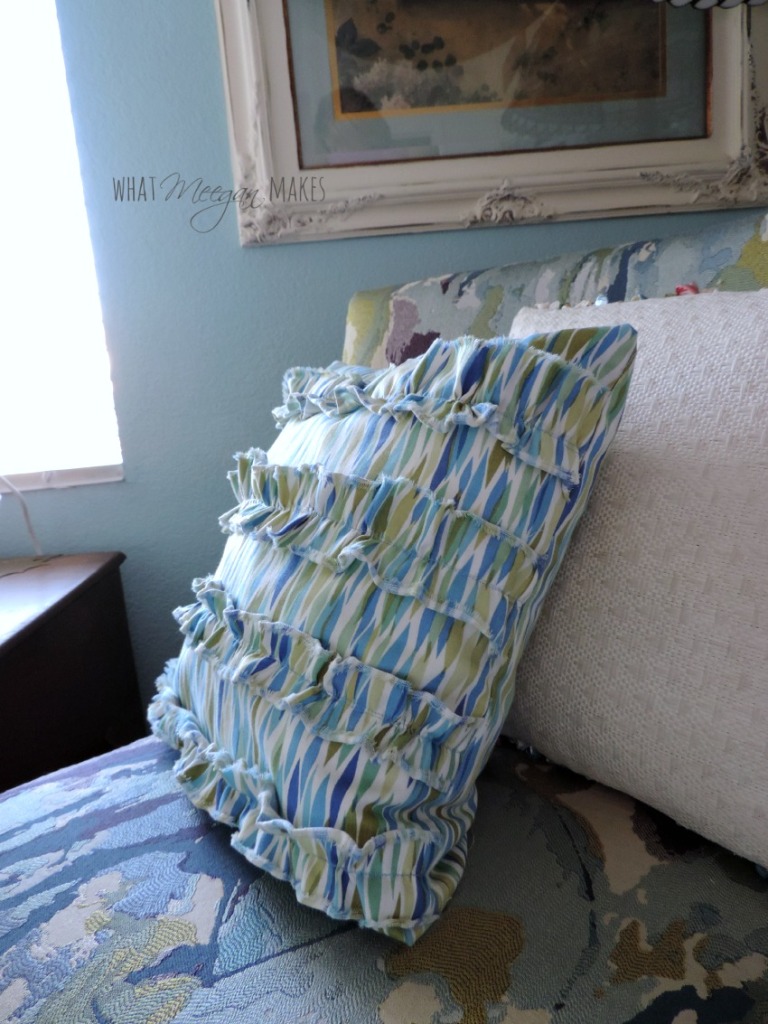
 Create Felted Pillows
 Make a Simple Ruffled Farmhouse Pillowcase
 A 15-Minute Ruffled Burlap Pillow
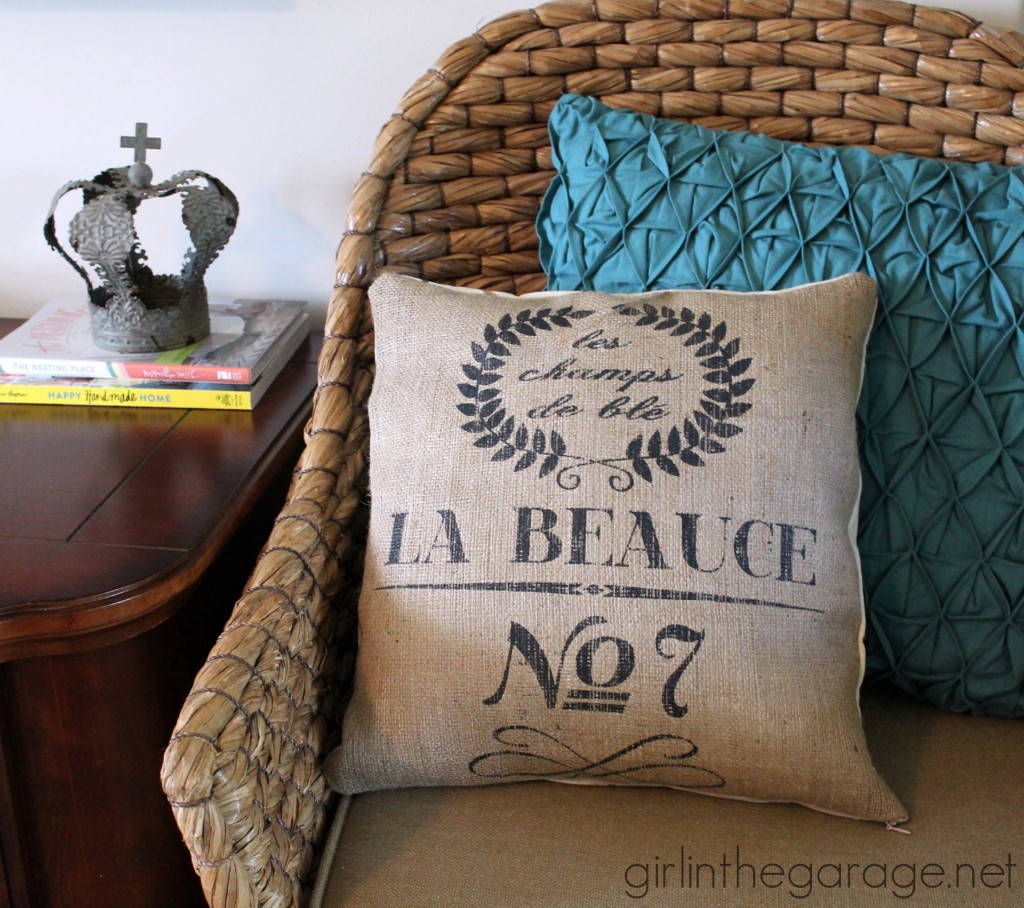
 Repurpose Placemats into Pillow covers
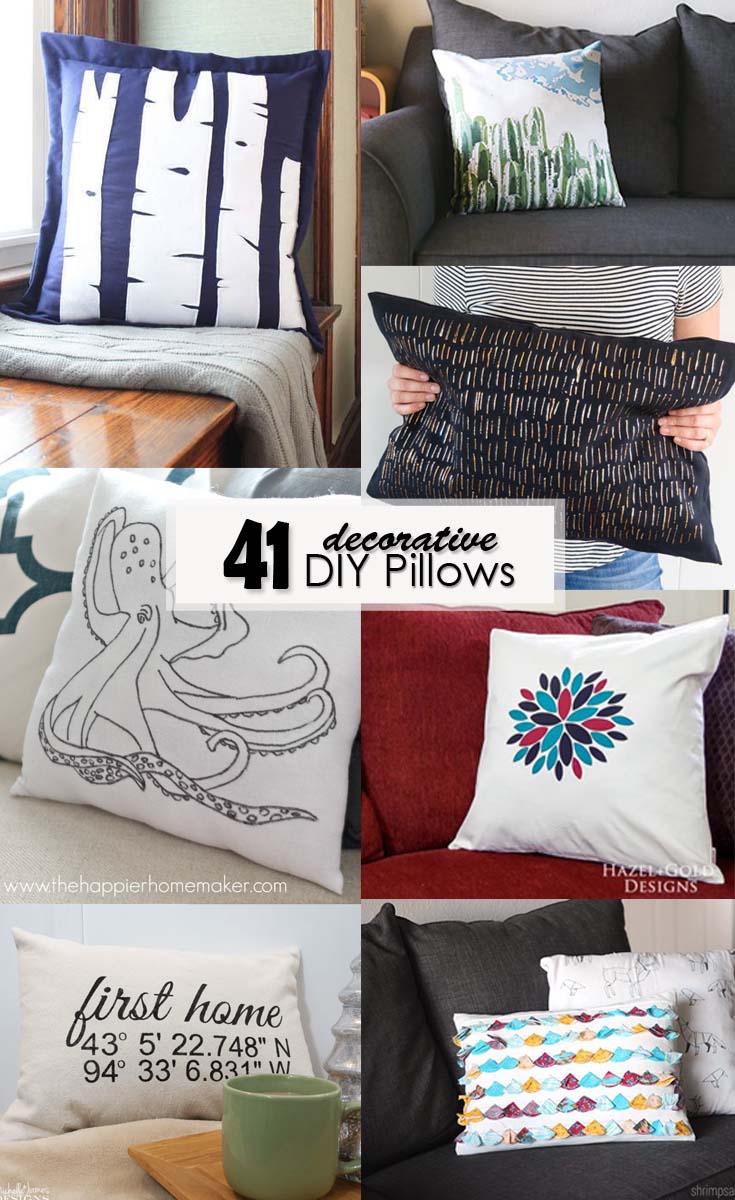


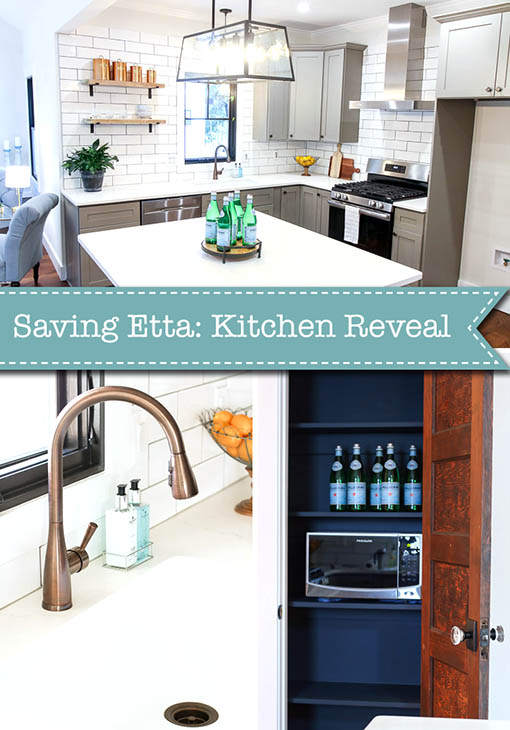 Saving Etta: The Long Awaited Kitchen Reveal
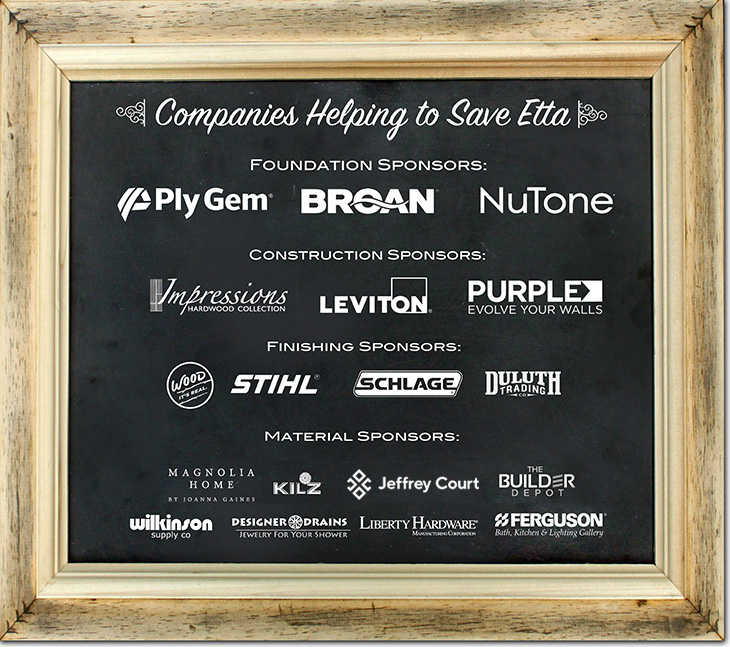


 Saving Etta: Kitchen Update & Installing the Range Hood