10 Unique Ways to Decorate for Valentine's Day | Pretty Handy Girl

Valentine’s Day is around the corner. It’s time to put away your Christmas decorations and welcome some romance into your home. You could surround your home with bouquets of roses, but who wants to spend money on flowers that don’t last more than a few days. Instead I’d love to share with you 10 Unique Ways to Decorate for Valentine’s Day.

All You Need is...Valentine String Art | Pretty Handy Girl

Grab some scrap wood, a few nails and string to make this All You Need is Love String Art.

Make wool roses out of old sweaters, some branches, and scrapbook paper.
Plus, learn how I used these flowers somewhere else.

Make a book page rose for your mantle using an old book and a ceiling medallion.

Make this adorable house shaped door decor with a few scrap wood pieces and some paint.

Who knew PVC pipe could look this good? With some paint and hot glue, you can easily make this heart decoration for Valentine's Day!

Decorating for Valentine’s Day can be as simple as hitting up your local plumbing parts store. What? Click here to make a gorgeous PVC Heart.


For a rustic look, learn how to make a wood slice heart.

Do you have some scrap fabric and maybe a placemat lying around?
That’s all you need to make a garden flag out of a Dollar Store placemat.

DIY Wooden Arrows

Conjure cupid-themed art by making this DIY Wooden Arrow. Luckily, this art is perfect for displaying well beyond February.

A coat hanger and ribbon seem an unlikely pair for a wreath, but you’ll see how combined they make a beautiful Double Ribbon Wreath.

Why does your home have to have all the romantic decor?
You can make your neck happy with this pretty DIY Leather Heart Necklace.

Of all these decorating ideas, which is your favorite from the 10 Unique Ways to Decorate for Valentine’s Day?

I’m always looking for ways to simplify my holiday decorating and re-use what I have. This DIY Jingle Bell Garland project is perfect for that!  Perusing the holiday collections at my favorite home stores gave me the idea of making this simple bell garland. It’s a lovely nod to Scandinavian decor if you like that style.

Hello, Pretty Handy Girl Readers! Now that the holiday season is upon us, I thought it would be fun to share an easy DIY project to help you decorate your homes this year.

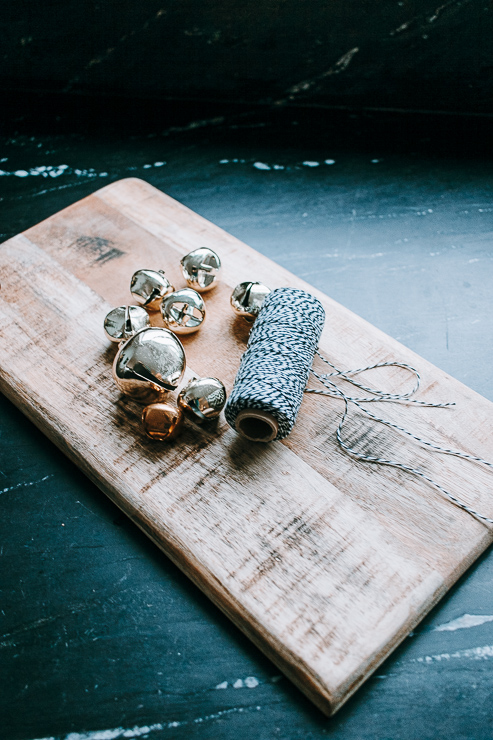
All you need are two inexpensive items to make this. (You might even have them already. Hint: Look in your gift wrap stash!)

That’s right – these bells are actually cheap gift toppers from Target.  Yes, they are functional and they sound beautiful (like Jingle Bells!)

This garland will take you all of ten minutes to create, and another five to hang it up. How’s that for simple, inexpensive, and quick!

Let’s get creating!

Materials:

(I’ve included affiliate links for your convenience. I earn a small percentage from a purchase using these links. There is no additional cost to you. You can read more about affiliate links here.)

Instructions:

Follow these steps to make lovely little bell garlands. I’ll include tips for hanging, decorating, and storing as well.

Step 1: Cut a long piece of string

Whether you are using baker’s twine, jute, or ribbon, cut a long piece to get started. My piece ended up being about 30 inches long. You can always snip any excess off at the end.

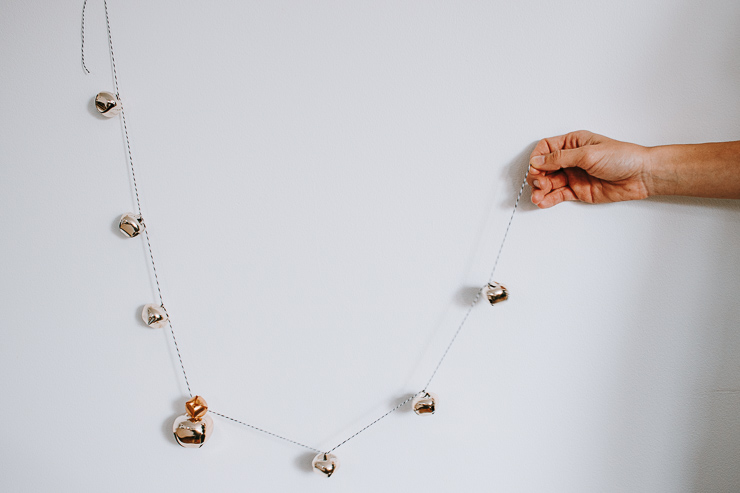
Step 2: Thread your bells on your string:

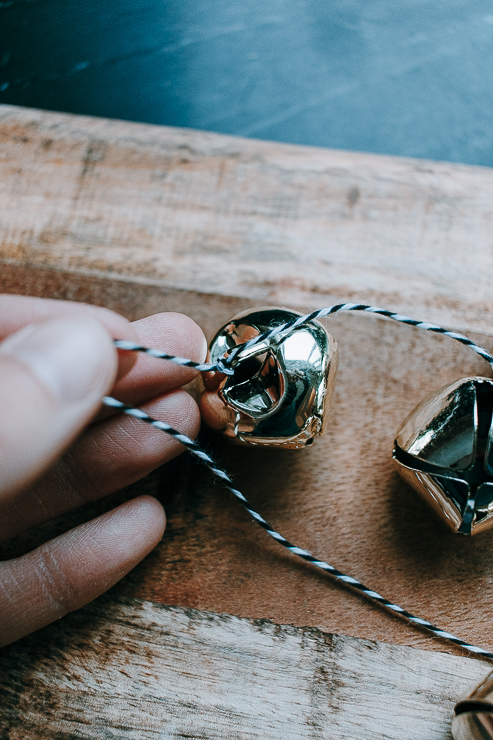
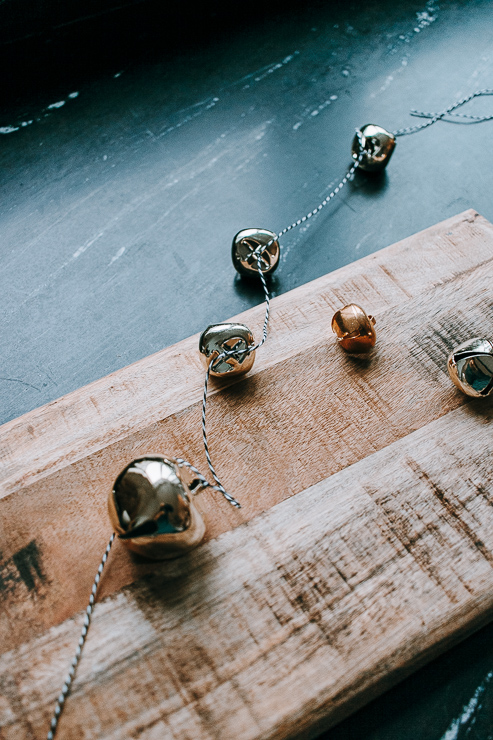
Time to thread those bells on! My gift toppers came with a little loop to attach them. I’m sure your bells will, too. All you need to do is tie a little knot to make sure they stay. You don’t want the bells sliding all around on you.

I decided to space my bells out a bit, but you can also string them close together. But, if you do, you’ll need more bells!

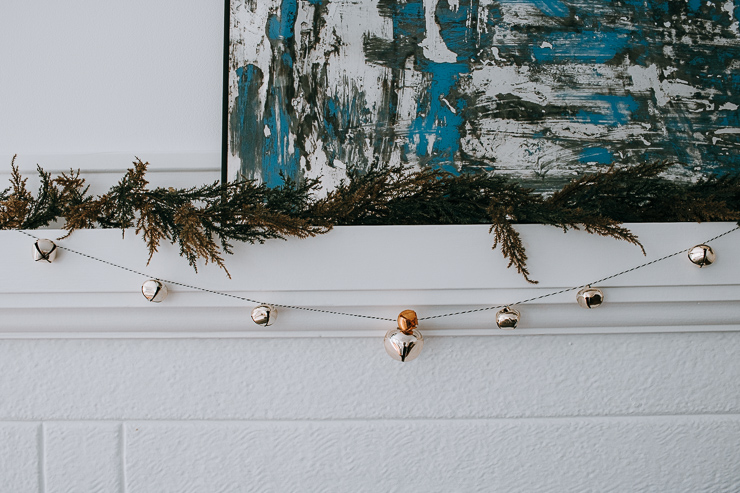
Step 3: Hang up your garland

Once all your bells are knotted and secured on the string, it’s time to hang it up.

Initially, I was using scotch tape. However, my garland kept falling! (Consequently, I’ve been hearing a lot of fallen jingles in this house today). I ended up using 3m clear light clips and they are not falling anymore. You can tie both ends of garland onto the light clip and hang it up that way. If you are also decorating with garland, this helps to hide the clips as well.  It has not fallen since! Yay!


Where to hang your bell garland?

Call me traditional, but I like these bell garlands draped across a window or hung from a mantel. They feel so Christmas-y to me!

Some other ideas would be to drape them across a mirror or over a pretty piece of artwork.
Have open shelving? Drape them on your open shelving like it was a mantel!

What about storing your garland?

After the holidays are over, it’s time to pack up all the decor! But wait — how do I store this garland without it getting tangled?

So glad you asked! I found the simplest way to store these garlands is to tape one end to a piece of sturdy cardboard, then wrap the garland carefully around the cardboard and finish by taping the other end.

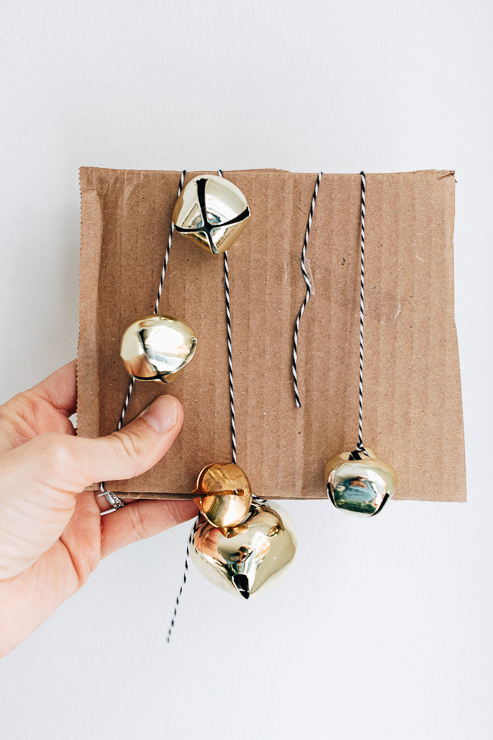
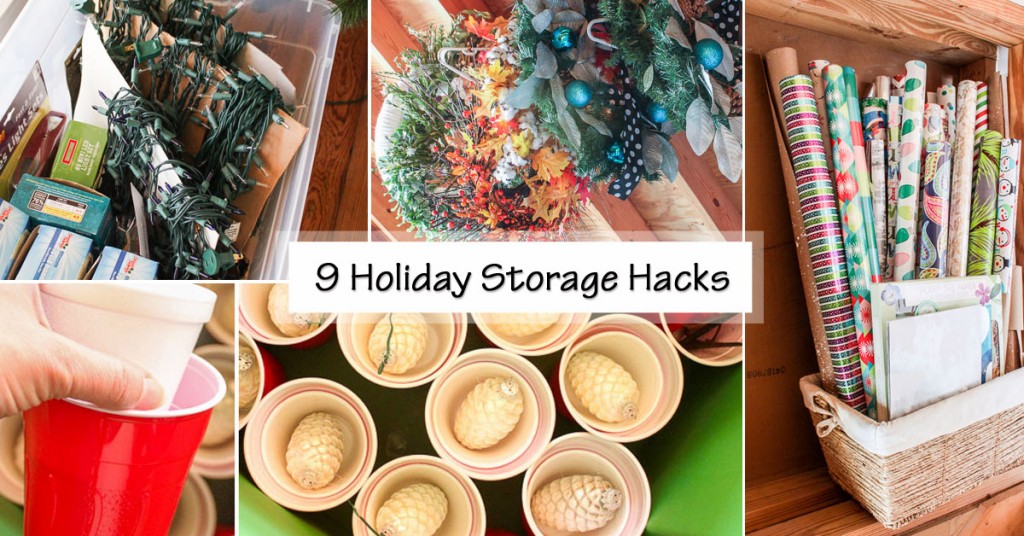
It’s secure and it won’t tangle on you! You might also appreciate these 9 Holiday Storage Hacks for your other holiday items!

9 holiday storage hacks social media image

I love the way this bell garland turned out. However, I think a nice satin ribbon in red or white might be my go-to for next year. I love the contrast between the gold bells and the silky ribbon. In the meantime, pin this tutorial to share with a friend!

Looking for more Holiday Decorating Ideas? Check out these DIY frosted votive candle holders and this rustic Christmas tree crate.

I hope you are all having a wonderful Holiday Season so far! See you right back here next month.


karen signature

~ See More of Karen’s Tutorials ~


karen from decor hintHello!  I’m Karen, the creator of the Home Decor and DIY Blog: Decor Hint. I’m a Native of the East Coast, but I currently live in beautiful Seattle with my hubby, our two wonderful children, and our spunky wheaten terrier.

You can usually find me with some sort of craft in one hand and a coffee in the other. And I’m always rearranging furniture or moving lamps from room to room. I have a passion (read: obsession) for decorating, DIY, and gardening. In short, I love making my house into a home.

Like many, I’m inspired by what I see in home decor magazines, but I’m not so inspired by the price tags.  Consequently, I love finding and creating beautiful budget-friendly home decor items. In a head to head competition, I bet you’d never know the difference between the designer items and my DIY creations!  Many of my DIY projects focus on sewing, crafting, upcycling and organizing. Some of my favorite projects have been making pretty wreaths, sewing my own tassel hand towels, and crafting these trendy wood bead garlands. I can’t wait to inspire you and spark your creativity through my DIY projects.

You can always connect with me on Pinterest, Twitter or Instagram.


DIY Simple Fall Wreath for Less than $10

Hi everyone!  Happy Fall!

Today I’m back with this super simple wreath idea that will cost you less than $10 all in! It includes using an inexpensive starburst twig wreath from Amazon and some cattail bunches that I picked up at Dollar Tree for a buck each.

I happened to see this twig wreath from Amazon and it was only $7. I knew I wanted to make a Fall wreath with it. That’s what started this whole project! The nice thing about using twig wreaths is that they help to “fill out” your wreath. You don’t need as many floral/greenery accessories because the twigs add bulk.

I love making wreaths. It’s one of my favorite crafts. Lately, I’ve gravitated toward very simplistic, almost minimalistic looking, wreaths. And that’s how I wanted to design this one.

The cattails add a nice pop of color.

Let’s get started!

Materials:

(I’ve included affiliate links for your convenience. I earn a small percentage from a purchase using these links. There is no additional cost to you. You can read more about affiliate links here.)

Instructions:

Follow these three simple steps to creating your Fall wreath.

Step 1: Cut off Individual Cattails.

Since my cattails came in bunches, I started off by snipping each individual cattail from the stems. I left a bit of a stem on each one.

Step 2: Use floral wire to attach Cattails to your Wreath Form.

Using small pieces of floral wire, attach your cattails to your wreath form. You can twist the wire in the back to secure each cattail. I wanted my cattails to follow the twisted pattern of the wreath.

You can also try inserting the cattails through the twig wreath wire. Just be careful not to loosen or break the twigs from the wreath.

Step 3: Hang up and enjoy it!

After all your cattails are attached, you just need to hang up and enjoy it!

I like to use a 3m wreath hanger to hang them on my front door. If you have a glass door, you can buy a suction door wreath hanger that comes with a little hook.

These wreath hangers allow me to hang it anywhere on the front door and not block the windows. I like to hang my wreaths directly under our new lion doorknocker.

But you can also hang your wreath indoors. I especially love using wreaths for jazzing up an interior door or wall and I love hanging one from our kitchen vent hood around the holidays.

You don’t have to spend a lot to add some Fall Decor to your home. Dollar Stores are a great place to pick up a few florals and keep the cost low. You can always reuse the twig wreaths too!

For more wreath ideas, check out this modern hoop wreath tutorial here.

Until next time!

karen signature

~ See More of Karen’s Tutorials ~


karen from decor hintHello!  I’m Karen, the creator of the Home Decor and DIY Blog: Decor Hint. I’m a Native of the East Coast, but I currently live in beautiful Seattle with my hubby, our two wonderful children, and our spunky wheaten terrier.

You can usually find me with some sort of craft in one hand and a coffee in the other. And I’m always rearranging furniture or moving lamps from room to room. I have a passion (read: obsession) for decorating, DIY, and gardening. In short, I love making my house into a home.

Like many, I’m inspired by what I see in home decor magazines, but I’m not so inspired by the price tags.  Consequently, I love finding and creating beautiful budget-friendly home decor items. In a head to head competition, I bet you’d never know the difference between the designer items and my DIY creations!  Many of my DIY projects focus on sewing, crafting, upcycling and organizing. Some of my favorite projects have been making pretty wreaths, sewing my own tassel hand towels, and crafting these trendy wood bead garlands. I can’t wait to inspire you and spark your creativity through my DIY projects.

You can always connect with me on Pinterest, Twitter or Instagram.


How-to-faux-paint-a-fake-pumpkinHow to Fake a Fake Pumpkin

Have you seen those neon orange fake pumpkins and nearly vomited because you wouldn’t dream of decorating with them. I mean—get real—everyone would know they were fake. Ah ha, but have you seen the price tags? $1 – $6? For that price you might just be willing to take a leap of faith with me, wouldn’t you? Awesome, because I’m going to show you how to faux paint a fake pumpkin so you can decorate with them year after year and fool your friends.

Materials:

(I’ve included affiliate links for your convenience. I earn a small percentage from a purchase using these links. There is no additional cost to you. You can read more about affiliate links here.)

materials

Instructions:

Start by painting all the pumpkins with Chalk Paint (use gray, white, green and blue paint.) Allow the pumpkins to dry.

paint-pumpkins-french-linen


Painting Realistic White Pumpkins:

It helps to look up some pictures of real pumpkins to refer to.

pure-white-country-grey

Using the stencil brush, paint a mixture of grey and white on one of the pumpkins.

paint-white-mixture

Before the paint dries, dab some of it off with the sea sponge. (Keep your sea sponge dry, not wet during the process.)

sponge-off-white

Dip the stencil brush into the white paint and add paint on the outer most bumps on the pumpkins. This is adding highlights.

highlights_on-white-pumpkin

Dab the highlights gently with the sea sponge to blend.

sponge-off-white-2

Use the fan brush dipped in a small amount of green paint inside the pumpkin ridges. Dab the ridges with the sea sponge to blend.

white-gourd-pumpkin

Have you ever seen a truly unblemished pumpkin? I think not. It’s time to add some spots or marks on the pumpkin to truly fool your friends. Dip the end of the paint brush into brown paint and dot it onto the pumpkin. Blot the spot with a sea sponge and maybe even transfer a few new spots with the sponge.

add-blemishes

Paint grey around the base of the stem and into the grooves with the round paint brush.

add-dark-depth-around-stem

Paint brown and green paint onto the pumpkin stem. Blend slightly with the sea sponge.

paint-sponge-stem

Can you spot my fake white pumpkin? Well, of course you can because I just showed you how to paint it. But, it will definitely fool your friends!

grouping_left_pumpkins

Painting Realistic Blue Pumpkins:

Painting blue pumpkins uses the same technique as painting the white pumpkins, only using a few different colors.

Use the stencil brush to paint blue onto another pumpkin. Dab the blue paint while it’s still wet with the sea sponge.

add-duck-egg-blue-sponge

Use the fan brush dipped in gray and brown craft paint to fill in the ridges.

darken-crevices

Dab the paint with the dry sea sponge to blend.

sponge-crevices

Add some highlights with a mixture of grey and white. This serves two purposes. 1) It adds dimension. 2) It tones down the excess blue on the pumpkin.

add-highlights

Paint the stem the same way you learned above.

To truly fool people, set up your fake pumpkins with some real pumpkins and real gourds. Sooo, can you spot the fakes?

guess-the-fakes

How many did you get right? The metallic gourd is simply spray-painted with copper spray paint. But, I did try my hand at faking a green and yellow gourd using the same technique as the pumpkins, but adding green to the top and yellow to the bottom.

the_fakes

Okay, I’ll give you a second shot. Guess the fakes:

vertical-fall-vignette

How did you do this time? Ha, you can now apply for a job as an art forgery detective ;-).

truth_fake_gourds
Now seriously, how many people will be viewing your pumpkins that close? Umm, next to no one. Normally they’ll view them from afar.

full-living-room-shot

Get your paints and palette out and go fake some fakes! It will be our little secret.

fall-vignette-grouping

PHGFancySignDid you like this painting post? Ahhh, then I know you’ll like this Ballard Pear painting tutorial:

Or if you’re feeling like taking on a larger scale project…how about Faux painted bricks!

Or perhaps you’d like to perform some faux zinc painting magic:

You can do it! I know you can.

signature

How to Install Ceiling Plant Hooks

How to Install Ceiling Plant Hooks

Two Ways to Install a Ceiling Hook for Plants

There are a few different methods to install a ceiling hook to hang a plant from, but this post is going to cover two of them. The first method involves finding a joist, and the second method uses a toggle bolt. Don’t let the words “joist” or “toggle bolt” worry you though, both of these methods are very easy, and require few tools. Read on for instructions for two ways to install a ceiling hook.

Supplies Needed for installing a ceiling hook

Install a Ceiling Hook into a Joist

Hanging a plant hook using a ceiling joist is the most secure way and the safest, especially if you plan to hang a heavy planter. 

Materials:

(I’ve included affiliate links for your convenience. I earn a small percentage from a purchase using these links. There is no additional cost to you. You can read more about affiliate links here.)

Instructions:

Step 1

Decide where you will install the hook. Grab the stud finder to locate a joist in that area. Don’t have a stud finder, try one of these 5 Ways to Find a Stud without a Stud Finder. Make several passes to ensure you know exactly where the joist begins and ends, and mark the area accordingly.

Step 2

Drill a small pilot hole into the drywall and joist with a drill bit slightly smaller than the size of the screw being used.

drill pilot hole

Step 3

Hand screw the hook into place until it is flush against the drywall. (If it becomes too difficult to turn, you can put a screwdriver into the hook to use for leverage.)

Installing ceiling hook into joist

Step 4

Hang your planter and pat yourself on the back for a job well done!

Install a Ceiling Hook with a Toggle Bolt

If you don’t want to go through the trouble of finding a joist, or there isn’t a joist where you want to hang your plant, you can use a toggle bolt with the hook. (Just make sure your plant isn’t heavier than the specified weight limit for your ceiling hook.) It sounds intimidating, but it’s actually very easy!

First, what is a toggle bolt? A toggle bolt is a bolt with “wings” that you hold closed to insert inside a hole in drywall, and once inside the hollow wall the wings spring back open. They are great for using with ceiling hooks!

Toggle bolt open

Instructions:

Step 1

Decide where you’ll be installing the ceiling hook for your plant and make a small mark with a pencil.

Step 2

Make a small pilot hole where you just marked using a drill and a 1/8″ drill bit. If you happen to hit a joist consider going back to the first method above, otherwise you’ll need to move to the left or right of the joist.

Step 3

Using a 3/8″ drill bit and drill, make a larger hole into the ceiling drywall to fit the end of the toggle bolt.

Step 4

Holding the wings on the toggle bolt closed, gently insert the bolt (hinge side first) into the hole in the ceiling drywall.

Toggle bolt closed

Once inserted the wings will pop open, securing the bolt inside the drywall.

Installing ceiling hook with toggle bolt

Step 5

Screw the swag hook onto the bolt, and continue screwing until the hook is flush against the drywall. It’s helpful to pull down gently on the bolt while screwing the hook into place to keep it from just spinning in place.

Installed hook flush against ceiling

Step 6

Hang your planter and you are finished with this project!

ceiling hook with hanging plant

I hope this tutorial gives you the confidence to install a ceiling hook in your own home!

Check out my other tutorials HERE.

I’m Amanda, and I am the creator and voice behind the food and DIY blog, Domestically Creative. What started as a place to share updates with friends and family after we moved from Illinois to Tennessee and then to Texas, turned into a passion for finding creative and frugal ways to feed us and decorate our homes.

I have always had the “make it myself” attitude and I’m not afraid to bust out the power tools or get creative when it comes to decorating our home on a budget. You can usually find me scouring the local thrift stores, garage sales and estate sales looking for my next makeover (like this litter box cabinet), or dreaming up ways to make our new house feel more like home. My most recent project was giving my home office a much needed facelift. Some of the plans included creating a fun inspirational accent wall and adding pegboard to store my craft hoards.

I currently call Missouri home, where I live with my husband, dog, and 2 cats in a pretty dull, late 90’s split level. My husband and I both love to travel the U.S and recently purchased a small travel trailer to tag along in our journeys. In our free time together we can usually be found working together on a home project, exploring a new place, or just lounging with our pup, Delilah.

I’d love for you to connect with me on social media via Facebook, Instagram, Pinterest and Twitter!

See all of Amanda’s tutorials HERE.


If you liked this tutorial, you’ll love this two-tiered scrap wood plant stand:

Easy two-tiered plant stand made from scrap wood