Spring Foyer Vignette | Pretty Handy Girl

Spring Foyer Vignette | Pretty Handy Girl

My blogging friend Melissa Michaels just published a wonderful new book to help you “Love the Home You Have.” She focuses on simple things you can do to embrace the home you live in. With easy suggestions and achievable goals, she breaks down all the barriers you have when it comes to truly loving your home.

Love the Home You Have by Melissa Michaels

To help Melissa promote the book, I agreed to take on a quick little Love Your Home Challenge. Her book has 31 Small Challenges to help you love your home again. Each one is simple, quick and easy.

Love Your Home Challenge | Pretty Handy Girl

I decided to focus my efforts on our foyer. I still loved the little rustic IKEA hack chest, but the mirror was a little to drab. I’d been staring at the pussy willows all winter and needed an infusion of color.

foyer-before

Originally, I chose to work with the Day 30 suggestion to Paint Something. I removed the mirror and within 30 minutes I painted the wood slats with white chalk paint. Then I used some patina Rub ‘n Buff to give the edges an aged metal look.

Spring Foyer Vignette | Pretty Handy Girl

Much better.

Spring Foyer Vignette | Pretty Handy Girl

To continue adding some cheer to the foyer, I incorporated the Day 11 Challenge by Adding Fresh Flowers.

Spring Foyer Vignette | Pretty Handy Girl

I didn’t spend a dime on my flowers or vase. The red bud branches were clipped from our tree. And I slipped a mason jar into the boot for a fun and quirky vase. I think it’s a nod to the saying, “April Showers Bring May Flowers.”

Spring Foyer Vignette | Pretty Handy Girl

A small collected birds nest and feathers add an additional nod to springtime.

Spring Foyer Vignette | Pretty Handy Girl

I also painted an old frame with blue chalk paint and popped a piece of scrapbook paper into the frame for instant art.

Spring Foyer Vignette | Pretty Handy Girl

My total cost was $0! I can honestly say that seeing this springtime foyer vignette has made me happy.

Spring Foyer Vignette | Pretty Handy Girl

Within an hour, I was able to love this corner again. What can you do for $0 in your home? Read more

Build a Temporary Pergola with Trellises | Pretty Handy Girl

Build a Temporary Pergola with Trellises | Pretty Handy Girl

This tutorial to build a temporary pergola is perfect for a wedding, photo shoot, for some shade, or for your garden if you are okay with it not lasting forever.

My sister and I constructed it for our Thompson’s WaterSeal Bali Dream Deck to provide some romance and shade from the hot Bali sun.

Bali Dream Deck for Thompsons Water Seal | Pretty Handy Girl

Materials:

Build a Temporary Pergola with Trellises | Pretty Handy Girl

  • 2 Trellises (with double vertical construction)
  • 1 Trellis
  • 4 – 2 1/2″ wood screws
  • Drill bit
  • Drill
  • Clamps

Optional:

Instructions: 

Dry fit your trellis pieces together to create the pergola shape. Make note of where the top trellis intersects with the two side pieces.

Build a Temporary Pergola with Trellises | Pretty Handy Girl

Pre-drill holes through the top trellis piece at the four intersecting points.

Build a Temporary Pergola with Trellises | Pretty Handy Girl

Pre-drill holes into the top outer pieces of the vertical side trellises (where they meet the top trellis.) Read more

How to Build a Rustic Crate Centerpiece (No Power Tools Needed!) #DIYCourage | Pretty Handy Girl

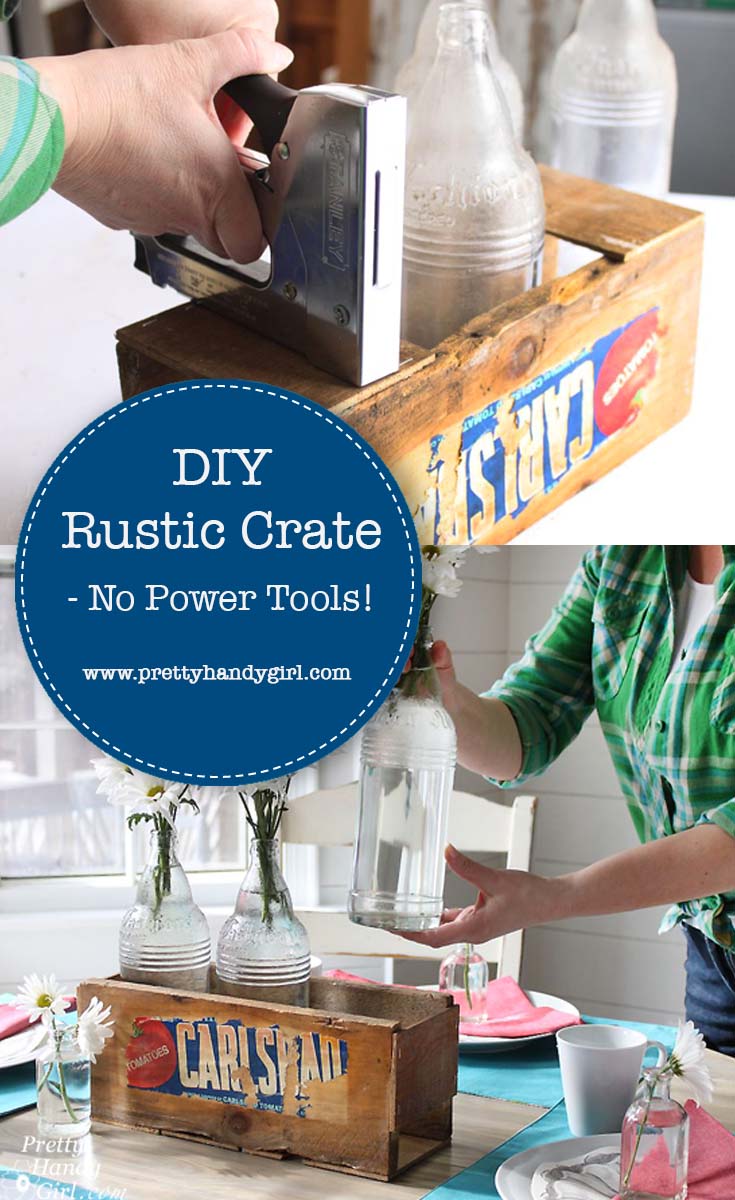
It occurred to me the other day that many woodworking projects may deter people simply because they don’t have power tools or they don’t know how to use them yet. For that reason, I created this tutorial to help you Build a Vintage Produce Crate Centerpiece using no power tools!
How to Build a Rustic Crate Centerpiece (No Power Tools Needed!) #DIYCourage | Pretty Handy Girl

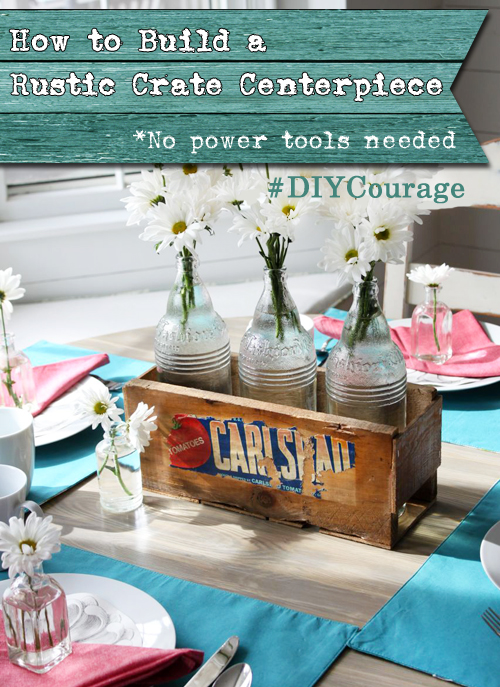
Build a Vintage Produce Crate Centerpiece – No Power Tools!

Many people are turned off by DIY projects because they fear using a power tool. Although I can tell you, I know you can learn how to use power tools safely, let’s go ahead and skip them today so you can get your hands busy creating a beautiful crate. This little vintage produce crate can be used anywhere in your house on display. Use it as a centerpiece, or in the office to hold files or utensils, or fill it with flowers or small items to give as a gift.

Regardless of how you use this little vintage crate, you’re going to love making it.

Materials:

(I’ve included affiliate links for your convenience. I earn a small percentage from a purchase using these links. There is no additional cost to you. You can read more about affiliate links here.)
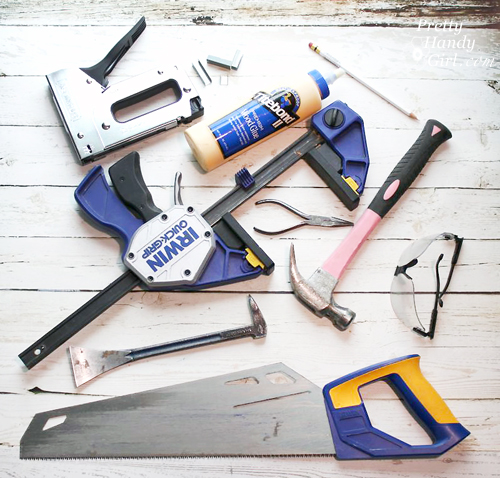
How to Build a Rustic Crate Centerpiece (No Power Tools Needed!) #DIYCourage | Pretty Handy Girl

Optional: 

Instructions:

I happen to stumble across this vintage produce crate and vintage bottles that a neighbor was giving away. If you don’t have a neighbor who periodically gives away vintage produce crates, you can ask your local grocery store for produce crates you can salvage. Or you can purchase a produce crate on Amazon. Or look for thin slats at the hardware store to use for this crate. (Then you can learn how to fake the Aged Wood Look yourself.)

How to Build a Rustic Crate Centerpiece (No Power Tools Needed!) #DIYCourage | Pretty Handy Girl

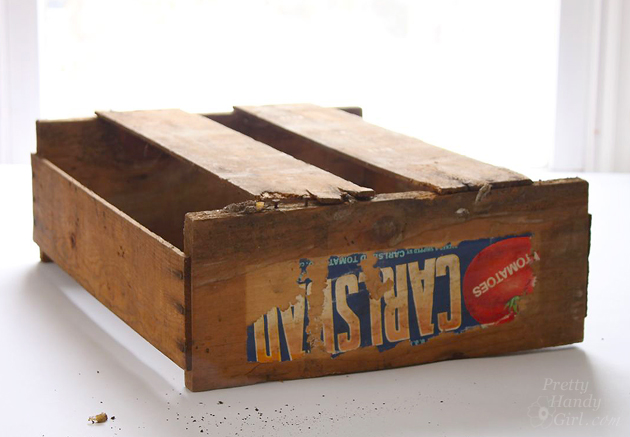
The crate I had was very rustic. So rustic, that I was able to pull the bottom slats off the crate with my bare hands. (In hindsight, I should have been wearing my gloves to avoid splinters.)

How to Build a Rustic Crate Centerpiece (No Power Tools Needed!) #DIYCourage | Pretty Handy Girl

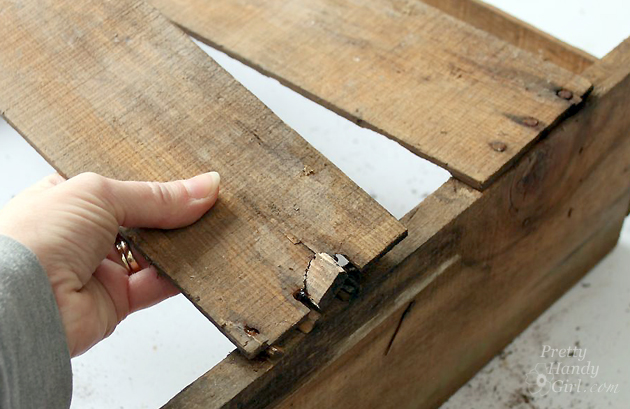
If you want to spare your hands, use a handsaw to remove the slats. Set them aside for use later.

How to Build a Rustic Crate Centerpiece (No Power Tools Needed!) #DIYCourage | Pretty Handy Girl

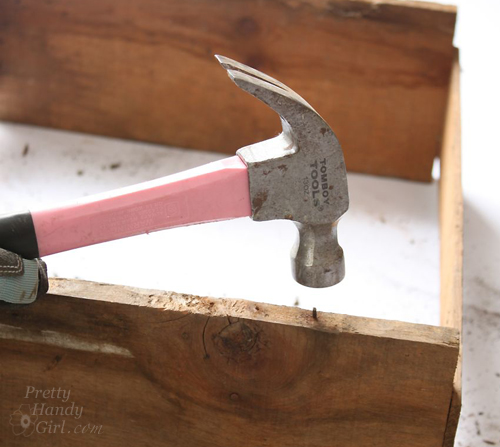
After removing the slats, pry up the nails with a prybar. Be sure to wear gloves to protect your hands. Stubborn nails can usually be wiggled out with the needle-nosed pliers.

How to Build a Rustic Crate Centerpiece (No Power Tools Needed!) #DIYCourage | Pretty Handy Girl

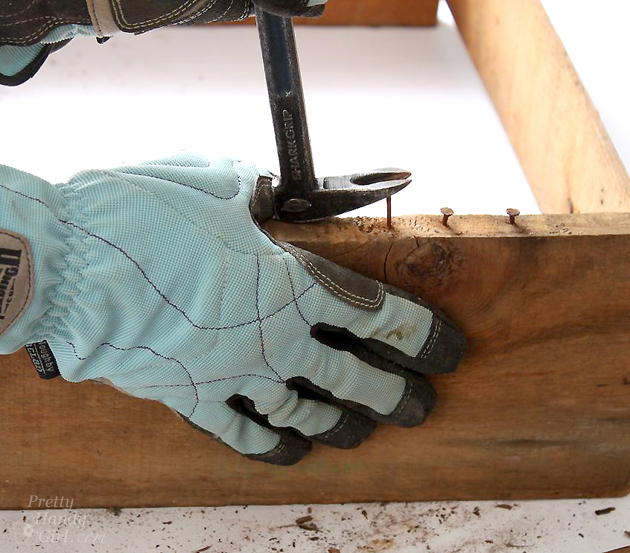
Any nails that are too rusty to remove can be hammered into the wood.

How to Build a Rustic Crate Centerpiece (No Power Tools Needed!) #DIYCourage | Pretty Handy Girl

Align the front and back of the produce crate with the bottles or vases you will display in your crate. Or use 5″ as a general measurement from the outside front to outside back. Measure the distance to cut your sides, or just lay one of the slats next to the front and back and mark where to cut it with a pencil.

How to Build a Rustic Crate Centerpiece (No Power Tools Needed!) #DIYCourage | Pretty Handy Girl

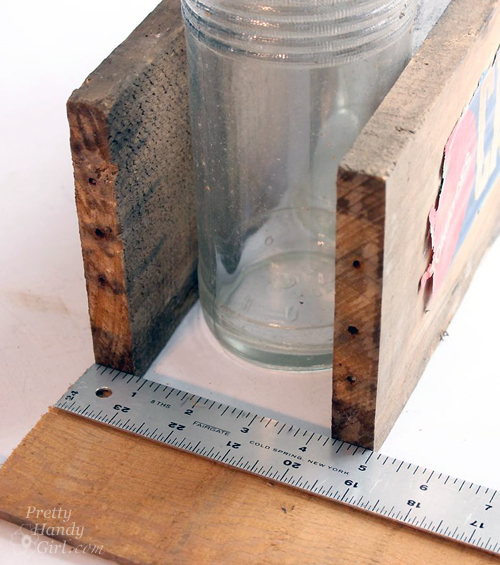
Cut down the salvaged slats to 5″ widths (or your own bottle measurement). Using a miter box will help keep your cuts square.

How to Build a Rustic Crate Centerpiece (No Power Tools Needed!) #DIYCourage | Pretty Handy Girl

Squeeze wood glue onto the bottom of the produce crate front and back pieces.

How to Build a Rustic Crate Centerpiece (No Power Tools Needed!) #DIYCourage | Pretty Handy Girl

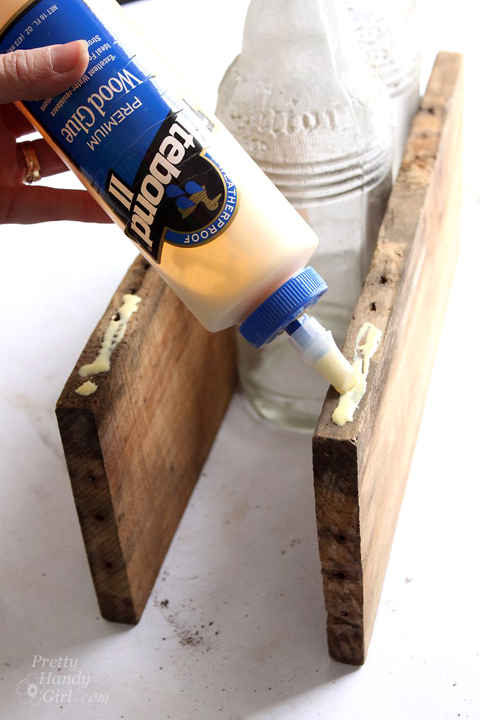
Set one of the 5″ slats into the glue and staple the slat into the crate front and back. Three staples per side should hold the slat while the glue dries. If the slat doesn’t lie flush with the crate, you might need to clamp the slat while the glue dries.

How to Build a Rustic Crate Centerpiece (No Power Tools Needed!) #DIYCourage | Pretty Handy Girl

Repeat for the opposite side by stapling the slat to the bottom. Continue working toward the center of your crate.

How to Build a Rustic Crate Centerpiece (No Power Tools Needed!) #DIYCourage | Pretty Handy Girl

Attach one slat to the sides of the crate with wood glue and staples.

How to Build a Rustic Crate Centerpiece (No Power Tools Needed!) #DIYCourage | Pretty Handy Girl

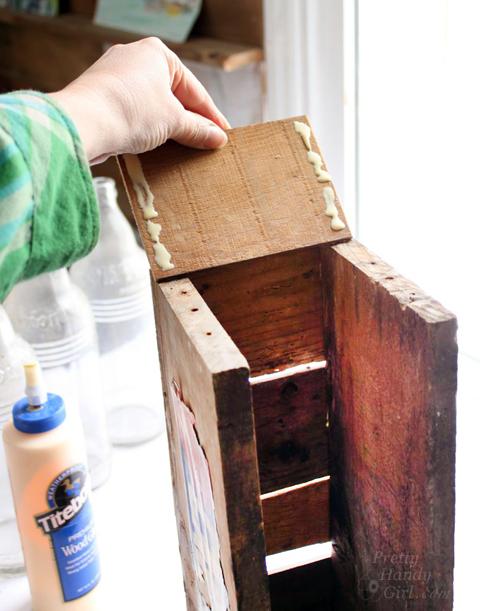
You’ll notice I left spaces between the slats for that vintage produce crate look. If you want, you can butt the slats tight up against one another. Clamp your crate as the wood glue dries.

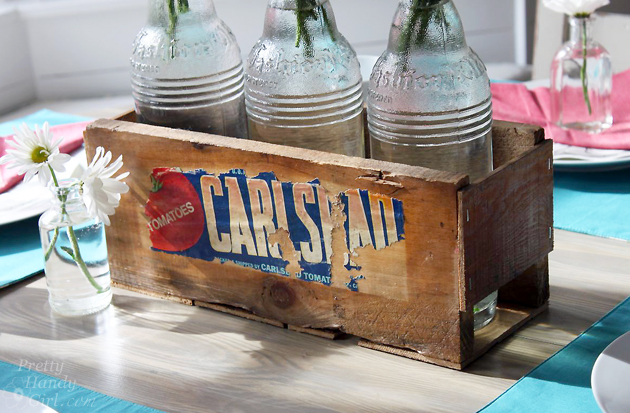
If you have a true vintage produce crate, you might need to secure what is left of the label. Gently wipe the crate and label with a damp rag.

How to Build a Rustic Crate Centerpiece (No Power Tools Needed!) #DIYCourage | Pretty Handy Girl

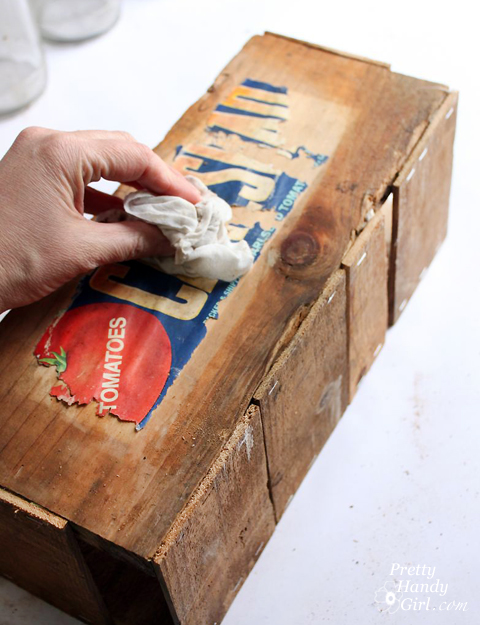
Apply a coating of Mod Podge to the underside of any parts of the label that are peeling up. Then apply a second coat of mod podge over the entire label to seal it to the crate.

How to Build a Rustic Crate Centerpiece (No Power Tools Needed!) #DIYCourage | Pretty Handy Girl

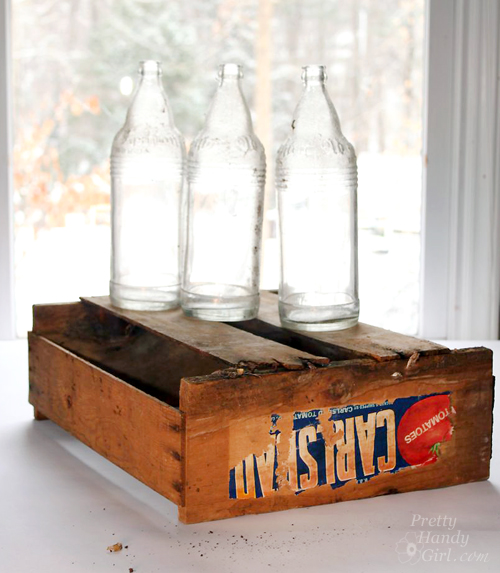
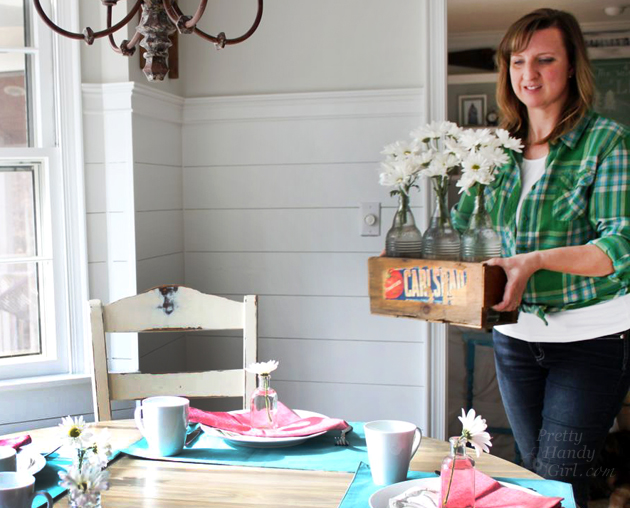
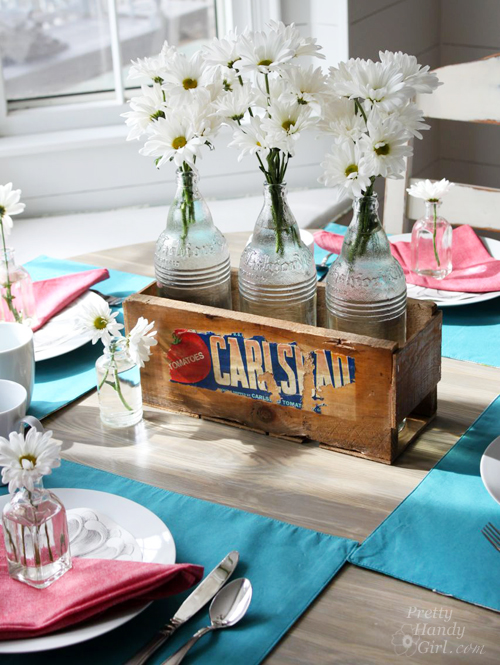
When the crate is dry, load it up with vintage bottles filled with fresh flowers.

How to Build a Rustic Crate Centerpiece (No Power Tools Needed!) #DIYCourage | Pretty Handy Girl

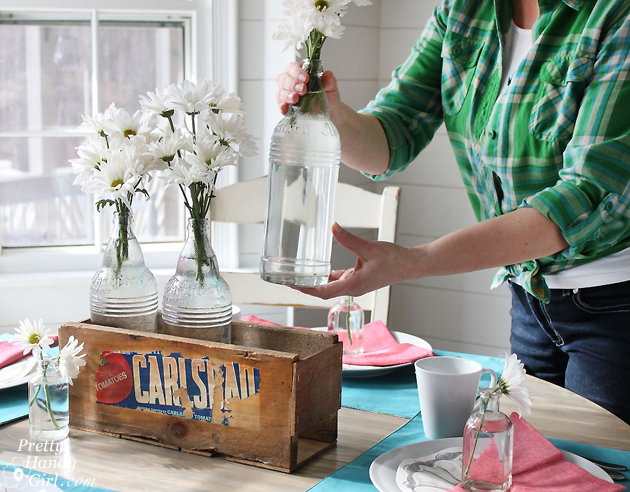
Place it on your table and invite a friend for lunch.

How to Build a Rustic Crate Centerpiece (No Power Tools Needed!) #DIYCourage | Pretty Handy Girl

The conversation will surely turn to your Rustic Produce Crate Centerpiece you made yourself.

How to Build a Rustic Crate Centerpiece (No Power Tools Needed!) #DIYCourage | Pretty Handy Girl

Which you can proudly say you made…by hand…without any power tools.

How to Build a Rustic Crate Centerpiece (No Power Tools Needed!) #DIYCourage | Pretty Handy Girl

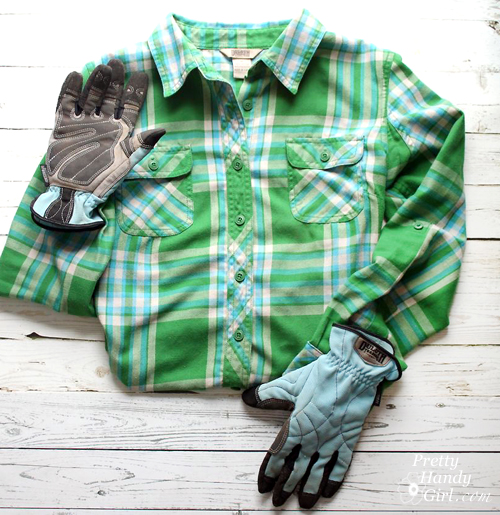
Want to know where I got my shirt? The Duluth Trading Company Crosscut Performance Flannel Shirt is super comfortable. It’s like wearing your PJs all day. The flexible gussets in the back give you more freedom of movement while working. FYI, the crosscut flannel shirt is on clearance right now. If you don’t see the color you want, check back in early fall to snag your favorites (but don’t wait, they go fast.)

How to Build a Rustic Crate Centerpiece (No Power Tools Needed!) #DIYCourage | Pretty Handy Girl

PHGFancySign


Pin for later!

Build a Vintage Produce Crate Centerpiece using no power tools whatsoever! | Pretty Handy Girl #DIY #rusticcrate #DIYcrate

Painted Chandelier Sleeves | Pretty Handy Girl

Painted Chandelier Sleeves | Pretty Handy Girl

When you were perusing my holiday tablescape post did you see my fancy copper chandelier sleeves? My chandelier was looking a bit dingy with the aged yellowing sleeves. I decided to spray paint them copper for a new look.

To update chandelier sleeves, you can paint them any color you like.

Simply remove the light bulbs.

Painted Chandelier Sleeves | Pretty Handy Girl

Lift the sleeves off.

Painted Chandelier Sleeves | Pretty Handy Girl

Wash the sleeves off and dry them.

Painted Chandelier Sleeves | Pretty Handy Girl

Then pick your favorite spray paint color and spray paint them. I used Rust-Oleum High Heat Ultra Enamel Spray – Aged Copper to paint mine.

Painted Chandelier Sleeves | Pretty Handy Girl

That update was so easy, I might spray paint them again in a year. I’m thinking light blue or silver next time. What do you think?

PHGFancySign


Pin for later!

See how Pretty Handy Girl updated her dingy, aged yellow chandelier sleeves with copper spray paint! | Lighting DIY | Pretty Handy Girl #prettyhandygirl #DIY #lightingDIY #chandelierDIY

Metallic Color Block Canisters | Pretty Handy Girl

Metallic Color Block Canisters | Pretty Handy Girl

I’m back with another easy Lowe’s Creative Idea this month. When you get tired of your cobalt blue canisters you can easily spray paint them with a metallic color block pattern. That’s exactly what I decided to do with my thrift store canisters.

I’ve been on a major mission to purge things I no longer use or love from my house. I have almost completely filled our dining room with things to donate. I had contemplated donating my cobalt kitchen canisters because the color wasn’t making me happy anymore. But, then I realized that I could give them an entirely new look with some spray paint.

Materials:

Instructions:

Remove the lids, the metal ring, and spoons from your canisters.

Metallic Color Block Canisters | Pretty Handy Girl
(Wood plank photo backdrop courtesy of Leen the Graphics Queen.)

Use a sanding block to lightly rough up the surface of the canisters. Wipe all the sanding dust off with a damp rag.

Metallic Color Block Canisters | Pretty Handy Girl

Spray the outside and base of the canisters with Valspar Premium Primer. Read more