rustic wine bottle centerpiece

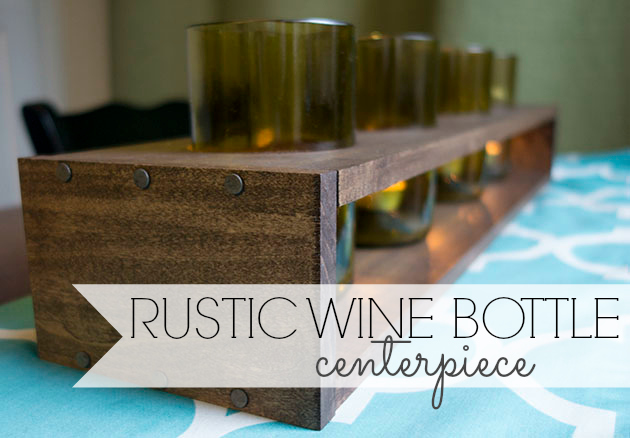
Hey everyone!  Jacque here from The DIY Village again to bring you another quick DIY tutorial! A few years ago I was given a really cool set of drinking glasses made out of old wine bottles.  Recently we purchased some new glasses but I wasn’t ready to donate the old glasses quite yet and decided to come up with a way to recycle them and keep them functional in our home.  After some thought, my rustic wine bottle centerpiece was born.

MATERIALS:

  • 1/2″ x 4″ x 4′  Poplar Board – Cut into 2- 5 1/2″ wide pieces
  • 1/2″ x 5 1/2″ x 4′ Poplar Board – Cut in half
  • 12 – 8 Penny Nails (Truss Hanger Nails)
  • 1/8″ Drill Bit
  • Drill
  • 3 1/2″ Hole Saw
  • Clamp
  • Sandpaper
  • Drill Press
  • Straight Edge (Speed Square)
  • Sliding Rule Square
  • Walnut Gel Stain
  • Foam Brush
  • Paper Towels
  • Pencil

Instructions:

measure in

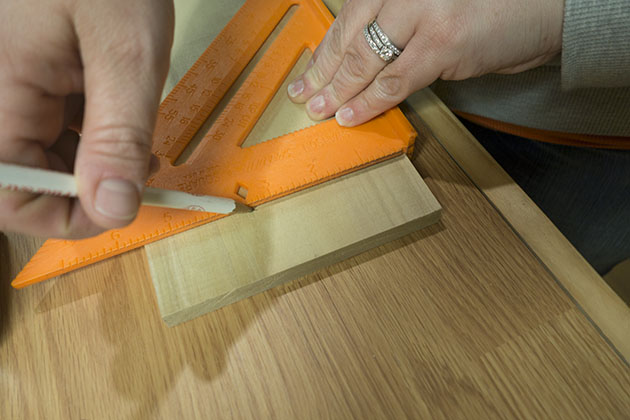
Start by cutting the 5 1/2″ board in half to leave you with  two boards approximately 24″ long.

measure over 7

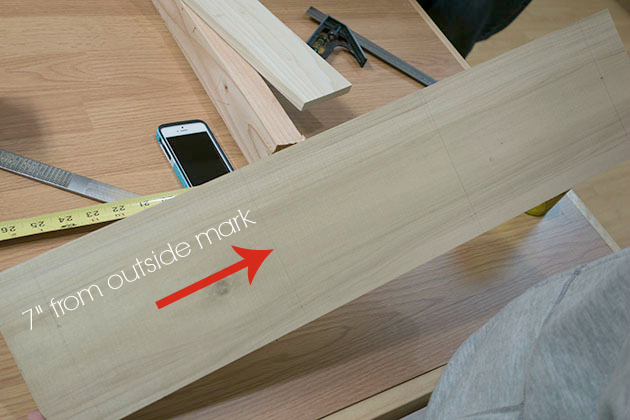
Measure 3.5″ out from the center line and mark a line with your speed square. Repeat on the opposite side of your center line. Measure 7″ out from the two center lines and make a mark with your speed square. These will be the center points for your four openings.

find center

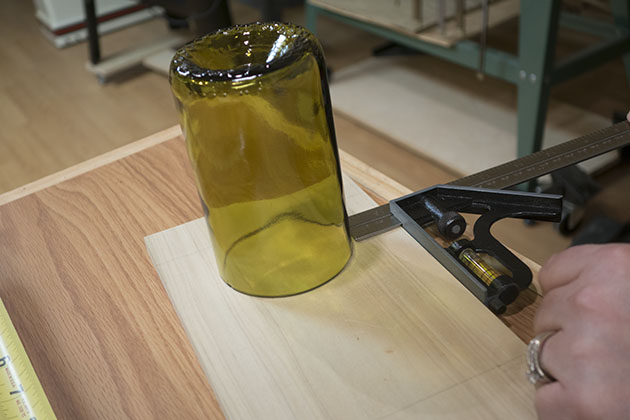
Use the wine bottle glass as a guide to help center the glass on the board.  Set the sliding rule square and use as a guide so that the glasses will be straight across the rest of the board.  Using a pencil to trace around the outside edge of the glass, repeat for all four holes. Read more

Racing Stripe Mirror Makeover | Pretty Handy Girl

Racing Stripe Mirror Makeover | Pretty Handy Girl

While my sister and I were renovating the Topsail Beach condo we had a strict budget. Finding a large mirror for less than $15 was challenging until I found this mirror with potential. I know my sister was doubtful, but I had a vision. Some red milk paint, lattice and glue would make this racing stripe makeover complete!

Racing Stripe Mirror Makeover | Pretty Handy Girl

To transform the mirror, I disassembled the top and cut off the panel portion using my Dremel MultiMax. I salvaged the top crown moulding and re-attached it to the new top of the mirror with glue and finish nails.

Then it was time to add stripes.

Materials (some links are Amazon affiliate links):

Instructions:

Tape off the edge of the mirror where it meets the frame. Paint two coats of Miss Mustard Seed Tricycle red paint onto the frame. (See this post for painting with milk paint.)

Racing Stripe Mirror Makeover | Pretty Handy Girl

After the paint dries, wax it or leave it unfinished. Mark the center of the frame at the top and bottom of the mirror.

Racing Stripe Mirror Makeover | Pretty Handy Girl

Cut pieces of lattice to fit the mirror frame width. (I used three pieces of lattice and cut a fourth piece in half for the outer stripes.) Pre-paint the lattice pieces ironstone (white) and let dry.

Wet the frame and the back of the lattice. Apply a small amount of Gorilla Glue to the backs of the lattice.

Racing Stripe Mirror Makeover | Pretty Handy Girl

Line up the center lattice piece with the pencil mark. Attach it and the other two pieces beside the middle lattice.

Racing Stripe Mirror Makeover | Pretty Handy Girl

Use a ruler to create a space between the middle stripe and the outer small lattice piece. Glue the outer pieces in place.

Racing Stripe Mirror Makeover | Pretty Handy Girl

Set a weight (or paint can) on top of a scrap board and the lattice pieces while the glue dries.

Racing Stripe Mirror Makeover | Pretty Handy Girl

Remove the weight. Paint the top and bottom edge of the mirror frame white to create the illusion that the stripe continues around the frame edges. Distress the lattice pieces with sandpaper if you want a rustic look.

Racing Stripe Mirror Makeover | Pretty Handy Girl

Hang your mirror on the wall and admire! Not bad for $15, two coats of paint, and some scrap lattice!

Some red milk paint, lattice and glue transform this $15 find into a charming racing stripe mirror perfect for a boys' room! | thrift store makeover | DIY mirror | mirror tutorial | #prettyhandygirl #DIY #tutorial

The mirror hangs happily in the twin bedroom at the Topsail Beach Condo. Click here to see the rest of the condo!

Some red milk paint, lattice and glue transform this $15 find into a charming racing stripe mirror perfect for a boys' room! | thrift store makeover | DIY mirror | mirror tutorial | #prettyhandygirl #DIY #tutorial

Hope you never turn down a $15 mirror again ;-).

PHGFancySign


Pin for later!


wood-block-picture-frames

Wood Block Floating Picture Frames | Pretty Handy Girl

We are days away from Christmas and I’m sure there is someone on your list that you just can’t figure out what to get for them. I have the perfect solution! Make them a wood block floating picture frame using scrap 2×4″ lumber and plexiglass.

If you don’t have scrap 2×4’s lying around, you can purchase a 2x4x8 foot stud for less than $4! You could make 16 photo frames out of that one board! (Granted, you’ll need to buy the plexiglass for each.)

Materials:

  • 2 – 2 x 4s (cut to 6″ lengths)
  • 4 – 6″ x 9″ pieces of plexiglass (3/32″ thickness)
  • Ipswich Pine Stain
  • gel stain or Minwax Express color
  • small detail paint brush
  • pencil or pen
  • photos
  • tape
  • rag
  • optional: scrapbook paper, double stick tape

Tools:

Instructions:

Set your table saw to a 10 degree bevel.

Wood Block Floating Picture Frames | Pretty Handy Girl

Set the saw blade to a depth halfway through your block (about 7/8″ deep.) Set the fence to 2″ from the blade.

Wood Block Floating Picture Frames | Pretty Handy Girl

Use your GRR-RIPPER to safely guide the 2×4 over the saw blade. Check to see if two pieces of plexiglass will fit in the groove created by the saw blade.

Wood Block Floating Picture Frames | Pretty Handy Girl

If not, nudge the fence over slightly and make a second pass over the blade. Check to see if the plexiglass will fit now. If not, repeat the process until they fit snugly. Read more

Holiday Tablescape | Pretty Handy Girl

Holiday Tablescape | Pretty Handy Girl

Can we be honest for a minute? This year when Jen Woodhouse from The House of Wood asked me if I wanted to participate in a holiday tablescape blog tour I nearly replied, “No way!”

Holiday Tablescape | Pretty Handy Girl

Not because I was too busy…

Holiday Tablescape | Pretty Handy Girl

… and not because I didn’t want to.

Holiday Tablescape | Pretty Handy Girl

The truth is, I’ve never created a tablescape before. Yup, it’s true. Go ahead and google “Pretty Handy Girl tablescape,” I’ll wait.

Holiday Tablescape | Pretty Handy Girl

Did you see my Pinterest board filled with tablescapes pop up in the search results? Yup, I had to create one for inspiration.

Pinterest board of Tablescapes

The other reason I was cringing at the idea of a tablescape is because I don’t own chargers. Well, I own lots of chargers for my battery powered cordless tools. (Bah da dun. Sorry bad joke.) How can you create a tablescape without chargers?! Read more

Pretty Handy Girl's Holiday Home Tour 2014

Pretty Handy Girl's Holiday Home Tour 2014

Welcome to my Holiday Home Tour 2014! If you are just arriving here from The DIY Showoff, welcome! If you came here first, be sure to catch up on the other tour participants by following the links at the end of my post. A special thanks to Chris from Just a Girl for putting together this fabulous tour.

I’m thrilled to be able to open my door and let you in to see all the decorating I’ve been working on. I admit to you that my home doesn’t normally look this clean. And there may be a pile of papers or shoes behind a door, so watch your step.

Pretty Handy Girl's Holiday Home Tour 2015

I love to update fake pine wreaths every year by tucking new elements inside. This year I used some tree picks from Lowe’s. You can see my old Presto Chango Christmas wreath if you want some more quick ways to dress up a cheap wreath.

Pretty Handy Girl's Holiday Home Tour 2015

The front door wreaths benefited from a few sprigs of cut holly from the yard.

Pretty Handy Girl's Holiday Home Tour 2015

Adding some ornaments to my little red wagon planter will take the place of plants until the spring.

Pretty Handy Girl's Holiday Home Tour 2015

Come on inside the foyer, I know it’s a little cold outside.

Pretty Handy Girl's Holiday Home Tour 2015

The kids’ advent calendars are filled and await their eager hands each morning. The colorful little houses look right at home on my IKEA hacked cabinet.

Pretty Handy Girl's Holiday Home Tour 2015

This year I wanted to add a lit garland onto the stair railing! If you look closely you might see a white cord taped around the baseboard leading into the office. I refuse to be dissuaded by the lack of a nearby outlet. Read more