How to Make New Wood Look Old, Weathered and Rustic
How to Make New Wood Look Old, Weathered and Rustic
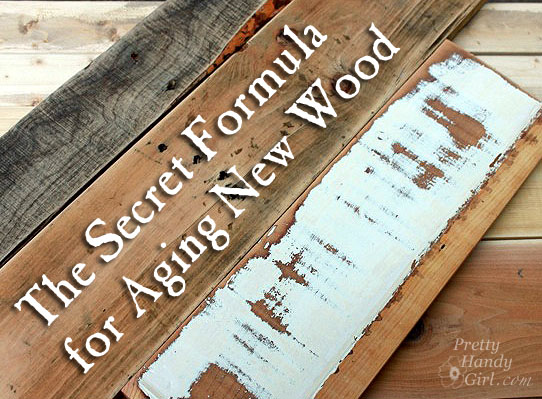
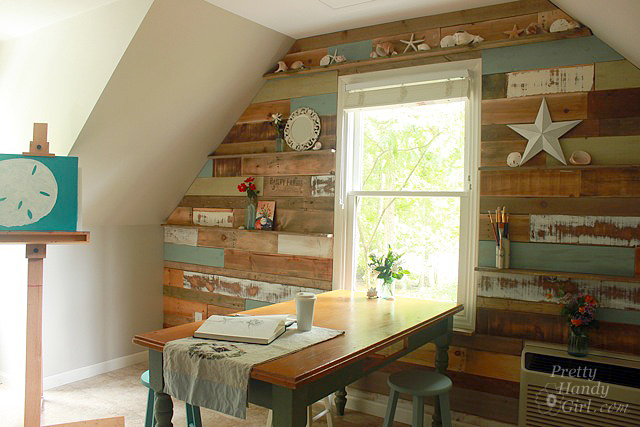
I have a confession to make. All the wood that you saw on my art studio wall is not exactly old or salvaged. Will you forgive me if I share with you the Secret to Make New Wood Look Old, Weathered and Rustic?
In order to have enough wood, I had to buy some new pine boards off the shelf at Lowe’s. I actually chose furring strip boards because they are already chewed up and imperfect.
But, I also grabbed a few other supplies:
- General Finishes VanDyke Glaze
- General Finishes Pitch Black Glaze
- Minwax Early American Stain
- Rustoleum Sunbleached Stain
- Rubber Gloves
- Rag
- Wide flat brush
Optional: General Finishes Flat Out Flat Top Coat to protect furniture.
(I’ve included affiliate links for your convenience. I earn a small percentage from a purchase using these links. There is no additional cost to you. You can read more about affiliate links here.)
The Secret of Weathered Boards:

Old rustic boards are gray and have enhanced grain and plenty of dings and character. Replicating that look can be tricky unless you have the right tools, glazes, and a few tricks up your sleeve.
I wrote another post about aging and antiquing that shares some other techniques, but today I’ll focus solely on making new lumber look old.
Weathered boards have a warm gray color. To create this color I stained the boards with Rustoleum sunbleached. Then wiped off the excess.

Next I added a little Minwax Early American and wiped it off.

The results are the blue-gray weathered look. For more dimension and detail try adding the glazing technique described below.

My Secret Rustic Glaze Formula:
UPDATE: Valspar stopped making the products I originally used. I’ve tried a lot of alternatives, and settled on General Finishes Van Dyke and Pitch Black glazes to get the same look. The good news is that you don’t need the additional clear mixing glaze.
There is nothing in this world more beautiful to me than rustic barn wood. Those dark chocolate timbers that look like they’ve been gathering dirt for decades are gorgeous in my eyes.
To fake this look I created a glaze that works wonders when wiped over new lumber.
Mix 2 parts Van Dyke glaze and 1 part Pitch Black glaze.
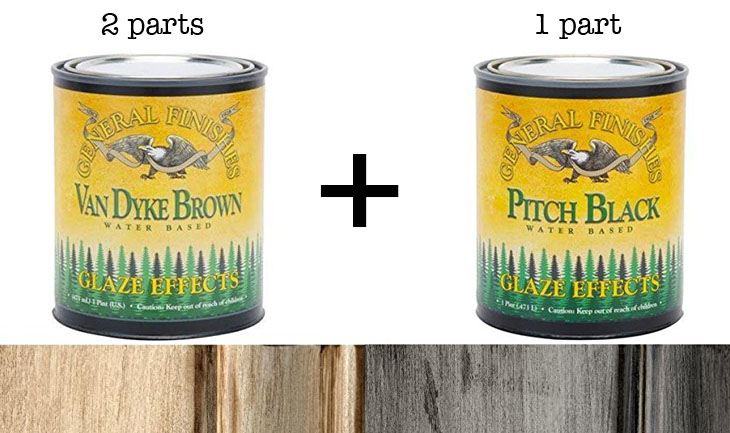
Mix thoroughly. The resulting color should be a very dark chocolate color. Adjust your color by adding more VanDyke or more Pitch Black.

Dip your flat brush into the glaze and drag it over the wood. The glaze really accentuates the grain in the wood.

Shake or tap the brush on a stick to give your lumber age freckles.

For more uniform color, brush the glaze over the entire board (don’t forget the ends of the wood.)

Rub the glaze into the wood and wipe off any excess.

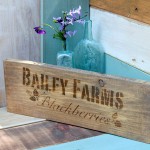
Take a look at the difference:

Not bad, did you know this farm crate sign is brand spankin’ new?

I hope I fooled you. Here’s the tutorial for making the farm crate sign.
In the meantime, have fun aging those new boards! I’d love to hear if you try these techniques and how they worked for you.


I have some white glaze and dark glaze. Could I put on the white thickly and then glaze the wood again with the dark glaze? I don’t have a vehicle to go the store and I’d really like to try this today. Thanks for your help.
I hope you experimented with what you have and it worked for you.
Is this technique effective on the outside of the house that gets direct sunlight?
I have burnt and clear coated (did not sand the wood before or after) the outside of my house twice in 2 years because I get direct sunlight, and the sun continuously fades it all away everytime. I can’t keep the weathered rustic look.
-Frustrated
Given your situation, I think you should talk to a paint specialist who can recommend a paint made for direct sun.
Sadly the bluish gray sunbleached isn’t available anymore.
Lovely detail DIY instruction, I will try to make some sign for my new house.
I will be checking out the other posts in this technique! It looks wonderful! I must admit, I like the wood with freckles the best!
Hello,
Thanks for your efforts in putting together this tutorial. My results so far haven’t been quite what I was hoping for. I did the first step of the sunbleached stain, let it sit for about 5 min. and then wiped off. Then I waited for drying time, then did the minwax step. At this point the board still looks very grey like the minwax stain didn’t do anything. Two questions….was I supposed to apply the sunbleach and instantly wipe it off? After that am I supposed to go straight to the minwax without waiting for dry time?
Thank you
Chris, I don’t let the sunbleached stain sit long at all. Just wipe it off immediately. I think I added the Minwax shortly after. You might want to try two coats of the Minwax. And make sure it is stirred up well.
Thank you so much for replying Brittany! I tried wiping off immediately and going straight to the minwax and that came up with much better results! Now my question is do you go straight to the glaze as well, or do you let the stain dry overnight first?
Thank!
Heck no. I’m too impatient to wait. Go right to the glaze ;-).
I absolutley love this and it is perfectly the look i am going to try and create for a hutch i am redoing. I would like the inside back panel to be the heavy blue -grey weathered barn wood and the outside more of a white wash aged wood look. I just want to make sure I got this process right. Do you start with sunbleached stain, then miniwax early american stain and wipe off and then you would proceed with the secret rustic glaze??? OR do you use first?
Thanks for this information! My husband and I just finished an accent wall in our bedroom using pallet wood this weekend, and your blog was really useful! We definitely took your idea of staining the wood, as the pallets we salvaged were not doing well aging on their own.
Thanks for sharing. This will win me some huge points with the wife. 🙂
Awesome! Everyone needs bonus points ;-).
I use to have a bottle of the Valspar antiquing glaze but used it all up bought it at Lowes and they now tell me that I have to buy a case from the company as they no longer sell it individually at the stores. Need a bottle to finish a project I am working on, please let me know if you know of a place where I can buy a bottle?
Carolyn, I’ve been trying the Modern Master’s glazes and found a look I like. It’s not the same exact color, but similar:https://prettyhandygirl.com/aging-antiquing-furniture-legs/
4 years late to this party and Lowe’s has discontinued the Valspar glazes. Boo!!!!
Love this !! Did you have a color added to the rustoleum sun bleached ? That bleu is so pretty, would be overjoyed to know !!
Donnie, I don’t think the blue color in that photo is accurate. I think the photo came out a little blue. The sun-bleached stain gives a cool gray. You can purchase a sample of blue paint and water it down to create a wash to tint your boards a little more blue. I suggest testing it on some scrap wood first.
Just found this tutorial & I’m loving it. How long do I need to wait between applying the miniwax & the next coat?
If I wanted to get more of a honey colored board, what paint colors would you recommend I mix with the clear mixing glaze? Thanks
Fay, you need to wait until the minwax is dry to the touch (not tacky.) Regarding the honey color, I’d start with a stain color that will mimic that color. Then if you want more depth and aged look you can follow up with the glaze.
I will be doing to secret rustic glaze formula on a wood plank top coffee table. Do you think I need to do a polyethylene coat on top to protect it from stains?? Thoughts?
Meredith, yes, it’s always a good idea to finish with a sealant. You can use polycrylic by Minwax for easier clean up.
The Lowes / Home Depot by me no longer sells Translucent Color Glaze 🙁 Any suggestions for a substitute? Thanks!
Hi, I need some help. I used a oil based rustoleom stain weathered gray. Which came out looking a very blue grey. I did some researching to tone it down. They said use a Ralph Lauren glaze tinted Black Silk. The man at Home Depot told me I can not use that as it is a water based glaze. I need this furniture done in a week and need help on toning it down. Any answers would be appreciated. She would like a true weathered look.
Jackie, I think you need to create a test board and try the glaze. If it were me, I have some great glazes from Modern Masters (https://prettyhandygirl.com/aging-antiquing-furniture-legs/) that I think would work because they don’t use a lot of glaze. It’s more color. You could also try dry brushing another stain on top.
thanks for taking the time to do this tutorial!!!
Hi
It seems that they do not make the translucent color glaze anymore. Do you know of any alternatives? Or can the glaze be effective without?
Thank You
Patrick, yes, sadly they discontinued the Valspar glazes. ;-( BUT, I found a comparable product, but the colors are slightly different. Modern Masters sells a clear glaze and tints that you add to the glaze. I tried a mixture of VanDyke Brown and Coffee Bean on this table leg and liked the look: https://prettyhandygirl.com/aging-antiquing-furniture-legs/
You could use the same glaze on wood to get that aged look. Look on Modern Masters site to find out where they sell the glazes. http://www.modernmasters.com/wtb.asp?type=1
Hi,
I really like the antique look to those boards. I am trying to do something similar with a pine headboard – totally brand new. But I want it to look more like the white and faded pieces you have on your wall. (Actually the board to the right, at the top of the star, is Exactly how I want my headboard to look.) How did you make the boards lighter?
Really beautiful wall, by the way!
You’ll probably need to bleach or paint your wood. All wood is different, I recommend experimenting.
I tried this 3 part glaze mixture today. LOVE the look!!! Best result I’ve seen.
Hi there. So I found all the valspar products finally. My project that I am doing is with brand new douglas fir and I already sanded it down pretty good. Is the effect with all the valspar products going to show up like your did being sanded?
Michael, I’d work on a test piece first. All wood is different, so the colors and effects will vary, but you should be able to make your wood look much much older.
Hi. I am trying to locate all the valspar products you have listed and am finding it somewhat difficult. It there any alternatives or do you know where I could find these products? I tried lowes and they did not have it.
Thanks!
Michael, I noticed that our Lowe’s doesn’t carry it either. I actually called Valspar today and they confirmed that it is no longer manufactured. I’m looking for a similar product and will get back to you or I’ll have to write a tutorial on creating your own Asphaltum glaze ;-).
Ok great. Glad I wasn’t going crazy. I appreciate your help.
Hello
I am wondering if I could use Valspar antiquing glaze lightly OVER my painted EXTERIOR shutters? Most glazing projects I see are for indoor projects. I love the look of the waxes used over chalk paint but I don’t think I can use any waxes on exterior wood. My shutters are painted a french blue using oil based paint and I want to add a little patina to them.
I think it would work fine! If you wanted to be double safe, you could put a coat of polyurethane over it.
Could you be so kind as to give me your suggested recipe for a Grey weathered finish (not blue!) with a touch of brown undertones? And which wood would be best? Thanks so much!
You’d probably have to experiment. Maybe try staining the wood and creating a gray glaze for on top of the stained wood.
Hi there!
I love the look of your glazed wood and decided to head to lowes and get all the stuff to try to make a “wainscoting” for my bathroom. I used a different wood than you and it definitely turned out darker than yours. It doesn’t have any grey to it and it looks just like the mocha brown color. What do you suggest I do to get less brown and more grey? Thank you!
Kelli,
Did you use the Rustoleum sunbleached stain first? If so, then you might try to make your own glaze using some gray acrylic paint and dry brush that on top.
There is also wallpaper & anaglypta wallcovering that resembles wood. Burlap, canvas, or feedsacks are other ideas. Thin unfinished veneer also comes in sheets, but that would be more expensive.
I LOVE repurposing items, especially boxes. I get a regular shipment of acai juice and the shipping containers are an EXCELLENT size for bathroom waste cans, storage bins, etc. At first I was covering them with decorative contact paper, then I began decoupaging them with magazine pages (another item I hate to toss—beautiful pictures, why waste them??). Any other ideas for giving these boxes a make-over and new use??
Elizabeth, are they wood or cardboard?
They are cardboard. If I knew how to post a picture I would show you.. ?
What if you used wood texture scrapbook paper to make them look like rustic wood crates?!
I think this is the best method I’ve seen online for making wood look antique! However, I’m a little worried with my teeny tiny budget that the three glazes are going to add up to be a lot. I tried looking up the cost but couldn’t find anything. I was wondering if perhaps you remember approximately how much they cost?
Hello I tried your technique, here is what I did:
I applied the sunbleached first (about three coats) and then let it dry. Afterwards I applied the early american. I did not obtain the blue-grey results in the picture. What would you recommend I do to achieve those results.
Isaac, it probably depends on your wood you are using. I used pine. I also only stained it one coat. You might try mixing a latex paint in the color you like with water to create a wash instead of using a stain.
I wanted to ask a silly question. When you mix your glazes you say part. Does that mean a cup or do you just pour it in there and mix it up until you find the mocha looking color?
Kayla, I do kind of eyeball the mixture when mixing it. But, you can experiment. I’m not sure the exact mixture, but you wouldn’t want to use cups or you’d have a LOT of glaze. But, here’s an example: Mix 4 parts clear mixing glaze with 2 part mocha glaze and 1 part antiquing asphaltum glaze. (try 1 cup clear glaze, 1/2 cup mocha glaze, and 1/4 cup asphaltum) But, even still that’s a lot of the mixture, so try halving that recipe if you only need a little. Good luck.
Thank you so much for this tip! My husband and I used this recipe to turn a new treasure box–to look old! It looks awesome!
Thank you again!
Your wall is AMAZING – nicely done!! Thanks for posting your “how-to” on the wood (you would never know it was new wood on there!), I’ve got this linked to my weathered wood post too today!
Hi there! For the glaze… did you do the glaze on top of the first 2 stains? (rustoleum bleached and minwax american) OR are the pictures you show above of the glaze on new bare wood.
let me know. thanks!
Gina, I did both. Some were just the glaze on new wood (the browner woods.) And some were the glaze on top of the stains. Just play until you like the results ;-).
This looks really great and easy to make at home. I’m definitely going to try it, I’ve always liked when wood looks older. Thanks for posting.
Hi Brittany. Just found your blog after I saw you follow me on Hometalk. I too am an avid DIY’er and furniture repurposer. (ok. Thats not a word) whatever. I love working with wood as well. I love your wood wall! I’m in the process of building a media cabinet and staining it with the new gray stain that Varathane has. Can’t wait to unveil it! (a few more days) I actually got the plans from Ana White. If you haven’t seen her blog, you must visit. It’s the Restoration Hardware Printers Cabinet. Anyway, I’m off to explore your blog, please come by and visit mine! Looking forward to hearing from you…
Beth
This is so cool! I am going to be posting it to StuffDOT in my BIY bin!
I love layering stains… Isn’t the Sunbleached stain by Rustoleum the bomb?? I am a huge fan (and frequent stalker) of Rustoleum wood products. The Sunbleached looks especially stunning on oak! Did you paint the greenish-blue boards on the wall too? Will you share the color name? I really love that color, as well as the color of the table base and stools!
Cher, yes, I did paint the other boards. Annie Sloan Chalk paint in Robin’s Egg blue and Versailles Green.
I very much appreciate how you share your techniques. I have stripped and stained plenty of furniture but I know absolutely nothing about this other. I know how much I love it. Your one of the few that share step by step tutorials. I have learned so much through your blogs and say everyone of them for reference. Thank You!
Amazing useful formula to age the wood as I also love the look of that old wood.
Awesome. This is going in my arsenal. My hubby and I were wondering what would be a good way to either speed up the aging process or fake it!
Shared it on my Facebook page tonight. You rock.
Jenny
Thanks for all these tips and for sharing your “secret” formula, Brittany. This will come in handy for me one day. Sharing it on the Worthing Court Facebook page tonight.
Great tips! I’m moving next month and want to cover an ugly brick fireplace wall with “aged” wood.
I love the aged wood look! This will definitely be added to the “things to do” list for our first house!
Looks great. Thanks for all the great tips. Cheers.
Love it! Oh yeah, I love this. Hope all is well!
Debbie
Love this technique! Thanks for sharing!
This is so good to know! I wish I’d known before I made my husband struggle with pallet wood to make a perfect octagon mirror recently. 🙂 This is much smarter!