HomeRight PaintStick vs. EZ Twist Review | Pretty Handy Girl

HomeRight PaintStick vs. EZ Twist Review | Pretty Handy Girl

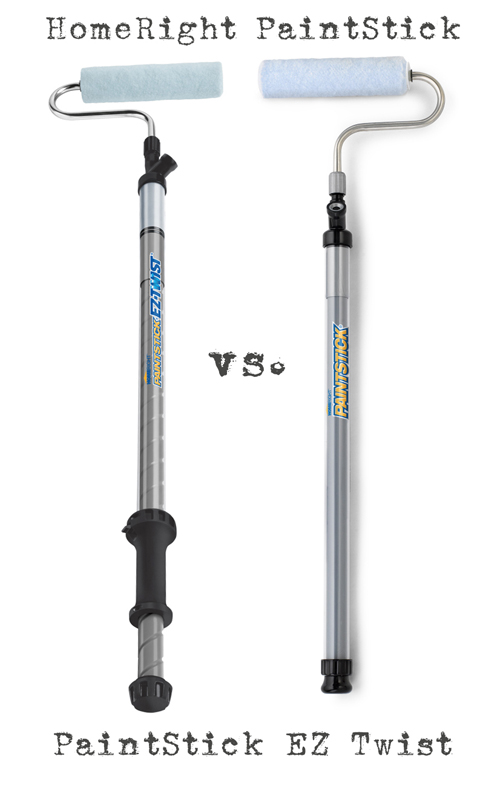
Remember when I declared that I only use a handful of painting products that I’ve used for 15 years? I usually detest “new and improved” painting gadgets. I’ve tried many and they are usually a flop or not as efficient as my current arsenal of painting tools. So, you’ll understand that when HomeRight first approached me about trying their PaintStick products, I declined. After saying no, I started seeing many rave reviews from other DIY bloggers. As I began anticipating the task of painting our master bedroom, I began to rethink trying the HomeRight PaintStick Paint Applicator. I was definitely tentative. Finally, I agreed to try out both the PaintStick original and the PaintStick EZ Twist. I warned HomeRight that I have high expectations and that if they weren’t met, I wouldn’t blog about their PaintSticks.

I guess you know where this is going because here I am to tell you that I really loved both PaintSticks! And I will be using one every time I paint a room from now on! Seriously, these products are a game changer.

For one, you don’t have to worry about the messy task of pouring paint into a tray and moving the tray with you as you paint. Both HomeRight PaintSticks come with a paint can cover and fill tube that fits on your gallon paint container.

HomeRight PaintStick vs. EZ Twist Review | Pretty Handy Girl

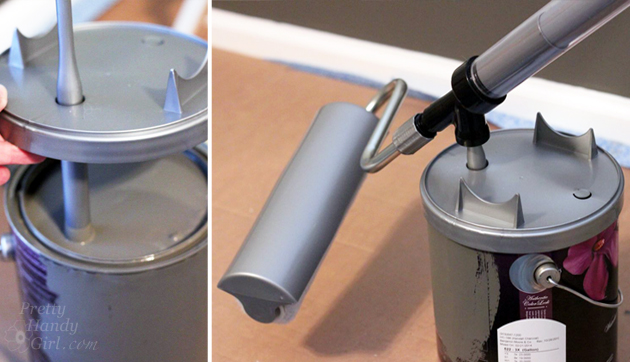
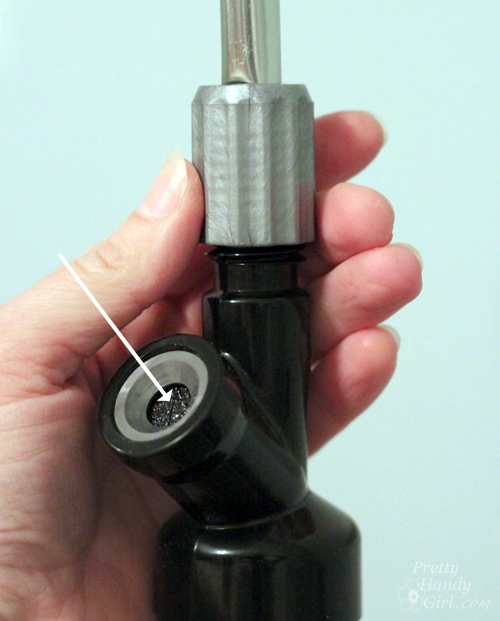
This keeps the paint from drying out and eliminates the need for a tray. The fill port on both PaintSticks is covered with a sponge type gasket that allows the fill tube to go through, but keeps the paint inside the PaintStick.

HomeRight PaintStick vs. EZ Twist Review | Pretty Handy Girl

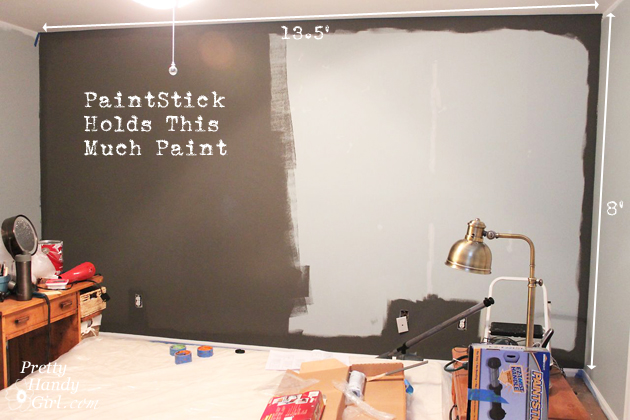
But, my FAVORITE aspect of the PaintSticks is that I can roll half a wall without stopping! No joke. With the traditional roller and tray I can usually paint a 4′ x 4′ square and then have to reload my roller. No more! The PaintStick literally allowed me to paint an 8′ x 7′ section (almost 4 times as much) without reloading.

HomeRight PaintStick vs. EZ Twist Review | Pretty Handy Girl

And refilling the tube is almost as fast as rolling. I cut my painting time down drastically. Here’s a video HomeRight made showing a side by side “Paint Off” race between the EZ Twist PaintStick and a roller and tray (and a paint sprayer). It’s pretty accurate in my experience.

The only negative, is that you will spend a little more time cleaning up. The PaintSticks have to be disassembled and cleaned out when you finish painting. But, this process doesn’t add enough time to come near exceeding the time it would take to paint conventionally with the roller and tray.

What’s the difference between the PaintStick and the EZTwist PaintStick? Read more

DIY Button Pendant Light | Pretty Handy Girl

DIY Button Pendant Light |Pretty Handy Girl

While I was house touring on Tybee Island and having  fun antique and salvage shopping in Savannah, I spied some bare lamp shade frame hanging lights. They immediately inspired me to design a DIY Button Pendant Light for over my bedside table in our master bedroom. Part of the desire was born out of the necessity to have more space on my bedside because the table actually doubles as my makeup vanity.

DIY Button Pendant Light | Pretty Handy Girl

Making a Button Pendant Light is an easy DIY project, but you’ll need some patience while threading the buttons. I’ll also show you how to wire a lamp socket and lamp plug! Ready to get started?

(I’ve included affiliate links for your convenience. I earn a small percentage from a purchase using these links. There is no additional cost to you. You can read more about affiliate links here.)

Materials:

DIY Button Pendant Light |Pretty Handy Girl

Optional:

Instructions: Read more

5 Minute Ceiling Fan upgrade | Pretty Handy Girl

5 Minute Ceiling Fan Update | Pretty Handy Girl

When I was updating my son’s bedroom, I gave the ceiling fan a 5 minute update! You can easily change the look of a ceiling fan by quickly swapped out the light shades. I removed the scalloped edged glass shades and replaced them with square ones for a more “gender neutral” look.

5 Minute Ceiling Fan upgrade | Pretty Handy Girl

New glass shades cost anywhere from $3 – $10 each at Lowe’s or other home improvement stores. The shade size is pretty much universal, but make sure you are buying the smaller shades versus larger ones that are sold for pendant lights. To be sure, bring one of the old shades with you or measure the diameter of the mouth on the existing shades.

Here’s the quick 5 minute how to swap out your ceiling fan light shades: Read more

Boy's Red, White & Blue Themed Room | Pretty Handy Girl

Boy's Red, White & Blue Themed Room | Pretty Handy Girl

Happy Friday!!! I finally finished my son’s room makeover. Poor kid has been asking for over two years when I was going to work on his room.

Boy's Room Before | Pretty Handy Girl

It feels so good to be done and be able to share the final reveal with you. The theme started four years ago when I converted his extra closet into a reading nook. The blue, white and red work beautifully together.  Read more

Wall-mounted IKEA LILLÅNGEN Mirrored Cabinet turned Stuffed Animal Storage | Pretty Handy Girl

Wall-mounted IKEA LILLÅNGEN Mirrored Cabinet turned Stuffed Animal Storage | Pretty Handy Girl

Have you ever shopped the “As Is” section at IKEA? There are some deals to be found there! Like this IKEA LILLÅNGEN Mirrored Cabinet. The cabinet had a small bent piece at the bottom and was therefore marked down to $60 from $100! Score! I easily bent the metal back in place with pliers once I got home. Then I decided to use it as a wall-mounted mirror locker for my son’s stuffed animals. Hang out for a few minutes and I’ll show you how to safely mount this cabinet AND move an outlet into the cabinet.

Wall-mounted IKEA LILLÅNGEN Mirrored Cabinet turned Stuffed Animal Storage | Pretty Handy Girl

Handy Boy #2 had a narrow spot between his closet and reading nook that I knew would be perfect for this cabinet. The idea was to give him some storage for his ever multiplying stuffed animals. (They are seriously like rabbits! It never ends. I might need to look into a forced sterilization program.) Knowing my son and his antics (have I told you how he can climb his way around the room without setting foot on the floor. It’s amazing, albeit scary to watch. I’ll have to video him sometime.) I knew that I needed to secure this locker to the wall. But, there was an outlet in my way. And this is the outlet that gives power to the copper wall sconce in his reading nook. Therefore, I had to have access to the outlet. Plus, when he gets older he could charge his electronics in the locker.

Wall-mounted IKEA LILLÅNGEN Mirrored Cabinet turned Stuffed Animal Storage | Pretty Handy Girl

(I should note that I neglected to buy the optional base for this cabinet. Instead, I built a quick one using 2×4’s and 1×4’s.) 

Materials:

  • Drill
  • Quilting pin
  • Measuring tape
  • Pencil
  • Outlet extender
  • Multi-purpose tool
  • Toothpaste
  • Screwdriver

Instructions:

First I located the stud in the center of the wall. Locating studs is easy by using a quilting pin. Read more