Racing Stripe Mirror Makeover | Pretty Handy Girl

Racing Stripe Mirror Makeover | Pretty Handy Girl

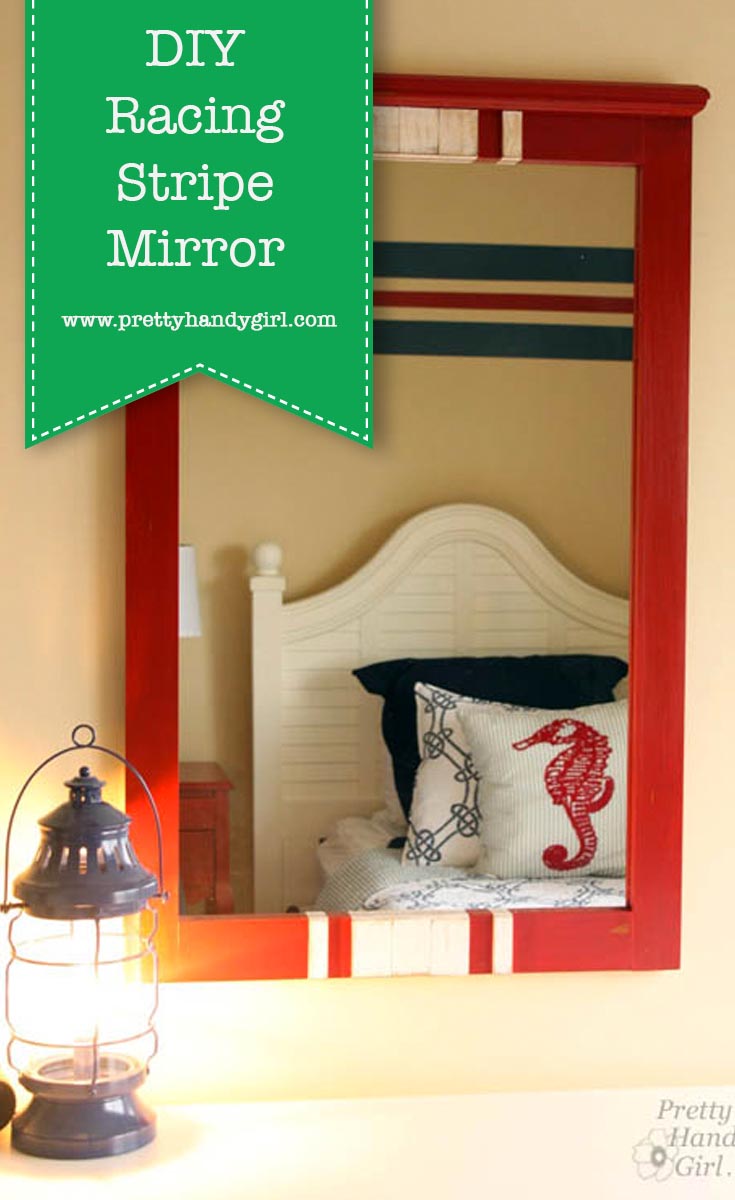
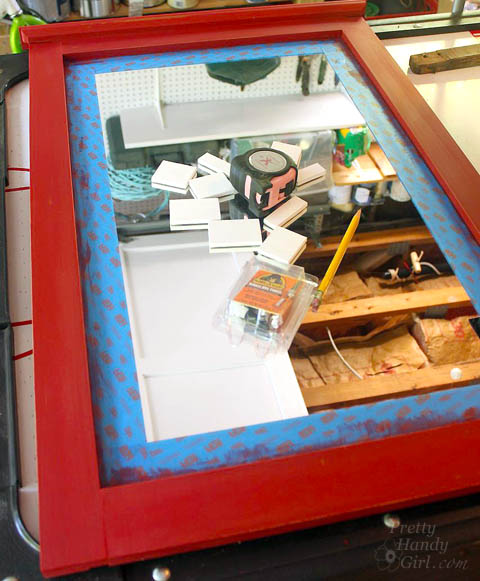
While my sister and I were renovating the Topsail Beach condo we had a strict budget. Finding a large mirror for less than $15 was challenging until I found this mirror with potential. I know my sister was doubtful, but I had a vision. Some red milk paint, lattice and glue would make this racing stripe makeover complete!

Racing Stripe Mirror Makeover | Pretty Handy Girl

To transform the mirror, I disassembled the top and cut off the panel portion using my Dremel MultiMax. I salvaged the top crown moulding and re-attached it to the new top of the mirror with glue and finish nails.

Then it was time to add stripes.

Materials (some links are Amazon affiliate links):

Instructions:

Tape off the edge of the mirror where it meets the frame. Paint two coats of Miss Mustard Seed Tricycle red paint onto the frame. (See this post for painting with milk paint.)

Racing Stripe Mirror Makeover | Pretty Handy Girl

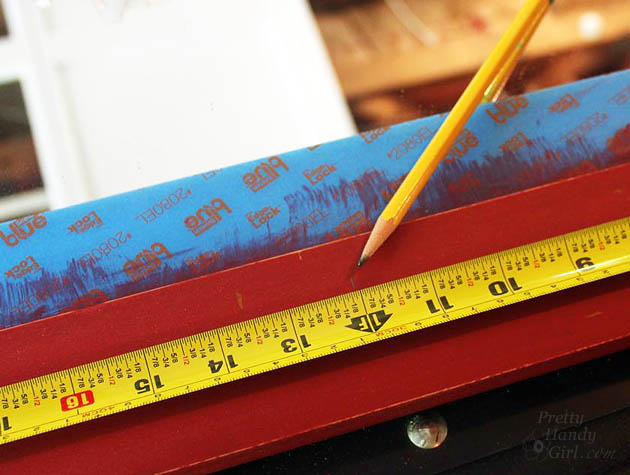
After the paint dries, wax it or leave it unfinished. Mark the center of the frame at the top and bottom of the mirror.

Racing Stripe Mirror Makeover | Pretty Handy Girl

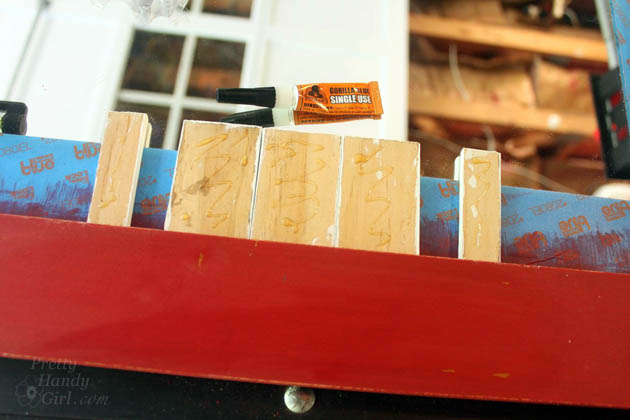
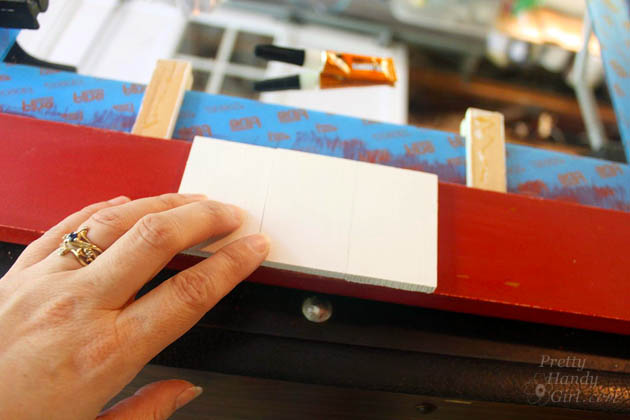
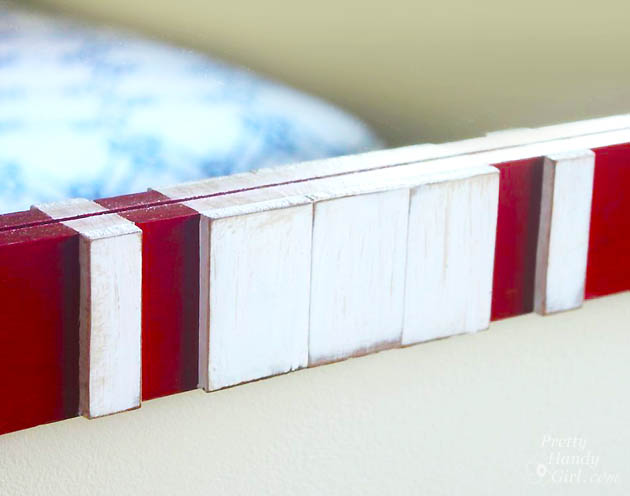
Cut pieces of lattice to fit the mirror frame width. (I used three pieces of lattice and cut a fourth piece in half for the outer stripes.) Pre-paint the lattice pieces ironstone (white) and let dry.

Wet the frame and the back of the lattice. Apply a small amount of Gorilla Glue to the backs of the lattice.

Racing Stripe Mirror Makeover | Pretty Handy Girl

Line up the center lattice piece with the pencil mark. Attach it and the other two pieces beside the middle lattice.

Racing Stripe Mirror Makeover | Pretty Handy Girl

Use a ruler to create a space between the middle stripe and the outer small lattice piece. Glue the outer pieces in place.

Racing Stripe Mirror Makeover | Pretty Handy Girl

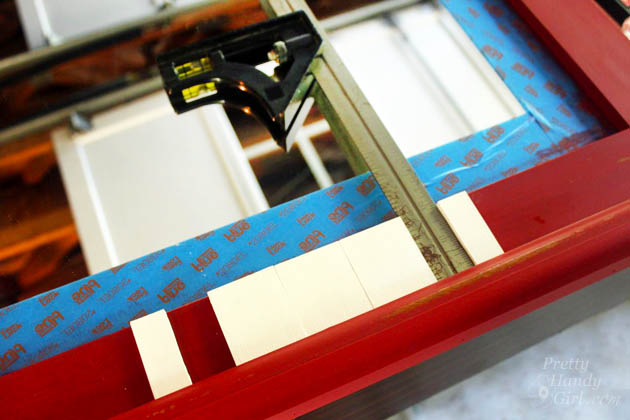
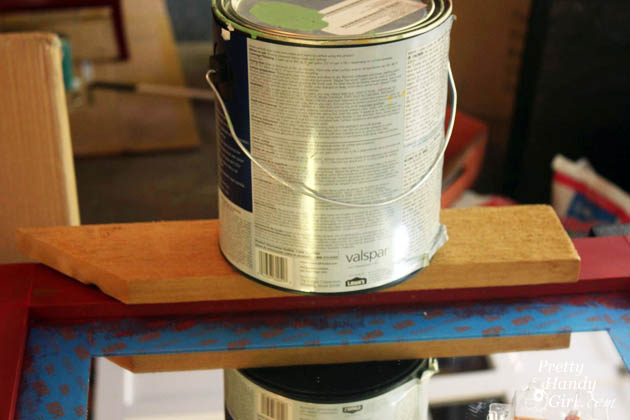
Set a weight (or paint can) on top of a scrap board and the lattice pieces while the glue dries.

Racing Stripe Mirror Makeover | Pretty Handy Girl

Remove the weight. Paint the top and bottom edge of the mirror frame white to create the illusion that the stripe continues around the frame edges. Distress the lattice pieces with sandpaper if you want a rustic look.

Racing Stripe Mirror Makeover | Pretty Handy Girl

Hang your mirror on the wall and admire! Not bad for $15, two coats of paint, and some scrap lattice!

Some red milk paint, lattice and glue transform this $15 find into a charming racing stripe mirror perfect for a boys' room! | thrift store makeover | DIY mirror | mirror tutorial | #prettyhandygirl #DIY #tutorial

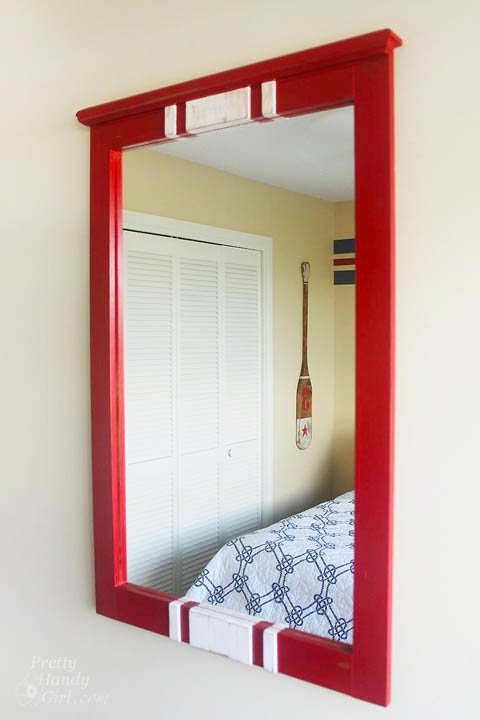
The mirror hangs happily in the twin bedroom at the Topsail Beach Condo. Click here to see the rest of the condo!

Some red milk paint, lattice and glue transform this $15 find into a charming racing stripe mirror perfect for a boys' room! | thrift store makeover | DIY mirror | mirror tutorial | #prettyhandygirl #DIY #tutorial

Hope you never turn down a $15 mirror again ;-).

PHGFancySign


Pin for later!


DIY Clock

DIY Clock

August means getting ready for the upcoming fall season, back to school, sports season and the holidays. Hi everyone, it’s Jessica at Decor Adventures and I have an easy project to keep you on time for all the activities you and your family have planned these next months, a DIY clock. Did you know you could make your own clock? It’s super easy to put together and you can paint or decorate it to perfectly match your home’s decor. Let’s get started.

Materials

  • Clock kit
  • Double sided tape
  • Wooden tray to make your clock
  • Paint (optional)
  • Decorative paper
  • Spray adhesive (optional)
  • Scissors
  • Pencil
  • Ruler
  • Drill and drill bits
  • Hanging hardware

Instructions:

1. To make this clock, I found a 99 cent tray at the thrift store. I knew it would be great for this project because it can hang on the wall and will conceal the clock kit inside the tray. You could also use a picture frame without glass or even some other creative object you’d like to use for your clock face. Make sure it’s something flat so your clock kit will fit into it.

Thrifted Tray

2. The back of the tray will actually become the face of my clock. To prepare it, prime your tray.

Make Your Own Clock

Decide where you would like to put the hands of your clock. It can be in the exact center of the tray or off center for a different look. Mark where the center of the clock will be placed. Read more

Painted Vanity Nightstand | Pretty Handy Girl

Painted Bedside Vanity | Pretty Handy Girl

In the quest to makeover our master bedroom and save money, I’ve been painting several pieces of furniture to coordinate with the new bed I built.

One of the pieces I painted was this small desk that doubles as a nightstand. Our bedroom isn’t very large and our master bathroom is even smaller than what can be described as a “master” anything! Doing my hair and makeup in our bathroom isn’t a viable option, especially when both Pretty Handsome Guy and I wake up at the same time. When I saw this little desk at a local thrift store, I grabbed it. Especially because she was only $20!

Painted Bedside Vanity | Pretty Handy Girl

She had lots of age, but not much character.

top-of-wood-vanity

However, she was the perfect size and had just enough storage for a makeup vanity.

With a light sanding, primer and a coat of Benjamin Moore Advance paint, she is now showing her more glamorous side. Read more

Facelift for a Knotty Pine Dresser | Pretty Handy Girl

Facelift for a Knotty Pine Dresser | Pretty Handy Girl

You know you’ve seen those knotty pine dressers from yesteryear. Their spotlight has faded and they are finding themselves at thrift shops, ReStores or worse yet…at the curb.

Facelift for a Knotty Pine Dresser | Pretty Handy Girl

I’m begging you to let this knotty eyesore back into your home. It doesn’t have to be banished. It’s KNOT her fault she was built from cheap pine. All this dresser needs is a new coat of paint and some beautiful brass knobs and all her flaws and knots will be forgotten.

Facelift for a Knotty Pine Dresser | Pretty Handy Girl

Extra observant points to anyone who realized that this blogger forgot to take a good before picture! She looked very similar to the knotty pine dresser shown above, except she had wooden circle knobs and an unfortunate set of bun feet. I did remove the bun feet from the dresser when I first brought it home. Mama ain’t got no need for buns in this oven (or on my dresser.)

Here are the details on how to refinish a knotty pine dresser and give it a complete makeover!

Materials:

  • Sandpaper
  • BIN primer
  • Damp rag
  • Paint brush
  • Foam paint roller
  • Quart of Benjamin Moore Advance paint (Deep Ocean)
  • Valspar asphaltum glaze
  • Brass hardware (I bought mine from House of Antique Hardware)
  • Drill with bits
  • Screwdriver
  • Level

Instructions:

This tutorial will be fairly brief, if you need more photos and explanation, you can view my previous dresser painting adventure.

Begin by removing all the drawers and knobs. Lightly sand the dresser and drawer fronts. Wipe off any sanding dust. Read more

DIY Button Pendant Light | Pretty Handy Girl

DIY Button Pendant Light |Pretty Handy Girl

While I was house touring on Tybee Island and having  fun antique and salvage shopping in Savannah, I spied some bare lamp shade frame hanging lights. They immediately inspired me to design a DIY Button Pendant Light for over my bedside table in our master bedroom. Part of the desire was born out of the necessity to have more space on my bedside because the table actually doubles as my makeup vanity.

DIY Button Pendant Light | Pretty Handy Girl

Making a Button Pendant Light is an easy DIY project, but you’ll need some patience while threading the buttons. I’ll also show you how to wire a lamp socket and lamp plug! Ready to get started?

(I’ve included affiliate links for your convenience. I earn a small percentage from a purchase using these links. There is no additional cost to you. You can read more about affiliate links here.)

Materials:

DIY Button Pendant Light |Pretty Handy Girl

Optional:

Instructions: Read more