DIY Loft Bed | Pretty Handy Girl

blue-loft-bed

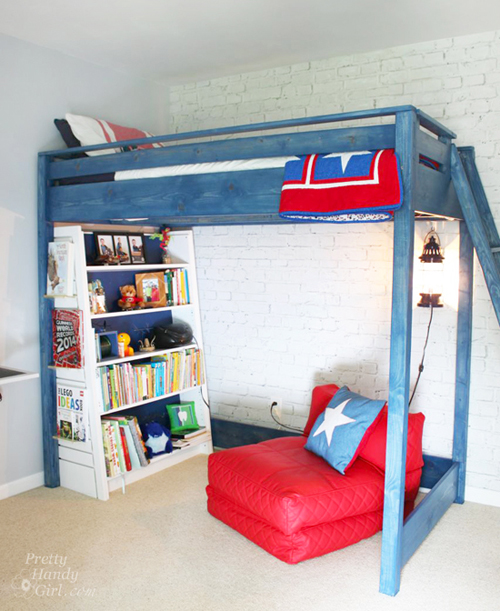
Guys and Gals, I am here today to tell you that you can build a loft bed for your child! However, unlike most of the tutorials you find on my site, building this loft bed is not one of them. Instead, loads of gratitude goes to Ana White and her fabulous plans for building a loft bed. You can follow her plans for the build. I assure you, they are detailed and easy to follow.

DIY Loft Bed | Pretty Handy Girl

The only modification I made to the plans was to move the ladder to the foot of the bed instead of the side. What I will show you is how to color stain the bed blue in two simple steps. I’m absolutely in love with the Minwax Express Color wiping stains. They go on super easily, and clean up is a snap with soap and water. Then you seal it as easily as you stained it. Coolest product EVER!

(I’ve included affiliate links for your convenience. I earn a small percentage from a purchase using these links. There is no additional cost to you. You can read more about affiliate links here.)

Materials:

Read more

Easy Added Color to a Dresser | Pretty Handy Girl

Easy Added Color to a Dresser | Pretty Handy Girl

Adding color to dresser drawers is definitely an easy way to add a pop of color to an otherwise boring piece of furniture. Add some new knobs and your dresser will look like a new piece of furniture! (Tutorial for creating custom knobs coming soon.)

You could say that I finally got that Kick in the Pants I needed to start working on my son’s room. One makeover I had in mind was giving his dresser a pop of color.  The top and sides of the dresser were in great shape and it has a tough laminate top. Instead of painting the entire dresser, I decided to paint only the drawers because — knowing my little guy — he would have it scratched up in no time.

Easy Added Color to a Dresser | Pretty Handy Girl

Materials:

Instructions:

Start by removing clothing from the drawers. Then firmly pull the drawers all the way out. Some drawers have a clip at the end, just pull straight toward you. Others may require you to lift up on the front to release the drawers from the track. Mark the inside of the drawer so you know which slot to return it to.

Read more

Installling Brick Mural Wallpaper | Pretty Handy Girl

Tips for Installing Brick Wallpaper Mural | Pretty Handy Girl

Today I can’t wait to show you how to easily add dimensional interest to a focal wall in your home. Installing a Brick Wall Mural is definitely a DIY project you can tackle if you have a friend or two to help you. When Wallpaper Direct contacted me to offer to let me try some of their products, I was still a bit wary (having stripped my fair share of wallpaper.) But, then I stumbled upon the white brick wallpaper and saw how cool it looked. I decided to give it a try and let them send me a wallpaper mural specifically for my son’s bedroom. But, let’s back up. Remember last week when I admitted to being a procrastinator? Well, this is what I started with:

Back Camera Back Camera

After staring at Nickelodeon green for 6 years, my son and I decided it would be calming to paint the walls a soothing gray. And, I thought it would be really cool to create a loft look by installing a giant wall mural of white brick. (Note: The large mural panels has since been discontinued, but you can purchase white brick wallpaper that looks very similar and may actually be easier to install by yourself.)

I ordered the mural and it arrived safely to our house in a few days. I quickly organized a few friends who had installed wallpaper to help me.

Installling Brick Mural Wallpaper | Pretty Handy Girl

To install a wallpaper mural, you’ll need a few tools.

(I’ve included affiliate links for your convenience. I earn a small percentage from a purchase using these links. There is no additional cost to you. You can read more about affiliate links here.)

Materials:

Prep Work:

Before wallpapering your wall, clean it with a mild cleanser (diluted TSP is wonderful, but you can use regular multi-purpose spray cleaner.) Patch any holes or imperfections with spackle (joint compound). After the compound has dried, lightly sand the wall. Read more

How to Recover a Butterfly Chair | Pretty Handy Girl

How to Recover a Butterfly Chair | Pretty Handy Girl

Happy St. Patrick’s Day! Do you have a butterfly chair that is sun-faded or has hideous fabric on it? I bet you thought it was a lost cause, right? Nope! With a sewing machine, some new fabric and a little spare time you can recover that ugly butterfly chair and have a new one. Okay, so I didn’t recover it with green fabric in honor of St. Patrick, but what could be greener than a good old upcycling project! Believe it or not, this was a much easier project than I had anticipated, so don’t get scared by the curves. You can “sew” do this! 😉

How to Recover a Butterfly Chair | Pretty Handy Girl

I stumbled upon this chair at Goodwill for $9.99. Normally I wouldn’t spend this much for a sun-faded chair, but because I was working on the school library makeover project — and we needed more comfortable seating — I bought it.  After all, we would have had to pay at least double for another comfy chair.

How to Recover a Butterfly Chair | Pretty Handy Girl

Luckily, I had some soft leftover fleece fabric that I could use to recover the chair. I wish I had measured how much I used, I think it was a little less than 2 yards.

Materials:

  • 2 yards of fabric
  • Coordinating thread
  • Pins
  • Scissors
  • Old butterfly chair + old cover

Instructions:

1. Remove the old cover from the butterfly chair frame. Lay it on top of your fabric (both right sides up.) Read more

Boy's Red, White & Blue Themed Room | Pretty Handy Girl

Galvanized Tub Storage Bench for Kids | Pretty Handy Girl

Every month Lowe’s challenges me to create another unique project to share with you. This month’s challenge was creative storage ideas. Have kids? This is a unique storage solution using a galvanized tub and a furry upholstered lid. It’s the perfect place to store and corral all that kid clutter in your child’s bedroom. The storage tub doubles as a bench and a step stool. Don’t be deterred if you don’t have children, the storage bench could be used for magazine storage and much more!

Grab these materials and tools and follow along with me (and my 13 year old assistant.)

Creating the Galvanized Storage Bench and Lid

(I’ve included affiliate links for your convenience. I earn a small percentage from a purchase using these links. There is no additional cost to you. You can read more about affiliate links here.)

Materials for the Galvanized Storage Tub and Lid:

Galvanized Tub Storage Bench for Kids | Pretty Handy Girl


Instructions:

Turn the galvanized tub upside down on the plywood. Use the sharpie to mark approximately 1/2 – 1″ out from the edge of the tub. Read more