Build Your Own Giant Chalkboard | Pretty Handy Girl

Build Your Own Giant Chalkboard | Pretty Handy Girl

Have you scoured antique stores or Craig’s List looking for a big giant vintage chalkboard? Those vintage school green chalkboards are highly sought after. But, hard to find. I have good news for you! You can build a Giant Chalkboard any size you want! (Although, typically you’ll be restricted to 4′ x 8′ if you want to use a sheet of masonite.) And you can mix your own chalkboard paint in any color.

Take out your notebooks, your pencils, and get ready to take notes.

Materials:

  • Masonite sheet cut to desired size (mine is 22″ x 48″)
  • 1×4″ pine boards for frame
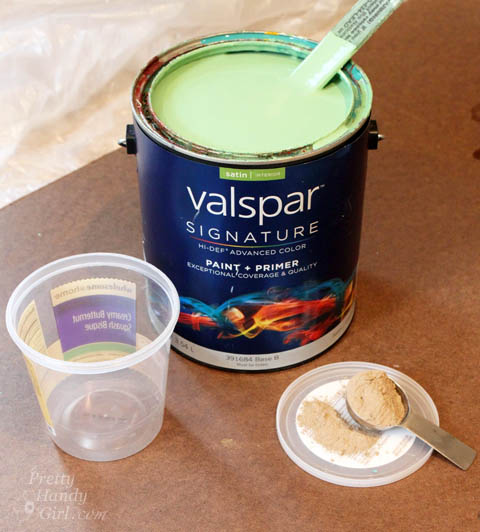
  • 1 cup flat latex paint in color you desire
  • 2 tbsp. of unsanded grout
  • Pencil
  • Stain
  • White paint
  • Paint brush
  • Sanding block
  • Container to mix paint in
  • Kreg Jig
  • Drill
  • 1 1/4 inch pocket screws
  • Staplegun
  • 1/2″ staples

Instructions:

Build Your Own Giant Chalkboard | Pretty Handy Girl

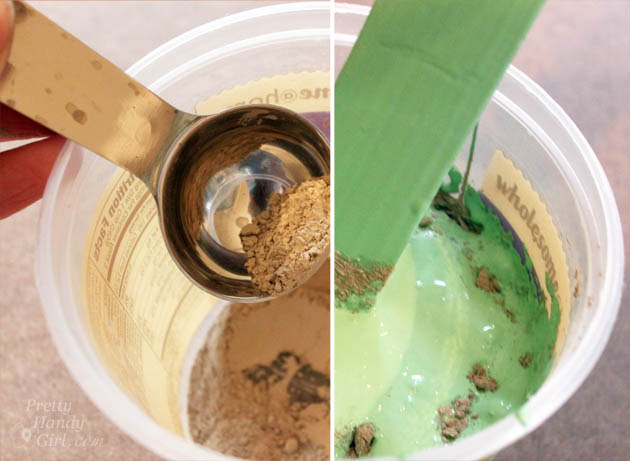
Pour 2 tbsp. of unsanded grout into your empty container. Add 1 cup of flat latex paint and stir well. (Yes, I used satin and it still worked.)

Build Your Own Giant Chalkboard | Pretty Handy Girl

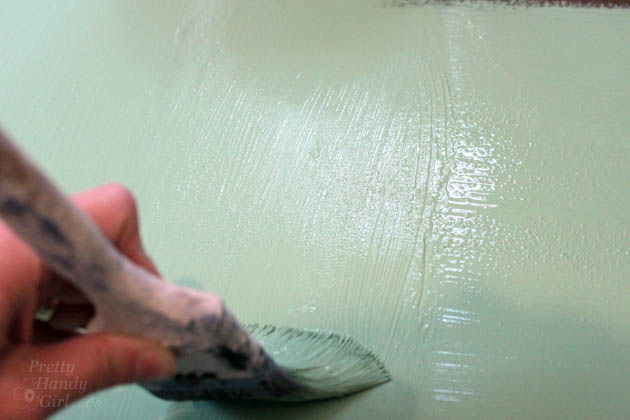
Paint the masonite with the chalkboard paint. Pull your brush in one direction. Then smooth out the paint by dragging the brush in a perpendicular direction.

Build Your Own Giant Chalkboard | Pretty Handy Girl

Let the paint dry. Lightly sand and add a second coat of chalkboard paint.

Build Your Own Giant Chalkboard | Pretty Handy Girl

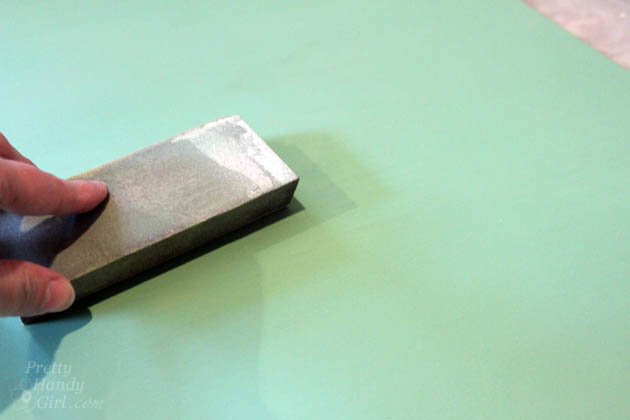
Let that coat dry and sand smooth.

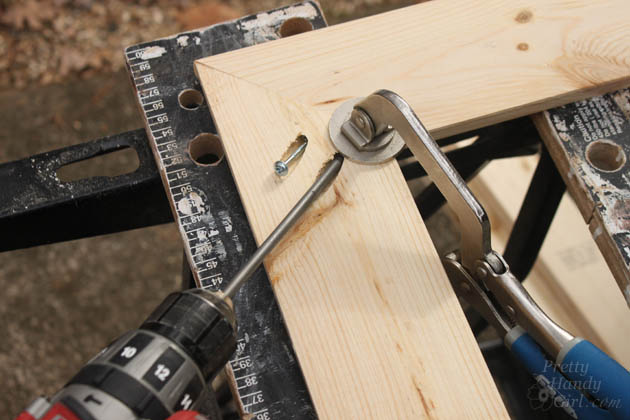
Assembling the chalkboard frame: Read more

12 Ways to Burglar Proof Your Home

Thanksgiving is next week and it’s the biggest traveling holiday of the year. Taking steps to burglar proof your home can put your mind at ease as you travel and keep your home and valuables safe.

The experts at Allstate have offered 12 Ways to Burglar Proof Your Home for the holidays. Of course, these tips will keep your home safe 365 days of the year!

1. Change the locks – Remember to change all the locks when you move into a new house. You’ll never know who had access to the keys before you moved in. If you lose the keys to your house, you should also replace all the locks for the maximum home security.

Changing_out_brass_door_knob

2. Invest in an Alarm – There are many companies that will install and monitor a home alarm system for a very little monthly fee, however sometimes you do not need an additional monthly expense. If an alarm company is not an option for you, you can visit your local hardware store to invest in home alarms that take seconds to install. They will make very loud and obnoxious sounds if the doors or windows are open. This is a very inexpensive option but can be a large deterrent from theft. Read more

snowglobe ornament

Jaime here today from That’s My Letter and it’s officially holiday prep time!  Today I’m sharing a DIY snow globe ornament with a wood base that makes a perfect gift for anyone big or small.

This snow globe ornament is constructed on a wood base where all the interior pieces can be glued to the base and then the clear globe is placed over the scene.  The globe is plastic and the entire ornament is very lightweight so it won’t weigh down your tree branches!

snowglobe ornament 4

You can put nearly anything inside the snow globe as long as it fits under the dome.  I used bottle brush trees, wire candy canes and a wood dowel sign with the family name printed on cardstock.  Add a little faux snow and you have the cutest little winter scene.

snowglobe ornament 2

The faux snow will cover any unsightly hot glue and adds just that tiny bit of sparkle.

snowglobe ornament 3

Add a small wood ball on top to compliment the wood base with a string for hanging and you have a keepsake ornament that will look beautiful on or off the tree.

snowglobe ornament 1

Materials:

snowglobe ornaments supplies

  • 3″ clear plastic craft ornament
  • 2″ circle (cut from cardstock, only used as a template)
  • 3″ wood square (1/4″ plywood)
  • mini pom poms
  • mini wire candy canes
  • mini bottle brush tress
  • 1/8″ dowel
  • small wood balls with hole in center
  • red string
  • white glue
  • paint brush
  • faux snow
  • x-acto knife
  • sandpaper
  • hot glue gun & glue sticks
  • scissors
  • pencil
  • black sharpie marker

Instructions:

Step 1: Using an x-acto knife cut around the ornament opening enough to remove the neck portion.  Don’t worry about being neat here the goal is to remove the neck and have a wide enough opening for scissors. Read more

How to Install an Exterior Security Light | Pretty Handy Girl

How to Install an Exterior Security Light | Pretty Handy Girl

Nothing deters a thief like a well lit area. But truth be told, I needed this light to illuminate the path when taking out the trash. There is nothing like walking out the door with the trash in your hands after dark and realizing that you forgot to turn on the exterior light. I should mention that our neighborhood is popular with the copperheads. Need I say more?

Installing any light fixture is a relatively easy DIY project, and installing an exterior light is no exception if you have a junction box or light already installed.

Materials:

Optional: Drill

Required Safety Instruction: 
Turn off the power to the light fixture you are working on. I highly recommend turning on the light you will be working on, then shut off the circuit at your circuit breaker and check to see that the light has gone out. Also note that just because the light fixture power is turned off, it doesn’t necessarily mean that other outlets or lights in the same area are on the same circuit. Always check for the presence of power before you work on it.

flip_circuit_breaker

If you have an existing light fixture remove it before installing the new fixture.  For this tutorial, we’re starting with a bare junction box:

How to Install an Exterior Security Light | Pretty Handy Girl

Test the black or hot wire with the voltage tester to be certain the power is turned off.

How to Install an Exterior Security Light | Pretty Handy Girl

Remove the existing mounting bracket if there is one installed.

How to Install an Exterior Security Light | Pretty Handy Girl Read more

Gray Restoration Hardware Stain Recipe | Pretty Handy Girl

Gray Restoration Hardware Stain Recipe | Pretty Handy Girl

I’ve fallen in love with the Restoration Hardware Salvage Gray wood stain. But, try as I might, I haven’t found a pre-mixed stain that produces the same look. That never deterred me, and I don’t like to give up. Therefore, I created my own recipe for approximating that Restoration Hardware Weathered Gray stain. You may have seen this beautiful gray stain on my Sports Gear Storage Shelves the other day. Because I love you and I love to share, here is the DIY Restoration Hardware Weathered Gray Stain Recipe.

Materials:

Glaze: 

DIY Restoration Hardware Weathered Gray Stain Recipe Instructions:

Premix your glaze in a jar or bottle. 1 Part Valspar Arid Plains with 3 parts Valspar clear glaze.

Sand your wood smooth. Put on a rubber glove and slip an old sock over the glove. Dip you hand into the stain and wipe the stain onto your wood. Always wipe on stain with the grain.

Gray Restoration Hardware Stain Recipe | Pretty Handy Girl

After the first coat has dried, repeat by adding a second coat of Minwax Provincial stain. Let the stain dry.

Gray Restoration Hardware Stain Recipe | Pretty Handy Girl

Lightly sand the wood before applying the glaze. Read more