Changing Out a Light Fixture (Bye-Bye Hollywood Strip Light)

Have you had it with those ugly Hollywood light fixtures? The ones where the bulbs are lined up in a straight line staring you in the face? Did you know that you don’t have to live with them? Even if you live in an apartment, you can switch light fixtures out fairly easily. (Be sure to keep the old fixture and all the parts so you can re-install it before you move out.)
Light fixtures range in price from $20 to well over $200. Sometimes you can luck out and find some nice light fixtures on Craig’s List or eBay for less.
I hope you can benefit from this tutorial. I think you’ll agree, it is neither difficult nor challenging changing out a light fixture.
Instructions:
Before beginning the installation you MUST turn off the power to your fixture.

Required Safety Instruction:
Turn off the power to the light fixture you are working on. I highly recommend turning on the light you will be working on, then shut off the circuit at your circuit breaker and check to see that the light has gone out. Also note that just because the light fixture power is turned off, it doesn’t necessarily mean that other outlets or lights in the same room are on the same circuit. Always check for the presence of power before you work on it.
Tools:
(I’ve included affiliate links for your convenience. I earn a small percentage from a purchase using these links. There is no additional cost to you. You can read more about affiliate links here.)
- Light Fixture
- Needle-nosed pliers
- Wire cutters and stripper
- Flat head screwdriver
- Phillips head screwdriver
- Optional: electrical tape
Unpack your new (or slightly used) light fixture. Read through the directions as some steps may vary from this installation tutorial.
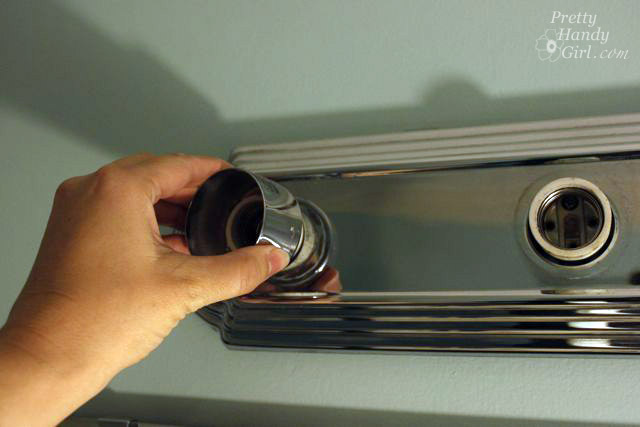
Begin by unscrewing the light bulbs and then remove the collars around the light bulb sockets.
Locate any other screws that might be holding the fixture in place. This fixture simply popped off.

Untwist the wire nuts holding the wires together.

Once all the wires are disconnected, unscrew the two screws holding the mounting bracket.

Remove the mounting bracket…

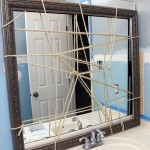
…and now you should be able to remove the light fixture. Laugh at any hidden colors and wallpaper beneath the fixture. (Toile! Ah, not so bad.)

You should be left with just the junction box and three wires protruding from the box. The bare or green wire is your ground wire. The white is your neutral wire and the black is your hot wire.

If you were eagle eyed, you might have noticed a small nick in the insulation of the neutral wire. This could cause a short, so I wrapped some electrical tape around the nick.

Install the new mounting bracket that came with your fixture (if you bought a used one, you may have to use the old mounting bracket from the Hollywood Strip). Attach the screws through the bracket and into the junction box.

The mounting bracket that came with my fixture has a rotating bar that can swing 180 degrees. Position this bar so the fixture will hang level.)

Test fit your fixture and adjust the depth of the mounting screws (the “no head” screws on the mounting bracket) and the angle of the swinging bracket arm. Once the bracket is level and fits snugly with only a small portion of the headless screws poking through; remove the light fixture and tighten the screw in the middle of the mounting bracket to secure the rotating bar.

Wrap the ground wire from the junction box around the green or bare screw on the mounting bracket.
Connect the ground wire from the light fixture to the ground wire from the junction box. Twist them together and secure them with a wire nut.

Twist the black wires from the junction box and the light fixture together.

Twist a wire nut on to secure them.

Repeat the same process to connect the white wires.

Gently fold and tuck the wires back into the junction box. Try to position the white wires on the opposite side as the black wires.

Place your light fixture onto the headless screws and secure the fixture by screwing on the small ball caps.

Remove the shade ring from the light bulb sockets.

Slip the glass shades onto the socket and then screw the collar back on to hold the glass light shades.

Repeat for the remaining light sockets.

Many vanity light fixtures are reversible.

I decided to rehang my fixture facing up for less direct light and to avoid bumping into the mirror frame.

What do you think? Do you like the new look? Do you think you will try it yourself? I hope so, it was easy!

Don’t forget the medicine cabinet ones can also be replaced
I have a horrid Hollywood light fixture, but the fixtures I want to hang are 2 individual sconces (double sink, so I have 2 oval mirrors and I want a light over each of them). So I’ll have 2 sets of wires. I assume I’ll need 2 junction boxes? Can I put a junction box in myself or is that something a professional should do?
Tara, since you are adding electrical, it’s better to have an electrician handle it.
Our huge 72” Hollywood Globe light fixture was adhered (either glue or adhesive tape) on top of a whole-wall sized mirror. How can I remove the light fixture without breaking the mirror, which we want to keep?
Try using a razor blade to carefully score under the fixture.
Think I have the same question. After removing my Hollywood lights strip fixture it leaves an extremely large cut out in the wall. How do replace this large triangular hole that in the wall? Do you have a link or video?
You need to have a junction box installed. You can use old work junction box like this one: https://amzn.to/2w20csz
Yikes. Your picture of the stranded hot around the solid hot is concerning. You’ve started the stranded wire way too far back. When the wire nut is screwed on, the stranded will push back even further creating a situation that could cause arcing and fire. Giving advice about electrical work is sketchy unless you have a lot of qualified experience or are in the trade.
What about the wall behind the old fixture?? Dry wall? Other materials? The new light fixture I have in mind is smaller than the old one
I’m not sure I understand your question.
Would you please post a video on adding a junction box if there is none?
You can purchase a remodel (old work) junction box from your home improvement store. It slides into a hole you cut to size, and then there are fins that grip the back of the sheetrock when you tighten them with a screw driver.
Thanks for the post. It gave me the courage to replace the light fixture in my hall bathroom myself. I am feeling successful!
You’re welcome. Sending you a virtual high five!
Aren’t you the clever one. Only prob is now THAT fixture you replaced it with is so passé. Ah fashion is fickle and never ends I am afraid. I also actually see them selling those old Hollywood light strips again! Still the tutorial is good. Lighting is such a make or break in decor.
Kaycee, well this tutorial was written in 2011, when that light fixture was in style. Hopefully readers will overlook the light fixture and garnish the information on how to change a light fixture ;-).
I did it! Thanks so much for your inspiring article. I found the same as another poster when I removed my Hollywood light- no junction box, just a hole in the wall.
Thankfully I knew this could happen and that I could also handle the fix with a quick trip to the hardware store and $1.98 for the ‘after the fact’ junction box. It took me just a few minutes to put it in, and within another 10 minutes my new light fixture was up and looking great.
Thank you!!
Hooray! So glad you replaced your light and installed a junction box. That will make it so much safer.
I’m a 63 yr. old widow whose husband did everything around the house. I just bought a smaller home that needs lots of updating. I have Hollywood lights in both bathrooms. I can’t believe I was going to pay an electrician to replace them. I’m going to do this myself thanks to you Brittany, I know I can do this. Thanks again.
I was once with my friend in their house and his mother asked me to do something similar. I thought it was so hard but after a few screws, I know there were just intimidate if you just look at them. Thank you Brittany for even posting an even easier way to change light fixtures.
So I found you by google. I have a 4 light fixture in bathroom. I’m preparing to paint. I took the glass shades off to wash. I’ve been trying to replace the glass shade, the stupid “sprocket” and bulb. I can not figure it out. The sprocket doesn’t screw on? It seems to big. I’m so frustrated
Patricia, have you tried to flip it around and screw it on the other way? These usually are a little loose, but should hold the shades on.
Omg, this! And Brittany is right. I was putting the ring on the TOP of the globe (light bulb cover) but flip it (put in inside the globe) and screw it on. It will hold the globe. I was about ready to glue the dang globes into place! Why don’t the manufacturer instructions provide an image of this? Old school was that screws would hold the globes in place.
Thanks for the guide. My new house (well new to me) has a pretty outdated bathroom and these same lights. I have been looking at them for weeks trying to decide if I could change them out. I am deathly affraid of shocking myself but this does make the task seem much easier. I guess I know what I am doing this weekend!
Tawny, good luck! You can definitely handle this!
I just took down two of these style light fixtures but there were not junction boxes behind them. The builder just punched a small hole in the drywall with a hammer and fed the wiring through. Do I need to have a junction box installed if I can get the light fixture base plate properly secured to the drywall with anchors?
I did that in a previous bathroom fixture swap-out since the one I put back had a base similar to the original fixture. It just had domes over the bulbs in stead of the exposed bulbs.
Kevin, YES! What your builder did was a fire hazard and a code violation. All electrical connections must be contained in a junction box. You can add a box after the fact by using one of these “old work” junction boxes: http://amzn.to/2kMNAwZ (affiliate link)
Simply trace a hole where you wish to install the box (making sure no studs are in your way.) Then cut out the hole. Punch out a tab in the junction box, feed your wires through the tab. Then press the box into the wall and use a screwdriver to turn until the wings rotate up and are securely tensioned against the drywall
Thanks for the tutorial! I’m only trying to takedown the frontier he fixture to give it a facelift with some spray paint. However, when I removed the bulbs and the collars, there is a small copper wire connecting the front plate of the fixture to the wall? Is this just to hold
It in place?
Thank you!
***the front plate of the fixture
That is the ground wire. It is necessary to ground your fixture.
Thank you for this post with the detailed instructions and clear photos. I was able to change out my bathroom light fixture this afternoon 🙂
I can’t thank you enough for posting this tutorial! I have had my new light fixtures for 2 months waiting for my not-so-handy hubby to get started putting them up with my help. Instead, I watched your tutorial and put one up so far by myself! Yes, I’m proud and grateful to you! I encountered some problems due to the builder’s short cuts, so I watched another tutorial on how to install a junction box. It took me a weekend with many stops in between, but my updated bathroom vanity light looks great and it works! Thanks for the confidence boost and yet another skill set to enhance my life.
I got all excited when I saw this tutorial because my fixture has a rotating bar bracket too and I could not figure out how to stabilize it. But, my bracket has a open circle hole in the middle – there’s no screw to tighten. How do I get the bar to not swivel when the light fixture is hanging?
Love your blog and I am in Raleigh too 🙂
Grace–
This is a standard size screw and you can find a replacement in the electrical department at your local big box hardware store.
Do you know where I could purchase just the shade ring or lamp collar ? I have two second hand fixtures that do not have them.
Thanks for the tutorial! I just changed my first two light fixtures myself. YAY!
I need the glass bulb nut. Your picture shows the nut i want. I have search through the evening and cannot buying the nut. Would you tell where I can locate the nut?
Nancy, your best bet is to contact the manufacturer and ask them to send you the nut that holds the glass shades in place.
Great tutorial on changing out bathroom light fixture! Did you DIY frame the mirror too? If so, do you have a tutorial on that?
Carol, sort of. The mirror frame is from MirrorMate. You send them the dimensions and they ship your your frame for assembly and instructions for attaching it to your mirror! Here’s the detailed post: https://prettyhandygirl.com/2011/08/mirrormate-installation-and-giveaway.html
Thanks so much for posting your “How to…” – I am not going to admit that prior to discovering your website I had been considering a crowbar and blow torch! Following instructions was so much easier! What a blessing!
Will, LOL. No blow torch required. Hope you get yours swapped out pronto!
Just this last weekend I attemped to change the same strip light in my master bathroom. I got a pretty deal on a fixture too. Upon removing the old fixture I noticed that there was no junction box but just a tiny hole will wires poking through. The fixtue was screwed to the wall directly. Arrrggg !! change of planes – I put it the thing back .I have to either put a junction box myself (gulp!) or get a different fixture. Wish me luck.
Sonu,
Hey, I know you can do this! Putting in a junction box is fairly easy. Easier than putting in a new light fixture ;-). I googled it for you. Just buy a junction box that has wings that will extend and hold the box in place: http://www.ehow.com/video_4419279_installing-electrical-outlet-box.html
Double check with someone at the store who should know what the code is in your area ;-).
this is great, but I am left with a huge hole next to the wire box? obviously not filled in by the contractors, and the wire box is also not center…any tips on how to fix this?
Bronwyn, oh, I HATE when that happens. You have two options. #1- Patch the hole around the box. Here is a tutorial on patching drywall: https://prettyhandygirl.com/2010/07/this-whole-post-is-on-repairing-holes.html or http://www.sawdustandpaperscraps.com/2011/10/25/diy-boot-camp-how-to-patch-drywall/.
#2 – Buy a larger canopy (the part that covers the junction box.
The centering problem usually means that you have to hire an electrician to move the box. Or, I’ve “cheated” the eye by moving the mirror below.
Good luck.
Brittany
I like the article about stocking a toolbox
liked on fb
Another great detailed tutorial. Your new lights are very pretty. What a change!
I really enjoyed the “Maximize a Small Space with Multipurpose Furniture” my entire house is a small space!
Jessica, congratulations girl! You won the $50 gift card from Apartment Guide! Just let me know if you want the gift card for Home Depot or Target.
Brittany
Love the tutorial. Also found the Article about “How to Save Money on a Moving Truck” to be very helpful. Who doesn’t want a save a few bucks these days?
I liked “Ask These Questions Before Renting an Apartment”. This would have come in handy a few weeks ago when I was trying to help my brother find an apartment. I’ve never rented before, only owned the house I grew up in.
aQrose at yahoo dot com
I’m following them on Twitter
aQrose at yahoo dot com
I like Apartment Guide on Facebook.
aQrose at yahoo dot com
I really needed this tutorial…now I can install a new light in my bedroom! Thanks! I also want to change the light in my bathroom. It’s the original one from when the house was built in the 60s but unfortunately, the only electric outlet in the bathroom is built into the light fixture! LOL! What the heck where they thinking? So I can either keep the ugly old thing, replace it & be without an outlet, or hire someone to install an outlet because that’s just not something I’d be comfortable DIYing. *sigh* Wonder how much that’s going to cost? And while he’s here I’ll have to get him to also install an exhaust fan, something else they apparently didn’t do in the late 60s. 😀
How did you fram your mirror? Do you have a tutorial on that?
I went to Moving Today and liked Ditch the Dust: Strategies for Keeping Your Apartment Dust-free.
Thanks for the tutorial! Makes me feel like I could actually tackle this job.
Great Tutorial on lighting. I always seem to zap myself. I liked that you flipped your light up. So many people have it going down.
I like the article about eating organic, but less expensively!
I enjoyed the decorating based on travel article, great tips about just focusing on one room and the mural idea is so great!
[email protected]
I am following Apartment Guide on Twitter.
@luckystars54
[email protected]
I liked the Apartment Guide Facebook page.
Whitney Lavender
[email protected]
Great article…thanks ! Went to the website and liked the article about whether to do it yourself or call a handyman. Of course, my hubby is usually my “handyman”, but there are occasions… 😉 Been wanting a new fixture in my bath for a while…winning this would really help. Thanks for the chance.
I don’t facebook or twitter….. but I did check out the website…….. I do my own llght fixture changes cause it’s super simple….. thanks!
GREAT tutorial, Brittany! The only bathroom in our house that I have not updated (no mirror on the frame YET, no new faucet, old ugly hollywood lights) is my girls’ bathroom (sorry, girls!) and you may have just given me what I need to get it started! I usually wait to ask my dad to help with electrical stuff like this but I feel confident that I can handle it with this info – thanks!
Fantastic tutorial!!! With the clear photos and directions, I now feel confident enough to do this myself.
I really liked the article about “Clearing Clogs in Your Apartment.” I have a constant problem with my bathtub drain clogging. I learned a bunch of new things from this article.
Thanks again for your wonderful tutorial.
You make it look so easy….maybe this is something I could actually tackle all by myself! 🙂
my problem is that the strip of Hollywood lights is built into the wall length mirror in my bathroom. Special challenge!
Following on Twitter! 🙂
Liked on fb. 🙂
Love this tutorial. We have the same Hollywood fixture but it does not make our bathroom glamorous in the least.
I also read the toolbox article to make sure my toolbox was in tip top shape before embarking on these home makeover journeys.
I liked on Facebook! Really enjoyed your tutorial!
Really enjoyed the tutorial! The pictures make it seem so easy. Checked out the Moving Today site- I appreciate the articles on money management.
I found the finding furniture article “Maximize a Small Space with Multipurpose Furniture” super helpful- especially since I just moved into a new place. I may need to take their advice and get a bed with drawer storage underneath.
Following on twitter :-).
Liked on facebook :-). Great tutorial.
The article about whether or not to call the handyman is super helpful. Thankfully I have a father in law who can handle most things! 🙂
Great tutorial. When I just swapped out my bath light to a barn light fixture, I called down to Hubs to take a look. He said, oh you need help? My response was not at all, turn the breaker on on your way up to check it out. I was so proud I did it all myself. Wire nuts and all.
I’m checking out the website! I am loving the post about Hard to Kill Plants. I need those kind of plants! Computing on the Cloud was a good one too. I hear so much about that, so it was good to have a little info all in one place! I wish this website had been around about 20 years ago when we were doing the move and rent lifestyle. I would have been all over it.
Awesome tutorial! Now can you do one to tell me how to re-wire an outside fixture through the plaster wall to the existing light switch? lol (it stopped working last season and we noticed something chewed through the wire)
I do like it better facing up, less ‘crowding’ of the mirror.
Good job Brittany!