Faux Aged Metal Pulley | Pretty Handy Girl

Faux Aged Metal Pulley | Pretty Handy Girl

Do you love rustic metal pulleys, but don’t like the hefty price tag? Wouldn’t you rather have a rustic metal pulley for less than $5? Ah, I have a secret. That beautiful rustic metal pulley above is actually:

Faux Metal Pulley | Pretty Handy Girl

Plastic! Ready to see how I secretly transformed that black plastic pulley into a gorgeous faux aged metal pulley?

Faux Aged Metal Pulley | Pretty Handy Girl

Materials:

(I’ve included affiliate links for your convenience. I earn a small percentage from a purchase using these links. There is no additional cost to you. You can read more about affiliate links here.)

Faux Metal Pulley | Pretty Handy Girl

Instructions:

Paint Metal Primer onto the plastic pulley. Read more

Chalkboard Arrow Sign (Mystery Thrift Off) | Pretty Handy Girl

Chalkboard Arrow Sign (Mystery Thrift Off) | Pretty Handy Girl

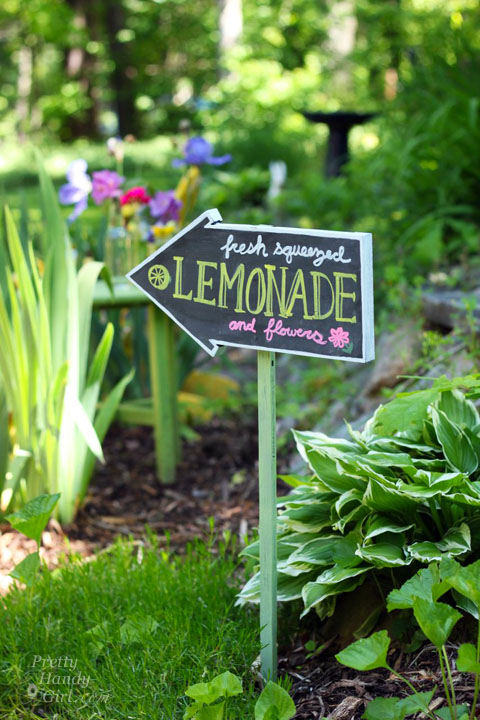
Are you having a yard sale, a lemonade stand or an open house? This Chalkboard Arrow Sign is an easy DIY project that will bring more attention to your event.

But, let me back up to explain exactly how this Chalkboard Arrow Sign came to be. Have you been following #TheMysteryThriftOff challenge? This is the brainchild of Lindsey from Better After. She chose a handful of people to take part in this challenge. After scouring her local thrift shops for ugly and hopeless items, she shipped off the chosen items to those of us in the challenge. I signed up—because frankly—I love a challenge. And, I love saving ugly items from the landfill. This week she’ll be revealing all the Mystery Thrift Off participants transformations and you can vote on your favorite!

But, when the box arrived from Lindsey, I was terrified to open it up! I mean what if she had sent me a ceramic scabies bear!  Yikes. You can imagine my relief when I opened the box to reveal this dated Christmas village.

Chalkboard Arrow Sign (Mystery Thrift Off) | Pretty Handy Girl

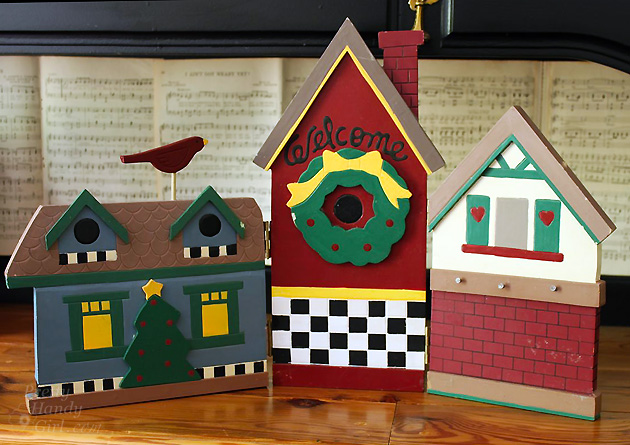
Not too bad looking is it.? Truth be told, it was falling apart and the colors were hunter green, colonial blue, mauve and fleshy tan.

Chalkboard Arrow Sign (Mystery Thrift Off) | Pretty Handy Girl

I flipped it over to reveal that this was the fine art of Ms. Debbie Mumm in 1999. And someone paid $24.99 for it! I certainly hope Lindsey didn’t spend that much. I think 1999 is calling and they want their village back.

Chalkboard Arrow Sign (Mystery Thrift Off) | Pretty Handy Girl

I’ll quickly show you how I transformed this village and then we’ll get to the tutorial for how you can make your own Chalkboard Arrow Sign.

The hinges were easy removed from between the houses. I kept them for another project.

Chalkboard Arrow Sign (Mystery Thrift Off) | Pretty Handy Girl

The wooden embellishments were popped off with a pry bar.

Chalkboard Arrow Sign (Mystery Thrift Off) | Pretty Handy Girl

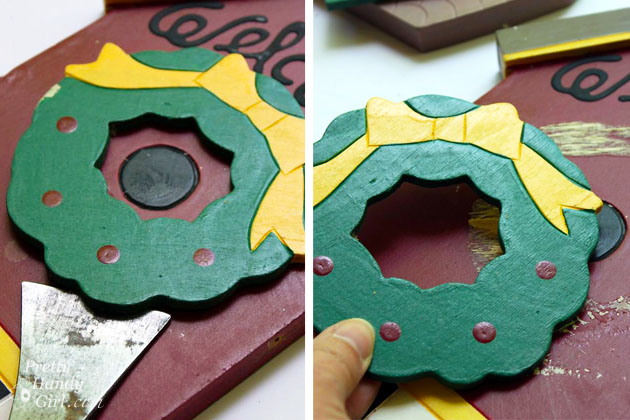
I also saved these embellishments for a future project.

Chalkboard Arrow Sign (Mystery Thrift Off) | Pretty Handy Girl

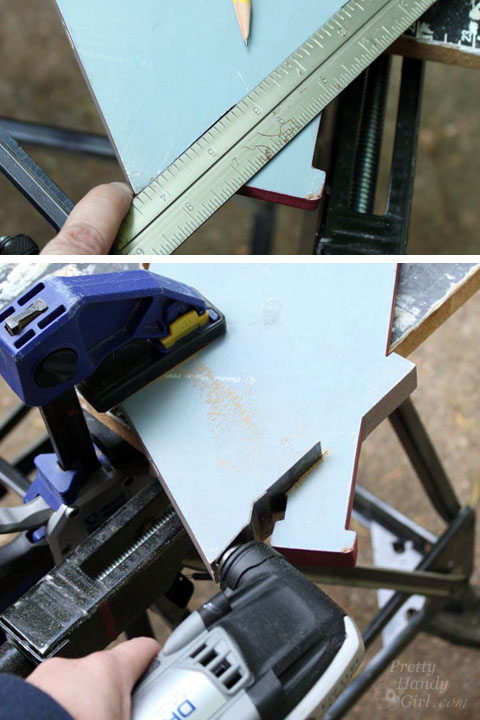
To create the arrow shape, I chose the middle tall building and cut off the chimney with my Dremel Multi-max.

Chalkboard Arrow Sign (Mystery Thrift Off) | Pretty Handy Girl

Here’s where you can pick up the tutorial. 🙂

Materials:

  • 9″ x 14″ piece of smooth plywood, masonite or wood board
  • Jigsaw
  • Sander
  • Valspar Gray Spray Primer
  • Chalkboard paint
  • Foam roller
  • Chalk Ink
  • 1″ x 1″ square garden stake (look in the garden section of Lowe’s)
  • Finish Nails
  • Wood glue

Instructions:

Print out the Chalkboard Arrow Template. It should fit on a legal sheet of paper. Cut out the template and transfer the shape to your wood.

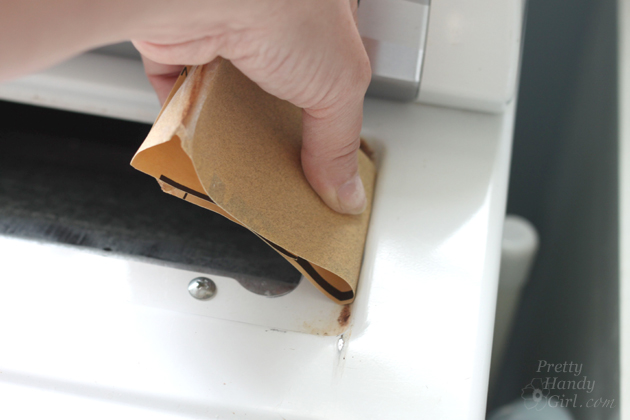
Use a jigsaw to cut out the shape. Sand any rough edges from your plywood. Read more

Aging and Antiquing Furniture | Pretty Handy Girl

Reclaimed Lumber Farmhouse Table | Pretty Handy Girl

Aging and antiquing furniture legs is an easy task if you want to fake age on a table or chairs. With some stain, paint and glaze you can fool most people into believing that your new furniture is an antique.

There are many ways to age and antique furniture. This tutorial will show you my favorite technique for table and chair legs.

If you’re just stumbling upon this post, I shared the tutorial for building a table last week. The table legs I used are the rope twist legs from Osborne Wood Products. I worked with Osborne Wood Products and custom designed the legs, so you won’t find them anywhere else. I do think they should have named them the “Brittany” legs or “Pretty Handy Legs.” LOL. I’m just excited that they provided me with a set for my table at no charge. 😉

This tutorial works best with unfinished wood, but you can skip the staining step if you have pre-finished furniture.

Materials:

(I’ve included affiliate links for your convenience. I earn a small percentage from a purchase using these links. There is no additional cost to you. You can read more about affiliate links here.)

Instructions: 

Stain your furniture leg with the dark stain. Follow up with a second coat if you desire. Allow the stain to dry.

Reclaimed Lumber Farmhouse Table | Pretty Handy Girl

Paint the legs with white chalky paint. Add a second coat if you need more coverage.

Reclaimed Lumber Farmhouse Table | Pretty Handy Girl

Mix up the Miss Mustard Seed Milk Linen colored paint and brush on a layer of milk paint on top of the white paint. (For more variety, you could use a contrasting color instead of linen.) Read more

File Cabinet Makeover Using Chalk Paint

Hey there everyone!  I’m working in my craft room to give it a major overhaul and make it a much more functional and creative space.  It also doubles as an office that I share with my husband.  It’s not always the easiest thing to do, partly because of a lack of organization. One of the biggest projects we’re taking on is completely making over the closet.  I’ve already replaced the closet doors with curtains and I love how much easier it has made it to get to things in the closet.

File Cabinet Makeover Using Chalk Paint

edited-8164

This file cabinet is one of the things that goes in that closet.  When we finish making over the closet, it will be moved to a more prominent location that will be more visible, especially if the curtains are left open.  Because of that, I decided that the boring beige color had to go and I gave it a quick and SUPER cheap makeover!

Here’s what you’ll need to do this project yourself!

File Cabinet Makeover Using Chalk Paint Materials:

File Cabinet Makeover Using Chalk Paint Instructions:

Unless you plan on painting it, you want to remove all of the hardware off of your file cabinet.  I wasn’t quite sure how this would go, but it was extremely easy to remove everything.  Just a couple of bolts and I was pretty much done!

edited-8166

To protect the inside of the cabinet from overspray or paint dripping through, cover all of the holes from the inside using masking or painter’s tape.

edited-8168

Time to mix your chalk paint.  What I love so much about BB Frösch Chalk Paint Powder is that there’s virtually no waste.  You mix as you go.  I like using the sample-sized paint containers because they’re cheap and if it’s a project where I’m not sure how much paint I’ll need, at least I know I won’t go way over by buying a quart.  The other amazing thing is that there’s virtually no prep work.

Wipe down the file cabinet with a wet cloth and that is it!

edited-8170

If you choose to paint your cabinet using a roller or paint brush, you can get started from this point.  If you plan to use a paint sprayer, you’ll need to prep the paint.  First and foremost, strain your paint!  Lowe’s sells little cone paint strainers (they look like coffee filters) for $.98 a four pack.  Once your paint is strained, you need to thin it with water.  The HomeRight paint sprayer that I use comes with everything you need to do this, plus great instructions. Read more

How to Refinish Rusted & Scratched Appliances | Pretty Handy Girl

How to Refinish Rusted & Scratched Appliances | Pretty Handy Girl

Do you have an appliance that has scratches and/or rust spots? Unfortunately over time the rust will get worse if you don’t deal with it.

How to Refinish Rusted & Scratched Appliances | Pretty Handy Girl

Today I want to show you how to refinish scratched and rusted appliances so you can extend the life of your appliances and make them look almost like new again.

How to Refinish Rusted & Scratched Appliances | Pretty Handy Girl

Before you get ready to tackle this project, you’ll need to order spray paint specifically for your appliance. If your brand doesn’t carry a touch up spray paint you can try the universal spray paint by Rustoleum. Or buy the liquid touch up paint and only paint the rust spots.

Be aware that all white paint is not the same color. However,  typically the colors are usually the same within a specific brand. (i.e. All Whirlpool white appliances are painted with the same white.)

How to Refinish Rusted & Scratched Appliances | Pretty Handy Girl

Materials:

Instructions:

Begin by sanding any rust spots down to the metal. Sand the entire surface lightly to minimize scratches.

How to Refinish Rusted & Scratched Appliances | Pretty Handy Girl

Fold the sandpaper in half to get into grooves and tight spots.

How to Refinish Rusted & Scratched Appliances | Pretty Handy Girl

Vacuum up any sanding dust and dirt.

How to Refinish Rusted & Scratched Appliances | Pretty Handy Girl

Use a clean damp cloth to wipe any additional dust off your appliance.

How to Refinish Rusted & Scratched Appliances | Pretty Handy Girl

If you can drag your appliance outside, that’s the best way to spray paint it. But, if you can’t, you can mask off an area around your appliance with cardboard and newspaper. You can also use saran wrap to mask off tricky areas.

How to Refinish Rusted & Scratched Appliances | Pretty Handy Girl

If you are working inside, crack a window and open a door. Use a fan to pull air away from your work area. Send the kids and pets outside if you are painting indoors.

How to Refinish Rusted & Scratched Appliances | Pretty Handy Girl

Put the respirator mask on. Spray the appliance with the spray paint. Use back and forth strokes that extend off the appliance and onto the masked area. If you stop at the edge you’ll have puddles of paint. A light coat is all you need for your first coat. Read more