farmhouse serving tray close up view. Letter J Monogram

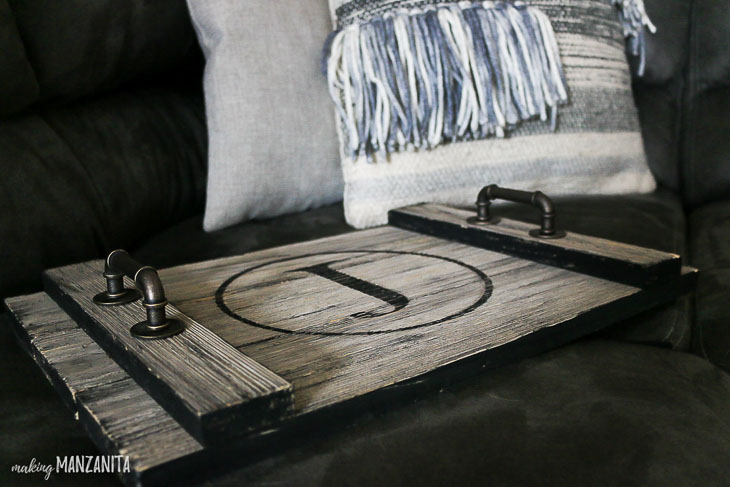
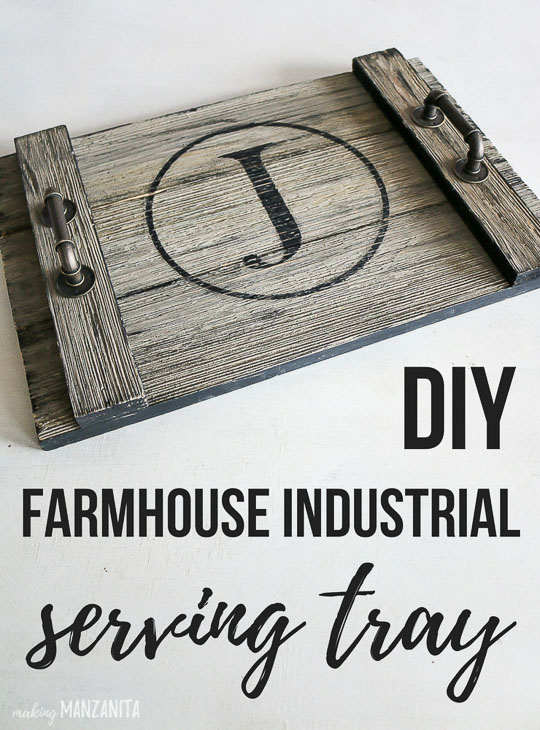
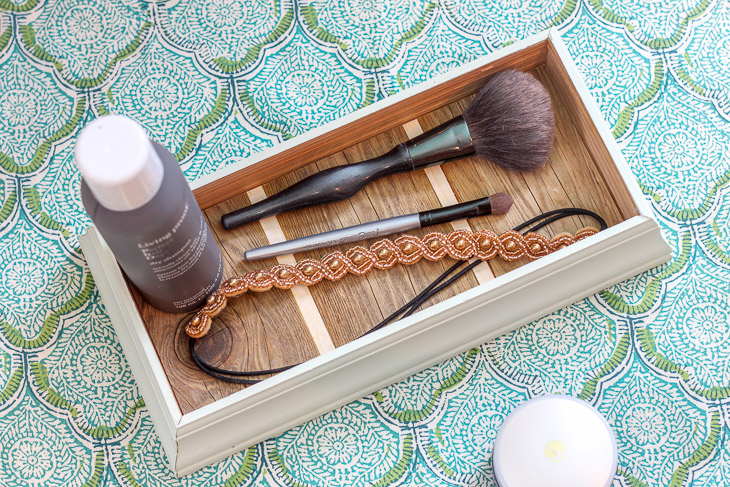
A common decor item with farmhouse style is a wood serving tray. Trays are an easy way to add style and function. This DIY Farmhouse Style Serving Tray with handles is so easy to create, I can’t wait to show you how it’s done!

DIY Farmhouse Industrial Serving TrayDIY Farmhouse Style Serving Tray

Hi there! Chelsea here from Making Manzanita, where it’s all about making your house a home! I’m so excited to be with you today. I love renovating and incorporating farmhouse style decor into our home. One of the easiest ways to decorate is with a serving tray. You can set it on a coffee table to protect surfaces from drinks, use it to style with a plant and a candle, or use it for serving!

Let’s get busy making this super easy DIY Farmhouse Style Serving Tray!
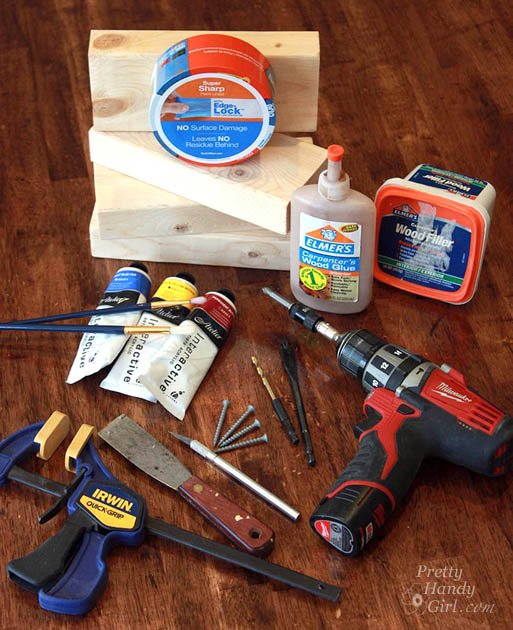
Materials:

(I’ve included affiliate links for your convenience. I earn a small percentage from a purchase using these links. There is no additional cost to you. You can read more about affiliate links here.)

Instructions:

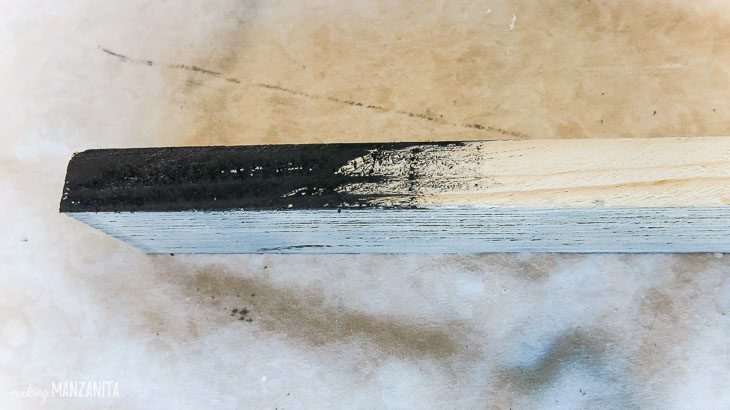
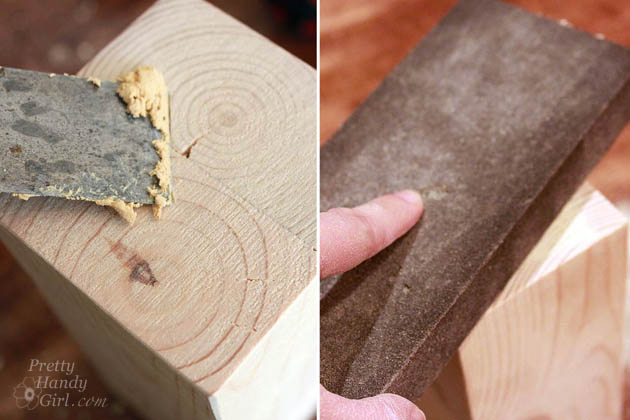
Step 1: Paint edges of wood

Using a foam brush, paint the edges of your wood with black acrylic craft paint. You may be wondering why this is the first step. I didn’t love the freshly cut raw edges of the wood I used. To give the serving tray a distressed industrial farmhouse feel, I painted the cut ends and corners with black paint.

painting wood slats with black paint

Step 2: Emphasize the texture of the wood to add character

If the wood you use for your farmhouse wood tray has a raised wood grain, dip your paintbrush into the black paint and lightly run over the top for a rustic look. This step enhances the rustic texture of the wood.

foam dry brushing black onto wood siding

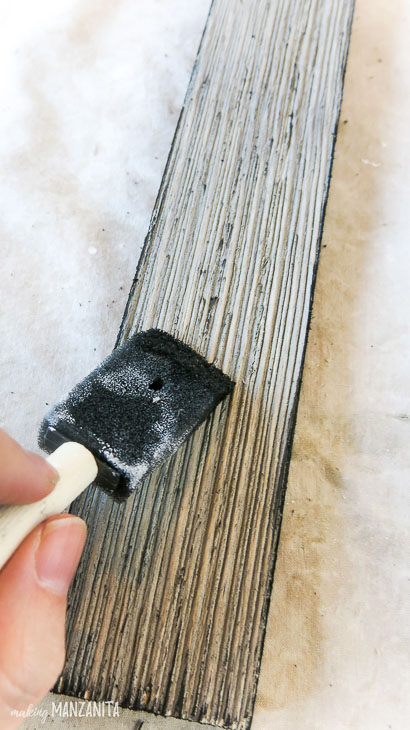
If your wood has a smooth surface, you can get a similar look by using a dry brush technique with a bristle brush. This works best if you use an old, ratty-looking bristle paintbrush. You put a little bit of paint on the brush and then wipe most of it off on a rag or paper towels, so the brush is essentially dry. Then lightly run the paintbrush over the top of the wood. The result is an enhanced grain pattern and a distressed farmhouse look!

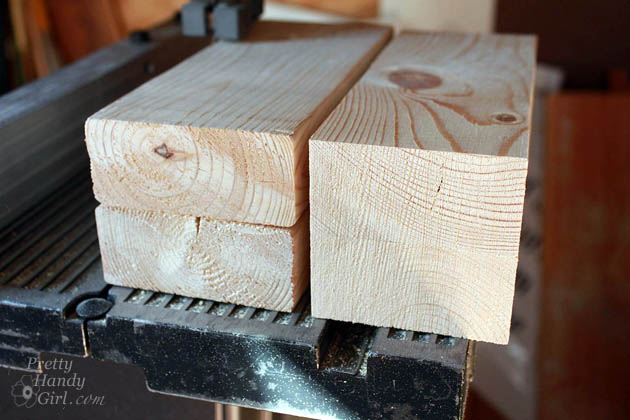
Step 3: Assemble farmhouse wood tray

Once the paint has dried, it’s time to assemble your farmhouse wood tray. Start by laying out the three larger pieces of wood horizontally. Next lay the smaller pieces of wood on top vertically at each edge. Allow about 1 inch from the edge of the tray.

brad nail gun laying on top of assembled wood tray

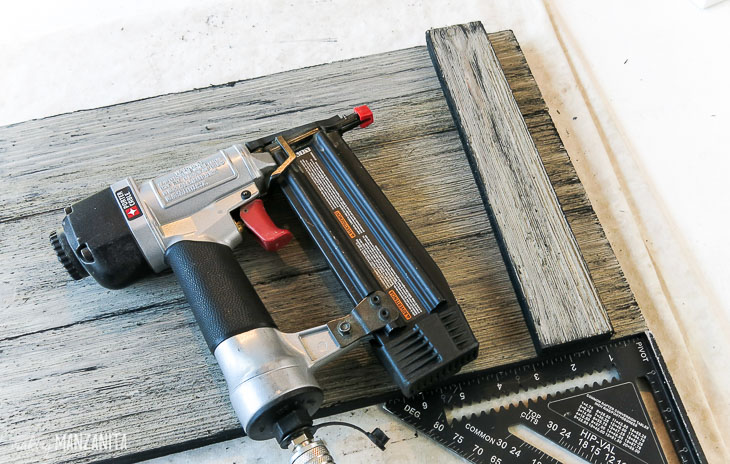
Before you start nailing, make sure everything is square. Use a nail gun to nail the smaller pieces of wood into the larger from the top of the tray with a couple of nails into each board.
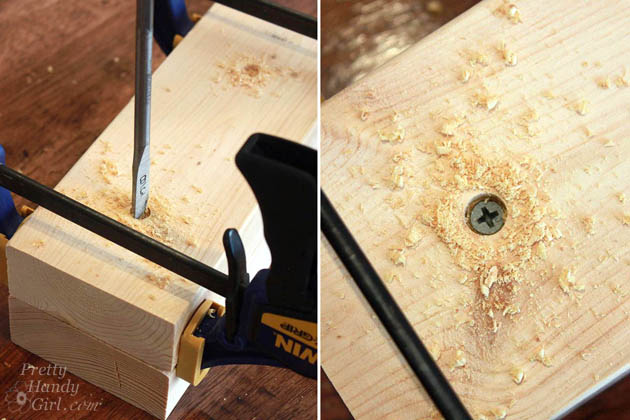
Step 4: Add handles

Measure the center of the vertical pieces and lay painter’s tape on top of them. Measure the width of your cabinet pull and mark where the holes should be drilled on top of the tape. The painter’s tape helps you see the marks on darker wood.

mark handle sides centered on tray

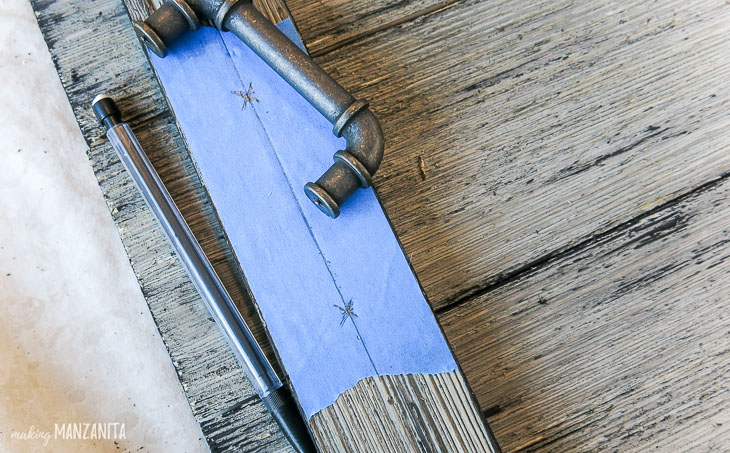
Line up your drill bit (match the diameter of the bit to the handle screws) on the marks and drill holes through both pieces of wood on your serving tray.

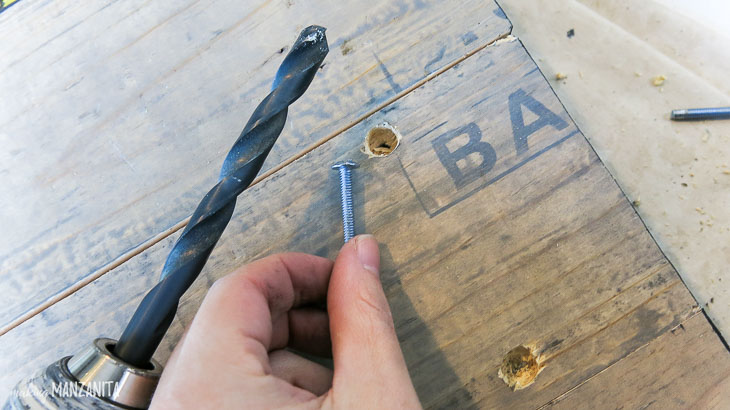
To get a flat surface on the bottom of the farmhouse wood tray, use a countersink bit on the underside of the tray. (If you don’t have a countersink bit, use a larger drill bit to create a recess for the screw heads to sink into. This helps protect any surfaces you set the wood tray on from getting scratched.

Countersink drilled into wood tray bottom

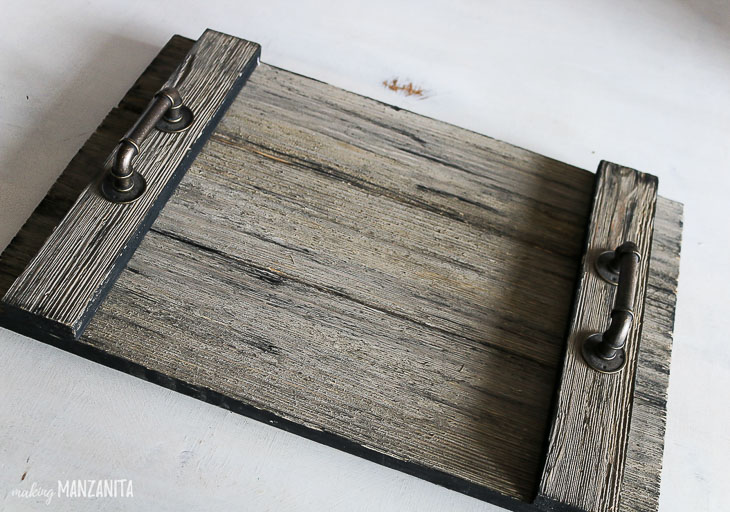
Flip the tray over and admire your new farmhouse style industrial serving tray.

rustic gray painted wood farmhouse tray

You can stop here, but to add a monogram, keep reading.
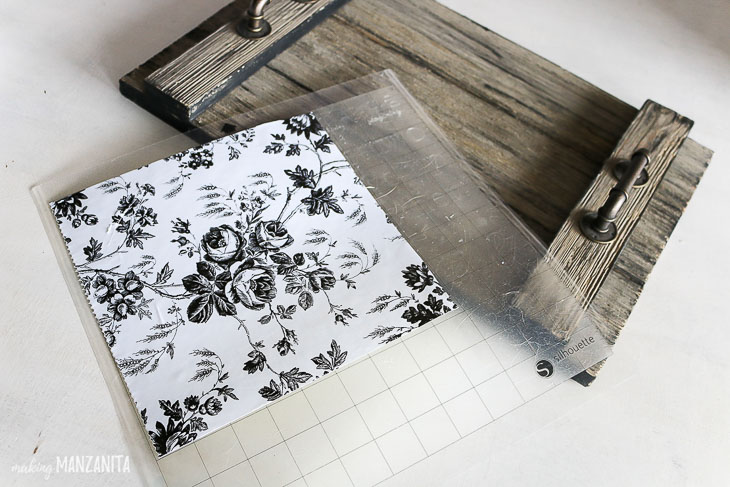
Step 5: Cut stencil

Using a vinyl cutting machine, design your monogram and cut your stencil.

Budget Tip: Use contact paper from the Dollar Tree as a cheap one-time-use stencil material.

adhesive shelf paper for vinyl stencil

To recreate a monogram like mine with an industrial farmhouse style, here are the details:

  • Font: Baskerville Old Face
  • Font Size: 489
  • Circles were created by drawing two circles with the shape tool around the letter

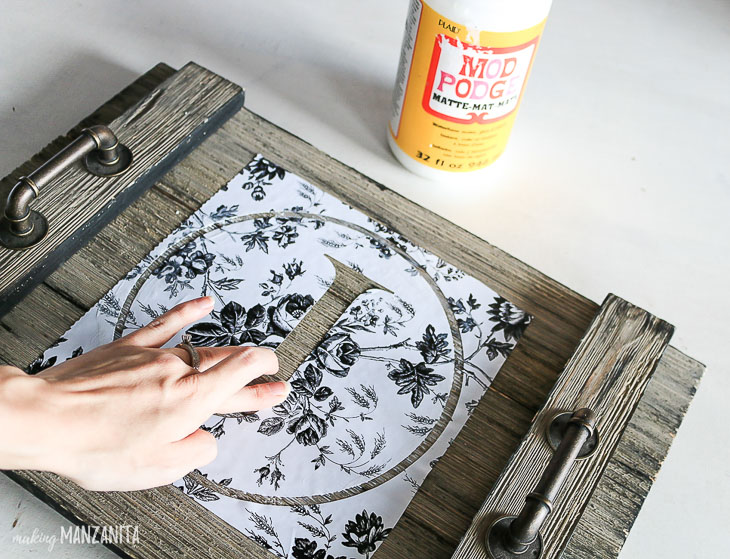
Step 6. Apply stencil

Cut and apply transfer tape to fit over your stencil. (Using transfer tape will help keep everything lined up and centered as you’ve designed it.)

weed excess vinyl from letter J stencil

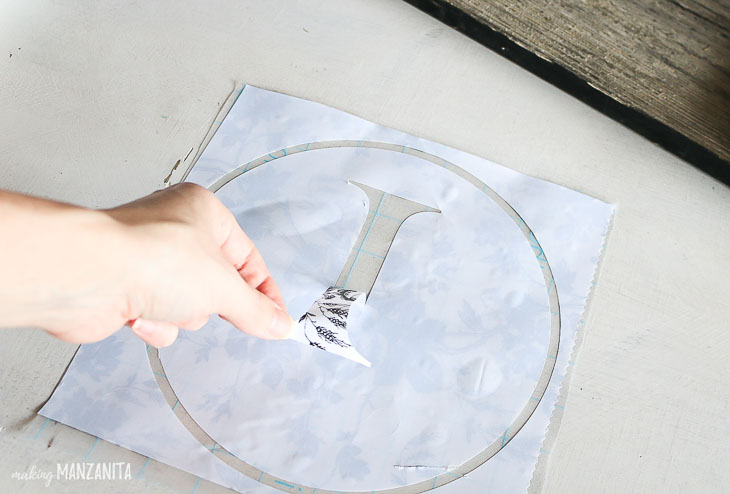
Peel the stencil and transfer tape off the backing and remove the part of the design that you would like painted (in my case, this is the circle border and the letter).

remove transfer paper from adhesive stencil

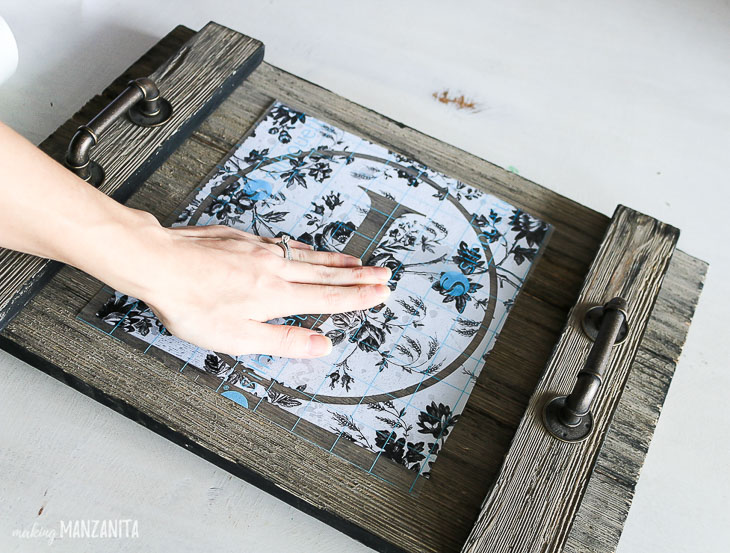
Measure the center of your serving tray and press down your stencil. Carefully peel the transfer tape away from the stencil. (I found that the ghost wood I was using didn’t really “grab” the stencil very well, so this part was kind of tricky for me. If you’re using a smoother wood, it should be a little easier.)

center adhesive stencil on tray

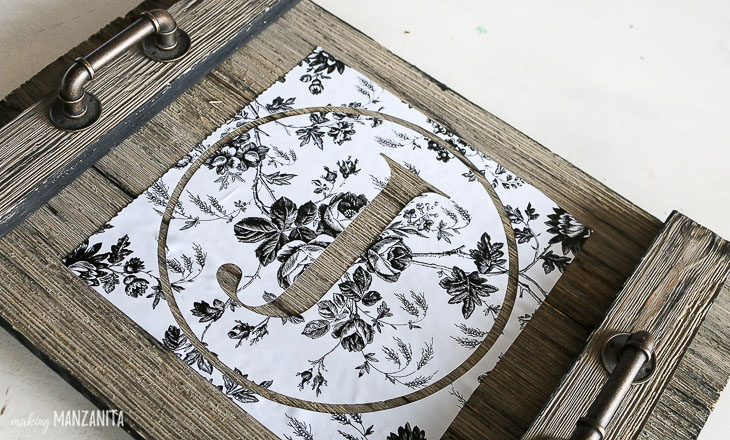
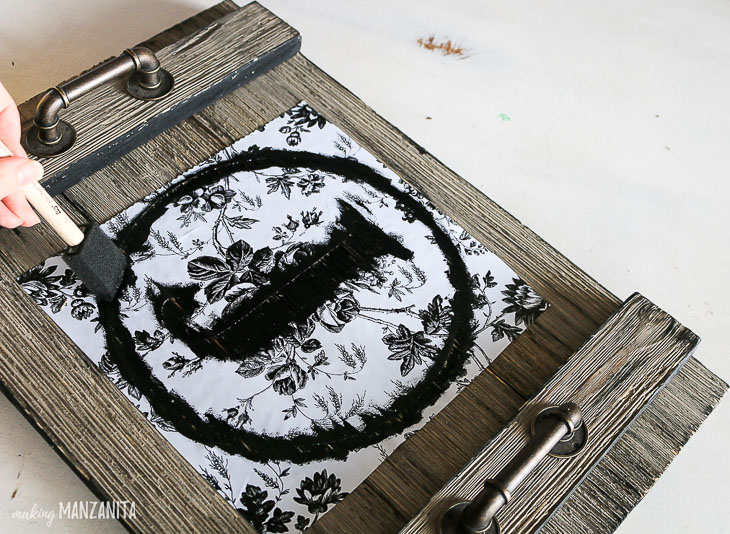
Step 7: Seal stencil

There’s a magic step that I use for all of my wood signs and stencil projects that prevent stencils from bleeding. Before painting the stencil, seal it with Mod Podge. Rub a little Mod Podge over the stencil edges once it’s adhered to your wood. Wait for it to dry to the touch before painting (usually about 15-20 minutes).

seal edges of stencil with mod podge

You can read more here about this awesome hack for how to stencil on wood. (I did find that this rough ghost wood required more Mod Podge than normal because of the grooves in the wood and the stencil not sticking as well as it normally does.)

Step 8: Paint over stencil

Once the Mod Podge is dry, paint over the stencil with acrylic craft paint using a foam paintbrush. Blotting the paintbrush up and down many times rather than brushing across the stencil will prevent the paint from bleeding under the stencil.

painted letter j on tray

Step 9: Remove stencil

When you’re done painting, you can peel up the stencil immediately except in areas where there are small intricate details that may smudge. In those cases, wait until the paint is dry to the touch before removing the stencil entirely.

remove stencil

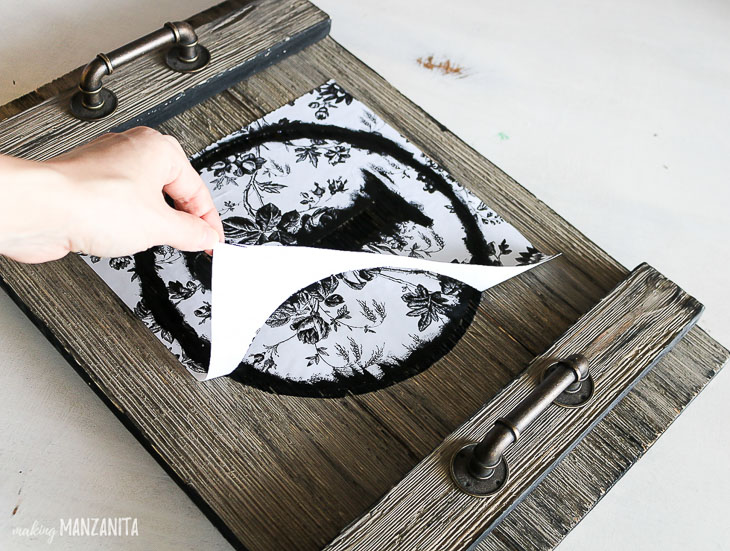
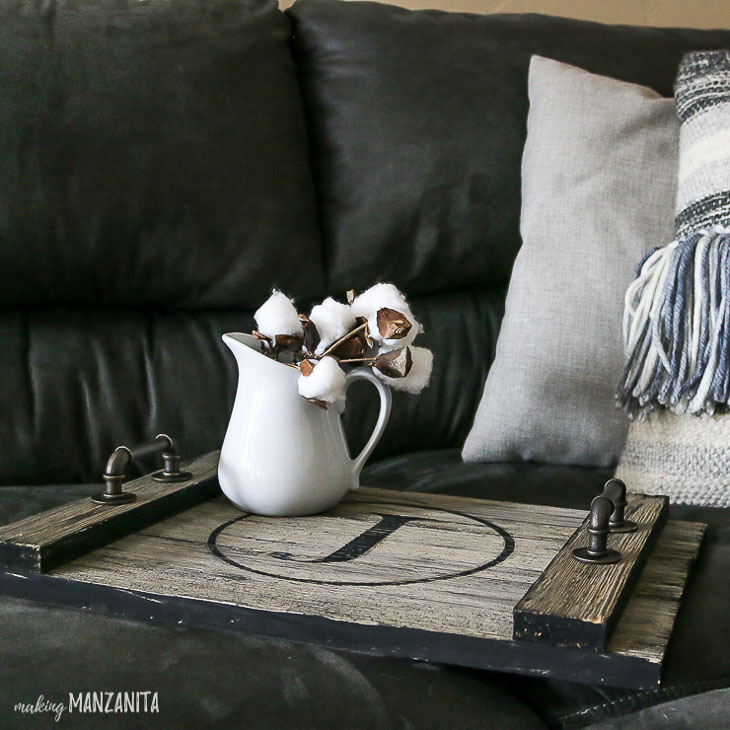
Look at those nice crisp paint lines! So pretty!

finished rustic wood serving tray with J monogram in circle

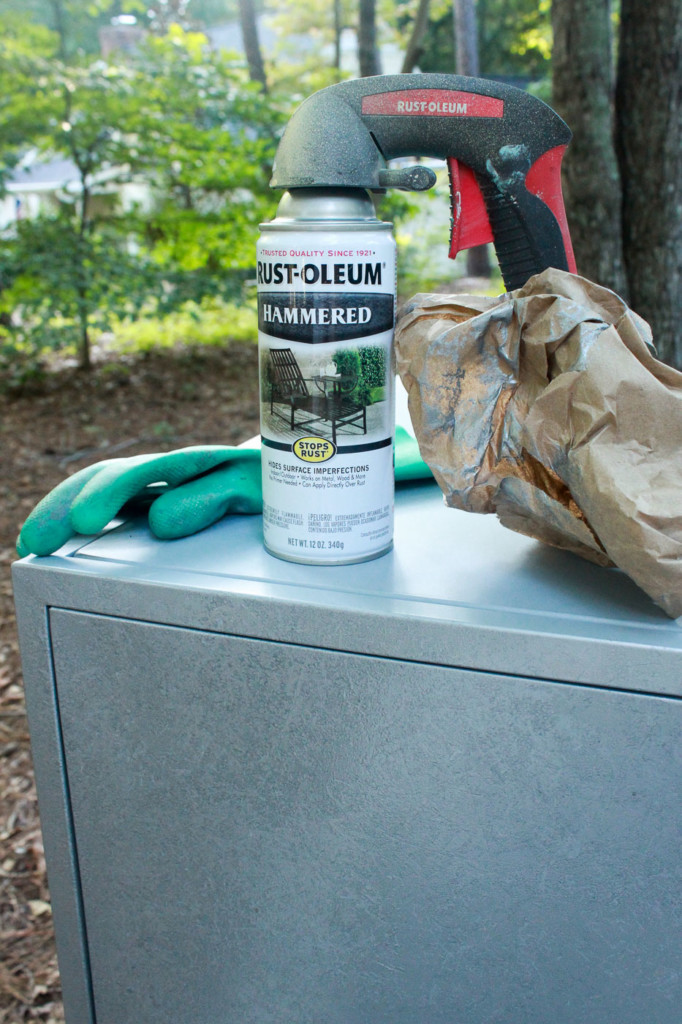
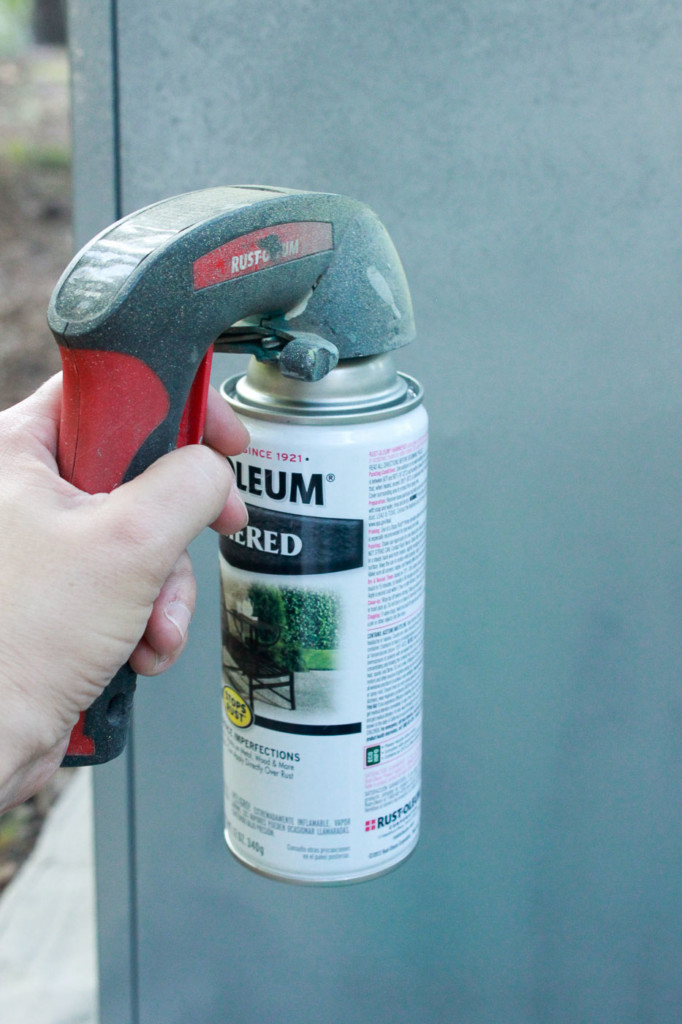
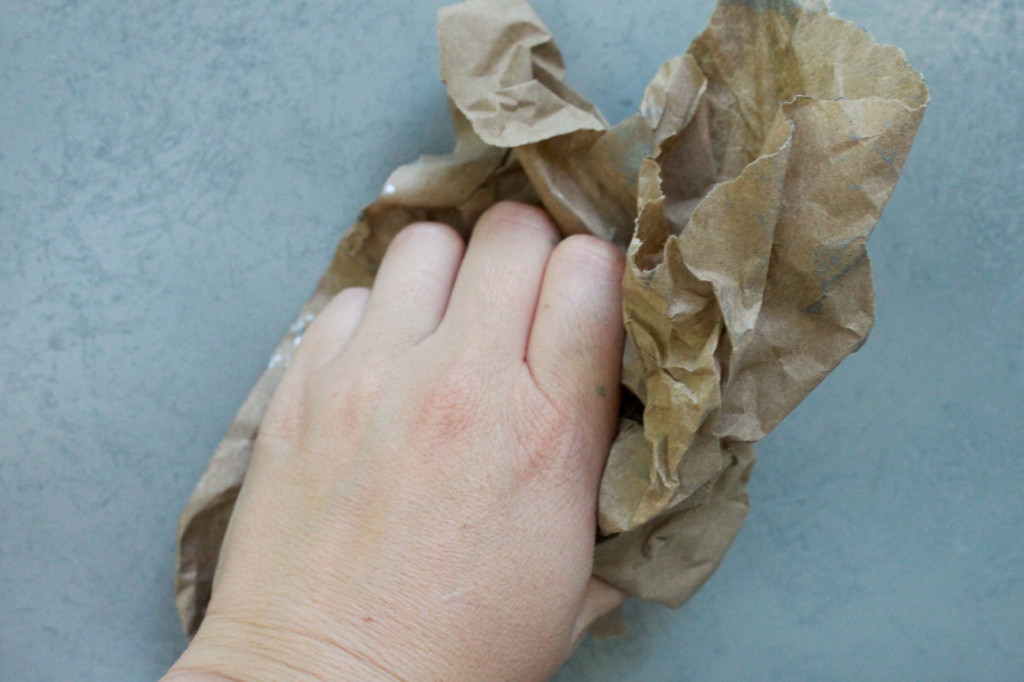
Step 10: Seal serving tray

To protect your serving tray, seal it before use with 2-3 coats of a spray sealer.

J Monogram Rustic wood serving tray

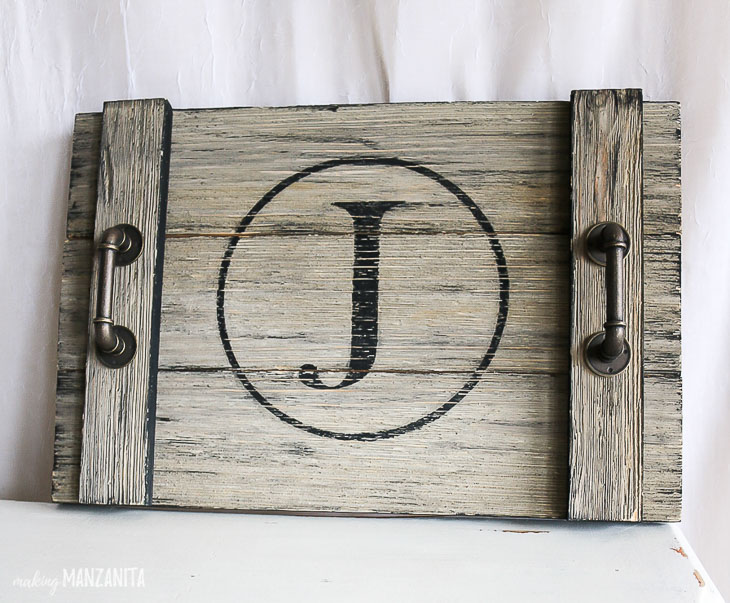
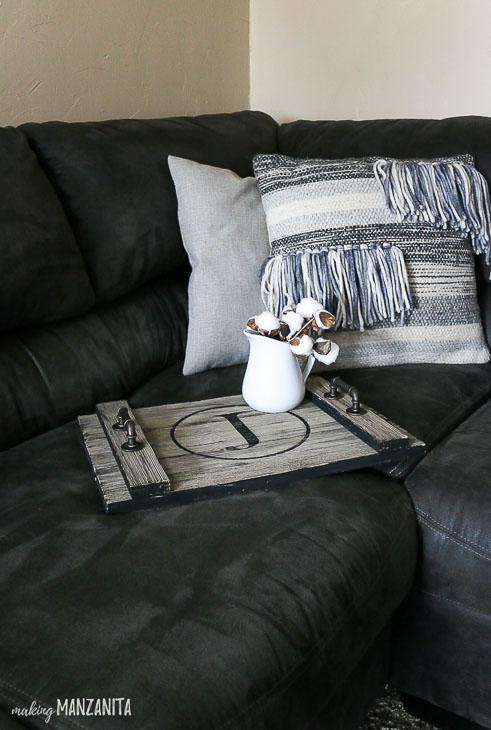
There you have it! A DIY Farmhouse Style Serving Tray with handles that adds style and function to your decor!

Industrial pipe handles on serving tray

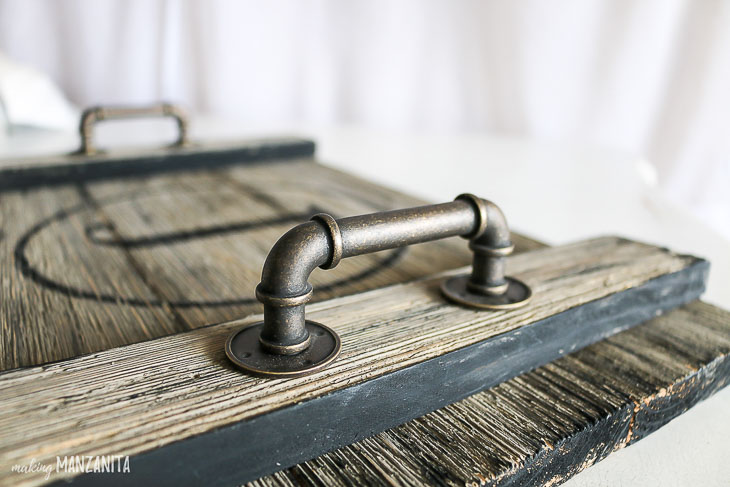
I love the industrial vibes that the handles and the gray textured wood bring to this serving tray.

The best part about this wood farmhouse tray is that no one else will have one exactly like it (just one of the many reasons I love making my own home decor).

farmhouse serving tray close up view. Letter J Monogram

Next time a friend comes over for a cup of coffee, you can grab this serving tray with handles to serve up coffee and snacks.

Farmhouse rustic wood serving tray on couch

She’ll surely ask where you got such a cute wood tray. You’ll answer proudly that you made it yourself!

rustic wood serving tray on black couch, pillows in background

Thanks for joining me today while I showed you how to make this DIY Farmhouse Style Serving Tray.

Chelsea - Making Manzanita

My name is Chelsea and I am the founder of Making Manzanita (www.MakingManzanita.com). I’ve found that many women don’t know how to start decorating or updating their homes, which is why my passion is helping others make their house a home they love. At my blog, Making Manzanita, my readers enjoy decor inspiration, craft & DIY tutorials written in plain English and simple homemaking advice to run their homes more efficiently. One of the things my readers love most is my perspective of working with what you have because your house doesn’t have to be perfect to feel like home.

I’m mama to the most adorable little man (with a little baby girl coming soon!) and wife to my DIY partner. We love our life in the beautiful Central Oregon as we continue our journey to renovate our 2nd fixer upper. We love to inspire others with budget-friendly renovation projects, like our faux shiplap wall and wood air conditioner cover made with pallets.

You can connect with me on Instagram, Facebook or Pinterest.

What a great tutorial! If you like this DIY farmhouse tray, I know you’ll also love these other DIY trays:

How to Build a Quick DIY Tray & Gift Box | Pretty Handy Girl

DIY Wood Slat Tray and Gift Box


DIY Scrap Moulding Trays | Pretty Handy Girl

DIY Scrap Moulding Tray


Rustic Pallet Serving Tray

Rustic Pallet Serving Tray

Many of us have been staring at the same walls and doors in our homes for many years (or maybe many decades.) If you’ve wanted to give your home an update, painting a door is a quick and easy way to do just that. Today I’ll to show you how to paint doors (the professional way) so they look amazing for years (or decades) to come.

How to Paint Doors like a Professional | Pretty Handy Girl

How to Paint Doors (The Professional Way)

So you want to paint like a pro? Well, sit back and let me give you some tips and a tutorial for painting a door. This tutorial pertains to any paneled door (interior or exterior).

How to Paint Doors like a Professional | Pretty Handy Girl

Our doors are all the six panel type. If you have flat (non-panel) versions, you can skip this post and come back later. For the rest of us, get out your paper and pencils and take some notes (does anyone do this anymore?)

Materials:

(I’ve included affiliate links for your convenience. I earn a small percentage from a purchase using these links. There is no additional cost to you. You can read more about affiliate links here.)

optional: Painting Pyramids

How to Test for Latex or Oil Paint?

To determine if you need to prime your door you need to assess if your door was painted with latex or oil paint first. To test the paint, rub a small spot with rubbing alcohol (or ammonia) and if the paint comes off it is latex. If not, it’s oil paint.

How Do I Know if My Door Has Lead Paint:

You can easily test your door (or any paint) for the presence of lead by using a lead test swab. I go into more detail about lead paint in this tutorial.

How to Easily Test for Lead Paint

But, the short of it is, if you have lead paint, you must be very careful when sanding it. Cover the area with disposable plastic. Use a wet sanding block (never use a power sander). Wear a respirator and be sure to clean everything with disposable wet wipes.)

When Do You Have to Prime?

As we determined above, if your door was painted with oil-based paint (and you want to use latex paint) you will need to prime. But, here are a few more reasons you need to prime your door first:

  • Bare wood or stained wood doors.
  • Dark painted doors you wish to paint lighter (or vice versa), you want to use a tinted-primer to cut down on coats.
  • If the door was painted with oil and you want to use latex paint. If you are painting over latex with latex (or oil over oil) and the previous paint job is in good shape you can skip the primer. (This was the case with my door, so I didn’t prime it.)
  • The paint is chipping. First, scrape or sand any flakes and then prime. (Important: Check for Lead Paint First.)
  • Lead paint (whether in good shape or not), you will need to prime.

Should I Remove or Paint a Hung Door?

The easiest way to paint a door is to remove the door, then remove the knobs and latch. Then you can lay it horizontally on sawhorses. Painting a door on sawhorses eliminates potential drips and is easier on your back. But, removing the door can also be a pain, especially if it’s a large solid wood door. I’ve painted plenty of doors without removing them, and they look great. It comes down to personal preference.

Preparation:

Whether you are removing the door or painting it in place, be sure to cover the area underneath with a drop cloth, newspapers, or flattened cardboard boxes (my favorite for hung doors because it gives some cushion when you are kneeling on the floor.

Lightly sand the entire door. No need to bust out the power sander, you can use a sanding block or sheet of sand paper. Be sure to sand down any bumps or blemishes. The main goal is to give your door a little “tooth” for the new paint or primer to adhere to. Wipe off the door with a damp rag to remove any sawdust.

Instructions for How to Paint Doors the Professional Way.

Step 1: Paint the interior panels first as shown in the graphic below.

How to Paint Doors like a Professional instructions

Using a small roller to paint doors can greatly speed the process. Begin by rolling paint on the flat panels. Work quickly by rolling on the paint, then use a brush to smooth out the paint and fill in the detailed areas around the flat panel.

This is one of the most important tips for getting a professional look:

Follow the grain direction when brushing on the paint

If you follow the grain and the direction of the arrows in the graphic above, you will maintain the look of the door construction. Original wood doors are made with several pieces and the wood grain changes direction. Even if you have cheap hollow core doors, you can fake the look of a quality door by following the grain pattern.

How to Paint Doors like a Professional Panels

In other words: NEVER run your brush strokes perpendicular to the wood grain. This does NOT look professional.

How to Paint Doors like a Professional | Pretty Handy Girl

Step 2: Next, roll the inside center vertical piece. Start by rolling the paint on in an up and down direction.

How to Paint Doors like a Professional | Pretty Handy Girl

Then drag your brush up and down vertically with the wood grain (see arrows in the above diagram.)

How to Paint Doors like a Professional | Pretty Handy Girl

Step 3: Next paint the horizontal cross pieces in the middle of the door.

How to Paint Doors like a Professional | Pretty Handy Girl

Keep your brush strokes horizontal (with the grain) and cross over the tall vertical center.

How to Paint Doors like a Professional | Pretty Handy Girl

Step 4: Paint the door border. Pay attention to the direction of the wood grain for this last step. The grain on the two sides should go vertically from top to bottom.

How to Paint Doors like a Professional | Pretty Handy Girl

There are header and footer panels sandwiched between the left and right sides. These “sandwiched” pieces should be painted by dragging your brush horizontally (see diagram above.)

How to Paint Doors like a Professional | Pretty Handy Girl

Step 5: The last step is to paint the edges of the door. (Do Not paint the hinges…that’s not very professional either!) If your hinges or doorknobs were painted previously you can follow this tutorial with four ways to remove paint from metal hinges.

4 Ways to Remove Paint from Metal Hinges (& more) | Pretty Handy Girl

Roll paint onto the edges then smooth them with the paintbrush. Be on the lookout for drips or puddles of paint. Go back and check the face of your door for drips now before the paint cures.

Let your door dry (30 minutes – 1 hour), then follow up with a second coat of paint. When you are done let the doors dry for 2+ hours before flipping to paint the other side. I have found that it helps to put pieces of cardboard or rags under the door so the paint doesn’t stick to the sawhorses. But you can also buy Painting Pyraminds which elevate the door and hold it on tiny points.

Ready to perfect more of your painting skills? Check out the Paint Week series with 5 Lessons to Perfect Your Painting Skills:

Paint Week - 5 Lessons to Perfect Your Painting Skills

And if you really want to paint your front door but can’t decide on a color, you’ll love this collection of Bold Colored Front Doors!

Bright and Bold Colorful Front Doors

signature

Need a quick gift using scrap wood? A Creative Block Desk & Art Utensil Holder is an easy and fun gift to make and certainly a project that you can customize to meet your needs. Best of all, the kids can help with the painting step!

create_art_block_holders_sm

Creative Block Desk & Art Utensil Holder

Mother’s Day is this coming weekend! Have you decided how to show her your appreciation and love?! I did! My mother is a professional artist. She creates amazing paintings that inspire others and brightens their homes. For Mother’s Day I wanted to brighten her studio with these art utensil holders. I call them “Creative Blocks.”

Go ahead and raid your scrap pile and join us as we make these colorful and fun Creative Block Desk & Art Utensil Holders.

Materials:

(I’ve included affiliate links for your convenience. I earn a small percentage from a purchase using these links. There is no additional cost to you. You can read more about affiliate links here.)

materials_wood_blocks_sm

Instructions:

1. Block assembly: Select two 2×4″ scraps cut to the same length. Spread glue on one board and sandwich them together.

glue_blocks_together_sm

Clamp the wood together and drill two small holes to countersink the heads of the screws. Drive two screws into the bottom of the wood to hold the pieces together.

drill_blocks_together_sm

Use a band saw, jigsaw, or table saw to trim off the rounded edges of the wood so you have a square block of wood with straight corners.

square_off_2x4s_bandsaw_sm

Putty any cracks or holes. Sand until smooth.

putty_and_sand_blocks_sm

2. Creating the mask:

If you have a craft cutter (Silhouette or Cricut) you can create a mask in vinyl easily. But, if you don’t you can use the computer to print out your words. Lay the print out on top of a strip of Painter’s Tape. Use a few pieces of tape to secure the corners.

create_art_printout

Trace around the words with the X-acto knife (be sure to have a few fresh blades on hand.) Transfer the resulting cut-out tape onto the block of wood. Press the edges of the tape mask to secure the tape.

add_scotch_blue_tape_letters

3. Painting the block: Paint a base color onto the block. Then use a brush and/or palette knife to dab thick paint over the block (minus the base.) Use the X-acto knife to gently peel off the tape mask. Let the paint dry thoroughly overnight.

lift_tape_up

4. Drilling Holes:  After the paint has dried completely, mark the location of the utensil holes with a pencil. Put a piece of painter’s tape on the drill bit to mark the depth of your holes. Clamp the block and drill holes at each pencil mark.

drill_holes

Dump sawdust out of the holes.

Wrap up the blocks in gift wrap and enjoy the look of joy as your Mom opens her Creative Block Mother’s Day gift!

create_pencil_holder_sm

art_brush_holder

You know, as an artist myself, I almost loved these too much to give them away. But, my Mom is worth it. (And I can make another set if I want ;-).)

create_art_block_holders_sm

For more last-minute Mother’s Day gift ideas and many other creative projects, check out the Gift Ideas section here on the blog.

PHGFancySignIf you liked this project, you’ll love these floating picture frames using more 2×4 scrap wood.

wood-block-picture-frames

Want to give something the look of zinc metal without spending money on zinc metal? You can create the look with spray paint and this technique.

How to Create a Faux Zinc Texture (with Spray Paint)

A while ago I was thrifting with a few friends and stumbled across an ugly cabinet at our local Goodwill. The metal chest had extra wide and deep storage, but the worst colors imaginable! The hot pink and mint green were disguising the true potential of the chest. Like a color-blind dog, I was able to see beyond its garish appearance. In my mind, I pictured a vintage metal cabinet with a faux zinc side and chalkboard drawer fronts.

I scooped it up and brought it home. Then the poor chest sat in our garage for months and months until I had a chance to work a little spray paint magic and turned it into….this thing of beauty:

Yes, that is the same chest of drawers! You could do the same transformation. Let’s learn How to Create a Faux Zinc Texture!

Materials:

(I’ve included affiliate links for your convenience. I earn a small percentage from a purchase using these links. There is no additional cost to you. You can read more about affiliate links here.)

Instructions:

Clean off your furniture piece really well. Remove any dirt or debris (I actually had to use a little Goo Gone to get rid of some sticky residue. But, lemon essential oil will also work for this task.)

Spray paint your object with automotive primer. (I prefer the automotive primer because it sticks to metal and can withstand a lot of abuse.)

Let the primer dry.

Adding a Faux Zinc Texture:

This is the most exciting part of the tutorial. I created this technique by trial and error and I’m excited by how well this method works for creating a faux zinc texture.

Getting a faux zinc texture is really easy. Just have some gloves on and use a crumpled up piece of craft paper. (A loose crumple works best.)

Spray paint your object with a thick coat of the hammered silver spray paint, (but not so thick that it runs). Let the paint get tacky by waiting a few seconds.

Then use the crumpled piece of craft paper to blot into the wet paint.

Work in small 1 foot sections and pounce the paper a few times. (Too much pouncing and you’ll lose the large textured pattern.)

Let the paint dry thoroughly. Then enjoy your beautiful faux zinc paint job!

Chalkboard Painted Metal Drawers:

For my cabinet, I chose to paint the drawer fronts with chalkboard paint for a nice contrast.

Remove the drawers from the chest. Tape over the drawer glides and slides. Mask off the drawer sides and insides by covering the drawers with tape and craft paper, leaving only the drawer fronts exposed.

Spray paint the drawers with chalkboard paint. (Use three fine coats of paint instead of one or two heavy coats.) Set them aside to dry.

Insert the chalkboard drawers back into the cabinet frame.

Add chalkboard art to your drawer fronts.

The thrifted cabinet has a wonderful texture now and the black and zinc colors work with any color scheme.

The chalkboard drawer fronts allow the flexibility for me to store and label other items inside.

I’m so thrilled with the results! I hope you try to transform your own object, now that you know how to Create a Faux Zinc Texture.

If you use this tutorial, I’d love to hear about it. Better yet, will you send me a picture?

Share this with a friend! Pin this image:

How-to-faux-paint-a-fake-pumpkinHow to Fake a Fake Pumpkin

Have you seen those neon orange fake pumpkins and nearly vomited because you wouldn’t dream of decorating with them. I mean—get real—everyone would know they were fake. Ah ha, but have you seen the price tags? $1 – $6? For that price you might just be willing to take a leap of faith with me, wouldn’t you? Awesome, because I’m going to show you how to faux paint a fake pumpkin so you can decorate with them year after year and fool your friends.

Materials:

(I’ve included affiliate links for your convenience. I earn a small percentage from a purchase using these links. There is no additional cost to you. You can read more about affiliate links here.)

materials

Instructions:

Start by painting all the pumpkins with Chalk Paint (use gray, white, green and blue paint.) Allow the pumpkins to dry.

paint-pumpkins-french-linen


Painting Realistic White Pumpkins:

It helps to look up some pictures of real pumpkins to refer to.

pure-white-country-grey

Using the stencil brush, paint a mixture of grey and white on one of the pumpkins.

paint-white-mixture

Before the paint dries, dab some of it off with the sea sponge. (Keep your sea sponge dry, not wet during the process.)

sponge-off-white

Dip the stencil brush into the white paint and add paint on the outer most bumps on the pumpkins. This is adding highlights.

highlights_on-white-pumpkin

Dab the highlights gently with the sea sponge to blend.

sponge-off-white-2

Use the fan brush dipped in a small amount of green paint inside the pumpkin ridges. Dab the ridges with the sea sponge to blend.

white-gourd-pumpkin

Have you ever seen a truly unblemished pumpkin? I think not. It’s time to add some spots or marks on the pumpkin to truly fool your friends. Dip the end of the paint brush into brown paint and dot it onto the pumpkin. Blot the spot with a sea sponge and maybe even transfer a few new spots with the sponge.

add-blemishes

Paint grey around the base of the stem and into the grooves with the round paint brush.

add-dark-depth-around-stem

Paint brown and green paint onto the pumpkin stem. Blend slightly with the sea sponge.

paint-sponge-stem

Can you spot my fake white pumpkin? Well, of course you can because I just showed you how to paint it. But, it will definitely fool your friends!

grouping_left_pumpkins

Painting Realistic Blue Pumpkins:

Painting blue pumpkins uses the same technique as painting the white pumpkins, only using a few different colors.

Use the stencil brush to paint blue onto another pumpkin. Dab the blue paint while it’s still wet with the sea sponge.

add-duck-egg-blue-sponge

Use the fan brush dipped in gray and brown craft paint to fill in the ridges.

darken-crevices

Dab the paint with the dry sea sponge to blend.

sponge-crevices

Add some highlights with a mixture of grey and white. This serves two purposes. 1) It adds dimension. 2) It tones down the excess blue on the pumpkin.

add-highlights

Paint the stem the same way you learned above.

To truly fool people, set up your fake pumpkins with some real pumpkins and real gourds. Sooo, can you spot the fakes?

guess-the-fakes

How many did you get right? The metallic gourd is simply spray-painted with copper spray paint. But, I did try my hand at faking a green and yellow gourd using the same technique as the pumpkins, but adding green to the top and yellow to the bottom.

the_fakes

Okay, I’ll give you a second shot. Guess the fakes:

vertical-fall-vignette

How did you do this time? Ha, you can now apply for a job as an art forgery detective ;-).

truth_fake_gourds
Now seriously, how many people will be viewing your pumpkins that close? Umm, next to no one. Normally they’ll view them from afar.

full-living-room-shot

Get your paints and palette out and go fake some fakes! It will be our little secret.

fall-vignette-grouping

PHGFancySignDid you like this painting post? Ahhh, then I know you’ll like this Ballard Pear painting tutorial:

Or if you’re feeling like taking on a larger scale project…how about Faux painted bricks!

Or perhaps you’d like to perform some faux zinc painting magic:

You can do it! I know you can.

signature