As a mother of two boys, my life is CHAOTIC! No matter how hard I try to contain the chaos that surrounds those two, I have come to terms with the fact that there are some things in life that cannot be controlled.

A week ago Tuesday night, while my dear husband was away on business, I had some super chaos thrown my way.

My boys were 5 ft. from me as I was putting away the dishes. They were showing off their “untrained” ninja moves to each other. My youngest proceeded to show his older brother an amazing kick that had so much momentum it swept him off his own two feet and sent him falling backwards. As anyone would do, he put his arm behind him to catch his fall. The results were 5 hours in the ER, a big fat co-pay, and this:

So, while I cannot control my boys’ crazy antics, what I can control is the chaos that exists in my home in closets, in drawers, and even under the kitchen sink!

I took an organizing 101 workshop back in the spring, and it was a great exercise in motivation and follow through for me. Over the course of 7 weeks, I learned  how to tackle small projects first. I learned what tools to use while organizing, what my road blocks are and many more useful tips.

Here is just a sampling of the organizational projects I’ve completed since taking the workshop:

Linen Closet

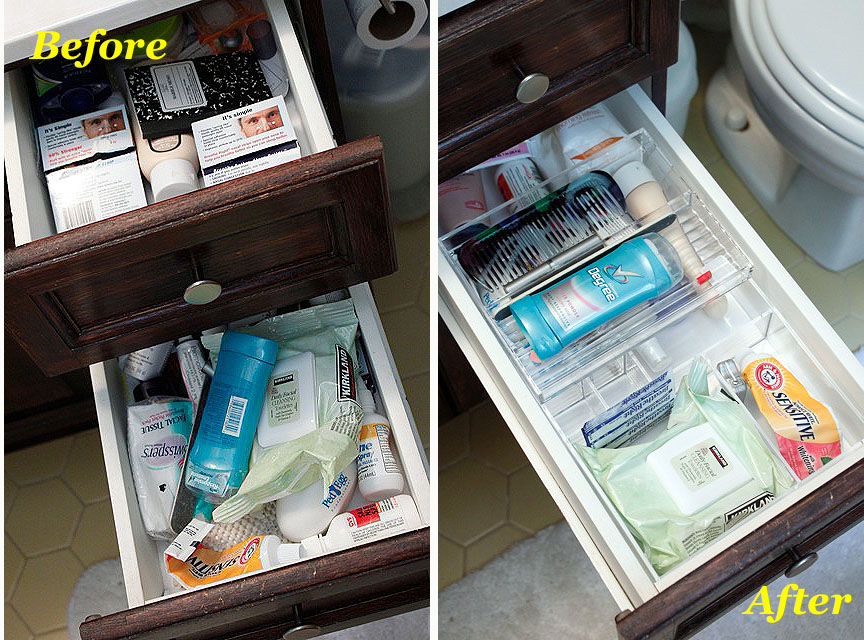
Under the Kitchen Sink

Bathroom vanity

and our Family Command Center

Having a more organized home has allowed me to have a more organized life. Which in turn gives me more patience and time to deal with little surprises, like this:

What about you? Do you want less CHAOS in your home and life? Well, meet your teachers:

Aby & Jay are the geniuses behind simplify1o1.com. Their goal statement says it all:

Our goal is to teach you skills and techniques to get more organized, as well as to provide you with the products and tools that will make getting the job done more fun and efficient. We’ll help you become a more productive, more energized and happier version of yourself. You’ll have more time and more energy to do the things you love (plus, you’ll be able to find everything you use to do those things you love!)

They help people take control of their homes which transfers to better control of their lives. By organizing your home, you can save countless hours a year. By simplifying and organizing your home, you will also save money. Best of all, having a neat and organized home will help you reduce CHAOS!

What better way to start the school year? Get control, get organized, and simplify your life. Banish the chaos that you CAN control!

In Organizing 101, you’ll learn a simple approach for de-cluttering your home. Plus, you’ll find out how to organize and store all the things you keep, so they’re easy to use (and put away when you’re finished!)

If you’d like more tips on organizing your home or office top to bottom, sign up for Simplify 101’s organizing newsletter right here ! You can also follow the blog and get even more daily tips.

Good luck!

Disclaimer: This is a sponsored post paid for by simplify101. However, in all honesty, I can’t say enough good things about simplify101. I will end by telling you that I thoroughly enjoyed the workshops I have taken so far (Organizing 101 and Organizing with your Kids).

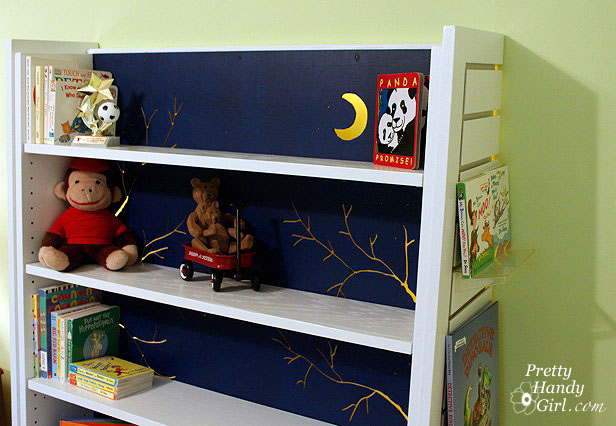
My 7 year old son and I worked together to take his room from this:

to this:

And the best part was that he enjoyed doing it and asked every night if we could work together on organizing his room. We worked in 15 minute segments over several days. You would not believe the things that were stuffed underneath his bed! I can’t even tell you because it was that bad. But, on the bright side, my oldest is learning to live in a less chaotic room. 😉


Slipcover a Couch Beautifully

We definitely have paranormal activity in our home. Things move without explanation. Pillows that were strategically placed by me to look magazine pretty inevitably end up on the floor after I leave the room. Kid sized chairs levitate on their own and land on top of the couch.

Slipcover a Couch Beautifully

And don’t even mention this pillow that has systematically lost all its buttons one-at-a-time!

Slipcover a Couch Beautifully

When questioned, both boys emphatically shout “It wasn’t me!” Hmmph.

Well, if this continues I might have to call in an exorcist, because it is getting VERY annoying.

But, I know you don’t want to hear about my boring ghost stories. Instead I thought I’d share with you a great source for brand name (to remain un-named) slipcovers at a fraction of the cost! May I introduce to you UglySofa.com.

Slipcover a Couch Beautifully

And let me tell you, the name is a misnomer, because this family-owned company is actually on a mission to give you a beautiful sofa! When UglySofa.com emailed me and said they wanted to send me a “brand name” slipcover to try out, I was skeptical. I mean – come on – how can you sell slipcovers from the famous PB&J (minus the J) at a fraction of the cost? I really doubted their authenticity. But, low and behold, a few days later my boxpleat slipcover arrived and when I opened it up, it truly was the brand they said it was and the quality was just as good as the slipcover I bought years ago from the store “that shall not be named.”

Slipcover a Couch Beautifully

I immediately ran over to pull back the worn red slipcover I’ve been using for as long as my oldest has been alive. WARNING: What you are about to see is a flashback to the 90’s. I admit, I did recover this sofa way back in my college years when hunter green was popular color. (I’m sad just wondering when blue-gray will be the “dated color”.) But, if you saw the granny fabric that lay beneath you’d be even more horrified.

Slipcover a Couch Beautifully

Now don’t even ask me why we still have a sofa that is well over 20 years old. Someday we’ll get around to replacing it…until then I have my new slipcovered sofa! Isn’t she pretty?!

Slipcover a Couch Beautifully

Have you ever purchased a slipcover because it looked beautiful in the catalog only to get it in the mail and you can’t for the life of you figure out how they got the slipcover to look so good?

Slipcover a Couch Beautifully

That used to happen to me too, until I worked as a photo stylist for Plow & Hearth (one of my responsibilities as a graphic designer for their catalog). I learned how to install slipcovers so they look beautiful.

Here are a few easy tricks for installing a slipcover so it look less like a rumpled college frat house slipcover. Please excuse my “butt shots”. I’m still new to this little thing called vlogging!

Start out by getting the ginormous cover on.

Find the “Back” tag on your slipcover. (And don’t look at the famous PB & J (minus the J) tag. Ha, I made you look ;-).

Slipcover a Couch Beautifully

Throw the “back” of the slipcover over the back of your sofa.

Locate the center of your slipcover and center it between the two arm rests.

Then line up the front skirt of your slipcover. I like to let the skirt puddle on the floor a little instead of kissing it.

Slipcover a Couch Beautifully

Smooth out the fabric with your hands, and neatly tuck and fold under any excess fabric.

Slipcover a Couch Beautifully

This is especially crucial on the arm rest, you want to disguise any excess fabric so the slipcover looks like it was custom made for your sofa.

Slipcover a Couch Beautifully

Wrap the side panels around the side.

Slipcover a Couch Beautifully

Locate the D- rings on the back of the slipcover.

Slipcover a Couch Beautifully

Feed the straps from the side panels through the D-rings in the back of the slipcover, and loop back between the two rings.

Slipcover a Couch Beautifully

Pull the straps until the slipcover is tight. Be sure to leave enough slack to be able to tighten the other side.

Slipcover a Couch Beautifully

Tuck any excess fabric into the folds behind the side panels and the d-rings.

Once you have the slipcover positioned, folded and tucked the way you like, then insert several cardboard light-sabers shipping tubes into the crevices between your cushions.

Slipcover a Couch Beautifully

These will secure and hold your slipcover in place.

And now, another little video on eliminating the wrinkles in your slipcover. I just used my hands and a squirt bottle filled with water. Be prepared as I almost cross the line. I admit it, sometimes I have the mind of a 7th grade boy.

I hope those videos were helpful for you! Do you like my new UglySofa.com slipcover?

Slipcover a Couch Beautifully

The boxpleat slipcover has a nice relaxed weave, very similar to a grain cloth.

Slipcover a Couch Beautifully

And the sides drape nicely over my sofa’s arm. The color I chose was ivory linen.

Slipcover a Couch Beautifully


Slipcover a Couch Beautifully


Another project I completed before the birthday party was a quick makeover for a pair of ho-hum dollar store flower pots. My friend Heather helped me add some jute rope and fake flowers then set them out with utensils in them. Perfect for a summertime birthday party!

Materials:

  • Hot Glue Gun w/ glue sticks
  • Jute Rope
  • Flower Pot
  • Fabric Flowers
  • Scissors
  • Foil or wax paper (to protect work surface)

Instructions:

1. Plug in your hot glue gun to warm up. Cut the stems of your flowers about 2″ from the flower.

2. Turn the flower pot upside down. Put a dollop of glue against the rim of your pot and secure the end of your rope on it. Squeeze a line of glue around the pot rim and press the rope into the warm glue.

3. After one row is complete, add the flowers by bending the stems until they lay flat against the pot. Secure with a lot of glue. Then wrap the subsequent rows over the stems.

4. Continue gluing the rope onto the pot. Make sure to press each row of rope tightly against the row before it.

5. When you reach the bottom of the pot, secure the end of the rope with another dollop of glue. Be sure your rope doesn’t extend past the bottom of the pot or it could make the base wobbly.


Now set them on your table and fill with utensils. Later you can put a plant, flower or pens inside.

Are you ready for Independence Day? Would you like a quick and easy sewing project to add some patriotic flair to your home? Hop on over to Parentables to read my tutorial for making adorable star pillows.


And don’t forget, today (June 30th) is the last chance to enter the giveaways! I will be picking the winners after midnight tonight.

I hope you will take a moment to view how I test drove my Dremel Trio. This is seriously a really fun power tool! Just be sure you are safe so as not to ruin the fun. Eye protection, face mask, and ear plugs. Check.

For those of you who like to skip to the end of the book and see the ending, here you go:


For the rest of you, here is how I created this cut out/back lit bookshelf that started life as a bookshelf from a closing Borders bookstore.


Tutorial for creating a cut out bookcase:
Almost any bookcase will work for this project, but the ones that have a thin wood (can be masonite) backing will work best. Set up a work area that you don’t mind getting dusty and dirty. Remove the shelves from your bookcase.

Cutting the endcap:

Materials:

  • circular saw
  • level
  • clamp
  • scrap wood
  • screws
  • drill

I cut the endcap in half lengthwise so I could use half for each end of my bookshelf, and to position it flush against the wall. To cut a straight line using a circular saw, I clamped one end of a level to the endcap. My level wasn’t long enough, so I drilled a scrap piece of wood on top of the level and into the end cap to support the other end.


I set the circular saw blade just below the depth of the endcap. By resting the endcap on two 2×4″ boards, I was able to creative a gap below the endcap for the sawblade to pass through.Then I ran the circular saw along the level for a straight cut. Straight as an arrow, and it met Pretty Handy Dog’s approval.

Cutting out the backing design and painting:

Materials:

  • Dremel Trio
  • Palm sander
  • Sandpaper (100 grit & 220 grit)
  • Scrap 2×4 lumber
  • Chalk or pencil
  • Wood putty
  • Putty knife
  • Primer
  • Paint (white and navy blue)
  • 3M Clean Edge technology painter’s tape
  • Newspapers
  • 2″ paint brush
  • Small paint roller and tray

Sketch out the design on your bookshelf (using chalk or pencil) before beginning.

Before using any new power tool, take some time to read through the manual.

To insert a bit into the Dremel Trio, you push in the blue (shaft lock) button on the front and use the enclosed wrench to loosen the collet nut on the tool.

Insert the cutting bit into the Trio. (The trio also comes with a sanding drum bit and a routing bit!)

Tighten the collet nut with the wrench.

Turn the blue handle on the side of the TRIO to raise or lower the base plate.

Adjust the base plate until the cutting bit extends slightly below the wood backing of your bookcase.

Lay the bookcase down on its back. Position 2×4 boards under the edges of the bookcase (or you will be cutting into concrete. I’m pretty sure the TRIO is not capable of that, but I could be wrong.)

Plug in your Trio and get ready to have some FUN! You may want to practice on a scrap piece of wood before working on your bookcase. The TRIO allows you to change directions quickly and easily. Creating fanciful cuts is a breeze!

Squeeze the trigger and when the bit reaches full speed you can plunge it into the workpiece. For the pin holes hold the Trio steady, insert the bit and then lift it back out of the same hole.

To cut trees and other designs, plunge the TRIO into the wood and then slowly move the tool through the wood to carve your design. Be wary of long “V” shape cuts as they will make the backing weaker.

When your design has been completed, use the power sander to sand the back of the bookcase (where the majority of the splintering will have occurred.)

Insert the sanding drum bit into the TRIO and sand any large cut out areas.

Fold a piece of sandpaper in half and feed it through the thin lines of the branches to sand any rough edges that can’t be reached with the sanding bit.

Set the bookcase upright and inspect the cuts for more splinters. You can preview what your design will look like when lit up. Lookin’ good, huh?!

Before sanding the rest of the bookshelf, repair any dents or holes with wood putty. (This is a post I wrote about repairing all types of holes if you need help.)

Use the palm sander and a fine grit (220 grit) sandpaper to rough up the rest of the bookshelf.

Apply a coat of primer to the bookcase, shelves and sides. (Still working on emptying that can of KILZ Clean Start primer! Love that stuff.

When the primer has dried, mask off the sides of the bookcase where they meet the back.

3M sent me this Scotch Blue Painter’s tape with Edge-Lock protector to try. I was skeptical, but when I pulled the tape off it did give me a clean edge. The only place I had a little bit of seepage was in the corners where I didn’t press the tape tightly into the corner. The key to using this tape is to firmly press the edges with your finger to engage the “Edge-Lock” seal. I haven’t tried it for painting walls, but you better believe I have a wall project coming up that I can try it on.

Paint the back of your bookcase. I chose a very dark navy blue. To save paint, I used a medium blue paint for my first coat to darken the back and hopefully save paint.

Then paint one coat of the navy blue.

Follow up with a second coat to eliminate any streaking.

When the navy paint has dried, tape along the edges of the navy blue backing, where it meets the sides. Slip pieces of newspaper underneath to catch any paint splashes. (Will you get a load of my lazy supervisor! You think he’s been working hard in the heat? Uh no, that would be me doing all the work and him snoozing away the day.)

Paint the rest of the bookcase, the sides and the shelves white. I used two coats of Benjamin Moore Impervo Semi-gloss white.


Once the paint has dried completely, re-assemble the bookcase. And screw the end cap halves onto either side of the bookcase.

I installed a light rope behind the bookcase (tutorial to come at a later date) and set the lights on a timer. The rope light comes on at dusk and illuminates all the cut outs.

There is a very soft glow emitted from the back of the bookcase.

It provides the perfect amount of light for my son who HAS to have a light on at night.

My only complaint about the rope lights is that they give off a strong plastic odor. But, after a week the smell has dissipated.

I had the foresight to purchase a few of the clear display stands that slide into the end caps of the bookcase. It makes it easy to display books to pique my son’s reading interests.

Oh look! There he is now! Mission accomplished, reading interest piqued. Yes, I think he is double-jointed and a teacher pointed out that both my son’s sit like that. Must be in the genes.

A few more detailed pictures of the bookshelf. This has to be one of my favorite projects I’ve created recently. And it wasn’t very difficult to complete.


I had the opportunity to meet Leen the Graphics Queen last week when she, her husband and her two sweet boys were in town. We met at Monkey Joe’s (an inflatable playground) and our boys had a fun and energetic afternoon playing together. If you haven’t heard of Leen, she is widely known in the decorating blog circles as the go-to gal for wall decals and vinyl. She helped Layla & Kevin install an ENTIRE wall of words for a beach cottage makeover.

Beautiful, don’t you think?!

I asked Leen to make me a custom quote for our bedroom wall, the one where I had agonized over what phrase to put. After months of thinking about quotes, one came to me and I knew it was the quote for us. You see Pretty Handy Guy and I are HUGE Dave Matthews Band fans, and this lyric has special meaning to us:

Leen sent me a few samples of vinyl colors to help me decide. I fell in love with the silver vinyl which changes color depending on the lighting and where you are standing in the room (as shown above.)

If you’ve never installed vinyl before, it isn’t terribly difficult, but it does help to know a few tricks of the trade. Here is how I learned to install vinyl (back in the days when I worked for the sign and banner company):

Materials:

(I’ve included affiliate links for your convenience. I earn a small percentage from a purchase using these links. There is no additional cost to you. You can read more about affiliate links here.)

Installing a Wall Quote:

Start by hanging your vinyl (front, lettering, backing and all) on the wall using painter’s tape to hold it. Adjust the location until you like where the decal will rest.

Set a level up against the bottom of the middle line of text. Adjust the placement of your decal until the type is level.

Draw a level horizontal line across the paper and let the line extend slightly onto the wall. Make a vertical line that is plumb (level up and down) and be sure to extend your line slightly off the paper and onto the wall.

You should now have intersecting lines that run vertical and horizontal on your wall graphic and four small tick marks extending onto the wall.

Remove your wall quote and lay it on a flat surface. Begin to remove the opaque shiny backing paper (it may have a grid or lettering on it.)  Your decal should stick to the clear semi-transparent sticky sheet that was on top of the quote. If some letters come up, simply lay the paper back down and rub it firmly with the gift card and try again.

Continue peeling off the backing paper.

Be careful not to touch any of the lettering (or they can stick to your fingers and won’t remain in proper placement.)

You are now looking at your lettering in reverse on a sticky sheet. Good job, the hard part is over. Well, almost over.

Carefully pick up your quote and turn it so the sticky side faces your wall. Line up your lines with the tick marks still on the wall being VERY CAREFUL not to rest the sticky paper onto the wall. (If it accidentally sticks, carefully pull it off being sure that the letters come off with the sticky paper.)

When all four tick marks are lined up with your horizontal and vertical lines, gently press your decal down. Starting from the center, rub your hand from the center out to the edges to adhere the quote and the sticky paper to your wall.

Lightly spray water all over the sticky paper. This will loosen the sticky paper and release the vinyl decal.

Use your gift card to burnish (sign shop lingo) the letters onto the wall. Use firm pressure and be sure to rub all the letters with the card.

Carefully begin to peel the sticky paper off the wall. If the letters start to peel off with the paper, lay the paper back down over that letter and rub your finger on top of the paper to press the letter back onto the wall.

When the paper backing has been removed. Erase your tick marks.

Now stand back and admire your new wall quote!

Thank you Leen for helping me complete my bedroom makeover! I LOVE IT!

Take a few minute to browse through some of Leen the Graphics Queen‘s beautiful decals in her website.

Some of my favorites are:

Home Decor Accents

Trees and Flowers