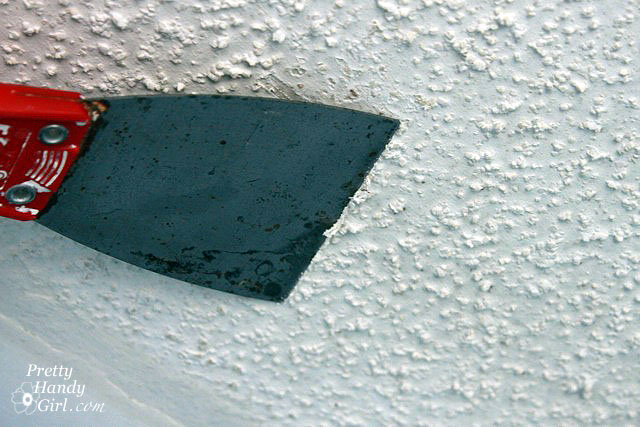
Y’all are gonna love today’s guest post! Hammer Like a Girl is in the HOWZZ! Check out that industrial book page topped table that they created.

Today’s guest post is brought to you by THREE handy gals! I’m seriously thinking about moving to Seattle just so I can be one of their friends and share in the DIY project co-ops. Heidi, Monica and Mary Jean make up the power trio at Hammer Like a Girl.

These ladies get together once a week to tackle a DIY project together. They rotate which house they will work in next. Check out some of their transformations like this oval to rectangle table transformation, rustic wood bathtub surround, or tile backsplash.

Read more

I’m about to share something a little embarrassing with the whole world. I confess to you that I regularly walk in my bathroom naked in front of the only window in our master bathroom!

Why would I do such a silly thing? Why? Well, I’m not intentionally trying to flash the world, that is for sure! I do it because I don’t want to cover that window that provides light and a view of our wooded backyard. I like to watch hawks, deer and other wildlife as they cross behind our yard. During the spring, summer, and fall I have plenty of privacy from the trees. BUT, in the winter that privacy is nearly nonexistent.

Now, I’m not insinuating that my neighbors are the peeping tom types, but I still feel a little self-conscious getting out of the shower at night in a brightly lit bathroom.Dear Mr. & Mrs. Jones (not their real names), if I inadvertently flashed you on one such night, I’m sorry.

When Wallpaper for Windows contacted me to ask if I wanted to try their product, I immediately said, YES! The name of their company is slightly misleading, because they sell a wide range of privacy films and decor clings for more than just your windows. You can find products in their online store for glass shower stalls, mirrors, side lights, and more.

I was instantly drawn to the decor tint line. The decor tints are sold in privacy and see-thru opaquenesses. With a variety of  11 colors to choose from, I knew I could find one to work with our blue bathroom. Ultimately I chose the sky blue see-thru film.

Why not privacy you ask? Well, here’s the thing, I didn’t want to block my view of the wildlife (and the kids playing in the yard), but I did want to keep my neighbors from thinking that I lead a wild life.

How to Install Wallpaper for Windows Window Clings

Materials:

(I’ve included affiliate links for your convenience. I earn a small percentage from a purchase using these links. There is no additional cost to you. You can read more about affiliate links here.)

  • Razor blade
  • Window cleaner
  • Water and soap mixed in a spray bottle (the Shaklee Basic H2 works for both cleaning and spraying)
  • Clean rag
  • Pencil
  • Ruler
  • Scissors (if you don’t have an X-ACTO knife)
  • Wallpaper for Windows film
  • Wallpaper for Windows squeegee

Difficulty: Easy to apply the film; Moderate if cutting shapes

Installing the Window Film

Step. 1 – Start by scraping any debris off your windows using the razor blade. (Confession #2 – that debris you see below is hairspray. Truth be told, I lived through the hair band 80’s and haven’t weaned myself off hairspray yet.)

Step 2. – Clean the windows thoroughly with glass cleaner and wipe dry.

Step 3. Measure each window panel. You may choose to add 1/4″ to the dimensions if you are unsure about your measuring or cutting skills.

Note: Wallpaper for Windows will cut your panels exactly to size (1 flat $6.50 fee for the all the divided lights in my window), but I chose to do it myself. It isn’t hard to cut the film, but you might want to pay to have Wallpaper for Windows cut it if you aren’t practiced at using an X-ACTO knife.

Step 4. – Transfer the measurements to the back of the window film (the white paper side.) Hold the ruler firmly on the back of the film and cut your panels.

Set the panels aside in a dry spot. Don’t let the paper backing get wet.

Wash your hands thoroughly to remove any oils or dirt. If you don’t, you could leave fingerprints or smudges between the glass and the film.

Step 5. – Wet the window with the water/soap mixture. (I used the Shaklee Basic H2 window cleaner.)

Step 6. – Peel the backing off the decor tint film.

Remember how I said not to get the backing wet, here is why:

Those little white spots of backing paper were near impossible to get off.

Step 7. – Position the window film onto your window. You can peel it off and reposition it as needed.

When the film is centered on the window, use your hand to press and smooth it onto the glass.

Step. 8 – Use the provided squeegee (also a credit card will work) to press from the center to the edges of the film. Push any air and water bubbles out to the sides.

Step 9. – Use a sharp X-ACTO blade to trim any excess film from the window.

This is how the see-thru decor tint (blue sky color) looks on the bottom half of the window. You could stop at this point and enjoy the privacy that it creates.

Here is a close up view of the blue sky tint next to the open window:

Cutting a Graphic out of the Window Film

If you’ve been reading my blog for a while, you know I’m the blogger who likes to push that “Amp Up the Creativity” button on all my projects. Which is why I wanted to cut graphic shapes out of the decor tint.

Step 1. Install the window film (see directions above). Let the window and film dry completely before moving on to the next step.

Install a fresh blade into the X-ACTO knife.

Step 2. – Use a sharp X-ACTO blade to lightly cut through the film. Use enough pressure to cut through the film but not to scratch the glass.

Step 3. – Use the X-ACTO point to pull a corner free. Peel the shape off the window.

Continue until you have completed the scene. I cut out simple graphic trees from the window film.

In the late afternoon, the sun shines through the cut-outs and projects this beautiful scene on the opposite wall.

And now I have the perfect amount of privacy and yet can still see wildlife and wild boys in the backyard.

The closer I get to the window, the more I can see out the cut outs:

However, as you can see, there is still enough of the film to protect my neighbors from seeing more than they bargained for.

If the tinted decor film isn’t your style, they have a plethora of other films to choose from!

Disclosure:  I was not paid or compensated to write this post. Wallpaper for Windows sent me a complimentary sample of their product to test. This post is my idea and my thoughts on their product. I was not told what to write.

You know that beautiful laundry room I showed you last year? Yes, this one:

Well, it isn’t so pretty right now, and honestly I strategically didn’t photograph the ONE wall in the laundry room that isn’t….so….pretty. Can you blame me?!

But, that is all about to change! I’ve been working with a Flow Wall System representative to come up with a plan for my laundry room wall.

Flow Wall Garage and Home Storage Solutions

Within half an hour of sending him my measurements (of my laundry room, not my body measurements – LOL), he sent back multiple possible configurations for our room.

I can’t even begin to tell you how fantastic it is to turn over the planning to someone else for a change! Of course, being the planner that I am, I had to tape up a few paper templates to help visualize how they would work in my space.

The Flow Wall System looks like it is going to be a snap to install (and I will definitely let you know for sure!) Here is a short 60 second video to show you a little more about Flow Wall System:

Here are my beautiful plans for the laundry room using the Flow Wall System sketches as inspiration.

1. Flow Wall medium wall mounted storage bins to hold the iron and ironing supplies

2. Flow Wall small storage hook to hang ironing board on

3. Flow Wall white coated wire shelves for extra storage and drying clothes

4. Flow Wall jumbo decor bins in cream to corral detergents, spot cleaners, etc

5. Waverly Pom Pom Play Spa fabric for a faux roman shade

6. Spray painted brass chandelier inspired by Modern Parsonage

7. Flow Wall cabinets to hide my unsightly mess

What do you think? Do you like the design? I’m probably going to scrape the ceilings and repaint in there too. The exact wall color will have to wait until I get the fabric. I’m particular about color like that. More on my color snobbishness next week. Until then, I hope you have a great weekend.

Disclosure: This is a sponsored post for Flow Wall Systems. I have been compensated for my time and will be receiving some complimentary products. However, the ideas and words are all my own. I was not told what to write or what products to write about. I believe you have the right to know when a post is sponsored. Regardless of whether a post is sponsored or not, I believe in honesty, truthfulness, and complete transparency in my posts.

I’m back to show you the updates I made to my kitchen. Remember the plans I shared with you? These fabric backed cabinets made the kitchen new.

Well, they have been implemented and I LOVE the results! Best of all, the materials I bought cost me under $25 and that included the white dish set. But, the cherry on top is that I can easily reverse the changes if we move (or get sick of the look.)

And now, I present to you:
Fabric Backed Open Cabinets for the Kitchen

When we first met these sad cabinets, they were dark, dreary and had an eclectic collection of mugs:

Within only a few hours (minus drying times), I had a stylish new look that is bright and cheery!

Follow along for the tutorial and the 50 cent tour (please deposit your pocket change on the way out.) Just kidding. I’ll let you in for free.

Materials:

(I’ve included affiliate links for your convenience. I earn a small percentage from a purchase using these links. There is no additional cost to you. You can read more about affiliate links here.)

Optional: 

Difficulty: Easy

Step 1: Empty your cabinets.

Clean the insides with an all purpose kitchen cleaner.

Step 2. Starting from the bottom, remove the screws from the cabinet door hinges. The last screw should be the very top hinge (to keep the weight of the door from wrenching the screw out of the wood.)

Put screws into a ziplock bag and label your cabinet doors in order so that you can return them to the appropriate cabinet opening at a later date.

Now you should have a clean slate like this:

Step 3. If your cabinets are dark inside, you may or may not decide to paint the insides. (Be sure to check with your landlord if you are renting.) I chose to paint mine because the interiors were so dark. If you want to skip this step, fast forward to the next step.

Prime the insides by rolling on primer over the flat surfaces. Use a brush to get into the corners and crevices.

Once the primer has dried, get out the wood putty and putty knife.

Step 4. Using the putty knife, spread a small amount of putty over the holes where the hinges were. Push the putty into the holes, then scrape the excess off. Allow the putty to dry completely.

Step 5. Sand the puttied holes until smooth.

Step 6. Touch up the putty holes with paint or stain. Add caulk to any cracks or seams at the back of your cabinet. Allow the caulk to dry thoroughly.

If you are painting the inside of the cabinets, roll on paint with the small roller and use the brush to smooth out the paint and get into the grooves.

Step 7. Measure the dimensions of the back of your cabinets. Make sure your measurements are precise (measure twice, cut once is a good adage.)

Cut a piece of foam board using the measurements you just took.

Test fit the foam board into the back of the cabinet. If your cabinet’s face frame is smaller than the cabinet back, you will probably have to bend the foam board to get it in.

Step 8. Iron your fabric. Make sure to iron all the wrinkles out.

Cut the fabric 3 inches wider than the foam board. Lay the foam board on top of the fabric (wrong side facing up.)

Step 9. Tape the edges of the fabric onto the back of the foam board. Be sure to pull the fabric taut.

Fold the edges of the fabric as you would on a gift. Tape the ends to the back of the foam board.

Step 10. Insert the foam board into the cabinet.

Push the foam board firmly against the back of the cabinet. The tension of the fabric and the board against the edges of the cabinet should hold it in place, no need to tape or glue anything!

It is a good idea to try to line up your pattern if you have multiple shelves. (Do as I say, not as I do.)

Start putting your coordinated dishes back into the cabinet. Think about displaying them as you might see in a store to complement these fabric backed cabinets.

For visual interest and extra storage, I hung some mugs from the top of the cabinet.

It was as simple as pre-drilling some holes and screwing in white cup hooks. (I did measure the same distance back from the face frame and spaced the hooks evenly. But, I’m a perfectionist like that.)

I am in love with my new kitchen! And all it took was less than $25 in supplies and a few hours.

What do you think?

The best part about this project is that I can easily remove the foam boards…

…or tape new fabric onto the back when I want to update the look!

Can you imagine a cheaper, easier or more glamorous update to your kitchen?

Are you an apartment dweller that is restricted from making permanent changes to your home? Or does your budget limit the renovations you’d really like to make? Why not make a few frugal changes that reflect your own style. These fabric backed cabinets are a win for any kitchen!

Apartment Guide has changes you can make that won’t break the bank:

Want to find even more design tips for your home? Apartment Guide has budget friendly ideas and DIY how-tos for people in any sized home on https://www.movingtoday.com and https://www.apartmentguide.com/blog/

Disclosure Statement:

Apartment Guide and owner Consumer Source, Inc. partnered with bloggers such as me to participate in their monthly blogger program.  As part of that program, I received compensation.  They did not tell me what project to create or what to purchase. Nor did they influence my opinions! We believe that consumers and bloggers are free to form their own opinions and share them in their own words. Consumer Source’s policies align with WOMMA Ethics Code, FTC guidelines and social media engagement recommendations.

If you happened to glance this way yesterday you may have seen a blank screen…nada…nothing! And if you came by today, you probably saw the home page with some error codes and not much else but 404 errors when you tried to go to a post.

I admit it, I broke my blog!

How did I do it? Well, in short, I blatantly disregarded the written warnings not to mess with the code in my theme files in WordPress. Being the do-it-yourselfer that I am, I was determined to fix something on my own. You know that motto of mine? “If a human being can do it, then there is a 95% chance that you can do it too!” Well, I guess I finally found that 5% that I can’t do!

Have I learned my lesson? Will I leave my blog code files alone? Maybe, at least for now I will.

Until that future date when I become a proficient coder, I will be relying on the fantastic WordPress Guru, Ashley, from MyFrontPorchSwing.com. She was able to recover my blog and bring it back from the dark abyss. I’m not exactly sure what she did or how she did it, but I am forever grateful!

Ashley is the code savvy person I used to switch me from Blogger to WordPress at the beginning of 2011. She was super helpful and spared me the headache of trying to learn to do it myself. She provides WordPress support and Blogger to WordPress conversions (in addition to social media promotions.) If you are thinking of making the big switch, contact Ashley.


Back Up Your Blog:

After this harrowing experience of breaking my blog, I have learned the über-importance of having a back up of my blog. Lucky for me, my guardian angels at BlueHost had made a back up a week ago. The tech support person I talked to was able to reload my blog from the back up they had created. However, the scare of losing all my posts has made me realize that taking back ups into my own hands is a necessity. Ashley recommended this WordPress Plugin that emails regular back ups to you: WP DB Backup

Stop Those Spammers:

When my blog was moved to WordPress the spam commenters came out of the woodwork. That was when Ashley told me to install Akismet (I installed the free version.) It catches about 99% of the spam comments and moves them into a folder for you to go through and delete anytime you have time (yeah right.) The spam comments add up quickly and there were repeat spammers. Which is why I loaded this other spam filter: Block Top Spammers. When you check a box next to the repeat offenders, the plugin  recognizes their IP address and stops their disgusting spam before it even goes into the spam folder. This has been a huge help for me because I don’t have time to go through thousands of spam messages and delete!

Speedier Loading:

This has got to be the biggest change I made to my blog! It is the one silver lining in this whole debacle that I endured for 2 days. Ashley told me about the W3 Total Cache plugin. It single-handedly turned my blog’s loading speed into a speed demon. I seriously can’t believe the difference it made! Load this sucker right away.

Uploading Multiple Images:

One of the biggest hassles I had when moving to WordPress was dealing with the image uploads. Being a tutorial blogger, I load oodles of pictures for each post! Faster Image Insert is a nifty little plugin that allows me to upload multiple images at once and choose one or all of them to insert into the post. I <3 this plugin!

Auto-Email Replies to Commenters:

Have you ever left a comment on a blog and months later you are back on that blog and realize that someone responded to your comment? Reply Me is a plug-in that automatically emails replies to the commenter and it is sent from the commenters email address so they can reply back with ease.

Creating a Site Index:

I have been struggling (and still am) with the best way to help my readers find past posts on my blog. But, I also wanted to make sure that the web spiders were able to crawl my site more efficiently. I found this cool plugin called AZIndex. It takes all of my posts and creates a site index. I placed the links on a page which is now my site index. The index is only customizable to a certain degree though. Some day I want to create a beautiful thumbnail directory for y’all, but until then this will have to suffice.

Loading the Plugins:

To load any of the above mentioned plugins into your WordPress blog, simply go to your WP dashboard, chose Plugins > add new and search for the plugin name I’ve highlighted above. I’ve linked each to their respective sites for more detailed information about each plugin.

I hope some of these plugins help you. I’d love to hear about any WordPress plugins that you love!

P.s. I hope to be back to the normal DIY tutorials this week. Thanks for your patience ;-). XXXOOO