Get a load of this transformation! See Millie’s Remodel and her exterior front reveal. Plus, I’m sharing tips to help you keep your home protected from termites when landscaping.

Millie’s Remodel Update: Exterior Front Reveal

This update of the Millie’s Remodel project is sponsored by Corteva, the makers of Sentricon. I’m grateful to have Sentricon on board as a Millie’s Remodel sponsor!

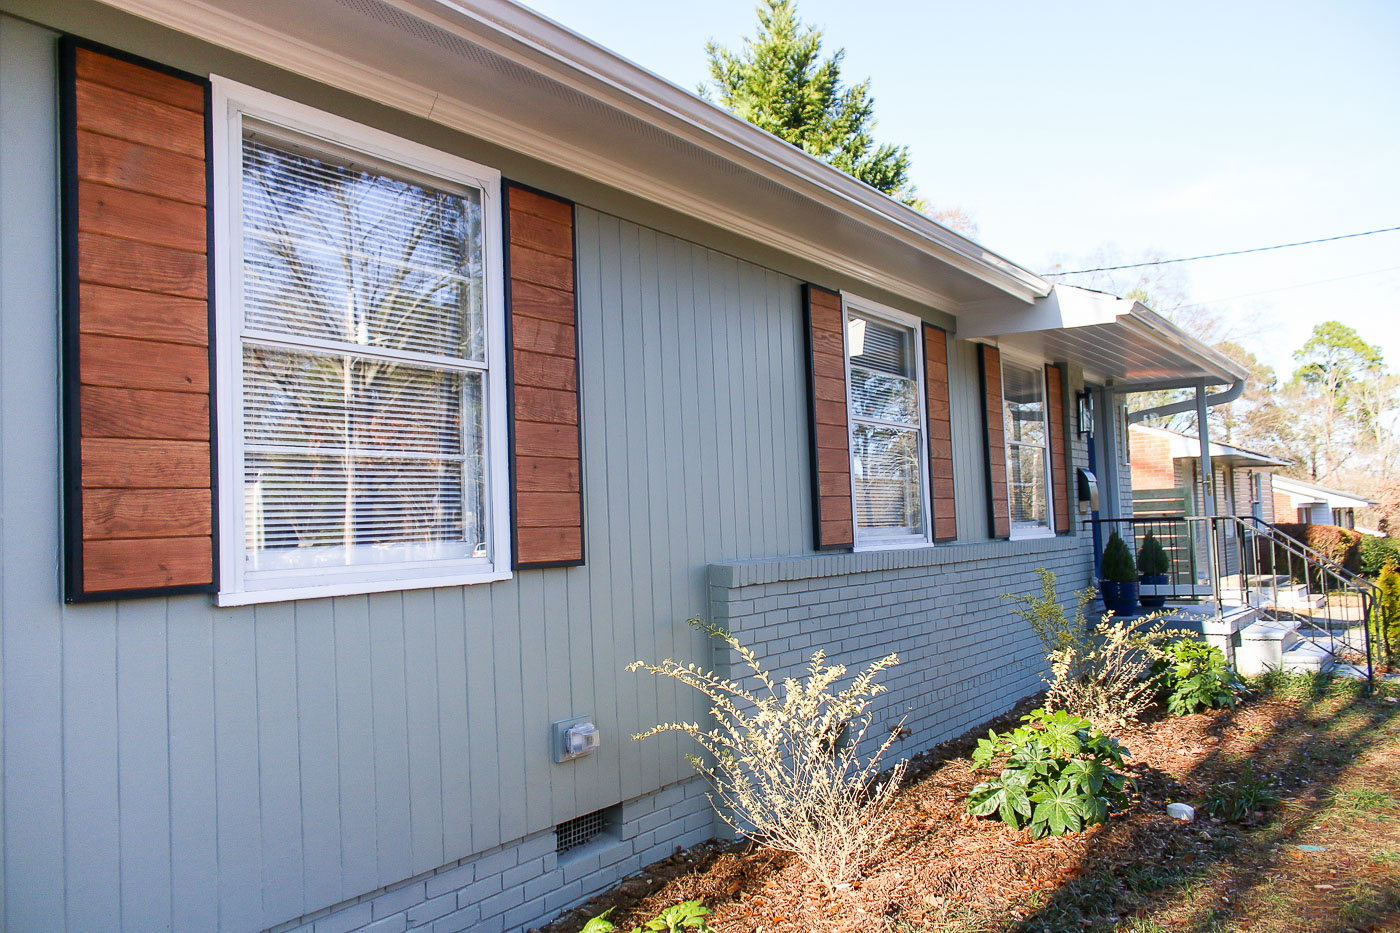
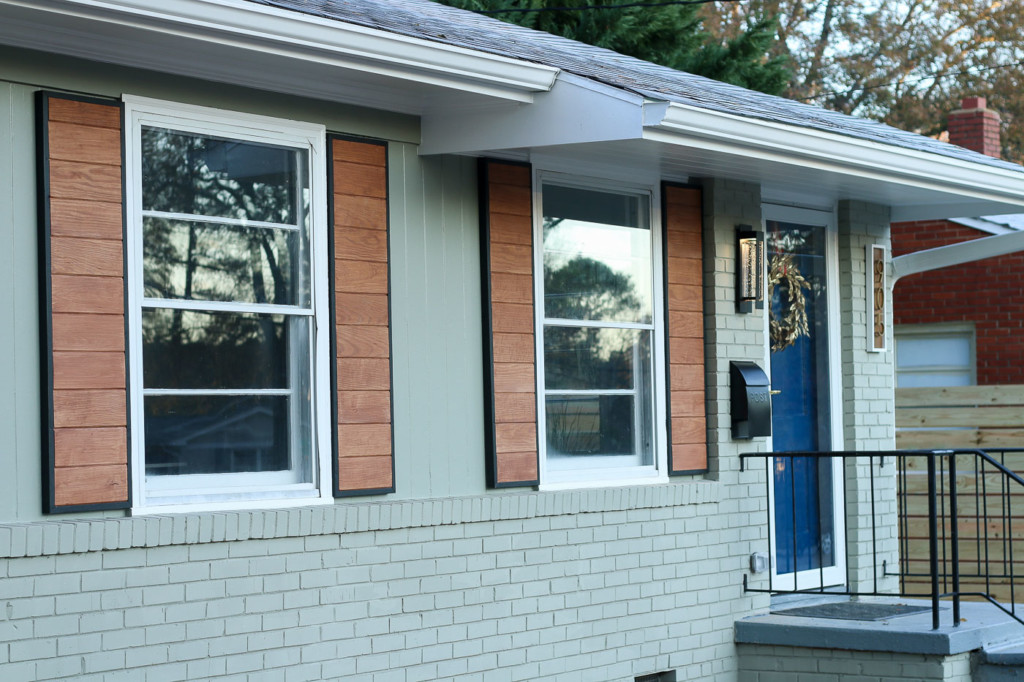
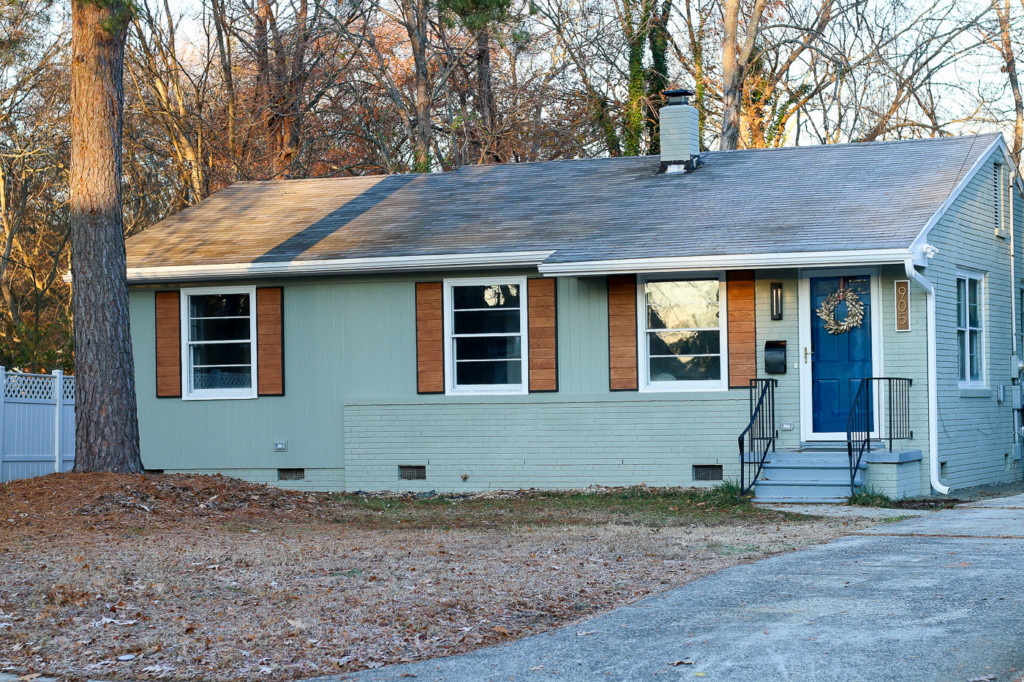
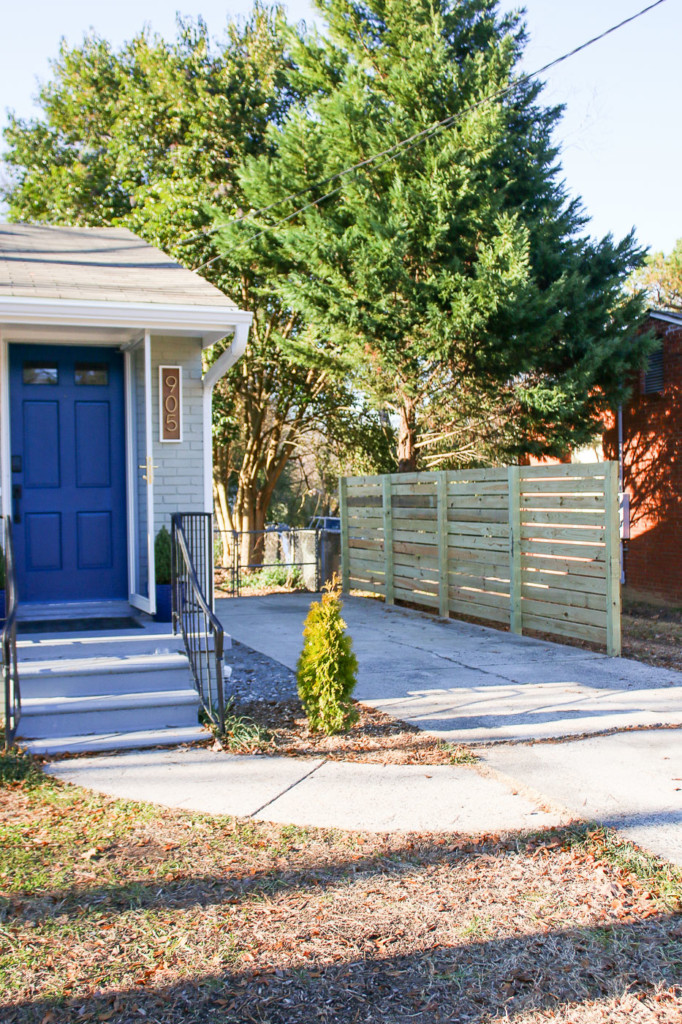
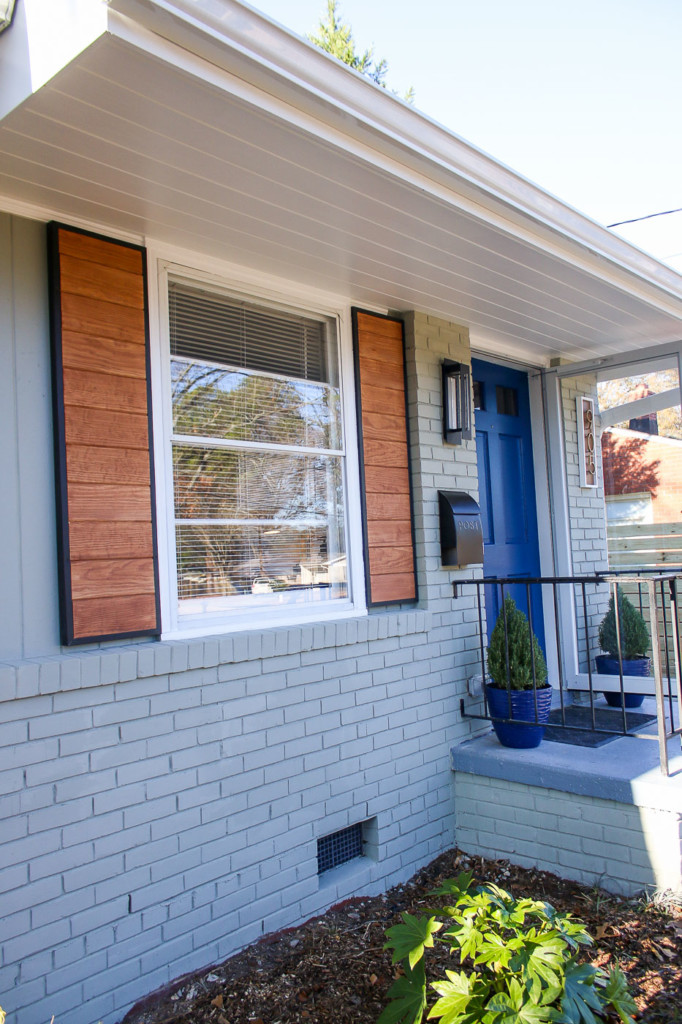
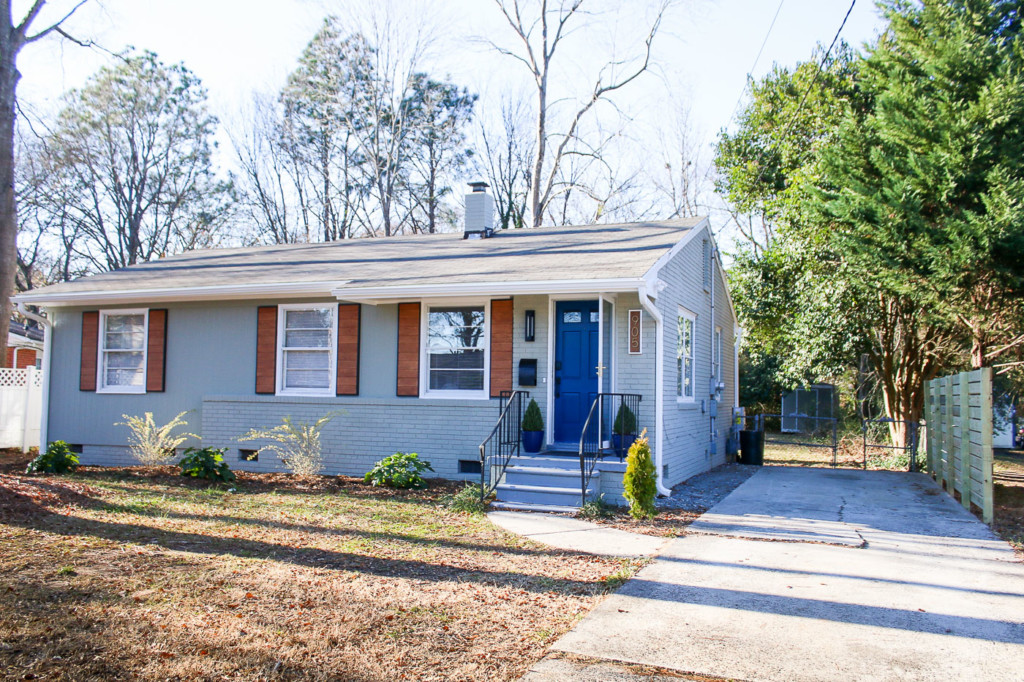
Although I still have a lot to catch you up on inside the Millie’s Remodel house, the exterior siding, brick, and front door has been painted. I chose a pretty bright blue for the front door. It’s Loyal Blue from Sherwin Williams.

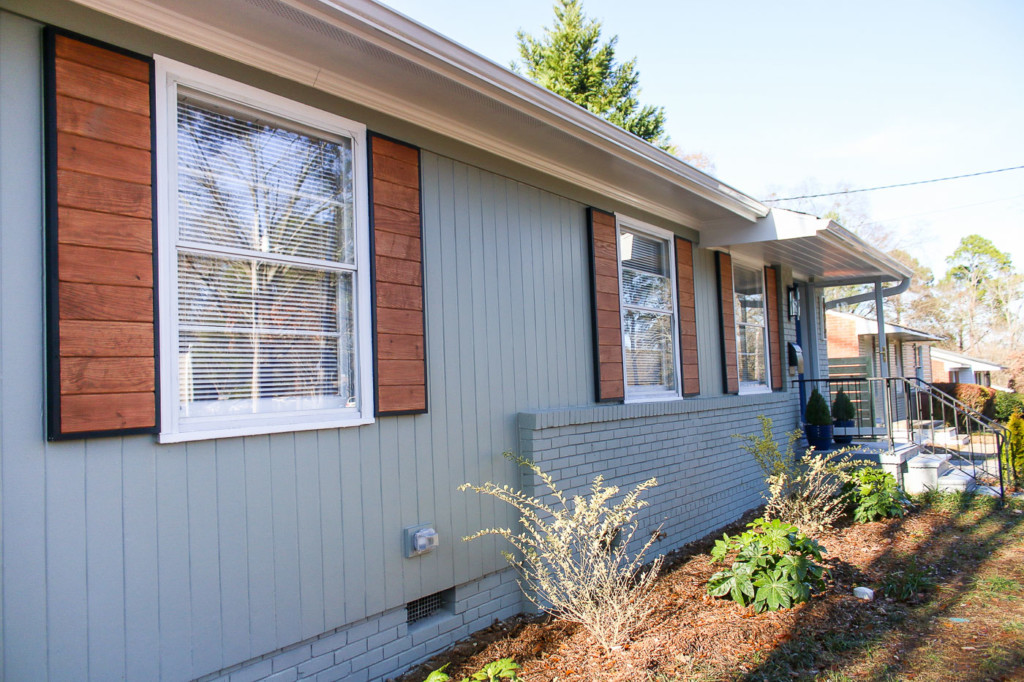
I built the shutters using leftover tongue and groove planks from the porch overhangs. I promise to share a tutorial for you in the near future.

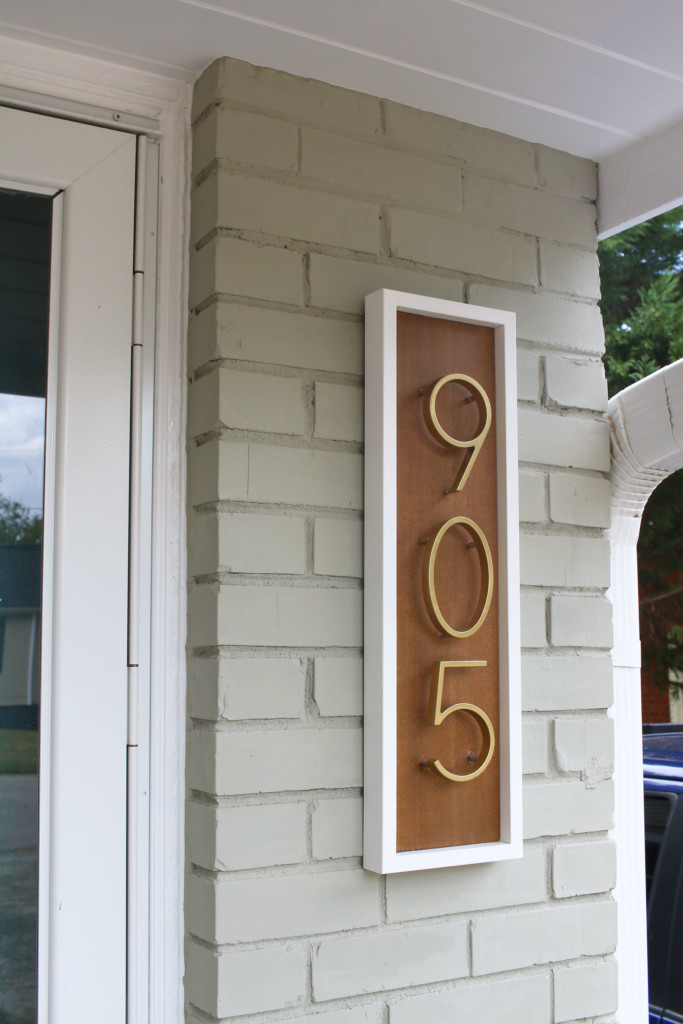
And I added a modern address plaque beside the door. Also, a DIY I’ll share a tutorial for later.

Although the shutters have been hung and the house numbers look amazing, I feel like something is missing. The house feels a bit naked from the waist down if you catch my drift. It needs some landscaping!

Unfortunately, I’m a little over budget on all the renovations at Millie’s Remodel, so I need to save some money on the landscaping. I decided to plant a few bushes out front and call it done.

Budget Landscaping for a Mid-Century Modern House:

With my budget being under $200, I was able to put in some foundation plantings and one feature plant to give Millie a more finished look outside.

I planted three Fatsio Japonica bushes (the wider bushes with bigger leaves).

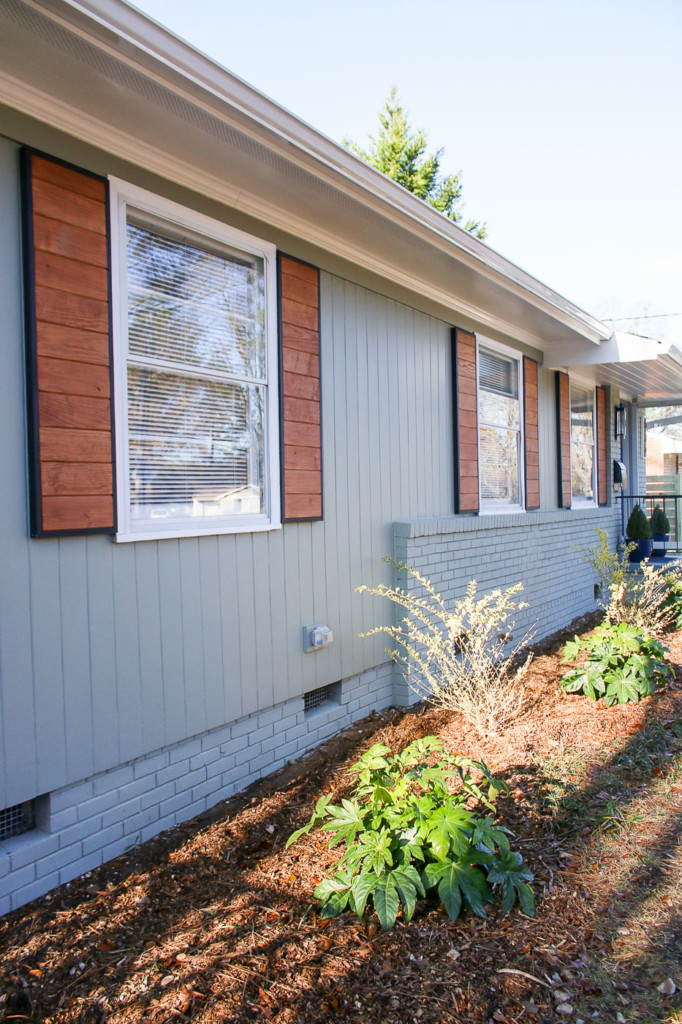
Between the Japonicas, I planted two Golden Ticket privet bushes. They should fill in a little over time, but for now, they certainly help ground the house.

For the feature item, I chose a pretty yellow Amber Gold arborvitae for the small bed between the front door and the driveway. I like the color and the tall skinny look of this tree. When full-grown it may be up to 5′ wide and 10′ tall. But, hopefully, it won’t reach full width and can stay a little narrower. I’ll have to keep an eye on it and trim the sides if it starts to get too big.

Luckily, I had a pile of wood chips in the backyard where I had to take out a large rotted tree that was hanging over the house. I was able to use the chips as fresh mulch around the plantings.

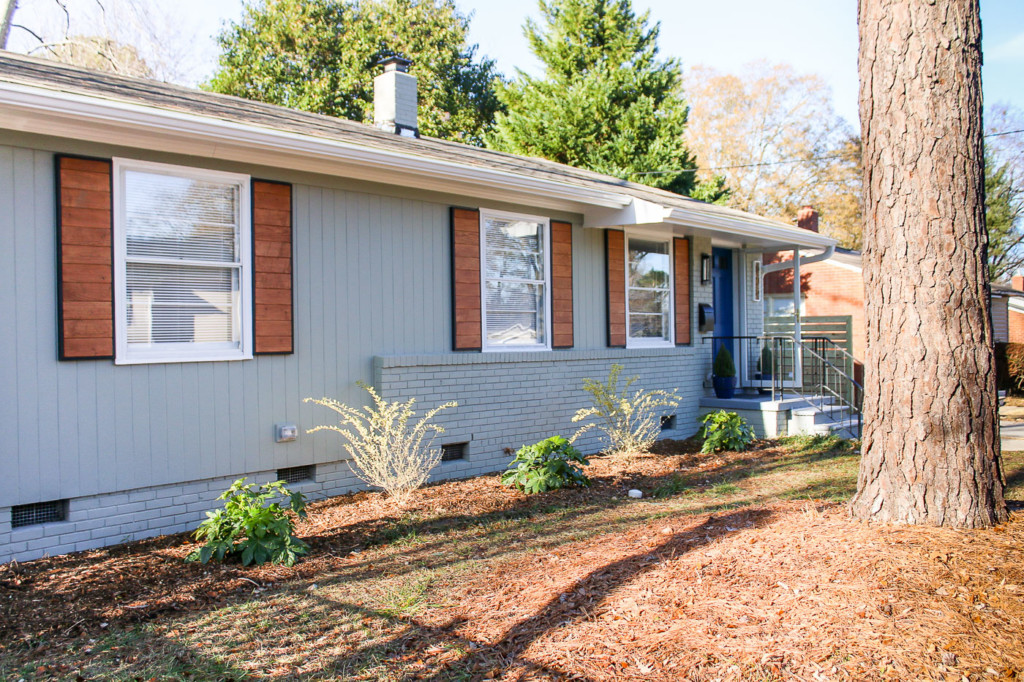
Although it’s hard to tell, in the above photo, I kept a barrier of bare earth (and no wood chips) against the foundation of the house. Why? Let me take a moment to talk about how to landscape while keeping your house protected from termites.

Landscaping While Keeping Your Home Termite Free:

I know we live in an area that is overpopulated with termites, so I’m very careful about protecting my homes from conditions that could lead to a termite infestation. Most plants need moisture to stay alive, but unfortunately, termites love wet mushy wood because it’s easier to chew and more tempting! For that reason, it’s important to pay attention to moisture around your home’s foundation. All the tips below will help you reduce the likelihood that termites will find your home tasty.

signature

  • When spreading mulch around plantings, keep it away from the house. Leave at least a one-foot perimeter along the foundation clear of mulch and other organic matter
  • Plant bushes so as to maintain a three-foot clearance from your home (be sure to look at the mature height and width information on new plantings)
  • Never pile firewood, lumber, mulch, soil, or other “termite-friendly” matter against your house
  • Don’t use wood timbers or lumber to create garden beds against your house
  • Install gutters and use downspouts to move water away from the foundation
  • Always make sure your land is graded with a slope away from your house
  • Keep gutters clear of debris to prevent them from overflowing.
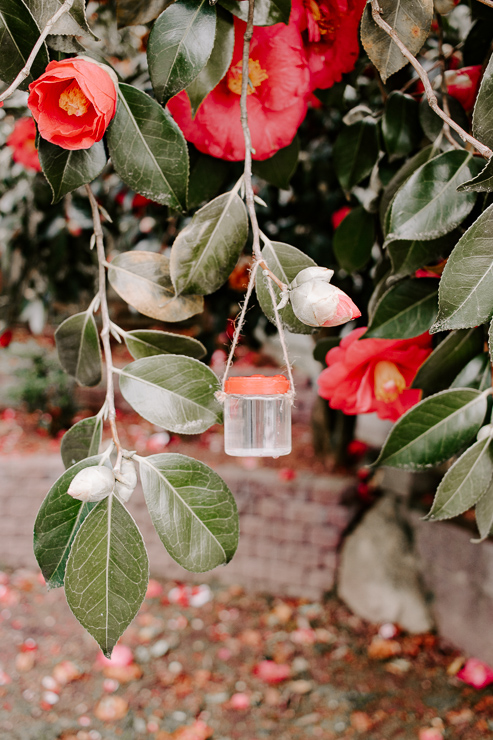
  • Contract with a good termite treatment company (you can read how I chose Sentricon in this post.)
  • Keep up with scheduled inspections with your termite company.

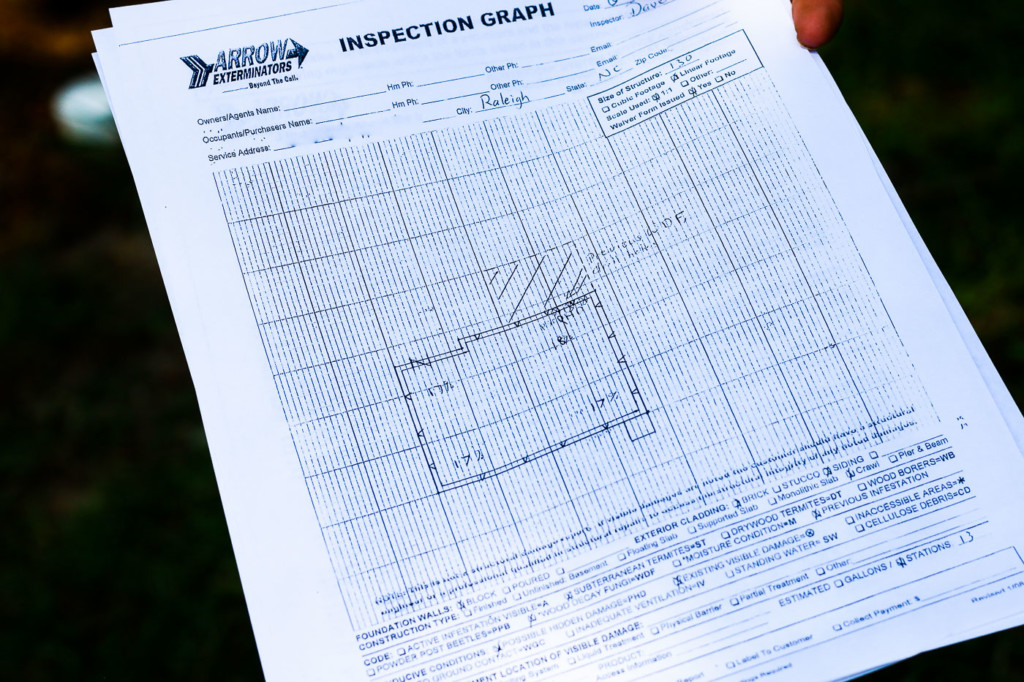
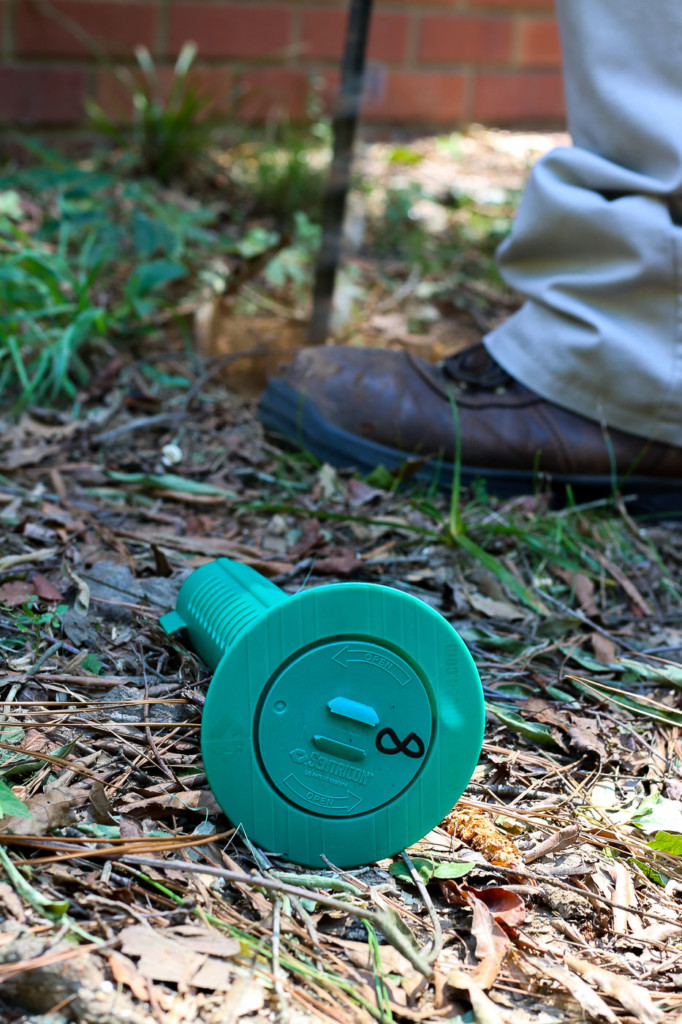
My local termite company that installed the Sentricon system came back two weeks ago to check on the system to see if there was any termite activity and inspect the bait stations to see if they needed to be replaced. My technician was able to find most of the bait stations from the map he created during installation.

But, if the stations were buried, he could use the detector to find them.

You can learn more about the Sentricon system and how it’s installed by watching my previous video:

We saw some minor evidence that they had found the stations. This is good because it means they are feeding off the bait stations and taking it back to the colony.

Unfortunately, the memory card in my camera was corrupt, or I’d show you the bait station after almost a year. Luckily, Sarah has an excellent photo of her Sentricon bait station after being in the ground for almost a year.

A Look Back at Millie’s Front Exterior Transformation:

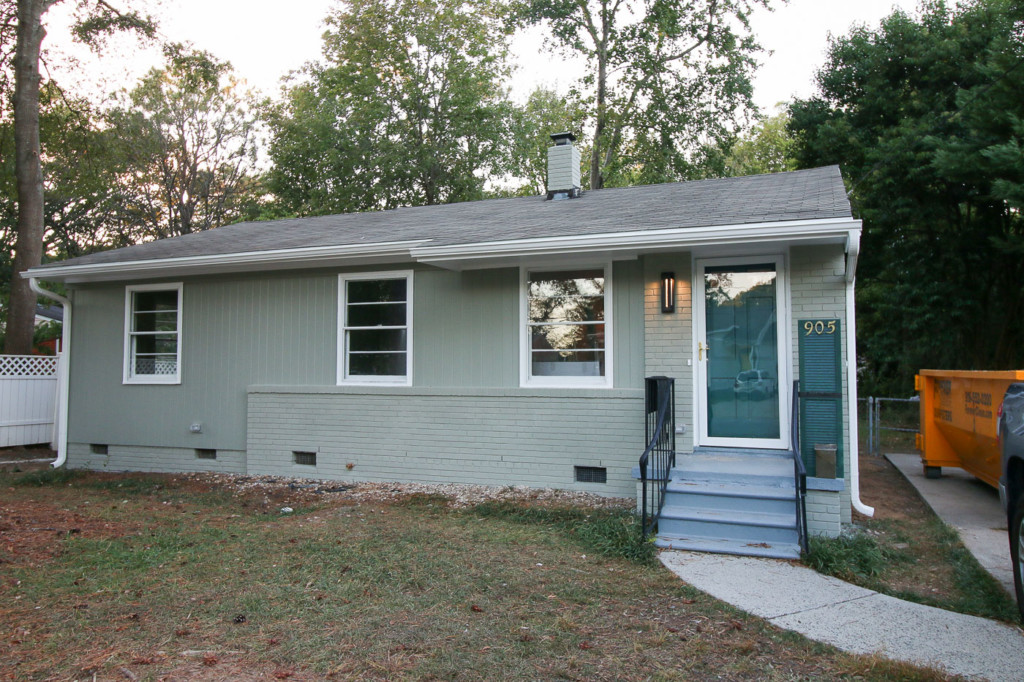
Together, I think the landscaping (although only 6 plants and some mulch) and painting made a big difference. We should look back to when I first bought the house. Remember how she looked? The greenery you see was all weeds!

Then, after painting, she looks great, but still needs some architectural pizzazz.

Finally, the shutters and painted front door made a big difference, but she was a tad naked around her base.

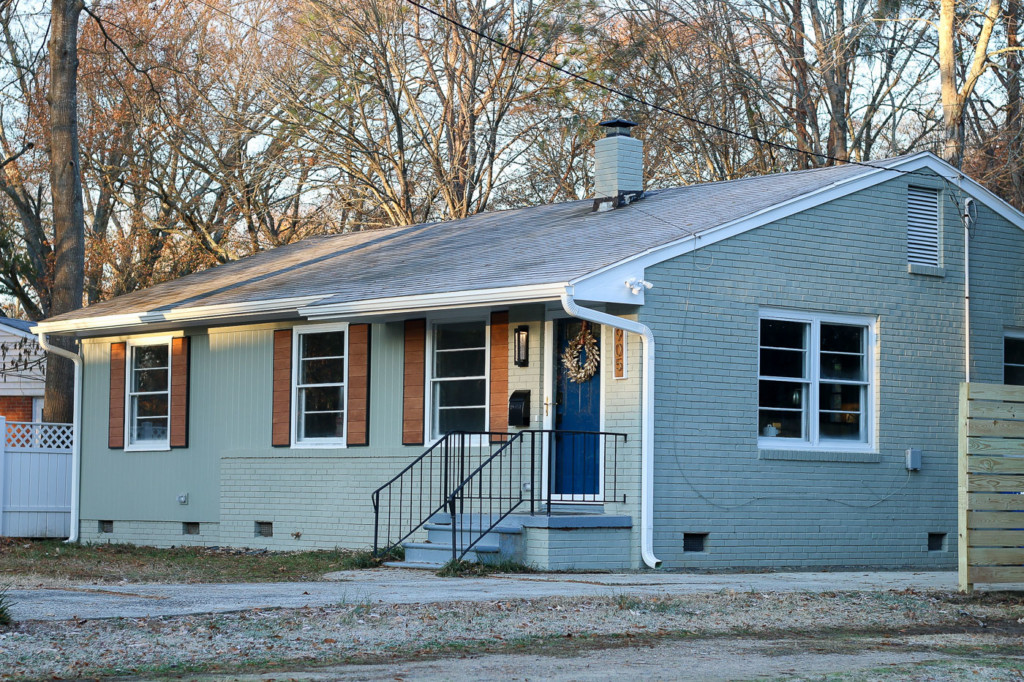
Now she has some beautiful modern greenery out front.

Did I do okay on my minimal budget?

Disclosure: This is a sponsored post for Corteva, the makers of Sentricon. I was provided complimentary termite protection for a year and was compensated for my time and efforts to promote Sentricon. I was not told what to write. All opinions are my own. I am particular about the brands I represent and will always let you know when you are reading a sponsored post.

DIY American Flag Planter Box

Want to add a little bit of a patriotic flair to your Summer porch or patio? This DIY American Flag planter box is so simple to make from start to finish, you can easily create one for yourself.

DIY American Flag Planter Box

DIY American Flag Planter Box

I hope you all enjoyed the Make It May series. I leave you with this adorable Americana planter Amanda created and hope you’ll make one too for your porch.

I’ve been slowly adding patriotic pieces, like this Americana plant stand, to my porch decor over the years. With a few extra fence pickets left over from a previous project, I decided to whip up this planter box to add some extra red, white, and blue to my Summer porch.

Materials:

(I’ve included affiliate links for your convenience. I earn a small percentage from a purchase using these links. There is no additional cost to you. You can read more about affiliate links here.)

Instructions:

1. Cut the wood pieces

Measure 6″ from the end of one fence picket and mark with your speed square. Use the miter saw to cut the fence picket at the marked line. Repeat this step until you have six boards cut to 6″ each.

Measure cuts for planter box

Measure 8 ¼” and mark with speed square. Use the miter saw, cut the wood at the mark you just made. Repeat this step until you have four boards cut to 8 ¼” each.

2. Assemble the planter box

Apply glue to the edges of each board where they will connect with each other. This step makes your box extra secure.

Assemble the base of the planter box

Use the nail gun to attach the boards together to create the base.

use nailer to assemble planter box

Continue nailing until the bottom tier of the DIY planter box is complete.

DIY planter box assembly bottom tier

Repeat the steps for the second tier of the planter box. Apply wood glue to the bottom of the second tier and place it on top of the bottom tier. Use clamps to hold both tiers in place and allow to dry for 12 hours.

DIY planter box assembly top tier

3. Paint the American Flag Planter Box

Paint stripes on the longer sides of the planter box with red chalky paint. Use painters tape to create straight lines (or just free hand it like I did).

DIY American Flag Planter Box

Fill in the rest with white chalky paint stripes.

Paint the shorter sides with blue chalky paint. When it’s dry, free hand white stars or use a stencil. In my opinion, freehand painting gives this American Flag planter box a nice rustic touch!

DIY American Flag Planter Box

Add little feet if desired to the bottom of the planter box using wood glue.

Add little feet to the planter box

Fill with potting soil and add flowers! You could also skip the soil and set a pre-planted 6″ flower pot inside the planter box.

DIY American Flag Planter Box

Red Geraniums and white Alyssum look great in this DIY American Flag Planter Box. The red and white combo really completes the patriotic look.

DIY American Flag Planter Box

If you build this planter box, what flowers would you try?

I’m Amanda, and I am the creator and voice behind the food and DIY blog, Domestically Creative. What started as a place to share updates with friends and family after we moved from Illinois to Tennessee and then to Texas, turned into a passion for finding creative and frugal ways to feed us and decorate our homes.

I have always had the “make it myself” attitude and I’m not afraid to bust out the power tools or get creative when it comes to decorating our home on a budget. You can usually find me scouring the local thrift stores, garage sales and estate sales looking for my next makeover (like this litter box cabinet), or dreaming up ways to make our new house feel more like home. My most recent project was giving my home office a much needed facelift. Some of the plans included creating a fun inspirational accent wall and adding pegboard to store my craft hoards.

I currently call Missouri home, where I live with my husband, dog, and 2 cats in a pretty dull, late 90’s split level. My husband and I both love to travel the U.S and recently purchased a small travel trailer to tag along in our journeys. In our free time together we can usually be found working together on a home project, exploring a new place, or just lounging with our pup, Delilah.

I’d love for you to connect with me on social media via Facebook, Instagram, Pinterest and Twitter!

raised garden bed with cucumber trellis

It’s spring-time and the perfect time to start a garden. Build this raised garden bed with or without a cucumber trellis and start gardening tomorrow!

Raised planter bed and cucumber trellisHow to Build a Raised Garden Bed with a Cucumber Trellis

Is there anything better than vegetables grown in your garden? They are hard to top! Cucumbers are very easy to grow, but do best if you give them a little extra care. When we decided to build a second raised vegetable garden, we decided to plan in advance to make it a strategic cucumber garden with a raised wooden trellis. We’re excited to show you how to build a DIY raised cucumber garden.

Hey y’all! We are Morgan & Sean McBride, and we blog at CharlestonCrafted.com where we are crafting our first home into our dream home and empowering you to try DIY. We share with our readers a variety of projects aimed at helping new homeowners make their homes their own. Some highlights include: our completely DIY coastal kitchen makeover; our tropical hammock oasis; and our budget laundry room refresh! Our most recent big project was our DIY concrete stone-look patio, which we are obsessed with. I’m likely to be found sharing behind the scenes and lots of laughs over on Instagram Stories, so pop over and say hey!

How to select a location for your cucumber garden:

raised garden bed with cucumber trellis

The number one thing to remember when selecting a location for your cucumber garden is to make sure it receives plenty of light. At least five hours of morning sun is ideal, and afternoon sun on top of that is good too. You also need to be prepared to water your cucumber garden a lot because they need a lot of water, plus they are growing in the summer, when it is hard to keep these things hydrated.

Materials:

(I’ve included affiliate links for your convenience. I earn a small percentage from a purchase using these links. There is no additional cost to you. You can read more about affiliate links here.)

Instructions:
Build your garden upside down. Start by cutting your 4″x4″ into four equal pieces one foot long each using a miter saw.

Cut your 8-foot-long 2″x8″ in half with a circular saw or miter saw.

Lay out your 10′ boards with your now-4′ boards on either end and place your 4″x4″ pieces in the corner. (It helps to lay a small piece of scrap wood in each corner to keep the 2″x8″s raised a half inch or so, but make sure the posts stay on the ground.)

Attach your four posts to the inside of each board keeping corners flush using the decking screws.

Dig four post holes in your garden location and install your flipped over, constructed raised bed by placing the long ends of the posts in the holes.

How to build a cucumber trellis:

Materials:

  • Three- 2″x2″x8′ boards
  • One- 2’x8′ lattice
  • Brad nailer
  • 1″ brad nails
  • Circular saw

Instructions:
A cucumber trellis is super easy to build. First, build the frame by cutting two 4-foot-long pieces out of one of the boards and three 3-foot-long boards out of the other two.

Use your nailer to attach the three foot boards to the inside of the four foot boards with two lining up on the outside edges and one exactly in the center.

Next, lay your lattice down on the frame and cut it along the edge with your circular saw. It should be 3 feet, 3 inches. Do that again with the excess to create a second piece for the other side.

Lay the two pieces of lattice down on the frame, marrying them next to each other in center. Use your nailer to go around and nail down the lattice to the frame.

Now, cut two 2-foot-long boards with a 45 degree angle from the remains of the 2″x2″ to serve as your legs.
Finally, position the two legs on the back of the frame and nail the frame down to the legs.

Add garden soil to fill your raised bed about 3/4 of the way full and then add the cucumber trellis on one side. You want to pick a spot that is accessible from the side so that you can easily reach under the trellis.

We are so excited to plant cucumbers in this garden this spring. The trellis will keep them off the ground and give the cucumber plants the support that they need to grow successfully. As a bonus, we also plan to plant lettuce under the shade of the cucumber trellis, where they should thrive out of the direct summer sun.

Thanks for having us and be sure to come visit us at CharlestonCrafted.com.

You can also connect with us on facebook, instagram, pinterest, youtube, twitter, and etsy.

A Note from Pretty Handy Girl:

I love this project that Morgan and Sean built, especially with spring right around the corner. It’s definitely time to start preparing your garden for the growing season.

You may have noticed that the lumber used for the raised planter bed and trellis is pressure-treated lumber. You should know that there is some debate over whether it is safe to use pressure treated lumber for an edible garden. Personally I like to use Cedar or other naturally rot-resistant materials to prevent the chemicals from leaching into your food. You can also choose to prime or line the inside of the bed. I’ll leave the decision up to you.

You may also like this tutorial for building a rot resistant raised planter bed:

How to Build a Rot-Resistant Raised Planter Bed | Pretty Handy Girl


It seems to me that we could all use a little distraction during this season of social distancing. I encourage you to step outside and try your hand at one (or two) of these DIY Projects to Get Your Garden Growing! Not only will you set yourself up for some fresh fruits, veggies, or flowers, but you can also soak in some sun yourself to improve your mood.

DIY Projects to Get Your Garden Growing

If you’re itching for some outside time, or need to start thinking about working on your green thumb, I have several gardening tutorials to inspire you! Let’s get growing!

How to Compost - Secret Gardening Formula | Pretty Handy Girl

Here’s the basics for how to compost and get top quality soil for your garden and landscaping for FREE!


Landscaping 101: Tools, Planting, and Adding Color to your Landscaping | Pretty Handy Girl

Choosing the best gardening tools for the job will make it so much easier!  Check out this comprehensive list of gardening tools and what they’re best used for.


It may be tempting to throw out a leaky garden hose, but did you know it’s fairly simple to fix? It is! I have the solution for you in this tutorial on How to Fix a Leaky Hose!


DIY Living wall

Not everyone has an expanse of land for a garden. You can easily plant herbs in this easy DIY Living Wall Planter Tutorial.


Raised Planter Bed with Cucumber trellis

Build this simple raised planter bed with cucumber trellis in no time and start growing cucumbers to eat (or for your DIY beauty routine.)


Quick and Easy DIY Fan Trellis

This easy spring trellis doesn’t require too much time, tools or money.  The best part is, you can make it exactly the size and shape that is right for a wall, by your mailbox, or your raised planter bed.


This fence trellis is easy to build, and will turn a dull fence into a living wall!

Is modern more your design style? Then you’ll want to check out this super simple DIY Modern Trellis.


How to Build a Rot-Resistant Raised Planter Bed | Pretty Handy Girl

Make this Rot-Resistant Planter Bed and never worry about the planter breaking down. This is my fifth year with these beds and they still look beautiful and rot free!


How to Build a Square Foot Gardening Grid that Won't Rot | Pretty Handy Girl

If you square foot garden, you have to see how to create a square foot garden grid that won’t break down and is super easy to lift up when you need to till your soil.


How to Build a Vegetable Trellis on a Budget | Pretty Handy Girl

Now that you have that planter ready to fill, you’ll need to know how to make a trellis (and save lots of money) by following this tutorial.


Love tomatoes? Great then you’ll love learning how to grow an incredible bumper crop of tomatoes this year.


Tips to Create Knock Out Container Gardens | Pretty Handy Girl

Maybe you don’t have much room for a garden. No worries, you can still display your green thumb with knockout container plantings!


How to Install Sprinkler System

Wouldn’t it be amazing if you could water your own garden or landscaping automatically? Yes? Then learn how to install your own sprinkler system.


Get your shed or garage organized with this hanging garden tool organizer!

Once you’re done planting, you could get your organization game on with this simple storage solution for garden tools.

I hope you find several of these tutorials inspiring and hope your weather is cooperating enough to let you get outside and dig in the dirt. Take care!

signature

An idea for making your own hummingbird feeder! Great kids craft and perfect for Spring.

Happy Spring Everyone! What a difference a few weeks can make. Like many of you, I am grappling with the uncertainty of this challenging time. My children are now home with me every day, for the foreseeable future. In Seattle, life has completely changed. Almost everything is shut down, even playgrounds are closed at the moment. And so, I’ve been focused on creating little projects that my kids and I can do while stuck at home. Let’s talk about DIY Hummingbird Feeder.

I came across these DIY hummingbird feeders with jelly jars and was instantly inspired! I’ve had a hummingbird feeder on my Amazon wishlist for quite some time. I’m not sure why I never considered making my own instead. This turned out to be a very kid-friendly project and they even learned a little bit about hummingbirds.

Make your own hummingbird feeder out of spice jars

The only issue was, I didn’t have jelly jars. So I improvised a bit and used these 1oz McCormick spice jars. I emptied out the contents and washed them out thoroughly. These little spice jars are the perfect size for those dainty hummingbirds.

Materials:

(I’ve included affiliate links for your convenience. I earn a small percentage from a purchase using these links. There is no additional cost to you. You can read more about affiliate links here.)

DIY Hummingbird feeder from little spice jars

Instructions:

Follow these steps to make your own hummingbird feeder.

Step 1: Prepare your spice jars

Wash your spice jars with hot soapy water - they are the perfect size for little hummingbirds!

Thoroughly wash your spice jars and lids with hot, soapy water. You don’t want any lingering spice odors or tastes that will turn off potential hummingbirds. I also removed the stickers from the jars with a little goo gone.

McCormick spice jars have a lid with holes in it, covered by a snap-top. All you need to do is rip off the snap-top section, we don’t need it. Hummingbirds will use their long beaks to drink the nectar from each hole.

Step 2: Make Hummingbird Nectar

Make Hummingbird nectar - recipe in post - then pour into your jars!

The recipe for making Hummingbird nectar couldn’t be easier. It’s just sugar water – but you need to know the correct ratio. Too much sugar can be harmful to hummingbirds and too little sugar doesn’t provide enough calories for them.

I followed the recipe from the Audubon website.  It’s ¼ cup of refined white sugar and 1 cup of boiling water. Mix until the sugar dissolves. Cool the mixture and then fill your spice jars to the top. Now, just replace the lid with holes in it.

Replace the spice lid on your jar - hummingbirds feed on the nectar through the holes.

Step 3: Attach Jute Twine for Hanging

Tie some string or jute twine to your jars for hanging on a tree!

I used some jute twine to create a little loop for hanging. Tie your knots tight and make sure the lid is secure.

Cut excess string from hummingbird feeder jars before hanging.

Now just hang it up somewhere outside and wait for those hummingbirds!

These spice jars make a great hummingbird feeder and it's the perfect activity for kids

Hang your feeder from a tree, where you see hummingbirds visit

We haven’t had a visitor yet that I could photograph, but I know those hummingbirds are on the way.

Hummingbirds love the nectar that you put in these jars

DIY Hummingbird Feeder from old spice jars!

Thanks so much for reading and being here today. karen signature

~ See More of Karen’s Tutorials ~


karen from decor hintHello!  I’m Karen, the creator of the Home Decor and DIY Blog: Decor Hint. I’m a Native of the East Coast, but I currently live in beautiful Seattle with my hubby, our two wonderful children, and our spunky wheaten terrier.

You can usually find me with some sort of craft in one hand and a coffee in the other. And I’m always rearranging furniture or moving lamps from room to room. I have a passion (read: obsession) for decorating, DIY, and gardening. In short, I love making my house into a home.

Like many, I’m inspired by what I see in home decor magazines, but I’m not so inspired by the price tags.  Consequently, I love finding and creating beautiful budget-friendly home decor items. In a head to head competition, I bet you’d never know the difference between the designer items and my DIY creations!  Many of my DIY projects focus on sewing, crafting, upcycling and organizing. Some of my favorite projects have been making pretty wreaths, sewing my own tassel hand towels, and crafting these trendy wood bead garlands. I can’t wait to inspire you and spark your creativity through my DIY projects.

Liked this project? You’ll love this beautiful glass bottle hummingbird feeder using a bottle from the recycling bin.

Check out these DIY Hanging Beaded Vases for another upcycled craft!