DIY jewelry holder tutorial | Pretty Handy Girl

Today I have one fabulous thrifter and DIYer! She’s well know for her DIY projects as well as showing off yours! Please welcome Roeshel from DIY Show Off.

page_break_2
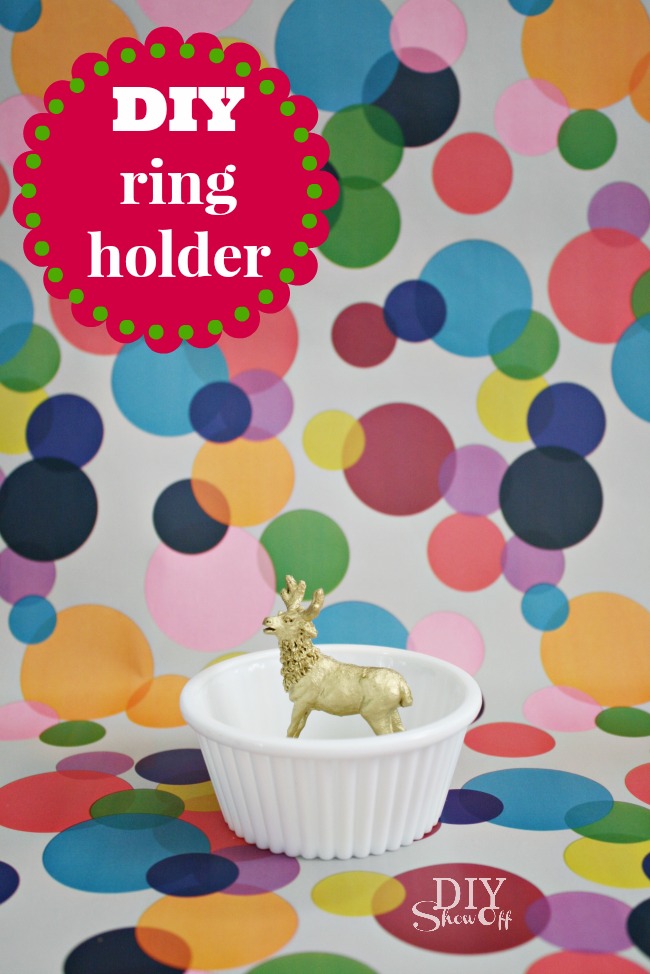
Hi, Pretty Handy Girl friends! I’m Roeshel from DIYShowOff and today I’m excited to be sharing a super easy DIY gift idea for the Très Frugal Gifts series. a DIY ring holder!
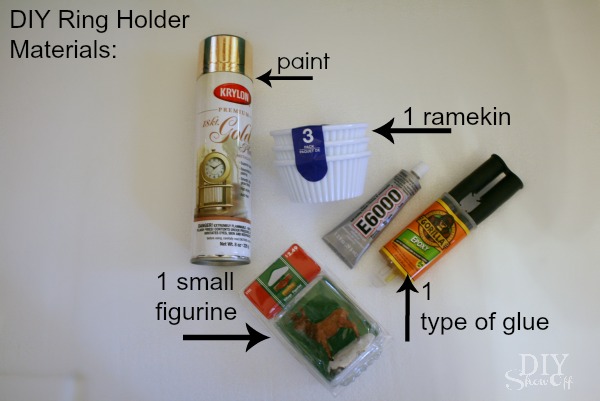
Materials: 

  • Ramekin (Dollar Tree 3 for a $1)
  • Deer Figurine ($2.50 at KMart in the holiday ornament section).
  • Gold spray paint
  • Industrial strength glue

DIY Ring Holder Tutorial Materials

Use what you have on hand to keep your costs down! You can use left over paint and glue. This ring holder can also work using things you may already have at home. Ornaments with a top that fits a ring, plastic toys like a giraffe with a long neck or an elephant with a trunk. I personally use is a cat and the rings slide onto the tail. A finial or dowel would be pretty too! Or how about that dried out highlighter/marker? Paint it! For the base, jar lids or small saucers/plates would work equally as well. Tight budget? Search the junk drawer!

Instructions:  Read more

Faux Cross Stitch Tea Towel | Pretty Handy Girl

Faux Cross Stitch Tea Towel | Pretty Handy Girl

How about a cheap and easy DIY gift idea today? Faux Cross Stitch Tea Towels are sure to please anyone and they cost less than a dollar! I bought several of the red striped Tekla tea towels at Ikea that cost .79 a piece!

Faux Cross Stitch Tea Towel | Pretty Handy Girl

I came up with the idea after seeing Miss Mustard Seed’s cafe curtains. But, decided to create monogrammed tea towels to give as gifts.

Faux Cross Stitch Tea Towel | Pretty Handy Girl

Materials:

  • Ikea Tekla Tea Towel
  • Red & green acrylic paint
  • Tiny round paint brush
  • Painter’s tape
  • Light box (if you don’t have one, you can tape your letter and towel to a window during the day.)

Instructions: Read more

Pen and Ink Sketch Decorative Dessert Plates | Pretty Handy Girl

Pen and Ink Sketch Decorative Dessert Plates | Pretty Handy Girl

My goodness, November is flying by! Get it…flying…insects. I crack myself up. But seriously, I have been having a blast coming up with new creative gift ideas that you can make. This idea for making pen and ink sketch decorative dessert plates turned out better than I expected! The only downside is that they really are only for decoration. The paint used on the plates can be cured, but the manufacturer states that it technically isn’t food safe.

With that disclaimer out of the way, think about how you could commemorate an event with a personalized plate. Or you could use the same stenciling technique on the outside of a pitcher, mug, glasses or anywhere that the food wouldn’t be in contact with.


(I’ve included affiliate links for your convenience. I earn a small percentage from a purchase using these links. There is no additional cost to you. You can read more about affiliate links here.)

Materials:

Pen and Ink Sketch Decorative Dessert Plates | Pretty Handy Girl

Optional: Porcelaine or glass ink pens for writing


Instructions: Read more

Make a Tray from a Cabinet Door | Pretty Handy Girl

Make a Tray from a Cabinet Door | Pretty Handy Girl

One of my favorite places to thrift shop is the Habitat ReStore. I mean, where else can you find cool $2 cabinet doors?

Make a Tray from a Cabinet Door | Pretty Handy Girl

This fine cast off door is just screaming to be upcycled into a beautiful tray. Especially when the same thrifting adventure yielded VERY COOL door hardware! Simply combine the two and you have yourself a unique serving tray to give as a gift (or keep for yourself.)

Make a Tray from a Cabinet Door | Pretty Handy Girl

Materials:

  • Cabinet door
  • Door handle or cabinet handle
  • Wood putty
  • Putty knife
  • Ruler
  • Pencil
  • Drill
  • Drill bits
  • Screwdriver bit
  • Rubber bumpers

Optional: Rub n’ Buff Gold Leaf

The steps are super simple. Read more

Easy Wooden Chalkboard Sign | Pretty Handy Girl

Easy Wooden Chalkboard Sign | Pretty Handy Girl

Do you keep scraps of wood and say to yourself, “I might need that for something someday.” Well, today is your someday! Grab a scrap (or ask Lowe’s for their scraps) and create this super easy wooden chalkboard sign.

When you’re done, you can turn it into a sign that displays your favorite quote; a plaque welcoming friends; or you could create a fun Christmas Countdown sign!

Easy Wooden Chalkboard Sign | Pretty Handy Girl

Materials:

Easy Wooden Chalkboard Sign | Pretty Handy Girl

  • Scrap wood (3/4″ thickness works the best)
  • Chalkboard spray paint
  • Painter’s Tape
  • Red paint (I used Miss Mustard Seed Tricycle Milk Paint)
  • White paint pen
  • Chalk
  • Pencil
  • Eye hooks
  • Drill
  • Drill bit slightly smaller than the eye bolts
  • Ribbon
  • Pencil
  • Safety glasses


Instructions: Read more