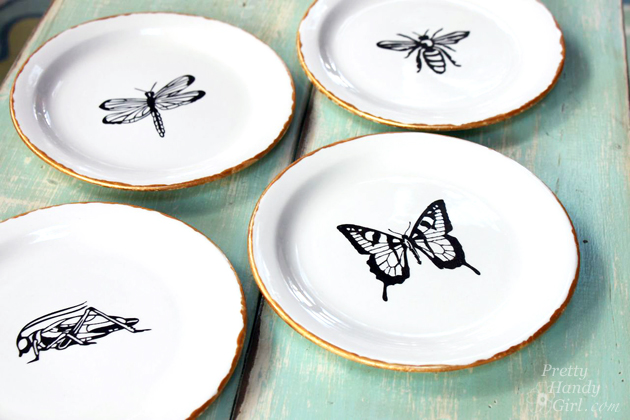
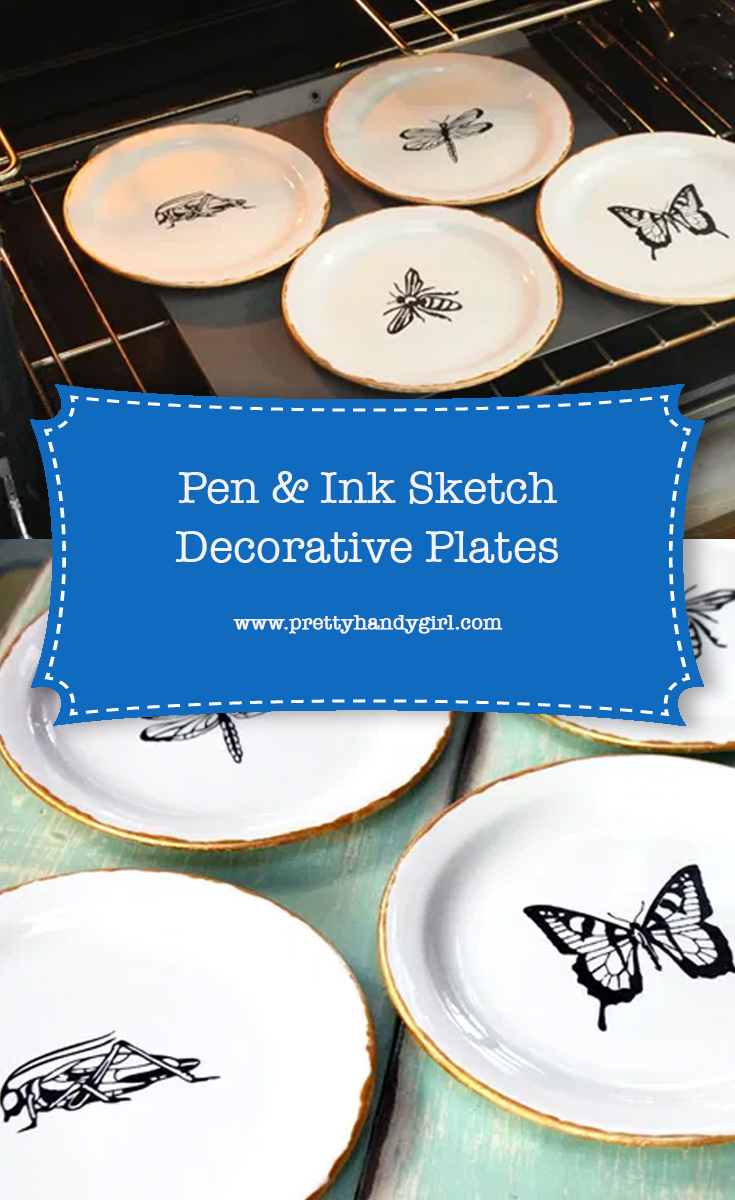
Pen & Ink Sketch Decorative Plates
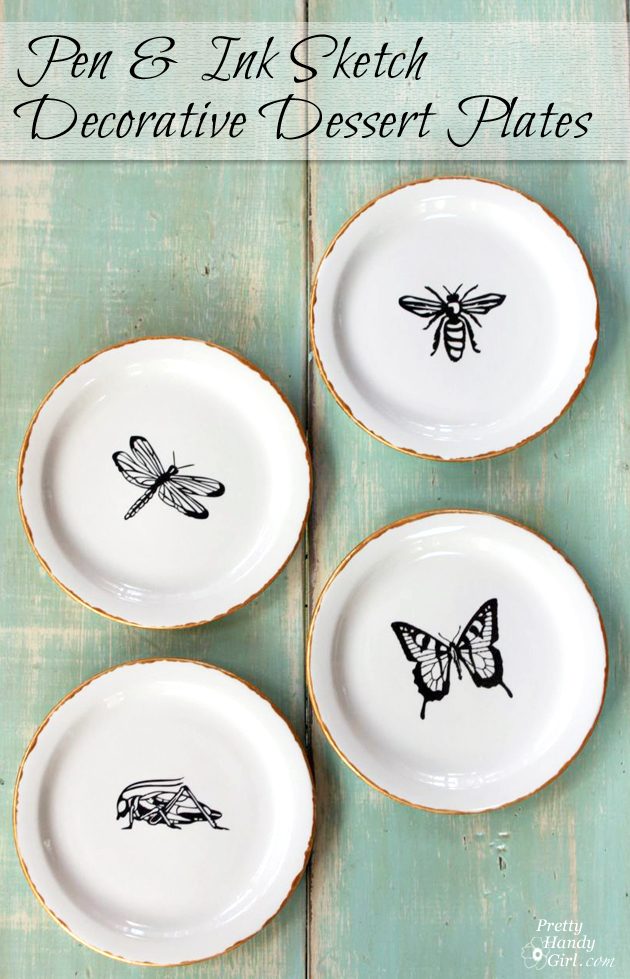
My goodness, November is flying by! Get it…flying…insects. I crack myself up. But seriously, I have been having a blast coming up with new creative gift ideas that you can make. This idea for making pen and ink sketch decorative dessert plates turned out better than I expected! The only downside is that they really are only for decoration. The paint used on the plates can be cured, but the manufacturer states that it technically isn’t food safe.
With that disclaimer out of the way, think about how you could commemorate an event with a personalized plate. Or you could use the same stenciling technique on the outside of a pitcher, mug, glasses or anywhere that the food wouldn’t be in contact with.
(I’ve included affiliate links for your convenience. I earn a small percentage from a purchase using these links. There is no additional cost to you. You can read more about affiliate links here.)
Materials:

- Dessert plates (bought mine at a thrift store for $1 each)
- Porcelaine Chalkboard paint
- Porcelaine gold paint
- Scissors
- Credit card or spatula for burnishing
- Sponge applicator or paint brush
- X-acto knife
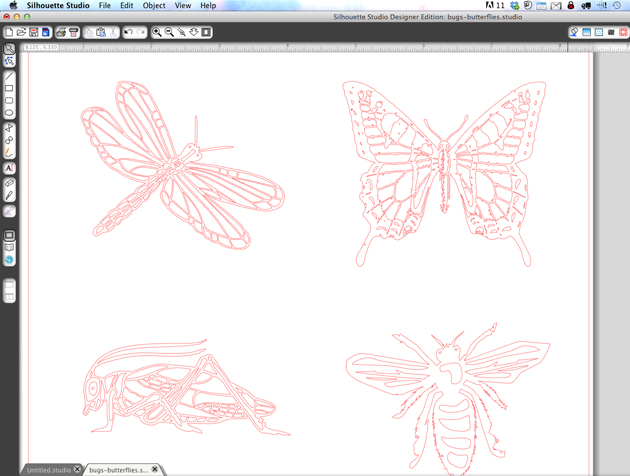
- Decorative stencil cut outs (used my Silhouette to cut bug shapes)
- Transfer paper
Optional: Porcelaine or glass ink pens for writing
Instructions:
1. Chose your design and use a Silhouette (or other craft cutter) to cut out the design on vinyl.
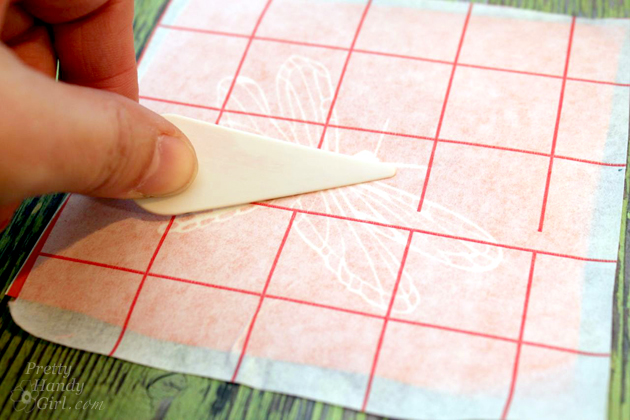
2. Weed out (remove) all the inside areas of your design. Lay a sheet of transfer paper on top of your vinyl and burnish it (rub the transfer paper to adhere it to the vinyl.)
3. Carefully remove the backing from the vinyl.

4. Center the design on a clean plate. Burnish again to adhere the vinyl to the plate.

5. Carefully remove the transfer paper from the vinyl.

6. Sponge or paint black chalkboard paint over the stencil.
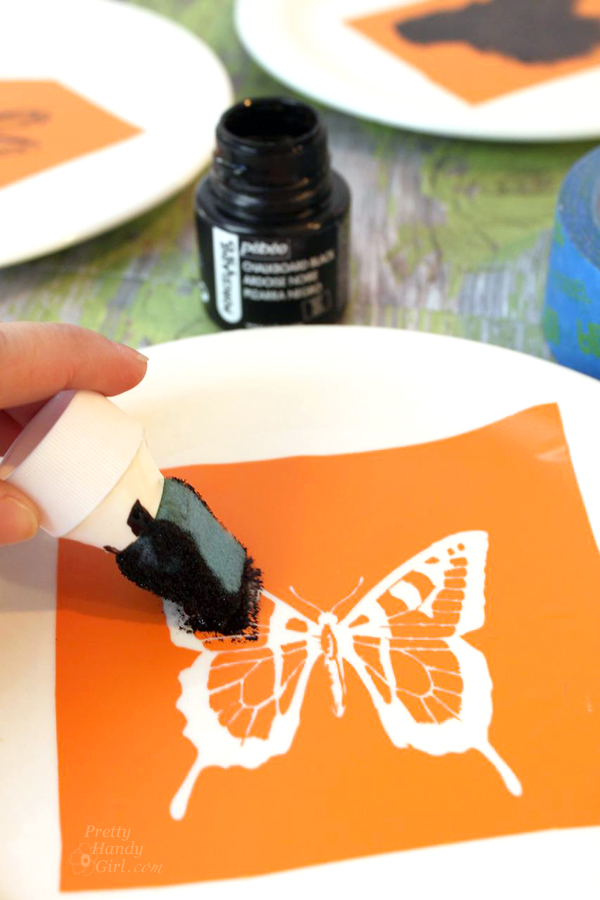
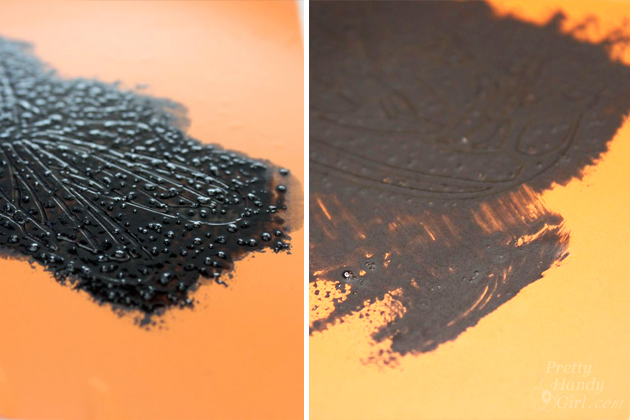
Don’t freak out when the paint appears bubbly. It will settle and smooth out as it dries.
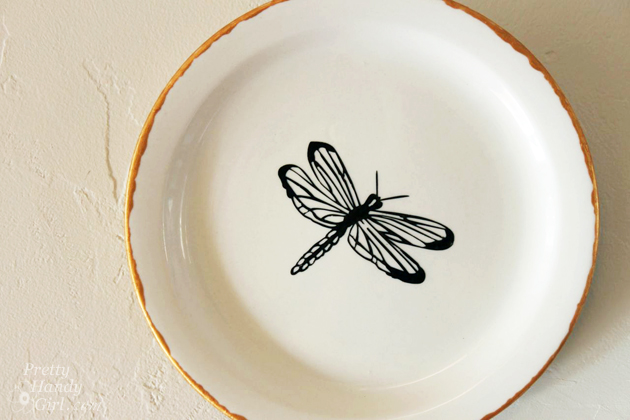
7. Paint gold paint around the plate edges. I found it difficult to get a precise line, so I went with the bumpy organic look instead.

8. Allow the paint to dry. Gently remove the vinyl from the plate. Use an x-acto knife to pull up the little pieces.

9. If you want to cure your plates, bake them in a non-preheated oven at 300F for 30 minute. Then leave them in the oven as it cools.

Use DiscChangers or other plate hangers to hang your plates on the wall.
I am of the mind set that if you can’t hide something unsightly then work with it. My Nest thermostat is now happily surrounded by some flying friends. I might add a few more plates soon.
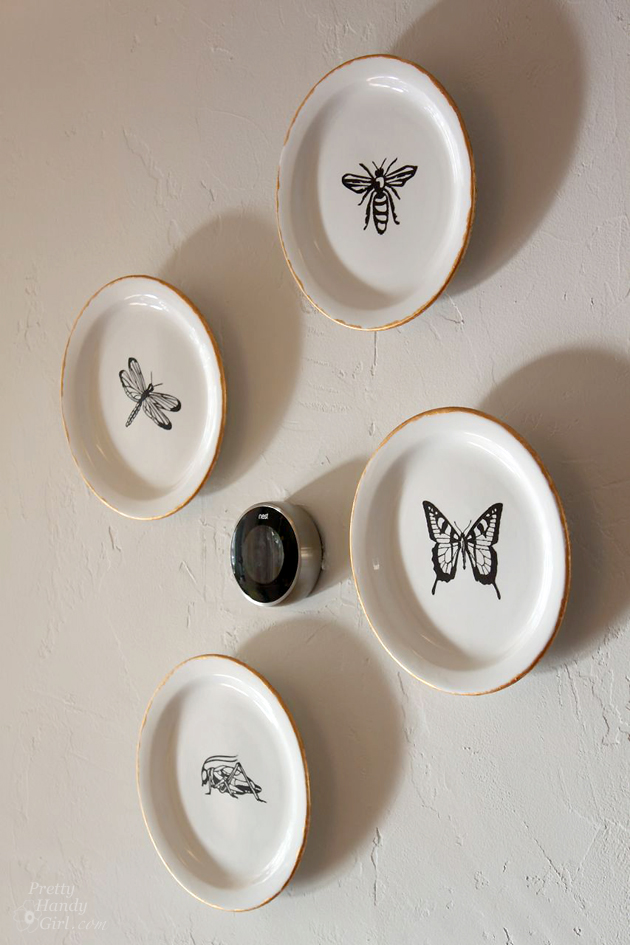
What do you think? These decorative plates are high end boutique-chic, don’t you think? And they cost $1 each plus supplies.
![]()
Pin for later!
Love these! great blog!New follower! Would you mind if I used one of your pictures of these lovely plates on my blog…I will of course credit and link back to you! Please let me know asap by e-mailing me!
Sincerely, June
i love the plate decor – i am working on my own christmas cards this year to save some dough
I used Mod Podge to put my kid’s photos on 4×4 tile last year. They were used as coasters by the grandparents.
These plates are such a great idea for decoration around the home. I would love to get some plates fro the thrift store and do this!
I am loving the chalkboard mugs!!!
Do I have to narrow it down to just one???? If I had all the time in the world, I would love to make the iPad holder, the succulent garden, and the book storage for myself. The scarves and clipboards would make great gifts for the kids teachers! 🙂
What cute plates!!
One of my favorite frugal gift I love to give as a kid birthday gift is a “fort kit” using a sheet with ties sewn on, clothes pins, a rope, a flashlight and any other fort necessity. I would love to use the portrait to make gift tags to go with the fort kit!
Great idea about the plates! I will definitely have to try it!
I love your plate tutorial. That would be a great project.
We did coffee cup sets for everyone last Christmas. 🙂 kidlet and used pretty white $1 store cups and sharpie paint pens. 🙂
I like the DIY Rustic Wood Cake Stand
I love frugal and I love crafts. I love all those ideas. I love your tutorial on how to do those plates. They look awesome. My aunt would love something like that with seashells! Thanks for the ideas! 🙂
I love the scarves and the plates are pretty awesome too!
These plates are FAB!!! & would be an awesome craft night project, new home decration, gift, etc! Thanks for sharing & having this awesome giveaway!!!
I love the birdhouse. It reminds me so much of my grandmother.
I love love love those plates! they are so cute! The dyed scarves are really neat as well.
Your plates are beautiful! I would love to win a Silhouette so I can do some fun craft projects too.
I love the cake stand!
I like to create cookie jars as gifts for relatives with pretty decorative labels.
I like the faux cross stitch tea towel. Makes me look craftier than I am!
I thought the dyed and stenciled scarves were fabulous. I am using this tutorial to make scarves for my sister-in-laws for Christmas.
I LOVE the monogrammed ornaments! Would love to make these for each member of my family.
Those plates are really incredible! I love how you can personalize then for just about anyone. And who couldn’t use a unique set of plates!
The bug plates is my favorite. gives me lots of great ideas too
I love, love, love these plates!
I am loving those bug plates!
Love the wooden chalkboard sign!
These plates are my favorite!
My special DIY was the same type of thing on rustic fabric for napkins with a sprig of evergreen and a napkin wring of a beautiful bark for your holiday table. It might make a great hostess gift.
Well I am just loving those plates!!!!!
stenciled and dyed scarves
thanks
The chalkboard mugs and the dyed/stenciled scarves are my favorites!
Love the chalkboard mugs. So fun!
Love these plates…thanks for the chance.
Love these plates….I am already thinking of designs…
Whole-made snow globes!
My favorite is the wooden chalkboard sign!
It was hard for me to choose between the chalkboard clipboard and the chalkboard-painted mugs. In fact, I can’t choose, so can I please like both? Thanks for all the fun ideas, and looking forward to more.
Love the hidden book shelf books. Wanted to do that for a long time, but I need a bookshelf first. lol.
Love the monogram tea towels.
I love the scarf idea. Perfect for gift giving
the plates! and i have the perfect spot to hang them.
Never tried plate art before, just might have to.
I like the etched soap dispensers.
I am loving the plates! They turned out beautiful. As far as a Très Frugal DIY Gift idea, hum….. I like to give food. Everyone has to eat! I also like personalized gifts such as blankets or a nice picture frame!
I love the chalkboard mugs. Very cute idea!!
I adore the books with hidden storage. I have old books waiting for me to make them into something fabulous.
I love the faux monogrammed tea towels! Great idea!
Thank-you for the great idea Brittany. I just have to cut those stencils@
I like the scrapbook lined trays.. super cute!!
Most definitely the plates, they are awesome.
I love a lot of them including the DIY room spray! Inexpensive, smells better than commercially available spray and cheaper too!
Hmmm…hard to pick ONE! I think the stamped spoon necklace, followed by these plates, are my favorites, followed by the chalkboard countdown.
The cabinet door tray is my favorite so far. The handles you selected are gorgeous!
Love the bug plates, and the chalk board mugs!
The bug plates are hand down my favorite. I am bee obsessed and would love to make a set of them. Love the gold edging on those, too!
Jenny
Very cute! I was thinking of getting sharpies and plates for my 5 year old to decorate for Christmas presents. I like the stencil idea.
love the hidden book storage idea – woow – but love clip board too !!
I love, love, loved the book with hidden storage! I’m soo gonna try this. 😀
I LOVE the scarf you did! So beautiful and always wonderful to have this time of year.
Love the chalkboard mugs!
I love the chalkboard mugs! I think I’ll use that idea for teacher gifts this year along with some homemade hot chocolate mix.
It’s a toss up…chalkboard mugs or stamped spoon necklace. Love them BOTH!
I’m loving the chalkboard mugs!!!
I love the chalkboard mugs and the bugs idea.
LOVE the stamped spoon necklaces. The plates are so pretty, too! I SO hope I win your giveaway!!!
Thanks!
I love the cabinet door tray…and these plates are adorable too!!!
I love this latest project (I anticipate making them, but also would love to receive them) of the plates. My daughter has just begun to raise honey bees and a series of plates with bees and bee keeping would be a great gift for her family! Thank you for the opportunity to enter this giveaway!
The chalkboard mugs look like the project for me! My extended family is coming for Thanksgiving and I think it would be a great project for Friday. Even our little girls can help! Thanks!
I really like the etched soap dispenser!
love the cake stand
This year I’m all about the fringe-no-sew fleece blankets! I’m making them for everyone, so easy, just takes about an hour of time and $15 of fabric for a heavy comfy blanket usually twice that cost in stores.
My favorite still, by far is the little bird houses and then the chalkboard signs.
I love the Pen & Ink Sketch Dessert Plates… I have just primed some assorted small saucers to go around the mirror in my dining room and wasn’t sure exactly how to embellish them… now I know… Thanks
I love your blog. You do the most amazing things. I love a wooden chalkboard sign. But there are a pile of other things I love too.
I love love love the monogrammed ornaments 🙂
It’s a tossup between the DIY room spray and wooden chalkboard sign. SO many cute ideas!
I am thinking of SO many things I could do with this!! Adore the plates!! 🙂
I just LOVE the cabinet door tray 🙂 Definitely going to make some of these as Christmas gifts!!
I love the cabinet door signs – so creative and affordable! I could think of one for everyone I know! 😉
I really love the Tres Frugal series..my favorites so far are the scarves..the cabinet door tray..and of course the dessert plates. All are pretty awesome though!
I love the bug plate stencils you made! I would like to take the idea and make Christmas themed personalized platters to give to friends for Christmas.
Lisa K.
love the plates!
I love these plates! Very cute. I have been really enjoying the Très Frugal series. I think my favorite so far is the chalkboard mugs. Or maybe the monogrammed ornaments. Hmmm. Maybe the scarves….. it’s hard to choose!
Is that tape really strong enough to hold up the plate?
Amanda, absolutely! It’s very strong and has a good bond. I’ll check it again in a few months, but so far I love that tape!
I luv the chalkpaint mugs!!
Without a doubt, the plates!!! That is so cute and so expensive looking! I love it and am doing this for sure! Thanks.
You are so creative!. I love the plates
The plates are awesome! Great job & I love the texture on your walls, only I would notice that…lol
I’d love to try the plates!
I love the cake stand and the 3-d snowflake, I plan trying this with my daughter!
I love the monogrammed ornaments!
The plates are so cute- great idea
I love the monogrammed ornaments!
The monogramed ornaments are my favorites. I hope to make them for my boys for Christmas.
I like the rustic wood cake stand.
Fav so far: dyed and stenciled scarves. Wow!
I love scarves as a cheap gift!
I love the stenciled plates…
I love the mugs and the scarves!
Love the plates and, ohhhhh heck.It’s all so pretty.
I love the chalkboard mugs and the scarves.
I love the bug plates. I bet stores are selling these for a bundle!
I love these plates! The gold edge is beautiful! 🙂
I love the cabinet door tray and the the wooden chalkboard sign!
I must have those plates! LOVE
I love the rustic painted cake stand…I can think of lots of uses! Thanks for the chance to win!
loved these plates…so cute and simple to make =)
My favorite so far is the dyed and stenciled scarves! So many possibilities!
So many wonderful projects but my favorite is the chalkboard mugs!
The book with the hidden storage has been my favorite project, though I’ve found all of them interesting and fun. I tried a hidden storage book before and it was a flop. This one was perfect. Thanks for great Silhouette tutorial and for giving us a chance to win one.
I love the bug plates, they would be perfect!
I love all your ideas. I thought the hidden book storage was exceptionally clever. I would love to win the Silhouette. I have always wanted one. Thank you for the giveaway!
I like the dyed and stenciled scarves.
I think the pen and ink plates are my favorite. So pretty.
The spoon tealight holder is unique!
I love the clipboard.
In the summer, I grow Sweet Baby Girl tomatoes and dry them. In the winter, they are gifts to my family and friends. They are wonderfully sweet and delicious1
My favorite frugal gift idea is subway art. So easy to make a plaque out of leftover wood to fit someone’s décor.
Cabinet door tray!
Love, love, love the plates!!!! Awesome!!! Thanks for the opportunity to win the Silhouette! It’s at the top of my Christmas Wish List!!!
The Reclaimed Wood Wall Sconce with Hook!
Monogrammed Ornaments. So cute
I LOVE these plates; Doing them with a rooster stencil would be the PERFECT gift for my ma
Your handmade teabags are something I want to do for Christmas gifts for my friends.
The plates! So many Possibilities…
I love the scarves!
Chalkboard mugs and the pen & ink stencil dessert plates! I want to stencil some number plates now! 🙂
I absolutely love the cabinet door tray! I actually pinned it the other day. 🙂 Hey that rhymed! LOL
I love those plates 🙂 That would be the cutest gift. But I also love the stenciled scarf.
I like the chalkboard mugs idea.
I love the fabric coasters!
I love the cabinet door tray. I can’t wait to make one myself! Thanks!
I love the idea of buying cheap, plain pillows and adding a decorative touch.
I love to make mini gift baskets with a mug and cocoa makings, great for the office gals
Love the hidden storage book!
Brittany,
Wow this is so cool.
I’m taking a pen and ink drawing night school class and it would be wicked to be able to get my art onto cups and plates, etc. because it would be such a personal gift idea!!!
You make me want to learn more about that printer.
olivia
These plates are darling and would look great with the cake stand!
the cake pan!
The chalkboard mugs have been my favorite.
I love the dessert plates!!
Loved the Chalkboard Mugs! Going to make them for my girls for Christmas.
My favourite DIY gifts are personalized baskets. S’mores etc!
Loved the plates and will have to try Gorilla tape, thanks!
I have made etched plates with Mickey mouse as a gift.
SO, I have broken the Tres Frugal into: ones I love and Ones I have made (plan to make)
Ones I love: scarves, chalkboard mugs
Ones I have made: fabric coasters (I was able to use leftover scraps) and chalkboard sign (painted the board last night!)
Refrigerator cookies–my dad loves them.
The etched glass soap dispense was great! I would love to be able to so many of things as gifts or as a gift to myself!
The bug plates. My sons are obsessed with bugs, so this has given me lots of great ideas!
I love bugs on plates!!!!! (Not real ones…. )
I like the dyed and stenciled scarves and these plates too!
I love the Faux Etched Glass Soap Dispenser Gift. I think etched glass is so darn pretty! Thanks for the chance to win!
I love the cake stand you made and now I love the dessert plates too!