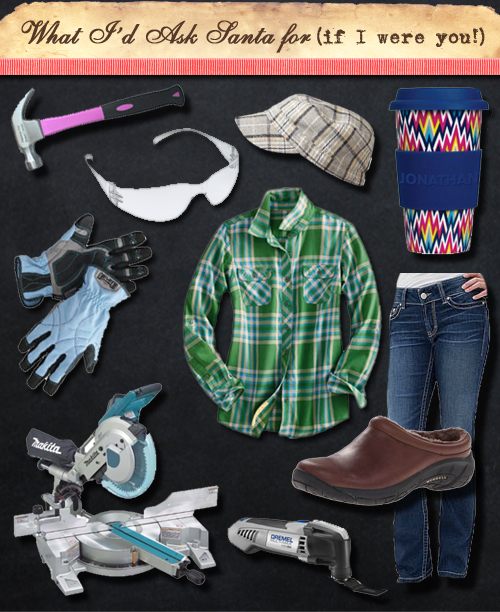
It’s the final days before the big guy packs up his sleigh and starts delivering presents to all the good little girls and boys. You’ve been good this year, right? This year I’m asking Pretty Handsome Guy Santa for a few things, but these are the gifts that I’ve received in the past that are my absolute favorites. Feel free to share them with the “Santa” in your life. You can send him or her a link to this post and let them know which number(s) you want. We’ll just pretend it was their idea ;-).
For the Workshop:
1. The Makita 10-Inch Dual Slide Compound Miter Saw with Laser was my Mother’s Day gift one year and by far this is my baby in the workshop. After 5+ years it still cuts like butter and is the one tool I’d cry over if it was stolen.

2. A PORTER-CABLE Orbital Jig Saw – years ago, I was given a jigsaw for Christmas that just didn’t cut it. Literally, the blade would bend and refuse to cut through most wood. It felt like a toy tool compared to this MacDaddy. This jigsaw can cut through just about anything I put in its way!

3. The Black & Decker Folding Portable Work Bench was a gift from my father decades ago! It sat in a box waiting for me to open it for 3 years. When we finally moved into a home that had a workshop I opened it up and it has been my BFF ever since. It’s the perfect clamping station and is a portable spot to work on projects. I like to set it up in our driveway for sanding. It’s also the perfect height to help guide long lumber through the table saw.

4. Speaking of Table saws, if you own one, the GRR-RIPPER 3D Pushblocks are absolutely the safest way to push your wood through the saw. Hands down (pun intended) the GRR-RIPPERs have changed how I use my table saw for the better.

5. Dremel MM30 Multi-Max Oscillating Tool This little powerhouse is my desert island tool (well assuming I have access to electricity.) This is my favorite tool to grab for cutting and sanding. It was a life saver when I was renovating my kitchen. From cutting through nails to cutting notches in studs, this tool has the power and precision to cut through a multitude of materials. Plus, the detail sanding head is great for small sanding jobs. Grab this one quick, they are selling out on Amazon quickly!

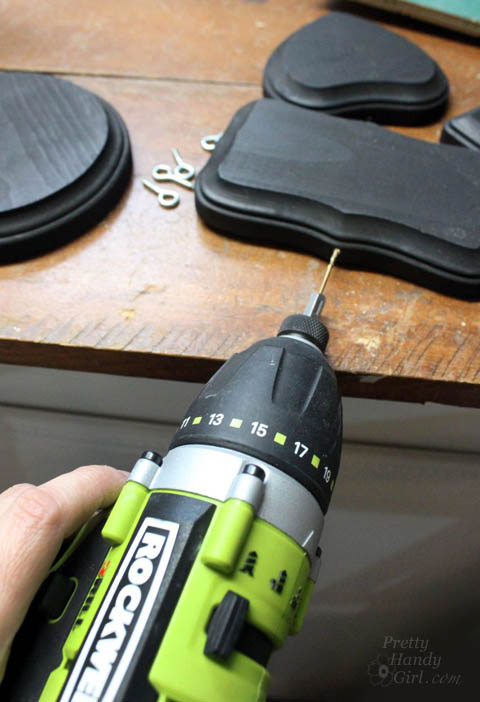
6. Rockwell 3RILL 3-in-1 Impact Driver Despite it’s 12 volt battery, this impact driver, drill and driver is my go to drill. It packs a lot of power in a smaller drill that is easy to hold and fits in a woman’s hand. The lithium battery lasts and lasts. Finally, the quick release hex chuck holds tight to drill bits and driver bits. This is my little green machine.

7. HomeRight EZ Twist Paint Stick I’ve painted almost every room in both my homes. I had tried many painting gadgets and always returned to the original edger and roller I’ve owned for over a decade. But, all this changed this past year when I tried the HomeRight EZ Twist Paint Stick. It literally cut my painting time in half! Plus, it eliminates the hazard of stepping in the paint tray (which I’ve done too many times to count.)

8. 3M TEKK WorkTunes Hearing Protection These ear protection muffs make remembering to use them in the workshop easy. I love hooking up my iPhone to the WorkTunes to listen to podcasts or music while working. The only problem is that we only have one pair which leads to a few battles when Handsome Guy wants to use them while mowing the lawn and I want to use them at the same time.

9. 3M Tekk Lightweight Safety Glasses – Having protective gear that is comfortable to wear is important. These safety glasses are so lightweight and comfortable that I often forget I have them on. The clear sides give full peripheral views. They are inexpensive which makes them perfect for a stocking stuffer ;-).

10. Tomboy Tools Magnetic 13 oz. Hammer I rarely buy tools specifically made for women because they don’t normally live up to my tough standards. But, this hammer is an exception. The hammer is lightweight, but still strong enough to get me through framing walls in our kitchen. It is perfectly weighted and has a shock absorbing handle. The magnetic notch on the head allows you to rest the nail and set it with one swing over your head. Best of all, because of its color the guys won’t run off with it. And, it’s easily spotted on the job site.

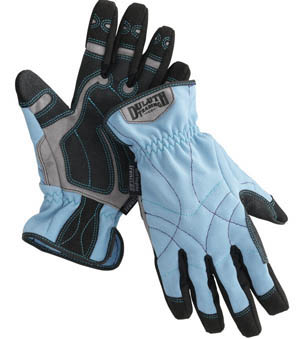
11. Duluth Women’s Work Gloves – Finding work gloves that fit a smaller woman’s hand and don’t slip around are important to me. These work gloves fit like a…well…like a glove. They are padded for comfort and the fingertips are reinforced on all sides (the place most other gloves fail.)
For Your Wardrobe:
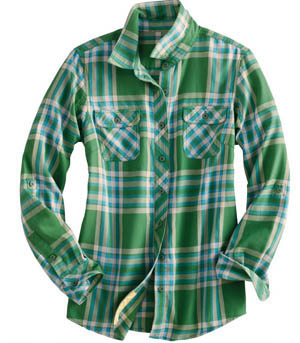
1. Women’s Crosscut Performance Flannel Shirt – Have you ever wanted to spend the day in your pajamas because they are just so darn comfy? This flannel shirt is exactly like wearing your PJs all day! I own two of these crosscut flannel shirts now because I would wear them every day if I could. Recently I figured out how to dress up my flannel shirt for church.
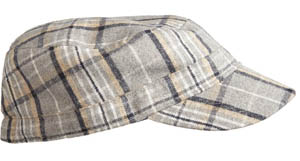
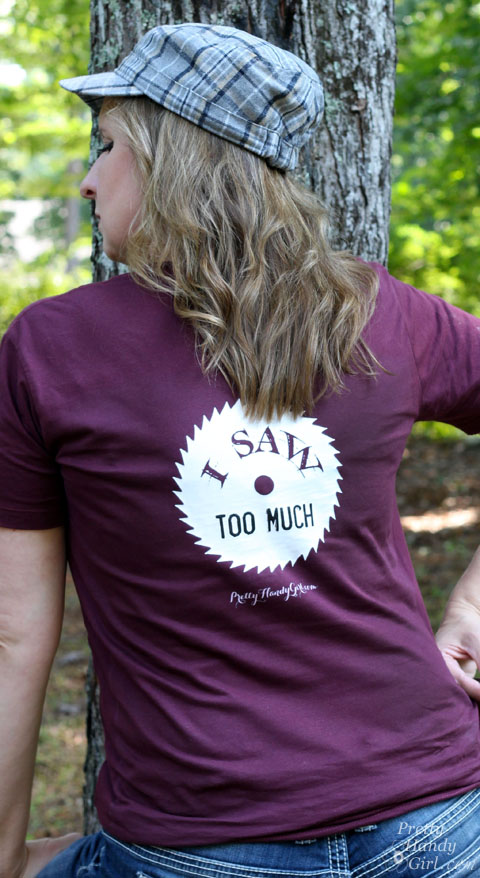
2. Plaid Military Cap This is my go to hat for bad hair days. The hat is lined with a satin lining and has a comfortable fit. I have a small head, so finding a hat that fits my youth sized noggin is huge! If you order this hat and you have a regular size head, order up a size.
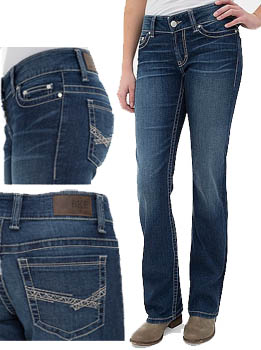
3. Buckle Payton Boot Stretch Jeans – Can we get a little personal here. I’m curvy, and I have a hard time finding jeans that a) won’t wear out in the thighs b) won’t ride so low they leave me with a muffin top. These are my favorite jeans. They look hip, but not too young. And I own two pairs that I wear almost daily. The price point is decent and they don’t accentuate my blogger butt. I’ve paid three times as much for a pair of jeans that ripped after only a year. When I die I want to be buried in these jeans!
4. PHG “I Saw Too Much” T-shirt – This is by far my favorite shirt that I designed. The Alternative Apparel shirt is lightweight, but not at all flimsy. It’s definitely a flattering cut on a woman. The same graphic is also available on a mens’ shirt. Oh hey, look! I’m wearing my favorite hat, jeans and shirt all in one photo! I told you I love them.
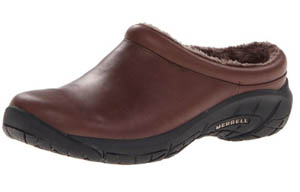
5. Merrell Women’s Leather Encore Slip-On Shoe Life is too short to walk around in cute and uncomfortable shoes. If you can’t tell by now, I’m all about the comfort over fashion. I am also lazy and despise taking an extra few minutes each day to tie and untie sneakers. For that reason, these are my favorite shoes. They feel like slippers, but have non-slip soles and leather exteriors. Merrell makes several slip on shoes in the Encore line. It’s up to you which style you like best!
For Your Picture Taking Abilities:
1. Canon EOS Rebel T5 SLR Digital Camera Pack If you are still holding out on buying an SLR camera, don’t wait another day. I have an older Canon T1 Rebel camera that I bought four years ago. It is amazing the difference it makes in my photography! Case in point. The picture on the left was taken with my point and shoot, and the right with my Canon Rebel T1 a few years later. The colors are more vibrant and the photo has a lot more depth. And the details are more crisp.

The Canon T1 is no longer manufactured, but if you see a used one grab it! I have bumped my camera more times than I can count. (Hello, I’m a DIY tutorial blogger, it happens!) I have purchased a few lenses (a Canon EF 50mm f/1.8 and aCanon EF-S 10-18mm Wide Angle Lens
) for my camera but have kept the same body.

2. Lightscoop Standard Version Bounce Flash – If you are trying to save money on photography equipment consider buying a Lightscoop instead of a camera mounted bounce flash. This little gadget clips onto the shoe for your flash and simply reflects the flash light onto the ceiling (or wall if you have your camera pointed sideways. I still don’t own a bounce flash and use this little guy a lot!

3. Induro AKB1 Tripod Believe it or not, this three legged creature has saved many a rainy day photoshoot! Plus, it let’s me take better selfies. If you finally upgraded to a SLR camera, you really need a good tripod. Indoor photography is tough without one. This is the tool that lets you get beautiful pictures in darker settings without having to raise your ISO (which can result in grainy photographs.)

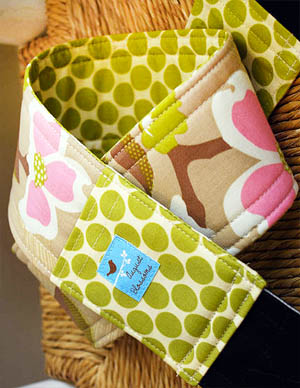
4. August Blossoms Camera Strap Technically this strap won’t improve your photography skills but it will safely hold your lens cap in the pocket and distinguish your camera from others that look the same. If you’ve ever been to a blogger event, a lot of us have the same camera. And personally, I think the cloth neck strap is a lot more comfortable on my neck.
For a Better Night Sleep:
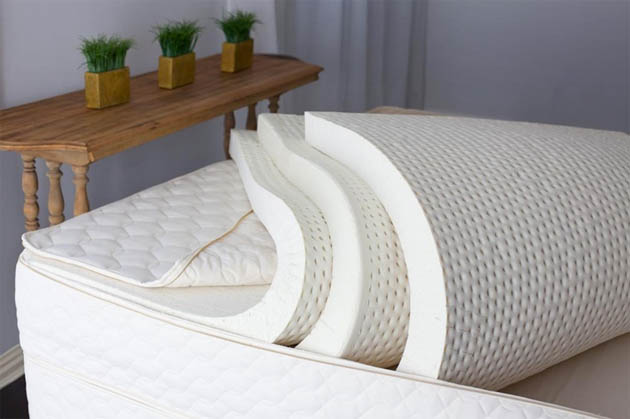
1. Savvy Rest Serenity Layered Latex Mattress If you’ve been an exceptionally good kid this year, why not ask for this mattress. You can tell Santa that you’ve reached the age where you need a good mattress that will last well into your retirement and beyond (20+ years.) We’ve been sleeping on our Savvy Rest mattress for a year now and I have to warn you that if you get one you won’t want to leave home anymore. I am so eager to get home and sleep in my own bed anytime I go away. I sleep much better and my hips and back thank me every morning.
2. Talalay Latex Foam Pillow This is the same pillow I’ve had for over 15 years! You’d think a 15 year old pillow would look flat and shapeless. And it would, except this pillow is a latex foam pillow and has the exact same shape as the day I bought it. For what it’s worth, I’m a side/stomach sleeper.

For Helping You Wake Up:
1. Jonathan Adler On the Go Coffee Mug This is my absolute favorite coffee mug. It fits in any cup holder. It keeps my beverage warm for a while. The fitted lid means less spills. And let’s be honest, it looks stylish!

2. Hamilton Beach 2-Way FlexBrew Coffeemaker I call this the marriage saver because I really wanted a Keurig to make quick cups of coffee. But, Pretty Handsome Guy prefers to make a pot of coffee in the carafe. I like mild coffee and he likes high octane coffee! When I saw this baby, I bought it immediately and now our marriage is saved!

I hope you found something to ask Santa for. Or you saw something to get as a last minute gift!
![]()
Disclosure: I was not compensated by any brands to write this post. These are my honest to goodness favorite things I own. In full disclosure, some of the links above are Amazon affiliate links.