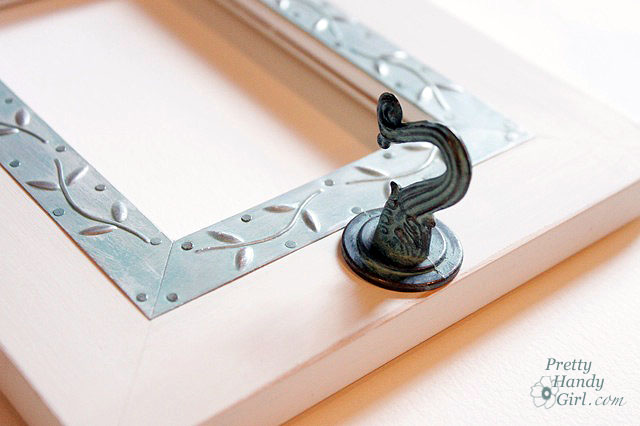

This little key hook frame was incredibly easy to make and would make a great gift for a new homeowner or that college student who is moving into a new apartment. (Or for that special someone who is always losing their keys.) Read more
This little key hook frame was incredibly easy to make and would make a great gift for a new homeowner or that college student who is moving into a new apartment. (Or for that special someone who is always losing their keys.) Read more

A few months ago when I got the call that Woman’s Day wanted to send a photographer to photograph me and my garage, I kind of freaked a little. I mean, it was my garage, the least attractive room in our house! Part of the unattractiveness stemmed from my workbench with a huge gaping hole in it.

It was suggested that I could just cover the hole with some fabric (which, yes, I could have done.) But, being that it is my workshop and a sawdust producing place, I felt I could do a little a little better than just some fabric. I decided to build custom doors for the opening. Luckily they turned out to be less of an involved project than I originally anticipated. (I love when that happens.)
Come on in the workshop and I’ll show you how I built these open frame cabinet doors. Read more

Today you have been invited to take a house tour at my friend Holly’s home. Holly is a good friend of mine, so luckily I didn’t have to beg too much for her to let us into her home. But, before we go in I want to tell you a little more about her. She wears many hats. She is a wife and mother of two boys first and foremost. But, she also runs Storywood Designs, a furniture refinishing business and Framed by Storywood, her Etsy Shop. She has a wonderful eye for color and design (which is evident in her furniture pieces and home décor.) When I first walked into her home, I knew I could live there and not have to change a thing.
Holly and her husband bought their 1980 home a few years ago. There were plenty of touches from previous owners that she worked with or covered in a creative way. I scanned the real estate flyer (sorry about the quality) to give you an idea what their house looked like when they bought it. The changes they made are phenomenal and yet they didn’t break the bank to do it.
Are you ready for the tour? Wipe your feet and come on it. Do you like the initial on her door?

She sells them in her Etsy shop!

Here we are in the living room, but this is what the room looked like a mere 3 yrs. ago:

And here is the living room today!


I know armoires are starting to go out of style, but this one is gorgeous with the cut out panels! If she ever tries to get rid of it, I’m grabbing it!

They painted the fireplace white and it really brightens up the room. See, I can appreciate a painted white fireplace, even though I repainted ours to look like brick.

I love all her fall décor. Especially the lit pumpkins on the hearth.

Beside the fireplace are sweet built-in cupboards and cabinets with wood countertops. It adds charm to the small niche.

Now we make our way into her kitchen — my favorite room and the most stunning transformation. This was the kitchen before:

Get ready to catch your jaw before it hits the floor.


The pendant light adds lots of warmth and texture to the space.

Adding corbels under the upper cabinets was a genius idea for adding instant charm. I am itching to do the same thing to our kitchen cabinets. When I do, you can be sure I’ll share a tutorial.


Holly and her husband made the kitchen table. The wood was whistling for my attention the entire time I was photographing the kitchen. And with lines like this, how could I help but stare?


By removing many of the upper cabinet doors they made the kitchen feel larger and more airy.


Did you see those little decorative tiles? Would you believe that they had hideous country scenes before. Holly simply painted over the scenes and added a stencil! What a smart idea!


Just in case you wondered (because I definitely wanted to know), the base cabinets got a coat of white sage paint by Olympic. (Holly says that Olympic discontinued the color so Lowe’s had to custom mix it in their kitchen and bath enamel paint.) The top cabinets and walls are painted Benjamin Moore Lancaster White.

Setting out a little lamp adds some warmth to this corner of the kitchen.

The breakfast area has built-in benchs on two sides. The pillows make the space feel cozy.


One of Holly’s frames turned into a chalkboard:

Okay, right this way to the dining room.

I really want to display my blue and white china like she has done on this wall.

Adjacent to the dining room is her sitting room. Here is the before picture of that room:

She and I (well mostly Holly) just repainted the room a very neutral gray. I can’t believe what a big difference it made.


The china cabinet is a recent refinishing project that Holly just completed. The distressing on this piece is perfect!

Check out those layers of paint and glaze. Scrumptious!

And the bowed front and curved glass make this cabinet unique.

Speaking of distressing, here is another one of Holly’s tables that she refinished. This little table would make a perfect breakfast table or just a side table. It is for sale right now!
I’m jealous of her talent. Maybe I can convince her to take me as her understudy.

Thank you Holly and family for letting us tour your home. Your hard work really shows in your beautiful home.

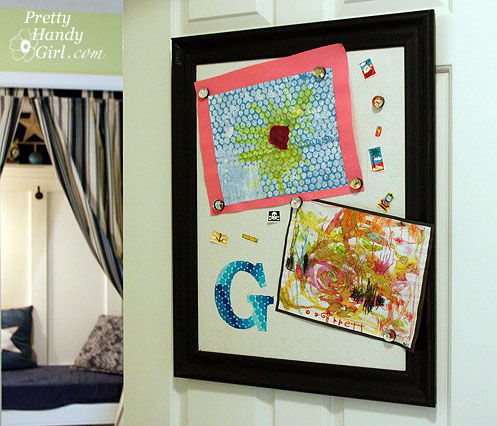

I don’t know about you, but I’ve been fighting a losing battle lately. I have begged, yelled, and threatened my boys to stop putting stickers and tape on the walls.

I think my youngest one upped me, he put tape and stickers on his door! I had given up the battle until I came across this magnetic chalkboard from Less-Than-Perfect Life of Bliss:

And this burlap bulletin board from Between Blue & Yellow:
Those two boards got me thinking. If I married the two ideas, I could have a magnetic fabric display board! Luckily I have a stash of old picture frames in the attic. I grabbed the biggest one I had and painted it black and within a few hours I had a magnetic display board for my son’s door!

Here is how to create your own:
Materials:

*Be sure to bring a magnet to test the sheet metal. Some of them aren’t magnetic.
Instructions for making the magnetic frame:
Start by measuring the opening in the back of your frame. Mark those measurements on the sheet metal using a sharpie marker.

Using tin snips, cut the sheet metal. Believe it or not, this was very easy, but gloves are a must because the edges are sharp.

Cut out the drop cloth about two inches larger than the sheet metal. Trim the corners off the fabric.

Fold the edges over and secure with Duct Tape.

Did you know that Scotch has a whole line of Duct Tape? There are five different kinds, and they each have a different use! REALLY! See for yourself.

I didn’t know about them either until they sent me these to try out. I haven’t used them yet, but I will be soon. And I promise to tell you what I honestly think. Until then, I wonder how I could make them into a cool vase.
Instructions for Applique Monogram:
To add an applique to the fabric, print out a large letter from your computer. Then fuse a square of fabric (large enough to fit the letter onto) to the double sided fusible interfacing. Follow the instructions on the interfacing package.

Pin the printout on top of the fabric and cut it out.

Peel the back off the interfacing …
![]()
…and iron it onto your fabric covered sheet metal.

Make sure the letter is securely fused to the drop cloth.

Insert the board into the frame.

Secure the board into the frame by using a staple gun and stapling at an angle into the frame.

Add a wire or hanger to the back of your frame.
Hang the frame on the wall, door, or wherever you like. Because I was hanging the display frame onto the door (and because 4 year olds are notorious for slamming their doors), I added some double stick foam tape to the back side of the frame.

YES, I know what I said, but Mommies are allowed to use tape ;-).

I used some of the glass bead magnets we made last summer and now my son can put up his artwork and stickers without incurring the wrath of Mommy!

Now that is what I call one handsome art display!
Looking for some more creative ideas for displaying your child’s artwork? Check out my article on Parentables today: 8 Great Ways to Display Your Child’s Artwork.

It’s a jolly good day, wouldn’t you say?! Did you watch the Royal Wedding this morning? Or did you DVR it to watch later (like I did.) I hope you enjoyed my photos from London and didn’t mind the diversion.
Now I’m back into DIY tutorial mode for the time being. Today you can get a double dose of Pretty Handy Girl! Can I get a “WOOT!”
First up I will be showing you how to make Cubby Shelves out of a Bread Crate and a wooden pallet.
And the best part about this project is it doesn’t require any nails or screws! To view this tutorial you will want to head over to visit with the very lovely and very beautiful Amy from Positively Splendid.

Not only is she as beautiful as Kate Middleton, but she also possesses the talent to create a royal wedding gown. Too bad Kate didn’t call her to design her dress. Amy is a sweetheart and a fellow blogger I met at Blissdom. You will just love her blog!
After you have read my tutorial (and gobbled up several of Amy’s tutorials) you can slip back over here to learn how to hang almost anything on the wall perfectly level and plumb the first time. I’ll be showing you how I hung my bread crate cubby shelves in the tutorial.

Let’s begin, shall we?
Materials:

Picture Hangers (be sure to check weight limit)
Hammer
Level
Pencil
If your object doesn’t have hooks or a wire yet, you will likely need:
D-ring hooks
Screwdriver or Drill with a screwdriver bit.
If you have had misadventures hanging pictures, I have the tutorial for you! Hanging anything on the wall successfully doesn’t have to be hard. All you need are the right hangers and the right technique.
Because my crate didn’t have any hangers attached to it, I needed to add D-ring hooks. Starting on the left, I carefully measured 3″ down from the top of my object. Then made a mark 4″ in from the side. I repeated the same steps on the right side making sure the hooks would be the same distance in from the edges and 3″ from the top edge.

Then I screwed the D-ring hooks into the back of the crate.

Hanging something heavy requires using some different hangers that are rated for the weight of the object you are hanging. Bulldog Hardware sent me some of their rubberized picture hanging hooks to try. These have rubberized tips to keep pictures from shifting or moving (like when my son rushes inside slamming the door behind him.)

In my case, my crate weighs about 12 lbs. filled up. So, I reached for two 50 lb. hangers (Did you forget I have boys that can exert up to 100 lbs. of pressure on anything in my home?)
Start by holding your object up against the wall where you want to hang it.
Make a pencil mark at the top of your object. Set your object down.

Now determine what you want to center your object on. For example: centering the object on a wall; centering it between two windows; or centering your object on another object. In my case I am centering my shelf on the toilet.
Find the center and make a pencil mark.

Set your level vertically against the center mark.

When the level reads perfectly plumb (straight up and down) you can transfer the center mark higher and closer to the top of your object.

Now, measure the distance between the hooks on your object.

Mine are 3″ down from the top. And let’s say the hooks are 16″ apart.
This tells me I need to install my picture hangers at 3″ down from the top of the object and 8″ out from the center mark on both sides.
 Use the level to make sure that both marks are level.

Set the picture hanger against the wall so the bottom of the hook lines up with the marks you made.

Gently tap the nails in with a hammer.

Carefully lift your object and line up the D-ring hooks with the picture hanger hooks. Sometimes it helps to have an assistant for this part.

Pull down on your object and make sure it is secure. Now fill ‘er up and enjoy!

What do you think? Did this method make sense? You can certainly use the same technique to hang pictures or a group of pictures.
