Hey guys and gals, I have a special guest for you today! Today I have a real life Handy Man today. That’s right we’re bringing in a little testosterone to mix things up.

This is Jeff aka Pretty Handy Man:

Jeff writes Home Repair Tutor, a blog that shares tips on saving time and money when doing home repairs. He shares his experiences, both good and bad, to help you with what sometimes seems like overwhelming home repair projects. He also likes the Steelers, (I’m supposed to tell you that because guys find that stuff important. So, if you hate the Steelers, boo on you. Can you tell I’m naive on how to talk sports?)

Plus, he always adds a little humor to his videos. (My favorite is garage door testing the unorthodox way. Don’t you just love a man who isn’t afraid to ride a pink bike?)

I’ve been following Home Repair Tutor for a few months now and Jeff’s recent post about garage door maintenance saved me some cash. I had been trying to solve why my garage door was running so rough and had already replaced the rollers. But, Jeff had one tip that I had forgotten to do: Lubricate all the moving parts! Duh, a few squirts of lubricant had the doors rolling smooth again. I hope you’ll check out his blog and follow along. You won’t be disappointed.

So, today I give you handy man and comedian, Jeff from Home Repair Tutor! Woooohoo!

Thanks Brittany for the opportunity to guest post on Pretty Handy Girl. You’ve set the bar high for home remodeling tutorials and I hope to empower your fans with another great DIY project. But first let me briefly introduce myself.

My name is Jeff Patterson and my remodeling blog is Home Repair Tutor. In my spare time I manage and fix my own older rental homes here in the Pittsburgh area. I’ve been doing this for almost a decade and have experienced numerous projects that include kitchen remodels, bathroom installations, hardwood floor restoration, and more. My goal is pass along all the tips and tricks that I’ve learned so others can benefit.

Today’s post deals with a project that anyone can do:

Replacing Garage Door Extension Springs

Garage Door Extension Spring Repair

A squeaky garage door has a penetrating sound that can drive anyone crazy. The average garage door is opened and closed over 600 times every year. This repetitive action is what leads to the creaks you hear on a daily basis.

But regular maintenance can help your garage door run smoothly and safely. Two of the most used items on your garage door are the extension springs that help lift and lower it. Extension springs are found on most traditional roll up garage doors. They’re dangerous if not properly maintained since they hold a tremendous amount of tension.

(Pretty Handy Girl notes: Torsion springs are the other type of garage door springs. They run directly over the garage door opening on a rod. Serious injury can occur if you don’t know what  you are doing or have the right tools to replace a torsion spring. In my opinion, these should be left to the pros.)

This tutorial will take the mystery out of how garage door extension springs work and will show you how to safely replace them on your own without spending a ton of money. By the end of this post you’ll confidently be able to perform this home repair project, and tell your neighbors you’re a garage door Jedi :).

Are Your Garage Door Springs Misbehaving?

This tutorial is going to address garage door extension springs that run along the door’s horizontal track. But how do you know if your springs need replaced?

The picture below is a good example of what a spring looks like at the end of its life cycle.

Warped Garage Door Springs

If this spring breaks it will release an extraordinary amount of tension that can be unleashed on a person or item in your garage.

Another sign of worn springs is creakiness or uneven closure of your door. Bad springs can put pressure on the garage door rollers and cause them to screech. If one spring is bad but the other is in good shape the door may close unevenly, too. You’ll notice this if the door is closed and one side is higher than the other.

Extension springs are colored coded. In my case the springs had red paint sprayed just on one end, and this indicated that we had a 150 lb. garage door.

Garage Door Springs are Color Coded

You can go to Home Depot and buy your replacement extension springs based on the color code. The picture below shows the wide range of springs you can buy.

Garage Door Extension Springs are Sold Based on Their Color Code

Now that you know how to choose your springs you can get started on your project.

Become a Jedi of Garage Door Springs

But even Yoda would agree that safety comes first.

Completely open your garage door and unplug the power cord to the opener.

Place a C-clamp on each track underneath the the bottom garage door roller. This will prevent the door from rolling down to the ground in the next step. For extra protection you can put a step ladder underneath the center of the door.

Use a C-Clamp Underneath the Bottom Garage Door Roller

Pull down on the garage door’s manual safety release. This allows the garage door to be moved up and down without the help of the opener.

Pull Down on the Garage Door Manual Safety Release

The door weight should now rest on the C-clamps.

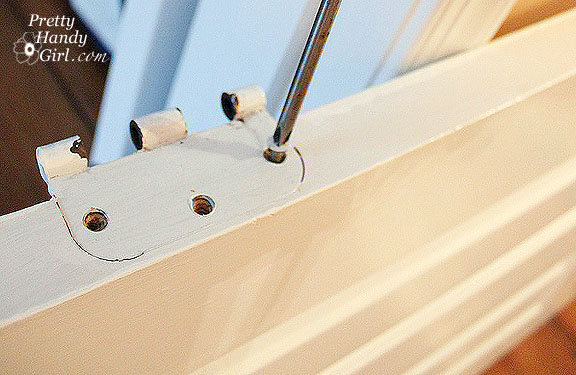
This next step is a smart tip that will ensure your extension spring installation was done correctly. Place a piece of blue painter’s tape on the garage door track underneath the pulley that’s attached to the extension spring. Then place a mark on the tape to indicate the center of the pulley’s bolt.

Place a Mark on the Tape to Indicate the Center of the Pulley's Bolt

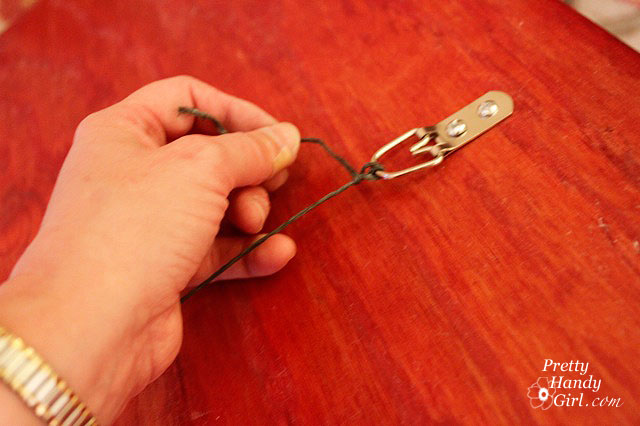
Since the spring has no tension in it you can safely remove the steel safety cable that runs through it. This cable is in place so that if your garage door spring snaps it won’t shoot across the room and hurt someone. The safety cable runs through the spring. It’s tied to the horizontal support bracket closest to the garage door opening on one end and is simply tied to the vertical support bracket on the other end.

Before removing the safety cable from the support brackets you should take pictures of how it was tied together. This will help you when you have to re-tie it after the new extension spring is installed. I also numbered the holes on the vertical support bracket as 1 & 2 to help with this process.

Take a Picture of the Steel Cable Before Undoing It

Since the steel safety cable will only need to be removed from the horizontal support bracket I also decided to make a reference mark on it. This mark will allow you to reinstall the safety cable to how it was originally setup.

Place a Reference Mark on the Steel Safety Cable

The next step is to remove the garage door extension spring.

There’s a steel cable connected to the bottom of your garage door. This cable runs over a stationary pulley that’s attached to your garage door track. This steel cable continues until it goes over and around a second pulley that’s attached to your extension spring via a pulley fork. The steel cable then is attached to the horizontal support bracket via an S-hook. This S-Hook is also attached to a three hole adjusting clip.

Mark where the S-hook was positioned on the support bracket then remove it.

Mark the Position of the S-Hook Then Remove it From the Support Bracket

Now you need to disassemble the pulley that is connected to the spring. This is simple but again take a picture of your configuration for reference. Remember that the steel cable that runs from the bottom of the garage door goes over the top of the pulley then to the horizontal support bracket. You’ll need two wrenches to undo the nut and bolt that hold the pulley to the pulley fork.

Remove the Pulley from the Pulley Fork by Undoing the Nut & BoltRemove the pulley and pulley fork from the extension spring. The spring can now be taken off the eye bolt hanger. The eye bolt hanger is attached to the vertical support brackets that come down from the ceiling.

Remove the Extension Spring from the Eye Bolt

The picture below shows the old spring on the left and the new spring on the right. Is there any doubt the extension springs needed replaced? 🙂

Old Versus New Garage Door Extension Spring

A New Era of Garage Door Efficiency Begins

The installation of the new spring, as you can imagine, is opposite that of the removal process. It’s easy but requires attention to detail.

Attach the non-color coded end of the spring to the eye-bolt and run the steel safety cable through it.

Pull the steel safety cable through the vertical support bracket. I labeled the two holes the steel cable will pass through.

Hole 1 has the cable going through it right to left. The cable should then pass through Hole 2 from left to right.

Position the Steel Safety Cable Through the Support BracketA loop is created. Thread the cable back through this loop. Notice the black reference mark that was made on the cable. I used pliers to pull the wire tight such that this mark stops short of going through Hole 1.

Thread the Steel Safety Cable Through the Support Bracket

Pull the steel cable through the hole on the far side of the support bracket.

Weave the cable back and forth in the same manner as it was before being removed.

Tighten the Steel Safety Cable to the Support Bracket

The other end of the steel safety cable that runs through the extension spring should be tied to the horizontal support bracket closest to the garage door opening.

This next part is where your attention to detail is somewhat critical.

Place the pulley fork onto the color coded end of the extension spring. Ensure the plastic bushing that has the steel safety cable running through it is facing away from the garage door track.

The Plastic Bushing on the Pulley Fork Must Face Away from the Garage Door Track

Pull the steel cable that comes from the bottom of the garage door over the top of the pulley. The S-hook and 3-hole adjusting clip attached to the steel cable should be hanging down from the pulley.

Make sure this steel cable is not twisted with the steel safety cable. (I didn’t check for this and had to undo the entire pulley/pulley fork assembly — not fun.) The steel cable should run freely from the stationary pulley closest to the garage door opening to the pulley that will be connected to the extension spring.

Position the pulley into the pulley fork then place the nut onto the pulley fork so that it is next to the plastic bushing.

Place the Nut for the Pulley on Top of the Pulley Fork Next to the Plastic Bushing

Pass the bolt through the pulley fork and pulley. Tighten the nut and bolt until they’re secure.

Attach the S-hook & 3-hole adjusting clip to the horizontal support bracket where it originally was located.

Place the S-Hook & 3-Hole Adjusting Clip into the Support Bracket

At this point you can use the reference mark on the blue tape to check the tension of the steel cable. In this case the pulley’s bolt lined up perfectly with the mark and tension was good to go.

Check the Tension of the Garage Door Extension Spring

The tension of the garage door springs can be adjusted by doing the following:

  • Move the S-hook to different holes in the horizontal support bracket
  • Adjust the cable in the 3-hole adjusting clip connected to the S-hook (this is a pain!)
  • Moving the eye-bolt up or down on the vertical support bracket. Do this with the door open and C-clamps on the tracks. (Moving the eye-bolt up will increase tension while moving it down releases tension)

Use great care when adjusting the spring tension. As mentioned before, garage door extension springs can cause serious injuries and that is the last thing anyone wants. This is a safe project to perform as long as you follow all of the steps :). Remember that both extension springs need to replaced at the same time. So, while this tutorial only shows one spring being removed you need do the above steps for the second. Otherwise your door may close unevenly. Besides, if one spring is bad, chances are the other isn’t in good shape.

Queue the Chariots of Fire Theme Song

Plug your garage door opener into the outlet and remove the C-clamps. Hold your breath (just kidding) and hit the garage door opener. With any luck you’ll see the garage door close smoothly, safely, and with a resounding feeling of accomplishment.There’s a chance that your door may not close completely due to the new springs having more tension than the old ones.You can adjust how far the door travels by turning the adjustment screws on the door opener.
Adjust the Travel of Your Garage Door by Turning the Travel Screws

Now you know how to safely replace your garage door extension springs. Give yourself a high five! New springs will help your garage door run smoothly and efficiently while eliminating annoying squeaks.

For more garage door maintenance tips, you can read my post on regular garage door maintenance.

If you have any questions please feel free to ask them in the comment section, I’d be more than happy to help you with your project.

Thanks again Brittany for the opportunity to bring this tutorial to your fans. Hopefully this showed that it’s not difficult to do any project when you’ve got the right mix of patience and curiosity.

Make it a great day!

Thank you Jeff, what a great tutorial! I can always count on Home Repair Tutor to help me learn something new.

Keeping with the theme of garage door repairs, I’ll have a tutorial on how to replace your garage door rollers on Friday! And how I fought the garage door and I won!

Stay tuned and don’t touch that dial (bonus points to anyone old enough to know what the heck that means.)

Happy Wednesday! Something kind of exciting happened to me yesterday. Woman’s Day sent a photographer, an assistant and a stylist to photograph me and my garage. They worked together like a well-oiled machine and made my garage more beautiful than I could ever imagine! If you follow me on Twitter, Facebook or Instagram (@PrettyHandyGirl), I snapped a few photos with my cell phone. I am still in the “I’ll believe it when I see it mindset.” But, this was for a small feature on organization for the September issue. Honestly, I’m a little concerned that the editor will take one look at the photos and drop them in the garbage. After all, it is the LEAST attractive room in my house! But, the editor assured me that they really want to show an organized garage space. So, I’ll be sitting on pins and needles until the issue comes out.

Two weeks ago I got an email from someone at Woman’s Day expressing interest in my garage. She politely asked if I could make a few changes to complete my workbench. They were all changes that I had wanted to do eventually. But, that date suddenly became last week. So, I put my tail in high gear and added those finishing touches to my workshop.

This was the workbench area of our garage before: Read more

Today you have been invited to take a house tour at my friend Holly’s home. Holly is a good friend of mine, so luckily I didn’t have to beg too much for her to let us into her home. But, before we go in I want to tell you a little more about her. She wears many hats. She is a wife and mother of two boys first and foremost. But, she also runs Storywood Designs, a furniture refinishing business and Framed by Storywood, her Etsy Shop. She has a wonderful eye for color and design (which is evident in her furniture pieces and home décor.) When I first walked into her home, I knew I could live there and not have to change a thing.

Holly and her husband bought their 1980 home a few years ago. There were plenty of touches from previous owners that she worked with or covered in a creative way. I scanned the real estate flyer (sorry about the quality) to give you an idea what their house looked like when they bought it. The changes they made are phenomenal and yet they didn’t break the bank to do it.

Are you ready for the tour? Wipe your feet and come on it. Do you like the initial on her door?

She sells them in her Etsy shop!

Here we are in the living room, but this is what the room looked like a mere 3 yrs. ago:

And here is the living room today!

I know armoires are starting to go out of style, but this one is gorgeous with the cut out panels! If she ever tries to get rid of it, I’m grabbing it!

They painted the fireplace white and it really brightens up the room. See, I can appreciate a painted white fireplace, even though I repainted ours to look like brick.


I love all her fall décor. Especially the lit pumpkins on the hearth.


Beside the fireplace are sweet built-in cupboards and cabinets with wood countertops. It adds charm to the small niche.


Now we make our way into her kitchen  — my favorite room and the most stunning transformation. This was the kitchen before:


Get ready to catch your jaw before it hits the floor.


The pendant light adds lots of warmth and texture to the space.


Adding corbels under the upper cabinets was a genius idea for adding instant charm. I am itching to do the same thing to our kitchen cabinets. When I do, you can be sure I’ll share a tutorial.


Holly and her husband made the kitchen table. The wood was whistling for my attention the entire time I was photographing the kitchen. And with lines like this, how could I help but stare?


By removing many of the upper cabinet doors they made the kitchen feel larger and more airy.


Did you see those little decorative tiles? Would you believe that they had hideous country scenes before. Holly simply painted over the scenes and added a stencil! What a smart idea!


Just in case you wondered (because I definitely wanted to know), the base cabinets got a coat of white sage paint by Olympic. (Holly says that Olympic discontinued the color so Lowe’s had to custom mix it in their kitchen and bath enamel paint.) The top cabinets and walls are painted Benjamin Moore Lancaster White.


Setting out a little lamp adds some warmth to this corner of the kitchen.


The breakfast area has built-in benchs on two sides. The pillows make the space feel cozy.


One of Holly’s frames turned into a chalkboard:


Okay, right this way to the dining room.


I really want to display my blue and white china like she has done on this wall.


Adjacent to the dining room is her sitting room. Here is the before picture of that room:


She and I (well mostly Holly) just repainted the room a very neutral gray. I can’t believe what a big difference it made.


The china cabinet is a recent refinishing project that Holly just completed. The distressing on this piece is perfect!


Check out those layers of paint and glaze. Scrumptious!


And the bowed front and curved glass make this cabinet unique.


Speaking of distressing, here is another one of Holly’s tables that she refinished. This little table would make a perfect breakfast table or just a side table. It is for sale right now!

I’m jealous of her talent. Maybe I can convince her to take me as her understudy.


Thank you Holly and family for letting us tour your home. Your hard work really shows in your beautiful home.

Removing a door’s hardware (knobs, latch assembly, hinges) is really a piece of cake if you know what you are doing.

There are several reasons you might need to remove a door from its hinges:

  1. The lock is broken and you can’t open the door.
  2. You want to replace your door.
  3. You want to replace the hinges.
  4. Your six year old was warned that if he slams his door one more time he will lose the door (true story).
  5. You want to repaint the door.

When I decided to give my downstairs half bathroom a makeover, I knew I needed to paint the door as well. The easiest way to repaint a door is to remove it from the hinges, remove all the hardware, and lay it flat on sawhorses and paint horizontally.

Before I show you how to paint the door, I will share with you how to remove the door, hinges, and the door knobs (or locksets if it has a key hole). How to remove the locksets is a helpful skill to learn should you wish to replace your door knobs, deadbolts or locksets.

Letting you in on a little secret: Speaking of replacing locksets, did you know that if your house has several different locks you can have them rekeyed to just one key as long as they are all the same brand? When we moved into our home we had three different locks (2 Schlage and 1 Kwikset) and keys to only ONE lock! Arrggghhhh!  Unfortunately, I didn’t have the keys for either Schlage locks.) But, I really wanted to change the locks for the whole house. When I got a quote from a locksmith, I nearly passed out. $250 to get all our locks to match and to cut a few spare keys!

I thanked them and hung up. So, here is what I did. I bought one new Schlage lockset (handles and deadbolt set) for the Kwikset door. Then I took the locksets off the other two doors and brought them to a local locksmith (Busse’s Lock Service in Raleigh.) They were able to rekey both locks using my new Schlage key. The cost was under $50!

Photo courtesy of Handlesets.com

Later when the old lock on our front door broke, I ordered new ones from Handlesets.com (they sell all types of door hardware) and the customer service rep helped me enter the code from our master key when I placed the order. That way my new locks would match the rest of our house. Best of all they didn’t charge extra to for that service!

Sorry for the diversion, but I really wanted to let you in on that little secret.

Removing the Door Handles and Latch Assembly:

There are several types of door handles, you will need to inspect yours to determine how to remove it. Most door handles have screws on the interior side (for safety reasons, you definitely want them on the interior) that you unscrew to release the handles. Our door handles are a little different, but almost as easy to remove.

Insert a flat head screwdriver into the little slot on the side of the handle.

Pull the handle out and away from the door until it releases.

Unscrew the collar (also called a trim piece or escutcheon – yup, there is that word again!) that is up against the door until it comes off. You might need to use pliers to coax it free.

When it releases from the threads, remove the collar (ring, trim piece, escutcheon, WHATEVER.)

Gently pull the other handle off.

To remove the latch assembly, unscrew the two screws above and below the latch.

Gently pry the latch assembly out.

And remove it being sure to keep the screws with the latch.

Removing the hinges:

If you have the type of door hinges that the pin can be removed from, follow these instructions. If not, you will have to unscrew the hinges from your door (but don’t worry, I’ll show you how to do that in a minute.)

Removing the hinge pin is a snap. I use a flat head screwdriver and a hammer. Set the screwdriver just below the head of the pin and tap it lightly with the hammer until the screwdriver can fit below the head. If you can’t get the screwdriver under the head of the pin, insert the screwdriver into the bottom of the hinge and tap the bottom of the pin up slightly. Then angle the screwdriver end up and the handle down. Continue to tap on the screwdriver handle with the hammer until you can release the pin*.

*Oh, and before you remove all the pins, you may want to ask someone help hold the door while you remove the pins from the other hinges. Not that I’ve ever made that mistake (uh, okay, maybe I did.)

Remove the other two hinge pins and gently pull the door off the hinges.

Use a screwdriver or cordless drill with a screwdriver bit to remove the hinges from the door and door frame if you are painting the trim as well.

I ran into a few painted over screws that I couldn’t turn. Here is how to deal with those little buggers.

Lay your door on it’s side with the hinge facing up. Fit a screwdriver into the screw slots as best you can.

Then use a hammer to bang on the other end of the screwdriver.

This will either crack the paint or make enough of an indentation that you can turn the screw.

Be sure to keep all your hinges and screws in a separate bowl or bag.

Now you are ready to paint your door or paint your hardware (Like Beckie at Infarrantly Creative did HERE) or both! More tutorials to come.

When Miss Mustard Seed and I were junkin’ on Black Friday, she asked what I was looking for. I immediately answered rustic, rusty, and anything that looks aged and has a story to tell. I am so wacky like that, I could care less how well something is made or if it is an expensive antique. When I die, my kids are going to be sadly disappointed that all these antiques I’ve collected over the years aren’t worth a dime. C’est la vie, right?

So, this year for our Christmas décor, I decided to create a natural rustic country inspired theme. What better way to invoke that spirit than with an old barn door. The only problem was that I didn’t own one. No problem, I’d just make one!

Materials:
Plywood board – painted or stained red
3 – 1″ x 4″ boards – painted or stained red
Nails or screws
Wood glue
D-ring picture hangers
Picture Wire
optional: Rusty door parts

In my “I can’t throw anything away scrap pile” I took some old plywood scraps that had been stained with red stain.

You will need to measured the space above your mantle, subtract a few inches from the top and bottom, then cut the plywood down to size (using a circular saw or table saw.)

Lay two 1″ x 4″ strips of plywood as cross pieces.

And one 1″ x 4″ piece at an angle. Draw a line where the horizontal pieces intersected with the diagonal piece.

Use a miter saw, circular saw or jig saw* to cut the angled cuts.

Liberally appy glue to the back of the 1″x4″ strips to secure them to the plywood base and then nail some finish nails into the strips to secure them. You can use a pneumatic nailer* if you have one, but screws or regular nails hammered in will work just as well! No need to buy any new tools for this project.

Hopefully you have a nail or hook already installed on your fireplace. Luckily I did, but in the past I have also just leaned artwork against the brick. So, if you choose to lean, ignore the next few steps.

Measure the location of the hook on your mantle. For example, if the hook is 20 inches from the ceiling, and you want your barn door’s top to hang 12 inches from the ceiling, then you will need to install the hooks 9 inches down from the top of the barn door. This will allow an inch for the wire to slack. Get out your D shaped picture hooks and screw them to the back of your barn door using a cordless drill* or just a screw driver and some muscles. Repeat on the opposite side.

Feed some metal picture wire through one D ring. Twist once…

…then feed the wire back through the D ring and twist the rest of the wire tightly against itself.

Pull the wire taught and repeat on the opposite side.

This is the best way to attach picture wire so it doesn’t slip. If you are hanging something super heavy, you might need to loop the wire back through the D rings a few more times.

If you have some old gate handles, hinges, or latches, attach them to your door. I screwed this old RUSTY gate lock to the top of my barn door. It makes a convenient hanger for…

…my Christmas wreath!
That’s all I’m going to show you of our mantle today.

Did you like this post? Want to be notified when there are more fantastic tutorials by Pretty Handy Girl? Sign up to receive emails in your inbox:

Enter your email address:


Delivered by FeedBurner

Or follow me on Twitter or Facebook so you can be the first to know!