Reinforcing You Door is Easy

Reinforce an Entry Door

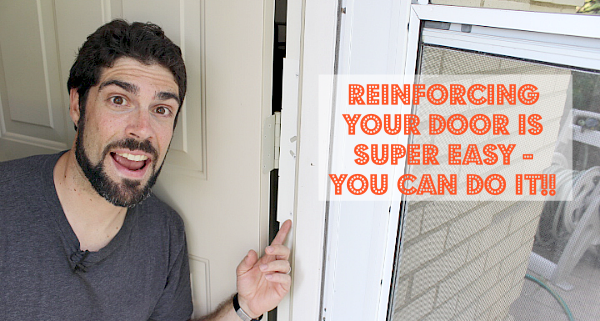
Burglar proofing your home is easy. Especially f you have a gazillion dollars to hire security guards, attack dogs and a web of lasers. Ahh, to dream a dream. But, for those of us who actually have a budget there’s a quick solution. And it’ll help you sleep a lot easier at night.

Having a home invasion is nerve wracking to say the least (yes, I’ve experienced this), I understand the fear many homeowners face:

A  passionate desire to keep our family safe from all the badness in the world.

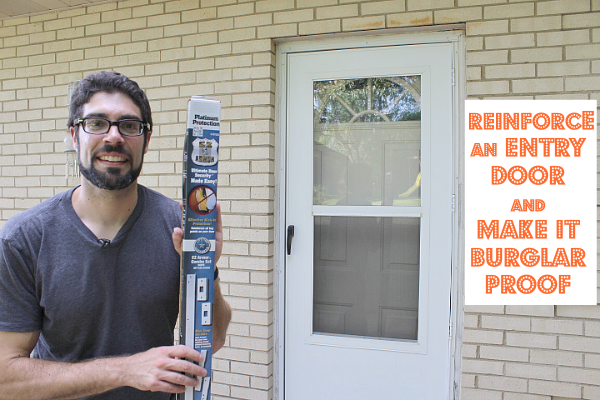
Think about this, in many instances the only things stopping a robber from kicking open your front door are 1/2 inch screws, some thin metal (in the form of hinges and  strike plates), and at best a wimpy 1 inch piece of wood called your door jamb. Um, I think my 74 year old dad could kick open most people’s doors.

Today I’ll walk you through the installation of EZ Armor (affiliate link). And How to Reinforce an Entry Door and Make it Burglar Proof!

EZ Armor is a door reinforcement kit you can buy for $69. You need limited tools and 15 minutes.

Here’s a supply list to help you get started:

(I’ve included affiliate links for your convenience. I earn a small percentage from a purchase using these links. There is no additional cost to you. You can read more about affiliate links here.)

I promise you’ll boost your home’s safety by leaps and bounds by using EZ Armor. It only take a few minutes to understand why.

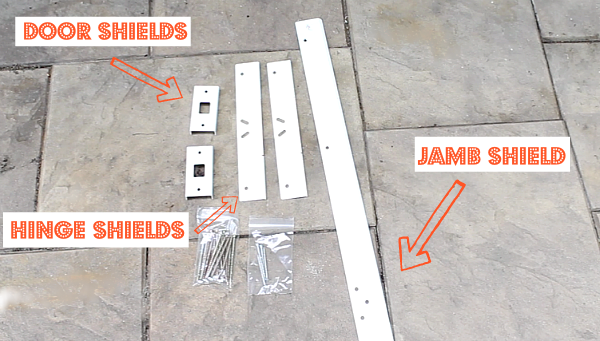
The EZ Armor kit I bought came with the following accessories:

  • Jamb shield (1)
  • Hinge shields (2)
  • Door shields (2)
  • 2 1/2 inch screws (4)
  • 3 1/2 inch screws (17)

Reinforce an Entry Door and Make it Burglar Proof

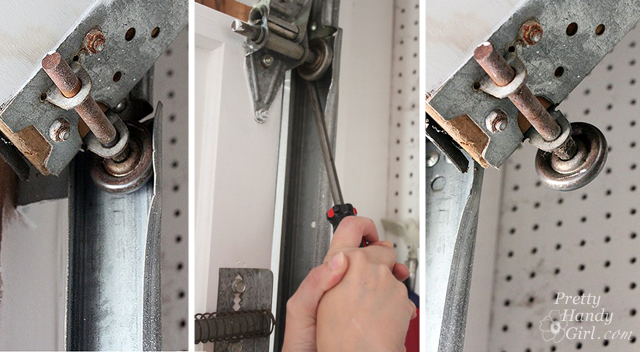
Okay, if you’re an excitable DIYer like me you might dive right into the installation. You can watch the video or read the photo tutorial below:

Read more

Ilkley_postcard

I’ve known Karen and her sister Anne since fourth grade. Karen was my best friend growing up and ultimately, my maid-of-honor. Anne is her older sister. During play dates, Karen and I were silly girls who avoided (the more mature) Anne, as we played top secret spy games under the stairs. After high school, Karen and I only saw each other every few years. I rarely saw Anne, especially after she met the love of her life in Japan and followed him to his childhood home in England. Anne and Chris settled into a beautiful old row house in Ilkley, UK, where they are raising their daughter and two twin boys. It has been years since I’ve seen Anne, but when we were contemplating our trip to the UK this summer, I thought it would be fun to look her up and visit with her and her family. We had such a wonderful visit with them and I fell head over heels in love with their home.

blue_doorway

I begged them to let me share their home on the blog, so be sure to thank them!

violets_doorstep

Come right this way, I have one of those antique keys to unlock the front door. Can you imagine how many generations of families have used this same key hole?

keyhole_brass_plate

The first thing you notice as you walk in the door is the amount of beautiful wood, molding and character in their home. Read more

D_Lawless_hardware_giveaway

The winners of the D. Lawless Hardware giveaway are:
Mary Glidden & Lora Wikle!

Congratulations gals, I hope you have an easier time deciding on what you’ll purchase with your gift certificate.

For the rest of you, Mr. Lawless himself has been kind enough to give y’all a discount code you can use to get 10% off your order! Simply use “prettyhandy” in the coupon code field at checkout. Visit DLawlessHardware.com to see all the beautiful hardware they sell.

Thank you so much for helping me decide which cabinet hardware I wanted for my kitchen. I appreciate each one of your suggestions and votes. I think I chose the ones that received the majority of the votes, but honestly it was more helpful to read your responses and realize that I either agreed or disagreed. It’s like when you go to a restaurant and you ask the waiter which of two meals he would recommend. And when he answers mac & cheese and you suddenly feel let down because you really wanted the hamburger. Yup, it was kind of like that situation.

And…the hardware I chose is:

chosen_drawer_pulls

If you can’t tell from the photo, I chose choice E! I really liked the little screw head pulls, but ultimately I liked the feel of the larger bronze pull in my hand. And you knew I couldn’t resist the bling! It will be glass octagonal knobs for this girl.

bronze_pull_glass_knob

I’m also very honored that D.Lawless has agreed to work with me and supply the hardware for my kitchen. It was really nice of them, but I want you to know that I approached D.Lawless Hardware because they are all about quality, service and price. I’d recommend D.Lawless Hardware to my friends (which means all of you.)

Have a great rest of your week! I’ll be crawling around on all fours installing flooring in our kitchen if you are looking for me.

PHGFancySign


Disclosure: I will be receiving hardware for my kitchen cabinets in exchange for posting about D.Lawless hardware. I was not influenced or told what to write about D.Lawless. 


A few months ago when I got the call that Woman’s Day wanted to send a photographer to photograph me and my garage, I kind of freaked a little. I mean, it was my garage, the least attractive room in our house! Part of the unattractiveness stemmed from my workbench with a huge gaping hole in it.

It was suggested that I could just cover the hole with some fabric (which, yes, I could have done.) But, being that it is my workshop and a sawdust producing place, I felt I could do a little a little better than just some fabric. I decided to build custom doors for the opening. Luckily they turned out to be less of an involved project than I originally anticipated. (I love when that happens.)

Come on in the workshop and I’ll show you how I built these open frame cabinet doors. Read more

How to Replace Garage Door Rollers

How to Replace Garage Door Rollers

Let’s give a big round of applause and a thank you to Jeff from Home Repair Tutor for his tutorial on Changing Your Garage Door Extension Springs.

Today I’ll help you learn how to replace your garage door rollers! After that, with a little maintenance, your garage doors should continue to operate smoothly for a while.

Materials:

How to Replace Garage Door Rollers

  • New Garage Door Rollers
  • Clamp
  • Pliers
  • Large flat head screwdriver
  • Prybar
  • A Helper

How to Replace Garage Door Rollers Instructions:

Start by opening  your garage door completely.

Place a clamp on to the track about 2/3 of the way up the door opening.

How to Replace Garage Door Rollers

Release the garage door from the power opener by pulling on the attached release rope.

How to Replace Garage Door Rollers

For added safety, unplug the garage door opener from the outlet.

How to Replace Garage Door Rollers

Near the top of the track use pliers to bend the track slightly open.

How to Replace Garage Door Rollers

Line up the first roller with the opening. Use the flathead screwdriver and wedge it between the roller and the track. Pry the roller out of the track.

How to Replace Garage Door Rollers

Remove the old roller.

How to Replace Garage Door Rollers

Slide a new roller in and insert the roller back into the track.

Roll the door down to the next roller and repeat the same process for removing and replacing the rollers.

When you have replaced the bottom 4 rollers, you’ll realize that you won’t be able to replace the top one because it won’t line up with the opening in the track. Bend the track back into alignment and then roll the door all the way open.

How to Replace Garage Door Rollers

Bend a section of track in the middle of the overhead section.

How to Replace Garage Door Rollers

Be sure to have your helper spot the door or it could slip from the track and bonk you on the head. (Home Repair Tutor shows how to use a 2×4 clamped to the track to support the door if you don’t have a helper available. He also has a different method for replacing the rollers, so be sure to watch his video.)

How to Replace Garage Door Rollers

(Oh yes, this did happen to me! I got knocked hard enough to have me down for the count, but I got right back up and kept right on swinging.)

How to Replace Garage Door Rollers

Pry the last roller out and replace it. Use your pliers to bend the track back into shape.

How to Replace Garage Door Rollers

Remove the clamp from the track. Plug the door opener back in. Re-attach the door to the garage door opener by pressing the button that controls the operation of your door (usually on the wall of your garage.) The door should automatically re-attach to the opener.

Close the door and watch for any misalignment of the track.

If you need to adjust the tracks, loosen the bolts on the side of the track and re-align the track. I used a prybar to give a little leverage to move the track small increments.

How to Replace Garage Door Rollers

Tighten all the bolts. While you are at it, make sure all screws and bolts on the garage and the tracks are tightened because the vibration of the door can usually shake things loose over time.

How to Replace Garage Door Rollers

And that’s it folks!

For more maintenance tips on keeping your garage in tip top shape, check out Home Repair Tutor’s post on garage door maintenance.

How to Replace Garage Door Rollers