Hey y’all! I’m super stoked because I’m on my way to Blissdom in Nashville, TN for a few days.

I can’t wait to learn some new blogging tricks; network with a few blogging buddies; and listen to some inspiring speakers. Don’t you worry, I’ll be sharing everything I learned when I get back.

While I’m away, I will be leaving you in very capable hands. My good friend, Holly, is going to give you a tutorial for repainting and distressing a sad 1980’s chest of drawers. But, before she begins I have some news…

…I am really stoked to be partnering with Tomboy Tools, Inc. Together we’re going to bring you some serious DIY empowerment!This is such a wonderful venture for me because I love their tools; I love that their goal is to empower women; and I love that they are a company that gives back to women through the Avon Foundation.

Tomboy Tools and I are going to get YOU inspired to create more in 2012!

You may remember Holly from the Charm & Character Tour of her home. Many readers commented that they wanted to know how she distresses furniture. Holly was kind enough to create this tutorial for you:

Welcome Holly!

I’m so excited to be doing a guest post at Pretty Handy Girl! Brittany has been such a wealth of information to me as I have been working on growing my business and creating a web presence for Storywood Designs. There is truly nothing that Pretty Handy Girl can’t do and her willingness to share her knowledge and skill with the rest of us is so appreciated!

Several months back, I had a client approach me about painting an old chest of drawers she had. It had been given to her in her college years and had been painted to embrace the trends of the times. 😉 The chest itself wasn’t an antique or looked like it had been built by hand. However, it has a lot of sentimental value for my client. She wanted to pass it on to her toddler-aged daughter… and envisioned something that wasn’t too “baby” and not pink in color, and wanted to create a piece that might stay with her daughter as she grows.

Check out the chest of drawers in all her 1990’s glory! The chest itself was painted with a textured hunter green paint and the drawers were cream with hand-painted burgundy, gold and hunter green flowers. She was in dire need of a makeover! My client envisioned a more feminine color scheme and wanted the piece to look distressed. She was also itching to get rid of the brassy hardware.

I knew there was no hope of stripping the piece to the bare wood, staining it and distressing it. The piece had always been painted and I had no clue (and neither did she!) as to what was under all that textured paint. I also knew it would be cost prohibitive to her to try to get to bare wood in order to stain. I suggested painting the piece an base color that I could use in the distressing process and to create the overall look she was going for. With a plan in place it was time to get started!

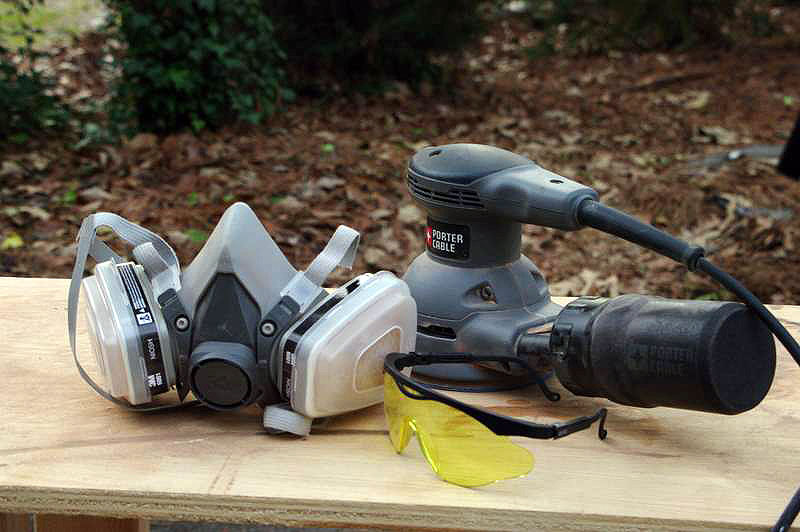
The first order of business in any refinishing project is to prep the piece for refinishing. In almost all cases, this means sanding. Painted pieces require less sanding than pieces that are being stained… and in this particular case, I knew I had to sand enough to smooth out that textured paint surface. Forunately, my orbital sander made quick work of the texture and using 150-grit sandpaper, I was able to completely remove the texture without much fuss. A mask and safety goggles are important anytime you sand – you never want to breathe in the nasty particles sanding stirs up; nor do you want to get it in your eyes. But in this case, the eye and mouth protection were super important! That textured paint flew all over the place as it was sanded off. I lightly sanded the drawer fronts as well so that the hand-painted floral design would no longer show when painted. We have a scary, apocalypse-looking mask only because we use it often and for some pretty yucky stuff, but any disposable mask will work just fine!

Once sanding was completed, I wiped the chest of drawers down well using mineral spirits. I then checked for loose pieces of the chest; keeping a close eye on drawer bottoms, corner and bottom moldings, and around the top edge of the dresser. I made repairs using wood glue and clamps to hold the pieces tightly together until dry. If needed, I added a finishing nail or 2 to the repair. Before painting, I also eyeballed the dresser looking for chips in the wood that needed to be repaired with wood putty. This dresser had a large chip in the base molding, so I filled it in with wood putty, let it dry and sanded it smooth with the orbital sander. Once the repairs were made, it was time to paint!

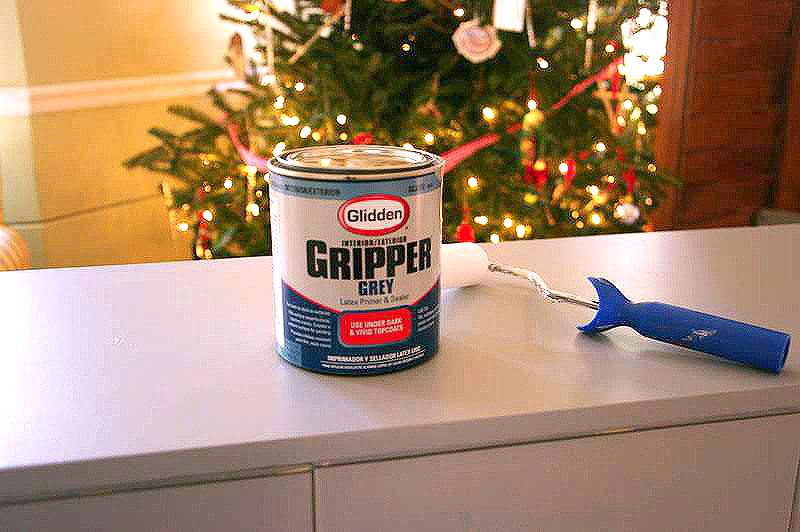
This dresser was a little different than ones I had completed in the past because my client wanted a distressed look, but we wouldn’t be distressing down to the original wood finish. I knew that the royal blue paint we were painting over needed a strong primer to cover it, so I went with Glidden’s Gripper Primer in Gray. It’s super thick, hides well and I’ve found it to have excellent coverage.

Since I didn’t have to worry about sanding through it in the distressing process, I knew it was the paint for the job. The simple lines of the dresser and its drawers made it easy to roll most of the paint on. I did run my brush through the grooves in each drawer, but was able to paint the rest of it with a roller, which really sped the process along.

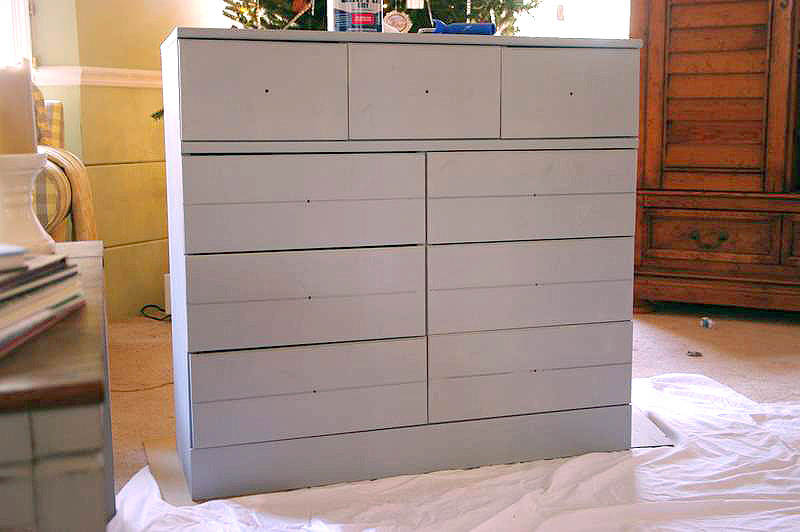
Once the primer coat was on the dresser and had thoroughly dried, I went to work on the base color. This is the color we would be distressing back to instead of the original wood finish. We wanted the dresser to look like it had originally been painted an antique white color… this would be the color that peeked through the final coat when the process was complete. I went with Benjamin Moore’s Navajo White.

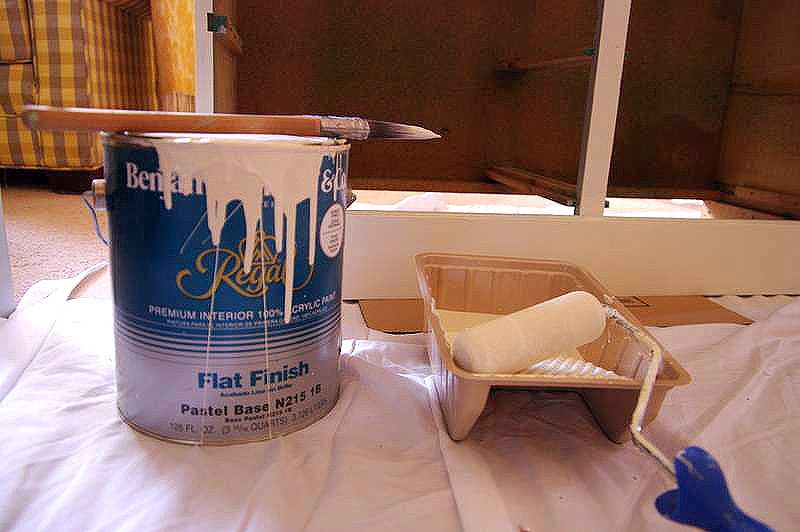
Navajo White is great because it’s one of those paint colors that is not too yellow and not too beige. It is a true neutral and has served me on many, many painting projects. I was able to apply the Navajo White in the same manner I did the primer… rolled it on with my foam roller and touched up the drawers’ grooves and various places with my brush. Since the Navajo White was only the base coat and had a strong primer underneath, one coat sufficed.

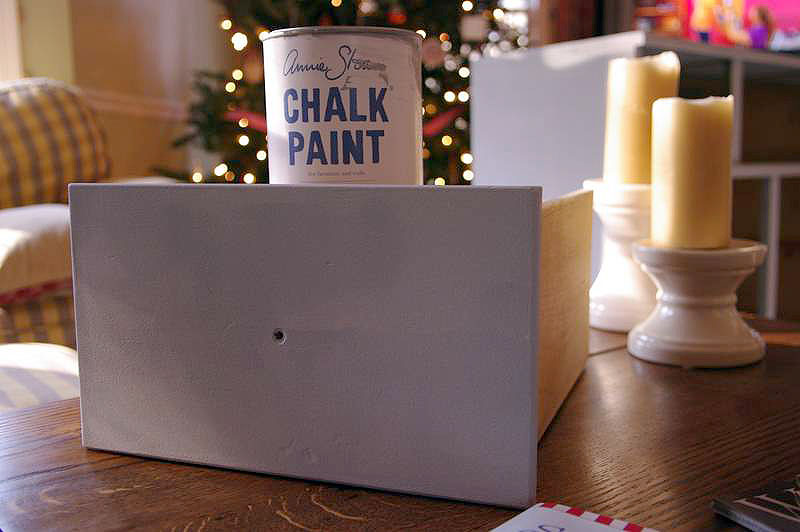
The final coat of the dresser was to be a beautiful grey color. I decided to use Annie Sloan Chalk Paint in Paris Grey for several reasons. First, Annie Sloan’s paints have great coverage and I knew that only 1 coat would be required. Secondly, and perhaps most importantly, Annie Sloan Chalk Paint gives you a lot of control in the distressing process. That control was very important to me on this project because I only wanted to distress back to my base coat, not to the primer or original royal blue color. Finally, Annie Sloan Chalk Paint waxes beautifully and easily and that was important to me as paste wax would be the final coat on the dresser. I painted most of the Paris Grey on by hand with my brush. Annie Sloan Chalk Paint is expensive and I try to use it sparingly!!

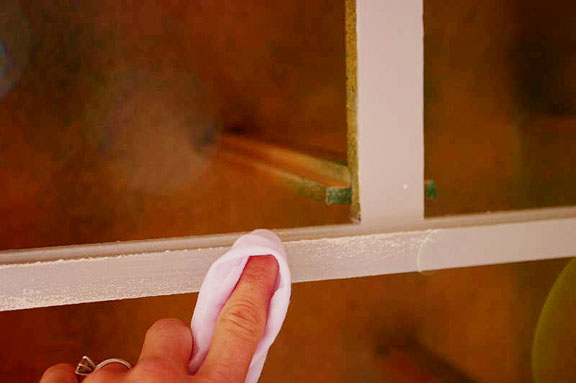
Once the chalk paint had time to dry, it was time to distress. In my opinion, this is where Annie Sloan Chalk Paint really sets itself apart from other paints. Chalk paint allows you a lot of control in the distressing process. In fact, there is no sandpaper required to distress Annie Sloan Chalk Paint! All the distressing on this dresser was done using a wet rag. I simply dampened the rag and started rubbing in the places I wanted to distress. The more I rubbed, the more distressing I got. I didn’t have to worry about sanding through my base coat and with a wet rag, I was able to get to places that would be difficult to get to with sandpaper. As an added bonus, I was able to distress the dresser in the house without a fine powdered substance all over everything!

The last steps to complete the dresser were to wax the entire piece and add the new hardware. With any piece I wax, I always start with a coat of clear wax. I’ve tried several brands, from Johnson’s Paste Wax to Briwax to Fiddes and Sons. I have yet to try Annie Sloan’s wax, only because the others are readily accessible to me in local stores. In my opinion, I have not noticed a big difference in application and finish between Johnson’s Furniture Paste Wax (which is found at Home Depot) and Briwax or Fiddes (which I can only find at a local wood working store). But there is a big difference in price. I think that it comes down to personal preference… there are definitely people that prefer one brand over the other… I just have not noticed a big difference in them! I did not apply a darker wax to this dresser… we wanted to keep it light and happy for a little girls room and I didn’t want to add the color changes that a dark wax brings to a piece of furniture.

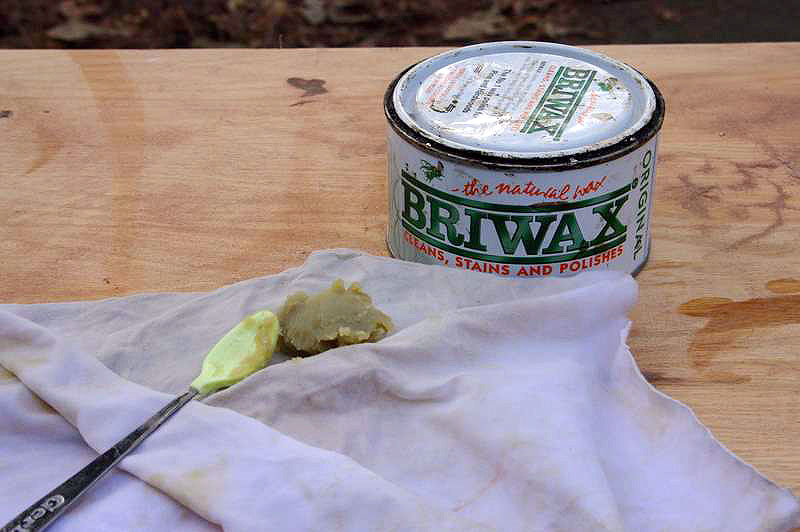
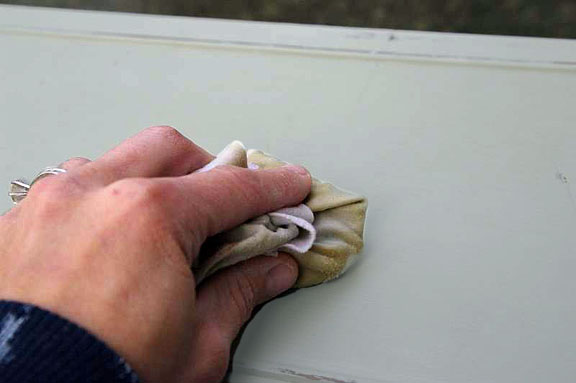
With waxing, the key is get thin, even layers of wax with each coat you put on a piece of furniture. I find the easiest way to apply the wax is to cut a clean rag, place a small amount of wax in the center and fold the rag around it. The wax will seep through the rag as you rub down your piece of furniture, keeping your coat nice and even. Once the wax coat is completely dry, you take another clean cloth and buff the piece. The result is a soft sheen and a smooth finish!

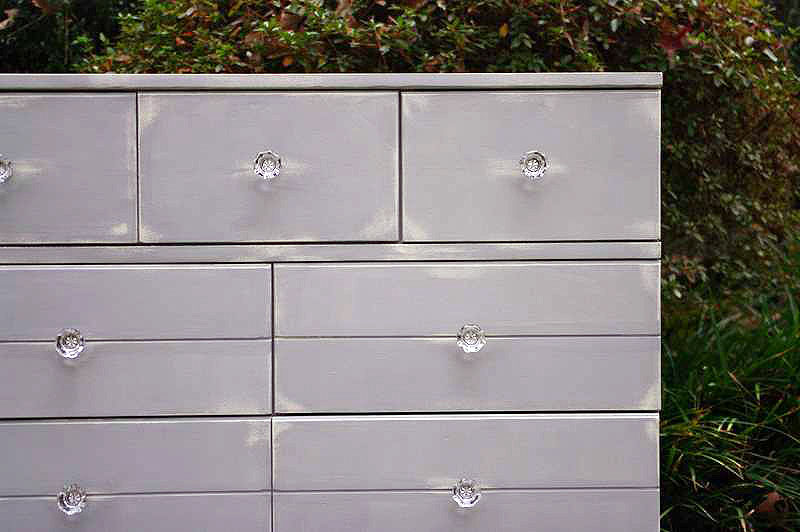
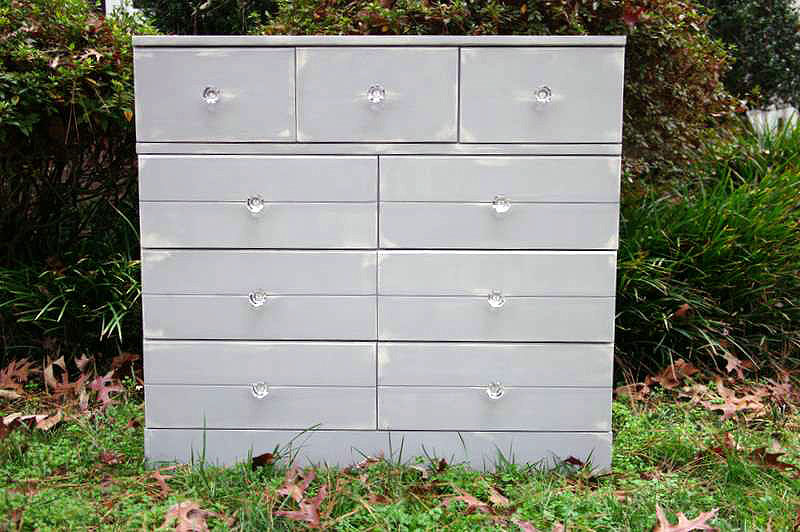
For new hardware for the dresser, we selected these beautiful glass knobs from Restoration Hardware.

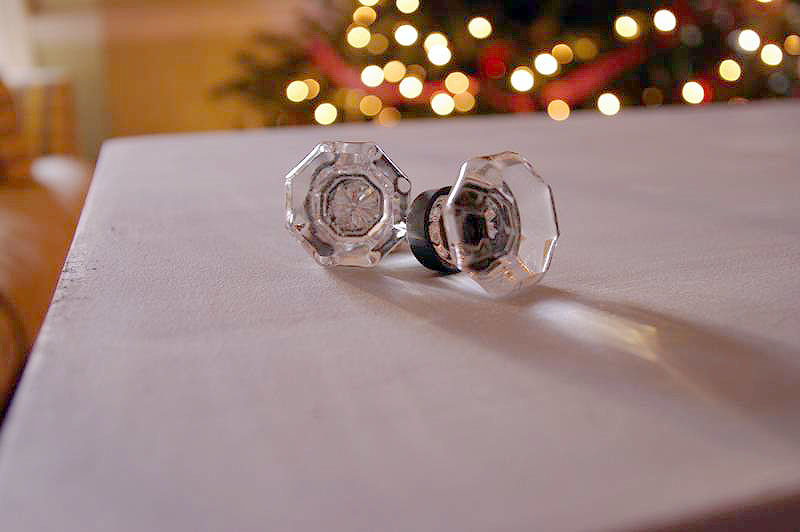
They added a bit of bling to the dresser, gave it a definite feminine touch, but weren’t too fussy or ornate. They fit into the existing holes with no issues, and with that, the dresser’s transformation was complete!

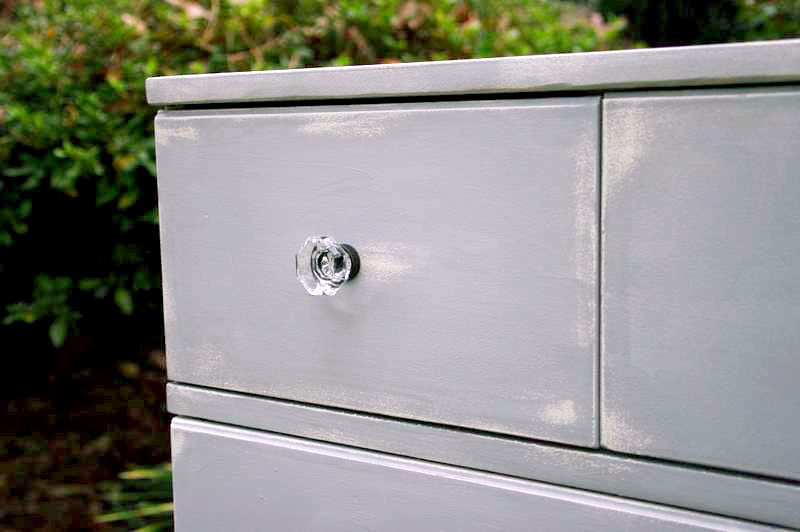
A lot of prepping and priming, several quarts of paint and a lot of elbow grease later, this dresser was transformed and updated and ready for its new life in a little girl’s room!

Thank you Holly! Oh my goodness, can you believe that transformation? From hunter green hand-painted to…

…shabby chic in Paris grey! Ahhh, that’s much better!

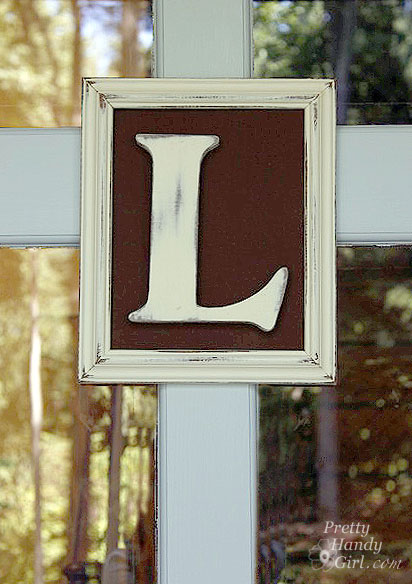
Be sure to check out Holly’s Storywood Designs Etsy shop where you can purchase a framed monogram like this one!

Holly also recently started a blog, Storywood Designs, showcasing the furniture that she refinishes. You really need to check it out!

Storywood Designs

Would you like to be a guest on Pretty Handy Girl? Well, here is your invitation: View this page for all the specifics on being my guest.

Thanks to my Facebook fan, Heather H., for the ultimate compliment on this lantern. She asked if I got it at Pier 1! Nope Heather, I got it at the Habitat ReStore and it found its way into my hands in this condition:

After a Women Build meeting at the Habitat ReStore a month ago, I spied that dusty relic. An old discarded hanging light fixture. I grabbed it and promptly paid $5 for it. Then I got to chatting with the clerk at the ReStore and absentmindedly walked out without my lantern. By the time I remembered, the ReStore had already closed. It was sad… it was tragic… I didn’t know when I’d be reunited with my light fixture because the ReStore is about 25 minutes away from my home. But, there is a happy ending to my story, my mother-in-law (who gives a good name to all MILs out there) offered to swing by the ReStore the following day to pick up my lantern for me. Hugs to her for reuniting us. But, I had to laugh at the look of skepticism she gave me as she handed over the dusty light. She couldn’t see its true potential, but I could.

How about you? Would you have passed this light fixture by? Or would you have seen the potential?

Well, next time you see a light fixture like that, grab it and I’ll show you how to transform it.

Materials:

  • Old lantern style light fixture
  • Pliers
  • Wire cutters
  • Two screwdrivers (at least one needs to be flat head)
  • Damp rag
  • Sandpaper
  • Plastic drop cloth
  • Kilz spray primer
  • Rustoleum Lagoon spray paint
  • Rub n’ Buff Gold Color
  • Paper towels
Difficulty: Easy
Step 1. Disassemble the lantern by unscrewing all the parts.

Step 2. Use wire cutters to cut the wire to the light housings.

Step 3. Pull the light sockets, bulbs and lighting out of the lantern.

Step 4. Remove the finial from the bottom of the lighting and set it aside with the lantern. Discard or keep the lighting parts for some other project.

Step 5. If there is a chain attached to the lantern, insert the two screwdrivers into the link attaching it to the lantern. Rotate the two screwdrivers in opposite directions as shown to pry the chain link apart.

Step 6. Pry up the tabs on the lantern that are holding the glass in place. Remove the glass panels and set them aside.

These are the parts that I kept for the lantern:

Step 7. Wipe all the parts with the damp rag to remove any dust and debris. Then scuff the lantern parts with sandpaper and wipe off any remaining dust.

Step 8. Set the lantern and parts outside on the drop cloth.  Spray them with Kilz primer, flip the pieces over and spray again.

Step 9. When the primer has dried, inspect the lantern for any paint drips that need to be sanded smooth.

Step 10. Spray paint the lantern and parts with Rustoleum Lagoon. Flip everything after the first coat is dry and spray a second coat of paint.

Step 11. After the lantern has dried thoroughly, reassemble the lantern.

Screw the finial onto the inside of the lantern where the lighting used to attach.

Step 11. Wipe a small amount of rub n’ buff on a dry paper towel. Rub it on the cross bars of the lantern.

Step 12. Clean the lantern glass with windex and a clean rag. Then insert the glass panels back into the lantern.

Admire your new aqua beauty!

The hardest part of this project was trying to decide where to display my lantern. I could see it in every room of our home!

But, ultimately I gave it a place of prominence on our mantle. And included an old picture inside it.

Have you seen these old light fixtures? Could you ever guess that they could be turned into beautiful decorating gems?
Have a great weekend y’all. I hope you make a trip to your local Habitat ReStore and search for your own lantern.

I hope you’ll join Heather and some other friends on Facebook so you can see what I’m up to next!

Sharing with Tater Tots and Jello Weekend Wrap Up Party


Looking for a gift for those hard to buy people on your list? Or simply an inexpensive gift for your child’s teachers? I found the perfect gift while grocery shopping. Our local Kroger had Illy ground coffee and tumbler sets on clearance. Naturally I shoved everyone aside and grabbed as many as I could (not really, but I would have!) For under $8 each, it was a real sweet deal.

I thought the gift sets needed a little somethin’ special to give them holiday flair (or maybe I was feeling guilty that the gifts were just too easy and inexpensive.) With a little Martha Stewart multi-surface craft paint and Martha Stewart decorative snowflake stencils, I turned them into extra special holiday gifts.

Materials:

(I’ve included affiliate links for your convenience. I earn a small percentage from a purchase using these links. There is no additional cost to you. You can read more about affiliate links here.)

  • Tumbler and ground coffee
  • Martha Stewart craft supplies:
    • Multi-Surface Craft Paints:
      • Mother of Pearl
      • Wedding Cake
      • Summer Haze
      • Metallic Sterling
    • Holiday stencils
    • Holiday adhesive stencils
    • Roller tops
    • Specialty sponges
  • 3M ScotchBlue painter’s tape
  • Paint brush
  • Fabric
  • Baby wipes or wet rag


Decorating the Tumbler:

Clean the tumblers with soap and water. Let them dry.

Tape off the areas of the stencil that you aren’t using. Add more tape to the outside edge of the stencil to hold it in place on the tumbler.

Wrap the stencil around the tumbler.

Dip a specialty sponge into the Martha Stewart  multi-surface craft paint. Dab off any excess paint.

Pounce lightly and straight onto the stencil. (If you come at it from an angle some of the paint may seep under the stencil or move the stencil.)

Gently remove the stencil and reposition it in another location on the tumbler. (Be careful not to overlap the first snowflake.)

Fill in areas between the larger snowflakes with small self-adhesive stencils.

The specialty sponge is too big for these smaller stencils, but you can use a paint brush to paint inside the stencil.

Repeat until you are happy with your decorated tumbler.


Snowflake Gift Bags:

Squeeze some craft paint into a Martha Stewart roller top (best invention EVER!)

Tape the stencil onto your fabric.

Gently roll the roller top back and forth over the stencil until the desired amount of paint comes out.

Remove the stencil and let the paint dry.

Repeat the snowflake design randomly throughout the fabric.

Sew a little box bottom drawstring gift bag, using the snowflake fabric. I think the snowflake themed coffee gift set will be a big hit! (Holiday decoration, thrifty, re-useable, and come on…who doesn’t LOVE coffee?!)


This was a very easy craft to create. You could decorate with any stencils you like. Think how cute a stenciled monogram would look on the tumbler.

I will probably include a note mentioning that the tumbler design will last longer if washed on the top rack of the dishwasher.


Disclosure: I was provided the craft materials and a small payment in exchange for writing this tutorial. The ideas, tutorials, and opinions are my own.
Sharing with:

Tip Junkie handmade projects

“It’s a Party and I’ll Paint if I Want to…Paint if I Want to… Paint if I Want To…You Would Paint Too if you had Scotch Bluuuueee!”
I think I’m going to call 3M ScotchBlue right now and suggest this as their new jingle. Kind of catchy isn’t it?!

Check out my project tutorial on revamping an old cabinet door below.

Go ahead, grab your paint and brushes — and don’t forget a roll of ScotchBlue painter’s tape!

I have been using ScotchBlue painter’s tape for a while and I really like it. I am not being paid to say this (even though they did send me a few free rolls of painter’s tape.) You’d know I like ScotchBlue tape if you have read the backlit bookcase post, painting the bamboo rug post and the painting like a pro post (where I share some tips for using ScotchBlue Painter’s Tape!)

But, enough looking back, I want to share with you how to make something out of a disgustingly filthy grease covered discarded cabinet door. So, let’s hop to it! While building my mudroom bench, I took off the doors and kept them in the hopes of being able to use them another day. I’m working on a new bench for my Habitat ReStore demonstration, so I have more cabinet doors now! I devised a plan to reuse the doors in a creative way, a way that would be fun and yet help us keep track of our comings and goings. Meet my cabinet door turned into a chalkboard message board with hooks:

Materials:

(I’ve included affiliate links for your convenience. I earn a small percentage from a purchase using these links. There is no additional cost to you. You can read more about affiliate links here.)

Instructions:

Clean the doors! If you have a cabinet that has finished it’s first life as a kitchen cabinet, and has so much grease on it that you could grease a pig…well, you need to clean it off. I experimented with several different techniques (GooGone, Dawn Detergent, Shakelee DeGreaser Spray, and Ammonia), but the one that worked best was inexpensive ammonia mixed with hot water.


I saturated the cabinet with the ammonia mixture. Let it sit for a few minutes and voila! The grease came off like butter (no pun intended.)


Dry the cabinets and gently sand all the surfaces to rough them up slightly. (Don’t rough ’em up too much boys, we need him to be alive. LOL! Spoken like a true Western character.)


Wipe off the door thoroughly with a damp baby wipe.


Use wood putty to fill in the wood grain on the middle panel of the cabinet. (You could also fill in the cracks on the frame of the cabinet too, but I have other plans for the frame.)


Let the putty dry for about 10 minutes. Sand the panel until it is smooth.


Wipe off the cabinet door again. Be sure to get all the sawdust off.

Spray your cabinet door with spray primer. One coat should be enough to cover the door. It helps to elevate the cabinet with a block or two underneath so it doesn’t stick to your drop cloth.


Mask off the middle of your door with newspaper and ScotchBlue Painter’s Tape. Press the edges down firmly by running a finger along the edge. (If your cabinet door is very textured, you can seal the edges by brushing matte medium where the tape meets the door.


Spray the frame with 2 even coats of the summer squash yellow color (allowing the paint to dry between coats.)


Remove the mask, now ooo and aaaa over that clean edge! Give the paint about an hour to cure before the next step.


Wrap newspaper around the back of the cabinet door and fold the edges up. Use ScotchBlue painter’s tape to tape the edges of the frame off (cover all the yellow with tape or newspaper.)


Spray the inside panel with 2-3 even coats of the chalkboard paint. Let it dry throughly before you remove the tape and newspaper mask.


It is starting to look rather purrrrdy, ya think?! Feel free to stop here and say that you are done…


…or if you are a perfectionist (like me), you will want to cover the woodgrain on the frame with scrapbook paper.


Simply measure your border and cut scrapbook sheets to that width. It is okay if your sheets aren’t long enough to fit on one length, you can tile them.


Brush one layer of mod podge onto the frame then lay the scrapbook paper on top of the mod podge. Press out all the air bubbles. Let the mod podge/paper dry for a few minutes.


Then brush 1-2 coats of the mod podge on top of the scrapbook paper borders to seal the paper.


If you want to embellish your chalkboard frame, you can rub on transfer decals (or paint some decorations using white acrylic paint.)


To make your chalkboard frame more functional, add 2 D-rings on either side of the back for hanging purposes. Then add some garment hooks to the front.


Don’t forget to season your chalkboard. (I prefer Old Bay seasoning…just kidding! I always wanted to say that.) Rub a piece of chalk on its side all over the surface and then wipe it off with a dry rag.


And that concludes the tutorial. Don’t you think the results are sweet! Especially because it is made from something that would have otherwise been discarded.


I envision a wall with several of these chalkboard frames lined up, one per family member. That way a message can be written to each person. I guess I better get busy and make 3 more.


I love how the hooks add additional storage! Be sure to use two picture hangers (one for each D-ring hook.) If you have good eyesight you might have noticed my fishing line that is hanging the cabinet above. This was for photography purposes only. Unless you want your frame to rip the drywall and land on the floor the first time your child wants to hang something heavy on the hooks, do as I say, not as I do.


Awww, isn’t she just a perfect little slice of sunshine on a blank wall? She makes me happy.


You made it through another one of my insanely long tutorials! Congrats!


Disclaimer: I was one of the bloggers chosen to host a ScotchBlue Painting Party. I was not paid or compensated for this post. I was sent a few rolls of ScotchBlue painter’s tape, but I honestly can’t remember if it was 2 or 3 or 5 because they promptly got added to the collection of ScotchBlue tapes I already own.

I have amassed quite a collection of “project” furniture and objects waiting for a future date with my creative magic sessions. I worry that some of this behavior is bordering on packratness (I don’t think that is a word, at least my spell check says it isn’t. But, you get my drift, right?!) So, when a Wagner rep contacted me about trying one of their paint sprayers, I couldn’t reply “YES!” fast enough. I had visions of setting up all those projects and spraying them down in a line-up fashion. But, I reined in my “glass half-overflowing” mentality and decided to tackle one project at a time. Good thing too, because although the Wagner Power Painter Plus with EZ Tilt (affiliate link) did spray at lightning fast speed, there were a few drawbacks.

But, I don’t want to get ahead of myself. I still want to give you a bonafide tutorial on how to fix, prep, paint and finish a wobbly yard sale find for yourself.


Materials:

(I’ve included affiliate links for your convenience. I earn a small percentage from a purchase using these links. There is no additional cost to you. You can read more about affiliate links here.)

*These items are purely optional. You don’t NEED them, but they help.

This wash stand had a $5 price tag on it. But, my neighbor gave it to me for $3. Is that robbery to talk someone into less than $5 for this antique?! In self defense, the stand was in pretty poor shape. It was VERY wobbly and had some big scratches on it. Can you forgive me?

Here is what you do when you find yourself as the new owner of a “this really should be trashed” purchase. Take it apart and rebuild it from the ground up. Having done this before with Daisy the Discarded Chair, I was prepared to tear this wash stand down to the ground. But, luckily it had some better joints than I had anticipated. So, I basically pulled apart anything that was not tightly joined.

The shelf over the drawer came off super easy.

As did a few joints.

I wiped the whole wash stand down with a wet rag.

Then, the side of the stand got some new glue and a few finish nails.

The joints got some Gorilla Glue and were set back together. And, I added a thin bead of glue and some finish nails to re-secure the shelf.

Next I sanded down the whole piece of furniture with these two 3M sanding blocks. I like to call them Tweedle Dee and Tweedle Dum because they are super easy to use. Even an idiot can’t screw up.

They work great for around spindly legs because they can bend and flex (I wish I could bend and flex like that!)

After wiping off all the sawdust, my wash stand looked like this:

Almost too pretty to paint, but it had some serious gouges, so I took a picture and said goodbye to the beautiful wood.

Here is where the race began. I decided to time myself painting on the primer with a brush. Then time myself using the sprayer for the first coat of paint.

Start your engine….paint brush and KILZ Clean Start Primer…GO!


After 30 minutes I had primed the entire stand from top to bottom.

After the primer dried, I gave the stand a quick, light sanding with a 220 grit sanding block and wiped it down with a damp rag.

I set up the sprayer, read all the directions (very important!) Then I filled the quart size reservoir and attached it to the sprayer. The Wagner Power Painter Plus doesn’t require a compressor, just a good old fashioned extension cord plugged into your household outlet.

Start your engine…Wagner Power Painter Plus…GO!

VROOOOOOM! The sprayer let out the loudest and most obnoxious noise I had ever heard (Note to self to wear ear protection next time.) I thought the sprayer was going to self destruct, so I let go of the trigger. Then I pulled it again and the noise returned, only to abate after a few seconds once the paint started to come through the nozzle. Phew, that scared me.

I breezed through painting the entire wash stand from top to bottom. I started with it upside down and quickly flipped it while it was still wet (I left a finger print underneath, but no one will know about that unless you squeal.)

And I was done. Then I looked at my timer and WHAT?!!! 5 MINUTES! Holy Cannoli! I had no idea a sprayer could shave that much time off a paint job.

I left the wash stand outside, while I took apart the paint sprayer.

To avoid emptying the paint canister, I covered the container with saran wrap and a rubber band.


Then I took apart the ENTIRE sprayer and cleaned out all the parts. It is soooo important to clean the sprayer thoroughly or you risk paint drying in your machine and ruining it. This is a look at the sprayer disassembled.

It is paramount to clean the tiny dual spray tips on the machine. They are small slits that can clog easily if the paint is allowed to dry in them.

After the wash stand had dried. I put the sprayer back together and screwed the paint container back onto the gun.

I was all pumped and excited to be done in 5 minutes! With dusk still 30 minutes away, I had no fear. BIG MISTAKE!

What was to ensue was a stressful 45 minutes of paint globbing, paint sputtering, my cursing, and frantic cleaning of the sprayer again. I finished spraying, but I had to use a different top coat color because I ran out of the first paint color. (Which ended up being one of those happy mistakes. You’ll see.)

I wiped off the big globs of paint and decided to give those areas a little “extra” distress in the morning.

After stepping back from the project, doing some research and having a twitter conversation with Shaunna (the furniture painting guru), here is what I concluded from my disasterouos 2nd attempt:

  1. The paint sprayer MUST have a full paint cup in order to work properly. When the reservoir gets down to less than 1/4 full any air that gets into the paint suction tube will cause the sprayer to sputter and discharge big globs of paint, instead of a nice even spray.
  2. The sprayer dispenses an INSANE amount of paint in 5 minutes and when it runs low #1 happens. I used a half gallon of paint on the first coat of paint on this small wash stand. Whereas, I normally would have used maybe half a quart to brush on two coats total. The drop cloth was so heavy with paint when I cleaned up, that I realized the majority of the paint was wasted in overspray.
  3. The Plus does not have a low paint level indicator. Therefore, it is very difficult to determine when you are getting low on paint until the sprayer starts to sputter and shoot out globs of paint onto your project.
  4. In the same vein, the paint canister only holds a quart of paint, and 1/4 of that isn’t useable unless you like Jackson Pollock style painting.

The next morning, I took out my power sander and gave the sink some character by distressing it.


This is where the happy accident occured. Because I had to use an aqua blue as the top coat on my sink, you could see the blue gray color peeking out! Which I think makes it look sweet, shabby and old.

Once I was happy with the amount of distressing, I sanded any chipping paint and rough spots with the 220 grit sanding block. Then, I cleaned off the wash stand with a damp rag. To protect the sink, I used Minwax wipe-on Polyurethane. I like the wipe-on Poly for speed. But, it doesn’t leave as thick a coat as the traditionally brush on kind. So, if you really want to protect a piece of furniture, use the brush on kind instead.

I added a cute little crystal cheap acrylic knob to the drawer.

And my new/old dry sink looks right at home in the corner of my porch! Although, it needed something…hmmmm….

…how about a plant! I dropped in a plastic pot with NO holes in the bottom. I filled the bottom 1/4 with rocks for drainage. And my pothos plant. I used to have a chippy pedestal that sat there, but sadly I had to get rid of it. I’ll fill you in on the details next week. It is a sad story ;-(.

Here is my summary of working with the Wagner Power Painter Plus model:

  • Pros – Saves time. $100 price tag. No compressor needed.
  • Cons – Small Paint Cup, No Flow Speed Selector, No Low Paint Level Indicator, Lots of overspray and wasted paint.

I will definitely try the sprayer again. When I do I might add Floetrol to my paint, which is supposed to help your paint even out and give you a smoother finish. (Especially if it globs on you.)

  • Wagner Power Painter Max has a two speed selector AND a paint level indicator. This model runs under $100. Have a great weekend and see you next week with some more DIY goodies.