How to Make Pine Cone Garland

How to Make Pine Cone Garland

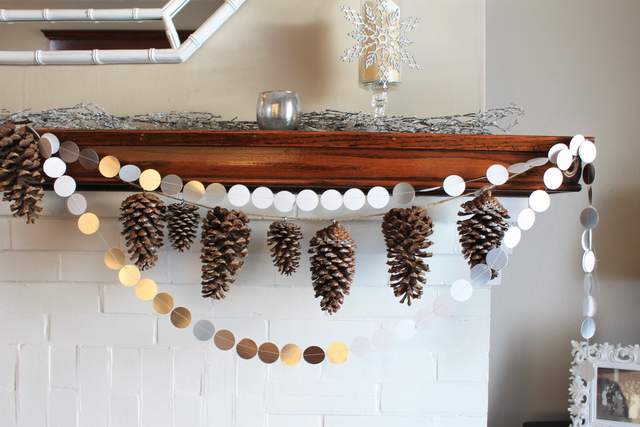
Happy December! The holidays are such a wonderful time of year and an opportunity to get creative with entertaining, cooking and decorating. Mostly, I love to make things simple and today’s lesson on how to make a pine cone garland will be just that. An easy, quick, not to mention very inexpensive craft you can do to decorate your home this season. And it can be done in about 30 minutes {minus an adventurous walk in the woods to get pine cones}, here is how.

Supplies:

Pine Cone Garland

  • Pine cones – These can be found simply going outside and looking around the pine trees. Depending on where you live, you’ll find all kinds of sizes. If you collect pine cones from outdoors, be sure to ‘de-bug’ them by baking them for 30 minutes on a low temperature. You can also get pine cones at craft stores, thrift stores, flea markets and such. Or maybe in a friend’s attic? Put those old holiday decorations to a new use.
  • Just twine or ribbon – This is to hang the cones. You can use anything you might like, or what matches your style.
  • Screw Eyes – Find these in the hardware section at the home improvement store. A small box will only cost a few dollars.
  • Optional supplies include a drill with a small bit and glue

 Instructions Read more

Très Frugal DIY Gift Idea Round Up

Can you believe all the wonderful DIY gift ideas that we had for you this past month? 31 DIY gift ideas that are frugal and attractive in this Très Frugal DIY Gift Idea Round Up.

And if that’s not enough, you can view 10 DIY Gift Ideas that take 15 minutes or less to create:

Happy Holidays to you!

PHGFancySign

Faux Cross Stitch Tea Towel | Pretty Handy Girl

Faux Cross Stitch Tea Towel | Pretty Handy Girl

How about a cheap and easy DIY gift idea today? Faux Cross Stitch Tea Towels are sure to please anyone and they cost less than a dollar! I bought several of the red striped Tekla tea towels at Ikea that cost .79 a piece!

Faux Cross Stitch Tea Towel | Pretty Handy Girl

I came up with the idea after seeing Miss Mustard Seed’s cafe curtains. But, decided to create monogrammed tea towels to give as gifts.

Faux Cross Stitch Tea Towel | Pretty Handy Girl

Materials:

  • Ikea Tekla Tea Towel
  • Red & green acrylic paint
  • Tiny round paint brush
  • Painter’s tape
  • Light box (if you don’t have one, you can tape your letter and towel to a window during the day.)

Instructions: Read more

Make a Tray from a Cabinet Door | Pretty Handy Girl

Make a Tray from a Cabinet Door | Pretty Handy Girl

One of my favorite places to thrift shop is the Habitat ReStore. I mean, where else can you find cool $2 cabinet doors?

Make a Tray from a Cabinet Door | Pretty Handy Girl

This fine cast off door is just screaming to be upcycled into a beautiful tray. Especially when the same thrifting adventure yielded VERY COOL door hardware! Simply combine the two and you have yourself a unique serving tray to give as a gift (or keep for yourself.)

Make a Tray from a Cabinet Door | Pretty Handy Girl

Materials:

  • Cabinet door
  • Door handle or cabinet handle
  • Wood putty
  • Putty knife
  • Ruler
  • Pencil
  • Drill
  • Drill bits
  • Screwdriver bit
  • Rubber bumpers

Optional: Rub n’ Buff Gold Leaf

The steps are super simple. Read more

Spoon Tealight Candle Holder

Spoon-Tealight-Candle-Holder-Feature

Jacque and I are so excited to be contributing in Brittany’s Trés Frugal- 30 DIY Gift Ideas!  We’re no strangers to DIY gift ideas!  In fact for as long as I can remember, my family has taken part in a Make-a-Gift tradition.  Each year we have to come up with some creative DIY gifts to give to family members.  It’s one of my favorite traditions!

With the holidays closing in on us, who couldn’t use some quick and budget friendly gift ideas? So today, we’re sharing a quick look at how to make a DIY tealight candle holder!

Spoon Tealight Candle Holder

Reclaimed wood seems to be the perfect material to make DIY gifts out of.  We have made a few different custom wall hangings using various types of reclaimed wood and love the rustic look.  We found out that a family friend was replacing some of his older barn boards and were lucky enough to snag a few for our stash!  Barn wood and pallet wood are great options for this project, but don’t rule out other sources of lumber.  We’ve actually used old decking boards for tons of projects.  If you can’t find any wood to reclaim, take a peek at Brittany’s tutorial on how to make new wood look old, weathered, and rustic.

Materials List:

  • Weathered Piece of Wood
  • 3 Spoons
  • 3 – 1 ” Wood Screws
  • D-Ring Wall Hanger (with screws)
  • 3 Tealights

Tool List:

  • Nail Set
  • Hammer
  • Drill
  • 1/8″ Drill Bit

Instructions: Read more