Happy Day After Thanksgiving! I don’t know about you, but despite the week I had last week, I am very grateful and thankful for modern medicine and trained surgeons who can take all the broken pieces and put them back together again. Humpty Dumpty never had it so good!
My seven year old is thankful for something completely different. When asked yesterday morning what he was thankful for he said (very seriously), “My bottom.” I tried so hard not to laugh, and was able to utter a quick “Why?”. He replied, “So we won’t explode!” Oh the thoughts of a seven year old boy. ;-D
I hope everyone got their fill of food and family time! And most of all I hope you got a little R&R. You may be looking around wondering where Tool Tutorial Friday is. Well, I’m sorry to tell you that it is on break (no pun intended.) After all the stress from my son’s broken his arm last week, I decided to give myself a much needed reprieve from blogging. No worries though, Tool Tutorial Friday will be back next week as previously scheduled.
I hope you won’t be too mad and disappointed with me. But, seriously, you don’t want to sit here and learn how to use another power tool today! You want to take some time to unwind and enjoy your family, right?!
In the meantime, I do have the Tomboy Tools magnetic hammer winner: Roxanne Lucchesi!
She says, “I have been wanting to tell you how much I love your blog. And now I REALLY love it. It is so great that you are taking the time to post these tutorials. I cannot tell you how much I appreciate them. I recently added a table saw to my collection of tools. Mind you, I have never used a table saw, but have always wanted one. Now you have empowered me to actually get out there and use it. Thank you!”
Thanks so much Roxanne, comments like yours are what make all the efforts I put into my blog worth it!
And a big thank you to my sponsor:
Laura from Tomboy Tools, who graciously offers a hammer a week for the Tool Tutorial Friday series. Laura is a super sweet mompreneur who also wants to empower women to take on their own DIY project. If you get a chance, check out the other tools she sells!
Hey y’all! I’ve been hopping all over town lately. Home Depot and Lowe’s have become my second home. So, if you see me in one of those stores will you send me home? I HAVE to finish my garage renovation sooner rather than later!
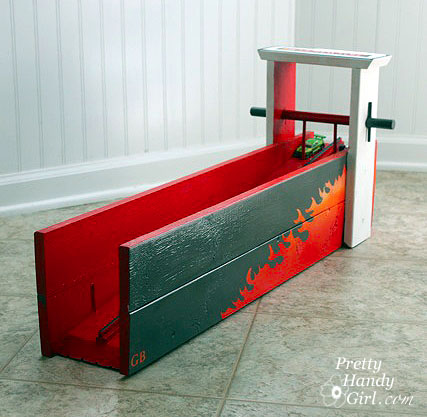
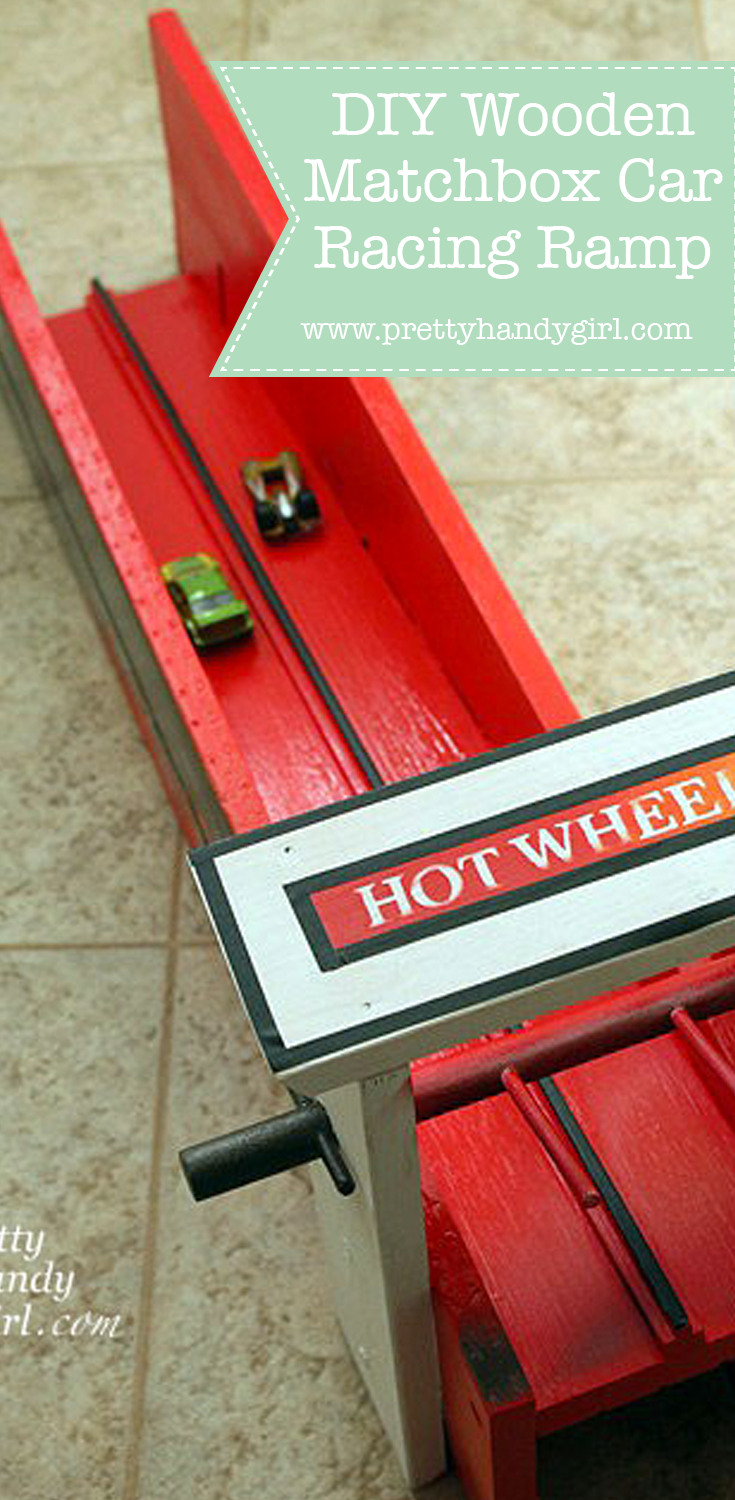
Today I have a tutorial for making a matchbox race track for those little car enthusiasts in your family! Now, don’t close this window because you think you couldn’t make it. I bet you can. There really aren’t any super complicated wood-working skills involved in this build. In fact, my 7 year old was responsible for the majority of the design.
I created this project and tutorial for my friend, Beckie at Infarrantly Creative. She is hosting a Pennywise Presents series full of inexpensive gifts you can make. Some fabulous bloggers have shared their amazing gift ideas!
Today I’ll teach you how to use a miter saw safely. We’ll learn the difference between a miter and a bevel cut. Plus, I’ll also show you the different features and functions of miter saws.
How to Use a Miter Saw
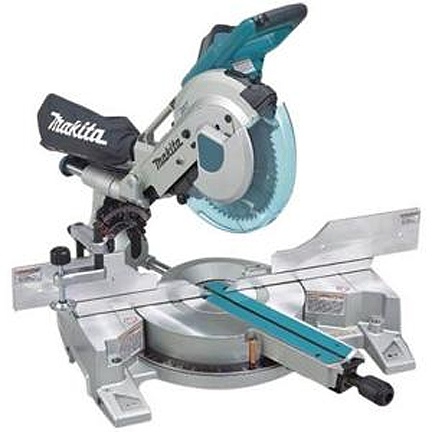
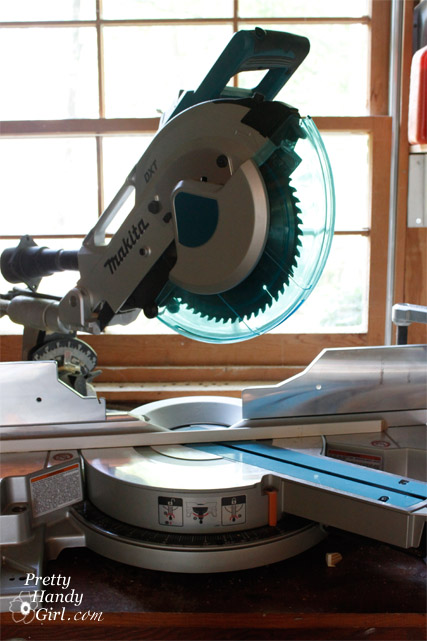
Hello and welcome to the very first Tool Tutorial Friday (a series of tool tutorials)! Come right in and have a seat. If you give me less than 10 minutes of your time, I will empower you with a new power tool skill! Today, I’m going to show you how to use one of my favorite power tools. Before I owned a miter saw, I used a hand saw and a cheap plastic miter box. But, they were really putting a cramp in my DIY style (if you know what I mean.)
About two decades ago, my husband gifted me my Makita 10″ Sliding Compound Miter Saw. That’s right, I don’t ask for jewelry for big occasions, Pretty Handsome Guy knows to ask one thing before an upcoming holiday, “So Honey, what power tool do you want now?” It’s true, I’m a power tool junky.
Ready to learn how to use a miter saw? Okay, let’s get started…
Working with power tools can be dangerous, but your risks drastically eliminated if you give the tool some respect. Today I’ll show you how to use a miter saw safely.
About Miter Saws:
Miter saws come in many shapes, sizes, and colors. The size (usually from 7.25″ up to 12″) refers to the diameter of the blade on the saw. The larger the blade, the wider the material it can cut. However, if you purchase a “sliding” miter saw, you can cut several inches wider than your blade diameter (the specifications on the saw should tell you this cutting distance). Miter saws run anywhere from $80 up to $800 depending on the features and brand you choose.
Sliding Miter Saw:
I highly recommend a sliding miter saw if you can afford it. Being able to cut lumber a few inches wider means the difference between using your miter saw or having to break out the circular saw or table saw.
On a non-sliding miter saw, the saw head will not slide forward and back. Most of the entry-level models will cut a miter and a bevel. You may have heard miter saws without the ability to slide referred to as chop saws. They will work great for “chopping lumber” but without sliding, dual miters, and dual bevels, you will spend some time flipping the lumber to make your compound cuts.
Speaking of miters and bevels, let’s talk a little more about what is a miter and a bevel cut.
Type of Cuts:
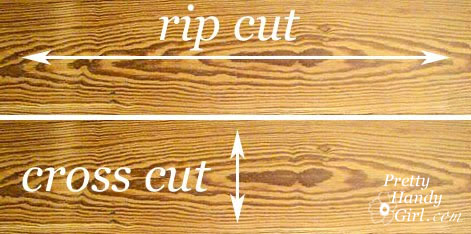
Miter saws are perfect for cross cuts, miter, and bevel cuts. Miter saws cannot make rip cuts. Rip cuts are easier cut on a table saw or track saw (or using a variety of other handheld saws.)
Rip – ripping a board is cutting with the grain along the length of a board. This is usually done with a table saw but can be done with a variety of handheld power saws and a straight edge.
Crosscut – a type of cut that is perpendicular to the grain or along the width of your board. Crosscuts are usually made with a miter saw or circular saw, but can also be made with a track saw, jigsaw, band saw, or hand saw. You can make crosscuts with a table saw, but you will need a crosscut sled to perform a crosscut cut safely.
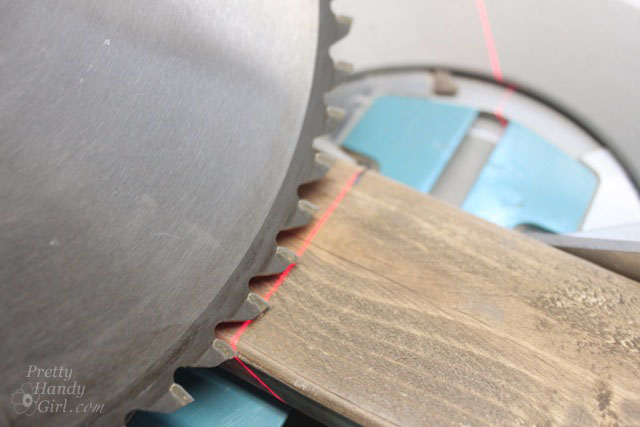
Miter Cut:
A miter cut is made when you change the direction of your blade from straight ahead (90˚) by moving it from side to side. Think of pizza wedges. For example, in the image below, the saw is set up to cut a 45˚ miter, and no bevel because the blade is still straight up and down.
Bevel Cut:
A bevel cut is made when you angle your blade tipping it to the left or right. As an example, in the picture below, I’m making a 45˚ bevel cut into the wood.
Compound Cut:
A compound cut happens when you make a miter and a bevel cut at the same time. Essentially you are cutting two angles simultaneously. This is particularly useful when you are cutting crown molding for a room.
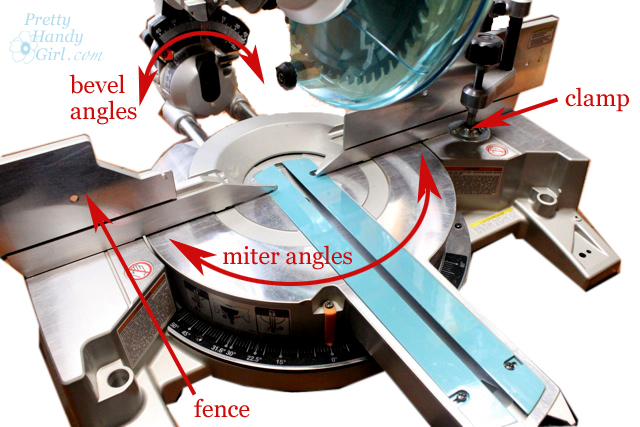
You can see in the diagram below how to set up your saw for bevel angles, miter angles, or both.
Safety Features and Operating a Miter Saw:
All modern miter saws have a trigger built into the handle. Most miter saws also have a safety button that you must push with your finger or thumb before you can squeeze the trigger. To start a straight downward cut, press the safety button, squeeze the trigger and wait for the saw to reach maximum rotation. Then slowly lower your saw into the board you are cutting. Never force the saw through the wood. Let the saw cut and then guide it downward. Once you have completed the cut release the trigger while the blade is in the wood. Let the saw come to a stop before lifting it out of the wood.
Most miter saws have a fence. The fence lets you rest the position your lumber against a straight edge. It keeps the wood steady and helps your miter saw cut true to the degree setting you have chosen.
Some miter saws have a detachable clamp. This is a nice option and helps keep your hands away from the blade during cuts. Let the clamp be your right-hand man (or left-hand man). If you don’t have a clamp on your saw, be sure to always position your hand as far away from the blade as possible. Do not attempt to make cuts where your hand is close to the blade. AND NEVER reach under the saw while it is rotating! Even when you have finished your cut, your hand is not safe until the blade has completely stopped.
Three Safety Tips for Using a Miter Saw:
Blade down until it stops! You should always end your cut and release the trigger while the blade is down and in the lumber. Let the blade come to a stop before raising the blade.
Always make sure the lumber is supported on both sides. And never clamp both sides of your lumber. One side should be free so as not to pinch the blade during the cut.
Never cut small pieces of wood where your fingers are too close to the blade. If you absolutely must cut a tiny piece, clamp or attach it to a larger piece of lumber.
Making a Safe Sliding Cut:
When using a sliding miter saw, there is a proper way to make a sliding cut (used to cut wider boards):
Make sure your saw is positioned fully on your workbench. Test the blade in its full reach toward you to make sure it won’t tip as you lower the blade.
Put your lumber up against the fence and clamp it on one side (if you can).
Before you start the blade, pull the saw toward you until the blade is directly over the board’s edge closest to you.
Squeeze the trigger to start the saw and wait for it to reach peak rotation speed. Then lower the blade down into the wood.
While the blade is still rotating, slide the saw back and away from you as your blade cuts through the rest of the wood (see photo below.)
Once the blade has finished cutting through the wood, release the trigger and let the blade stop before raising the blade.
I created a video, so you can see how to safely use a miter saw. Before you watch the video — a few necessary words of caution:
DISCLAIMER
The viewer assumes all responsibility and liability associated with the hazards of woodworking. Pretty Handy Girl is not responsible for any errors or omissions that may be present in this tutorial. She also assumes no liability for any action or inaction of a viewer.
Please use extreme caution when using power tools. Read your tool manual thoroughly and wear protective safety gear. Take your time familiarizing yourself with a tool before using it. (If you are missing the manual, you can easily find it online by going to the manufacturer’s website or google your saw’s make and model + manual.)
Update: Please recognize that I have tried to put together a basic miter saw usage tutorial to get you started. I have tried my best to show the safest way to use a miter saw. Two safety revisions I want you to be aware of:
You should wear appropriate Personal Protective Equipment when using a miter saw. (Ear protection, eye protection, and a dust mask.) I should have been wearing a mask.
When I first learned to use a miter saw, no one told me to keep the blade down until it came to a stop. This is now standard practice when I work.
And now, let’s get you more familiar with using a miter saw!
https://prettyhandygirl.com/wp-content/uploads/2011/10/my_miter_saw.jpg432432Brittany Baileyhttps://prettyhandygirl.com/wp-content/uploads/2021/07/PHG-logo-tagline-2020-1030x211-R.jpgBrittany Bailey2011-10-21 07:00:022020-05-15 18:23:22How to Use a Miter Saw
With the arrival of Autumn, I am looking forward to some fires in our fire pit and — of course — some S’mores! I made a fire pit in an afternoon last year after we had 14 trees taken down (boo hoo!) Sadly, they were dying or diseased. But, I was able to turn a negative into a positive by using some of the stumps for seating and the spot where two trees used to be as my fire circle.
https://prettyhandygirl.com/wp-content/uploads/2015/05/DIY_fire_pit_promo_image.jpg353630Brittany Baileyhttps://prettyhandygirl.com/wp-content/uploads/2021/07/PHG-logo-tagline-2020-1030x211-R.jpgBrittany Bailey2011-10-20 07:00:092021-07-08 16:55:33How to Make a Fire Pit in an Afternoon
Terrariums are making a comeback in home décor. Gone are the octagonal mirrored terrariums. They have been replaced by sleak apothecary jars, tall cylinders and lidded glass vessels (to name just a few shapes.)
Twig Terrariums has an amazing array of beautiful ready made terrariums or DIY kits for sale! Some of them have stunning details, right down to a little miniature person inside the lush world. The terrarium below sells for $200.
If you want to create your own version that is a little more budget friendly, it isn’t hard to do. In fact you can get some plants from a local nursery or as close as your own backyard!
Materials:
Glass container (with or without a lid)
Small decorative pebbles or pea gravel
Potting soil
Live Moss
Terrarium plants (small shade loving plants)
Potting shovel
Water
1. Clean your glass container with soap and water and dry it.
2. Add a layer of gravel or decorative pebbles to the bottom of your glass container.
3. Add a layer of potting soil. No need to level it.
4. Collect your plants and think through the plant placement in your head.
5. Gently remove a plant from the pot.
If it is root bound (all the roots are wound tightly around the bottom) gently tease some of the roots free and break apart the roots at the bottom of the plant.
6. Insert your plants into the soil.
Put taller plants at the back and the shorter ones in the front so you can see all the plants.
7. Cover the soil with moss. You can cut or tear pieces to fit flush with the edge of the terrarium.
8. Fill your terrarium and let the water soak in. The water should reach the top of the rocks. Check the water level a few times a week and be sure to refill when the water gets low. If your terrarium has a lid you won’t have to water as often as a lidless variety.
9. Add any decorative embellishments like these faux mushrooms (tutorial HERE)…
This version was made entirely with plants that I have growing in my shade bed. Small ferns, arugula and creeping ground covers. Plus, I added a few round pebbles for visual interest.
I might pick up a tiny person or two at a hobby shop next time I’m near one. Anyone seen any that look like the characters in “Land of the Lost” heh, heh, heh!
In the meantime, I’m loving my cost effective terrarium. Yes, terrarium singular, because the cylinder terrarium was a gift for our friends who dog sat for us.
I almost wouldn’t be surprised to see a fairy take up residence in one. I’ve been busy working on some more projects to show you, so hang tight and check back soon! 😉 In the meantime, I hope you have a fabulous weekend and are enjoying Fall!
https://prettyhandygirl.com/wp-content/uploads/2013/08/two_terrariums_promo.jpg407601Brittany Baileyhttps://prettyhandygirl.com/wp-content/uploads/2021/07/PHG-logo-tagline-2020-1030x211-R.jpgBrittany Bailey2011-10-07 07:00:012021-08-21 18:19:47Make Your Own Terrarium and Save Hundreds of Dollars