leather heart necklaces

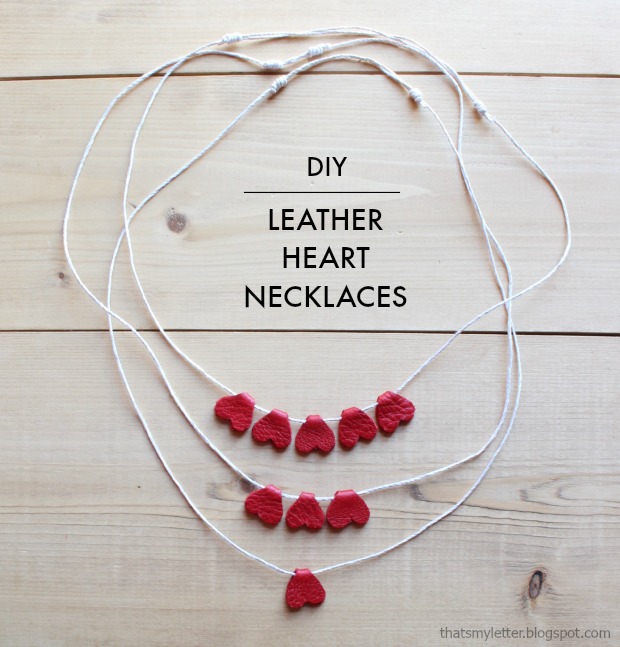
Hello Pretty Handy Readers!  We survived the holidays! Yes, January can be quiet but February will be here before you know it and that means Valentine’s Day. Jaime here today from That’s My Letter sharing this DIY leather heart necklace, no sewing necessary!

I’m a huge fan of giving valentines that are NOT CANDY and this project certainly fits the bill.  I used leather scraps and waxed hemp cording to make these simple leather heart necklaces.

leather heart necklaces 1

Add a lot of hearts or only one. It’s completely up to you!

leather hearts necklace 2

My necklaces are finished with adjustable sliding knots so the person wearing the necklace can have it loose and dangly or more snug up on the collarbone.

Materials:

leather heart necklace supplies

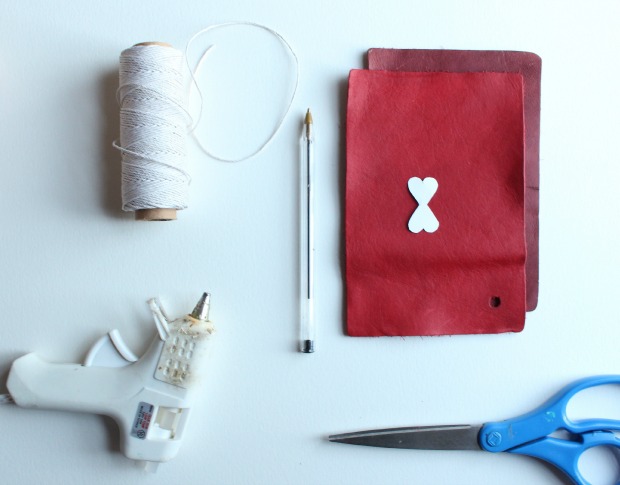
  • Leather (small pieces or scraps)
  • Cardstock (small piece for heart template)
  • Pen
  • Scissors
  • Waxed hemp cording
  • Hot glue gun & glue sticks

Step 1: Make a pattern for a heart shape similar to the one pictured above – two hearts with their points together.  Cut the pattern out of cardstock. Using a pen and your leather scrap trace around the pattern then cut out desired number of hearts.

leather heart necklace step 1

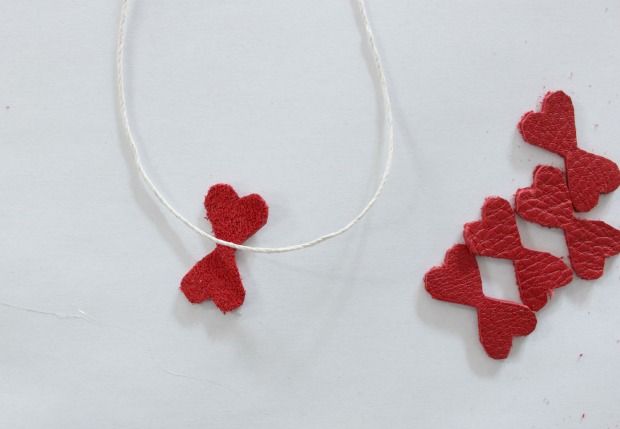
Step 2: Cut 34″ of cording for one necklace.  Place one heart shape under the cording as shown. Read more

Metallic Color Block Canisters | Pretty Handy Girl

Metallic Color Block Canisters | Pretty Handy Girl

I’m back with another easy Lowe’s Creative Idea this month. When you get tired of your cobalt blue canisters you can easily spray paint them with a metallic color block pattern. That’s exactly what I decided to do with my thrift store canisters.

I’ve been on a major mission to purge things I no longer use or love from my house. I have almost completely filled our dining room with things to donate. I had contemplated donating my cobalt kitchen canisters because the color wasn’t making me happy anymore. But, then I realized that I could give them an entirely new look with some spray paint.

Materials:

Instructions:

Remove the lids, the metal ring, and spoons from your canisters.

Metallic Color Block Canisters | Pretty Handy Girl
(Wood plank photo backdrop courtesy of Leen the Graphics Queen.)

Use a sanding block to lightly rough up the surface of the canisters. Wipe all the sanding dust off with a damp rag.

Metallic Color Block Canisters | Pretty Handy Girl

Spray the outside and base of the canisters with Valspar Premium Primer. Read more

DIY Constellation Wall Art

DIY Constellation Wall Art

Happy New Year! It’s Jessica from Decor Adventures, back with a fun project for your walls this month.  In late November, my husband and I had a baby girl! We are enjoying every minute of her and on the side I’ve been working on decorating her nursery. This idea for constellation wall art is both a way to add art to the walls, and some personalization of her birthday. It’s easy to put together and only requires a few basic supplies.

Materials

  • Picture frame
  • Hardboard to fit inside picture frame
  • Primer
  • White and black paint
  • Drill and drill bits
  • Small nails
  • Embroidery floss in white
  • Computer, internet, printer, paper
  • Hammer
  • Glitter (optional)

DIY Constellation Wall Art

Instructions

1. Paint your picture frame if desired. I used Smitten by Americana Decor chalky paint. I sealed it with 2 coats of polycrylic since chalky paint dries in a matte finish.

2. Prime and paint your hardboard with black paint. You could also use dark blue, since it will represent the night sky. I sprinkled a little bit of black glitter on the wet pant to add some sparkle (optional.)

Paint the nails white. These will be the “stars” in your constellation.

DIY Constellation Wall Art

3. Find an image of the constellation you plan to use and print out an image of it. You can find this with a quick search online, but this is a good resource for pictures. Print it on paper to fit inside your frame. Read more

Sleigh Gift Wrap

20 Creative Gift Wrapping Ideas | Pretty Handy Girl

Hi there! I’m Colleen from Just Paint It and I’m excited to share some of Pretty Handy Girl’s great creative gift wrapping ideas.

We’re reaching the home stretch before the big day and I know things can get crazy. But something I really enjoy is taking a little extra time to creatively wrap Christmas presents. It not only lets the recipient know you’ve put a little extra effort into their gift, but it’s also a great way to sneak some relaxation time in for yourself!

Let’s start with some basic boxes and add some cute embellishments.

Chalkboard Gift TagsChalkboard Gift Tag Signs

Polar Bear Gift WrapPolar Bear Gift Wrap

Snowman Gift WrapFrosty the Snowman Gift Wrap

3D Tree Gift Wrap3D Tree Gift Wrap

Dove Gift WrapDove Gift Wrap

Sleigh Gift WrapSleigh Gift Wrap Read more

wood-block-picture-frames

Wood Block Floating Picture Frames | Pretty Handy Girl

We are days away from Christmas and I’m sure there is someone on your list that you just can’t figure out what to get for them. I have the perfect solution! Make them a wood block floating picture frame using scrap 2×4″ lumber and plexiglass.

If you don’t have scrap 2×4’s lying around, you can purchase a 2x4x8 foot stud for less than $4! You could make 16 photo frames out of that one board! (Granted, you’ll need to buy the plexiglass for each.)

Materials:

  • 2 – 2 x 4s (cut to 6″ lengths)
  • 4 – 6″ x 9″ pieces of plexiglass (3/32″ thickness)
  • Ipswich Pine Stain
  • gel stain or Minwax Express color
  • small detail paint brush
  • pencil or pen
  • photos
  • tape
  • rag
  • optional: scrapbook paper, double stick tape

Tools:

Instructions:

Set your table saw to a 10 degree bevel.

Wood Block Floating Picture Frames | Pretty Handy Girl

Set the saw blade to a depth halfway through your block (about 7/8″ deep.) Set the fence to 2″ from the blade.

Wood Block Floating Picture Frames | Pretty Handy Girl

Use your GRR-RIPPER to safely guide the 2×4 over the saw blade. Check to see if two pieces of plexiglass will fit in the groove created by the saw blade.

Wood Block Floating Picture Frames | Pretty Handy Girl

If not, nudge the fence over slightly and make a second pass over the blade. Check to see if the plexiglass will fit now. If not, repeat the process until they fit snugly. Read more