DIY Message Cloth Napkin Gift Idea

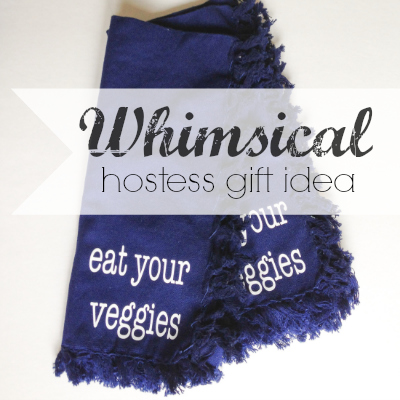
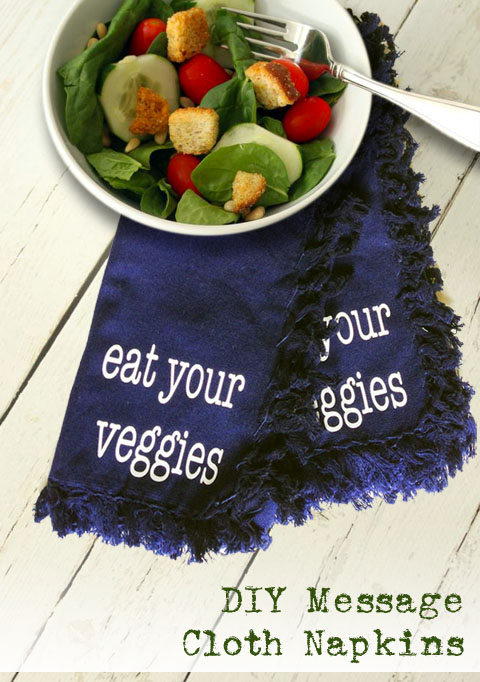
Bringing a hostess gift to someone whose home you are staying in is apparently a pretty universal thing.  I had never heard of such a thing until I was in my late 20’s.  It’s not a mind blowing concept but I have come to appreciate the simplicity of the thoughtful gesture.  Granted, if you are a “Real Housewife”, then I’m pretty sure if you don’t show up with a bottle of Cristal you get the stink eye.  Hostess gifts don’t have to be spendy, they just need to be thoughtful.  Today I am going to show you how to create an inexpensive gift for the hostess with a sense of humor. Gather around and learn how to make these “Eat Your Veggies” cloth napkins.

Materials:

  • Silhouette Cutter
  • Computer
  • Iron on Heat Transfer material
  • Napkins
  • Iron
  • Ironing Board
  • Towel
  • Tape Measure

Instructions:

Start by pre-washing the napkins.  Measure how big the lettering should be by folding the napkin (half fold or quarter fold napkins) and measure the printable area.

hostess gift idea

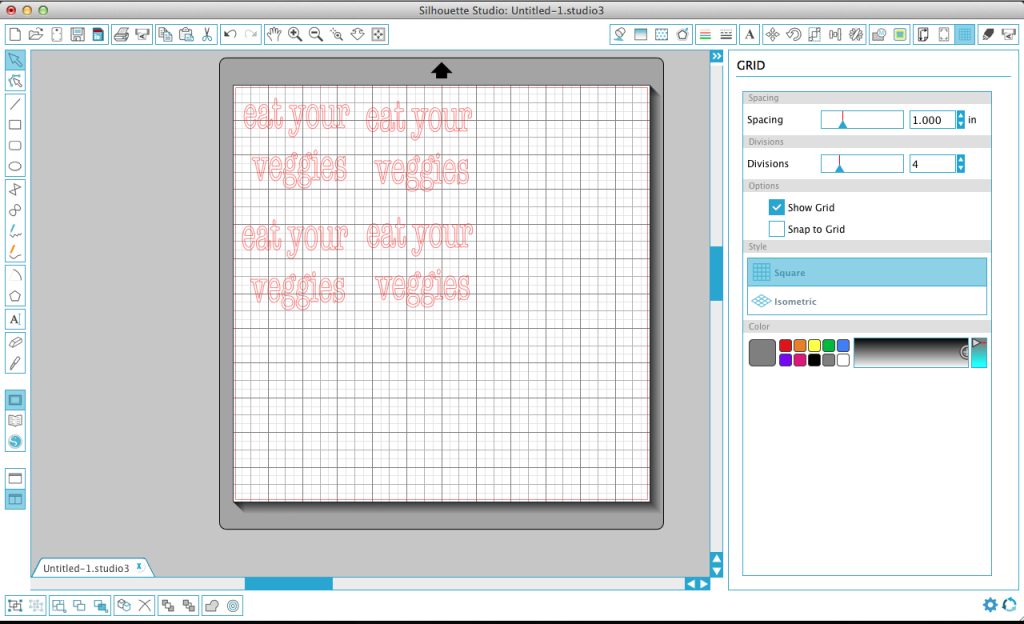
Arrange the words as you would like them to appear on the napkins.  Watch your dimensions!  Duplicate the image as many times as you have napkins.

hostess gift idea

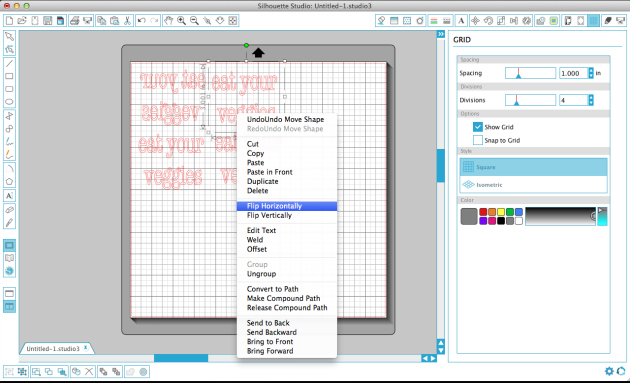
Right click on the image and flip the image horizontally.  This will be the mirror image allowing the words to be read once they are applied to the napkin.

hostess gift idea

Send the wording or images to the Silhouette or other craft cutter.

hostess gift idea

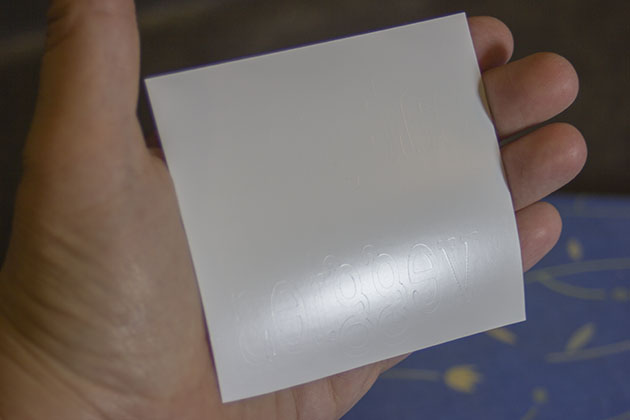
Once the image is cut,  weed out the negative spaces. Read more

How to Paint an Ombre Wall Technique | Pretty Handy Girl

How to Paint an Ombré Wall Technique

How to Paint an Ombré Wall Gradient | Pretty Handy Girl

Ombré painting is EVERYWHERE. Clothing, home décor and even wall paint techniques. An ombré wall is the paint technique I chose to create a misty and ethereal look in our master bedroom. It started when I fell in love with Kendall Charcoal by Benjamin Moore but didn’t want to make our entire bedroom too dark (I have a hard enough time waking up in the morning.) I decided a good solution was to use the dark charcoal gray color on a focal wall behind the headboard. But, I didn’t want to stop the color in the corners and create a sharp line.

How to Paint an Ombré Wall Gradient | Pretty Handy Girl

Instead, I wanted a softer edge that would make us feel like we were being hugged by the room.

How to Paint an Ombré Wall Technique

How to Paint an Ombré Wall Gradient | Pretty Handy Girl

I used Revere Pewter by Benjamin Moore to paint the other three walls in the bedroom, but created a random ragged edge where the two colors meet.

How to Paint an Ombré Wall Gradient | Pretty Handy Girl

This is how the side walls look in preparation for the ombré wall technique.

How to Paint an Ombré Wall Gradient | Pretty Handy Girl

Materials:

  • Dark latex paint color (Kendall Charcoal by Benjamin Moore)
  • Lighter latex paint color (Revere Pewter by Benjamin Moore)
  • A small container with a mixture of the two colors to create an in between gray
  • Paint brush
  • Dry brush
  • Water-filled spray bottle
  • ScotchBlue Painter’s Tape
  • Damp car wash sponge
  • Rubber gloves
  • Wet wipes or wet rag

Instructions: Read more

Super easy card table makeover
I can only imagine that Matt and I are not the only family in America with a less than stellar card table.  In fact both of ours were hand me downs from grandparents and though they may have been fabulous in the 80’s, now they are really lacking in the attractive decor department.  A few years go I picked up some vinyl table clothes with hopes of breathing new life into our sad card tables and once again life got in the way and I never recovered them.  I recently came across the table clothes and decided it was time to move on with my project but there was a small problem, I no longer liked the table clothes I had previously picked out.  Have no fear, after a quick trip to Target I was back in business and ready for my amazing, fabulous, incredible card table makeover!

Materials:

  • Card Table (old or new)
  • Damp rag for cleaning
  • Ratchet with socket
  • Vinyl Tablecloth
  • Drop Cloth
  • Spray Paint
  • Sand Paper – 180 grit
  • Drop Cloth
  • Hot Glue Gun
  • Hot Glue Sticks
  • Scissors

Instructions: 

Card Table

Give the table a good wipe down with a damp rag to remove any dust or possible cobwebs that may be lingering on the underside of the table.

Table

Remove the top of the table from the frame and legs. (Be sure to store your screws in a safe place because you will need them later.)  Most tables will be attached with a few hex screws that can easily be removed using a ratchet and socket or a socket wrench.

Read more

Best of #PrettyWaterlogueApril Week 4

Best of #PrettyWaterlogueApril Week 4

I have to send everyone who participated in #PrettyWaterlogueApril a big thank you! Thanks for participating because you blew up my Instagram feed with gorgeous images everyday! I truly couldn’t wait to check the hashtag feed to see all the beautiful creations. I hope you will consider continuing the challenge in May and beyond. I won’t be able to officially showcase my favorites, but please know that I’ll be following along. In order to create a more “lasting” hashtag, I’ve decided to change the hashtag to #PrettyWaterlogueGallery. Feel free to post your favorite Waterlogue creations using that hashtag to share and continue to gain new followers! I can’t wait to see your newest artistic creations!

Once again, this week was truly a challenge. I had over 100 favorites and had to narrow it down to 20.

Here is my week four showcase: Read more

lollipop stand

Happy Spring folks!  Jaime here from That’s My Letter back to share a fun DIY party decor idea: make your own lollipop stand.  I promise it’s fast and easy and adds tons of charm and sweetness to any party.

lollipop stand 2

This lollipop stand holds a ton of lollipops – 52 to be exact!  You could probably even use this stand for cake pops.  (The tutorial for the ‘celebrate’ script sign can be found here.)

lollipop stand 3


Materials:

lollipop stand supplies

  • 1 – 1 1/4″ wood dowel x 11″ long
  • 1 – 1×5  cut to 4 1/2″ (or any scrap wood 4 1/2″ square x 3/4″thick)
  • white gloss spray paint
  • sandpaper
  • 1 – 2″ wood screw
  • countersink bit
  • 5/32 drill bit
  • pencil
  • tape measure
  • drill
  • glue
  • scotch tape

Instructions:

Step 1: Mark the center point on the 4 1/2″ square wood base. Read more