Faux Weathered Gray Wood Grain Tutorial | Pretty Handy Girl

Faux Weathered Gray Wood Grain Tutorial | Pretty Handy Girl

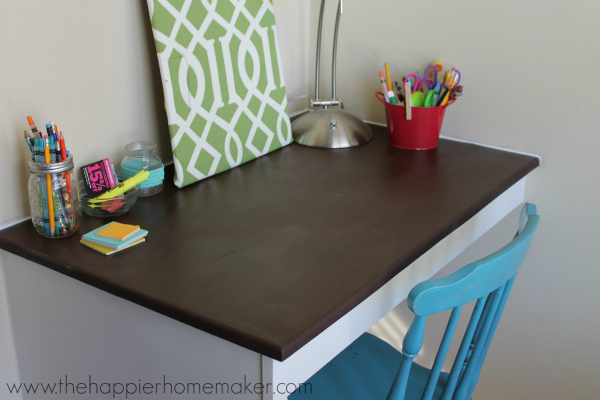
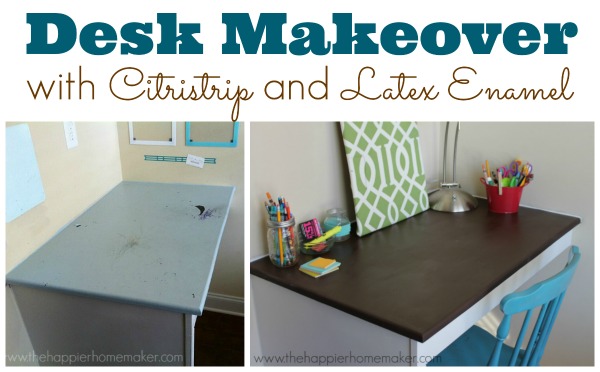
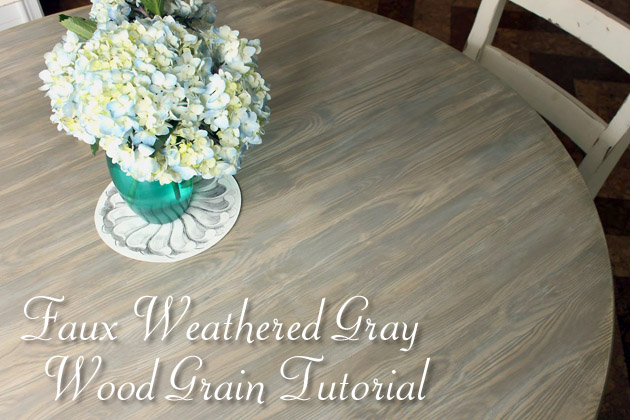
Do you love the Restoration Hardware tables that have that beautiful gray (driftwood-like) weathered wood? Me too. But, I can’t justify spending thousands of dollars on their furniture. Instead, I found a Craig’s List pedestal table that had the right shape and size for our kitchen. It was a cherry veneer finish, but after some paint you’d never know!

Faux Weathered Gray Wood Grain Tutorial | Pretty Handy Girl

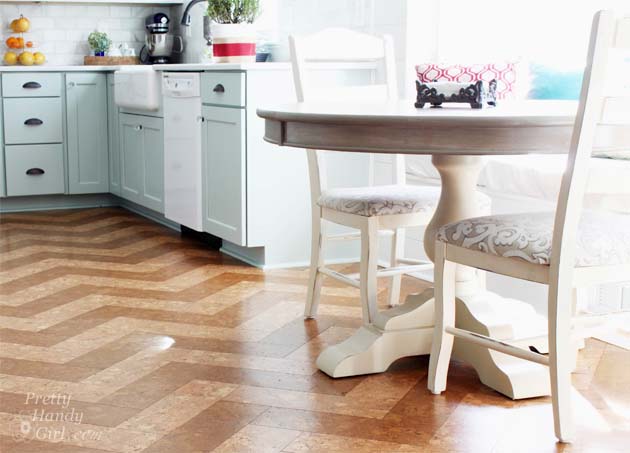
And then, I created my own Faux Weathered Gray Wood Grain top. All you need are some Valspar paint samples, some wood grain tools and a dry brush to achieve this look.

Ready to get started?

Faux Finish Weathered Wood Grain Materials:

(I’ve included affiliate links for your convenience. I earn a small percentage from a purchase using these links. There is no additional cost to you. You can read more about affiliate links here.)

Faux Weathered Gray Wood Grain Tutorial | Pretty Handy Girl

Faux Finish Weathered Wood Grain Base Coat and Glazes:

Faux Weathered Gray Wood Grain Tutorial | Pretty Handy Girl

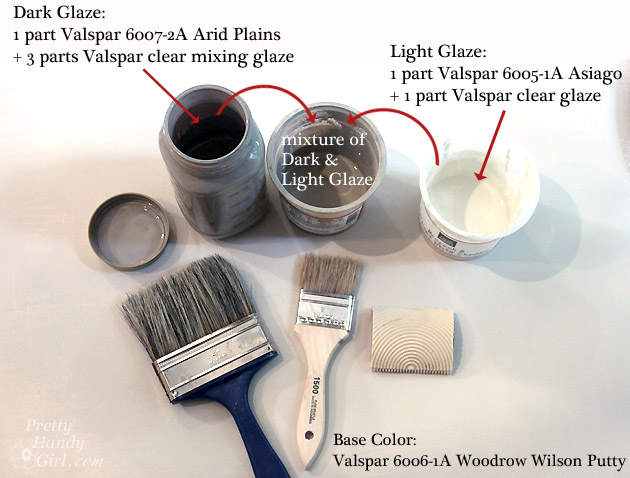
Before you begin creating your wood grain, you should paint your surface with Valspar Woodrow Wilson Putty and allow it to dry.

Faux Weathered Gray Wood Grain Tutorial | Pretty Handy Girl

If you are painting furniture, lightly sand the piece. And be sure to use Valspar Paint + Primer in one. This will allow you to paint directly onto the furniture and skip the primer. Read more

Upcycled Metal Rolling Cart Plant Stand | Pretty Handy Girl

Upcycled Metal Rolling Cart Plant Stand | Pretty Handy Girl

This past summer I spied a metal cart in a dumpster. To be frank, I have never truly actually participated in dumpster diving. The thought of actually climbing inside a dumpster has never been on my acceptable things to do list. But, this metal bar cart was floating on top of the trash pile. It was (to quote a Seinfeld episode) above the rim! And it was begging to be upcycled into a beautiful plant cart.

So, I convinced myself it was okay and wasn’t officially dumpster diving. Feel free to debate this fact in the comment section.

I brought it home and knew I could do a quick makeover with some spray paint. But, first it needed a good cleaning and some prep work. The tops of the shelves were very rusty:

Upcycled Metal Rolling Cart Plant Stand | Pretty Handy Girl

Upcycled Plant Cart Saved from “Above the Rim”

And the undersides were filthy. But, the end product was worth it! Here is how to upcycle your own little metal rusty bar cart into a beautiful plant stand!

Materials:

Upcycled Metal Rolling Cart Plant Stand | Pretty Handy Girl

  • 1 Discarded rusty bar cart (rescued from above the rim)
  • Socket set
  • Hammer for coaxing rusty bolts loose
  • Can of Rustoleum Heirloom White spray paint
  • Can of Krylon Copper Spray paint
  • Sander/sanding block
  • Fine grit sand paper
  • Wire brush
  • Rag and/or damp wipes
  • Painter’s tape
  • Drop cloth
  • Scraps of wood to elevate while painting
  • Optional: Drill

Upcycled Plant Cart Instructions:

Loosen corner bolts with a socket wrench or drill and socket bit. Hammer out any that are too rusty to budge. Read more

coffee stirrer keychain

Hello Pretty Handy Girl readers, Jaime from That’s My Letter back again to share a fun craft project.  Today we’re making DIY wood keychains using coffee stirrer sticks.

If you love coffee just as much as I do, what could be better than a nifty craft made from coffee stirrers!

coffee stirrer keychains 1

The pattern possibilites are endless, stripes, diagonal, rainbow, chevron and on and on.  And what a great gift or favor idea for a party – you could paint them to match the party color scheme.

coffee stirrer keychain sticks

I may or may not have borrowed a few wood coffee stirrer sticks from my local coffee shop with a green and white logo.  Of course, I let my daughter do the dirty work but you only need about 5 sticks for one keychain.  Or more appropriately you can purchase coffee stirrer sticks or thin wood craft sticks from most craft and hobby shops.

coffee stirrer keychains 3

The painted coffee stirrer sticks are sealed with clear gloss varnish which gives a super hard finish that will hold up to everyday wear and tear while protecting the wood and paint.

Try one and I guarantee you’ll be hooked — then you’ll be making different styles and versions for everyone you know in a school or team color scheme ;-).

coffee stirrer keychain 4Materials:

coffee stirrer keychain supplies

  • 5 wood coffee stirrer sticks
  • acrylic craft paint
  • small paint brush
  • basswood (purchase one stick at 36″ l x 3/32″ thick x 2″w)
  • super glue (gel version is best)
  • scissors
  • rubber bands
  • clear gloss varnish (Americana DuraClear or similar)
  • sandpaper
  • clear gloss polyurethane spray (optional)
  • drill & small drill bit
  • keychain hardware


Instructions:

coffee stirrer keychain step 1

Step 1: Paint wood coffee stirrer sticks desired colors using acrylic craft paint.  Paint the edges too but not the back. Read more

desk makeover sitristrip latex enamel

One of the unique features of our home’s floor plan is a “tech room” with built in desks just off of our mud room.  When we first built our house I thought they would make the perfect place for our older boys to do their homework.

PicMonkey Collage

The builders painted the desks with latex paint and unfortunately it showed evey little mark and scratch almost immediately after we moved in.  Within a few months I had already given the tops of the desks a coat of black chalk paint in the hopes of giving it a more durable surface.  I was again disappointed within a couple of weeks.

chalk paint on desk

In a last ditch effort to make the space look nice I did a total overhall last summer and redecorated the entire room.

TechRoom-Makeover2

It looked fantastic at first but again, it held up horribly.  I knew I needed to come up with a solution that would make the desks both functional and durable.

At this point the desks had multiple coats of paint and my husband and I decided to strip them bare and start over.  We opted to use Citristrip to strip the paint after much research.  We have three small children and the lack of toxicity was a big plus for us.

how to use citristripMaterials:

  • Citristrip Stripping Gel
  • Paint brushes
  • Scraper/Joint knife
  • Sanding block
  • Latex Enamel Paint
  • Safety Gloves
  • Protective Eyewear

Instructions:

Clean your surface of dust and debris. (You can see how horribly my latex painted desk held up to three little boys!)

painted desk stained

Apply a generous coat of Citristrip to the painted surface using a paint brush, you’ll notice the Citristrip has a thick, gel-like consistency and does not have the strong odor of other paint strippers.  It is important to use a thick coat (if your Citristrip begins to dry out, it was not thick enough.)

You should wear gloves and protective eyewear when working with Citristrip. (I didn’t realize until later that my husband didn’t have his gloves on in many of these pictures.  He has been sufficiently reprimanded!)

stripping paint citristrip

Allow the Citristrip to sit on the project for 30 minutes and test a small area with your scraper.  You can leave the Citristrip on the project for up to 24 hours before scraping.

Scrape the Citristrip and paint off the surface, scraping in the direction of the wood grain. The paint should be removed easily.

scraping paint citristrip

Remove paint debris and thoroughly clean the bare surface.  Sand surface lightly to remove any residual paint if necessary.

desk after stripping citristrip

When our desk was stripped we were left with a large piece of MDF.  We originally thought it would be regular wood so I attempted to see how stain would look on the MDF but the results were not good so that plan was quickly abandoned.

stain on mdf

After much research into durability we decided to use a latex enamel paint to finish the desks.  We chose latex enamel because it is a harder, more durable finish than traditional latex paint.

latex enamel

Apply one layer of latex enamel paint with a paintbrush and allow to dry fully.  Do not place anything heavy or damp on the painted surface for 7 days to allow the paint to totally harden.

desk painted with Latex enamel

I’m happy to say it has been three months so far and the latex enamel is holding up perfectly! It’s durable enough to scrub and I love the deep, velvety appearance of the paint!

MelissaSignature

 -Learn more about Melissa-


Pin for later!

DIY Aged Chippy Paint Technique | Pretty Handy Girl

DIY Aged Chippy Paint Technique | Pretty Handy Girl

This is another one of those tutorials that I’ve been dying to share with you! Like sitting on my hands and anxiously waiting to type it out. But after taking 2 weeks off from blogging, I’m back and ready to give you this fabulous tutorial for achieving the aged chippy paint look on your next project.

DIY Aged Chippy Paint Technique | Pretty Handy Girl

Before I give you the chippy gritty, I want to give you the background story on those gorgeous corbels.

If you’ve been following along, I finally completed my 13 month kitchen renovation. The last task was installing two open shelves on the full tile wall. Finding the perfect corbels to use as shelf brackets was not an easy task. I scoured eBay, Craig’s List and salvage shops. I was really getting discouraged. That was when I met Garlan from Southern Accents Architectural Antiques at Haven. We talked for a few minutes and he showed me some of the corbels he had in his store. There were some wonderful old ones, but I felt a bit like Goldilocks. One was too tall. The other not big enough, but the biggest problem was that I needed four of them. Garlan showed me some new corbels that he had. He told me he has a guy that can duplicate any corbel design and can customize them to meet any size requirements. It was as if the heavens parted and angels sang! I was elated and couldn’t wait to find an image of a design I liked. But, again, the Goldilocks in me couldn’t find the “perfect” corbels. So, I opened up Adobe Illustrator and started to design my own unique corbels.

Chippy Paint Technique

PHG Corbel Design for Sa1969.com


I designed a scroll pattern based off of one corbel I saw, but also added some relief portions inside the corbel. I sent the image to Garlan and a week later he sent me a picture of one of the corbels. It was love at first sight! I quickly approved the initial one and waited anxiously for the corbels to arrive. When I opened the box, they were beautiful and exactly as I had pictured them in my head.

Southern Accents Architectural Antiques corbels

I set forth to give them an appropriate aged chippy paint look to fool people into thinking they were actually antique salvage. Here’s how I did it. Read more