How to Fix Cracks in Door Panels without Taking the Door Apart
Wooden doors will develop cracks over time, especially if the panels aren’t free to expand and contract. Most of the time, years of paint or caulking the seams around the panels will cause the wood to stick and not allow the panel to expand and contract with the weather. The result is a big vertical crack along the wood grain. Today I’m going to show you how to repair the crack without taking the door apart!
You may remember right before I purchased the Saving Etta house, I discovered a discarded door by the dumpster behind our local grocery store. It had a big crack in the panel and was very dirty. But, otherwise, it appeared to be structurally sound. Pretty Handsome Guy and I salvaged the door on a late night rescue mission, and had a good laugh about it afterwards.
The door sat in the garage until the addition was framed and rough openings were created at the Saving Etta house. With the windows set to arrive, I knew I had to take a day out of my busy schedule to repair the cracked door and prepare it for installation.
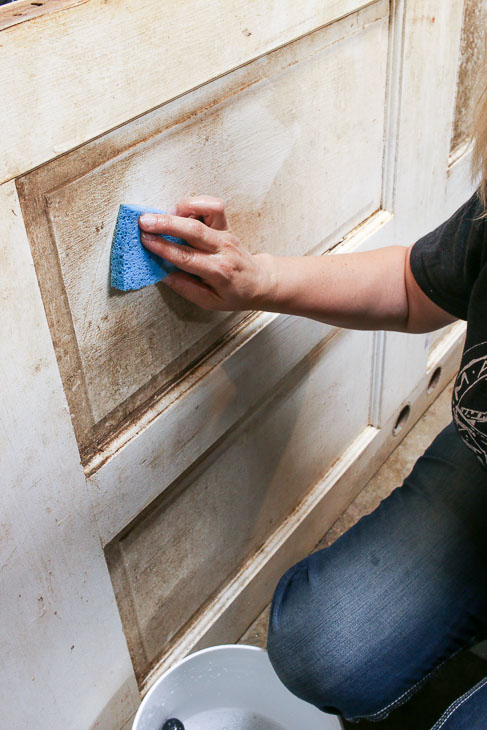
First the door got a good cleaning with soapy water.
Looking better already!
Now it was time to fix the door. Let’s learn how to repair a cracked door panel without taking the door apart.
Materials:
(I’ve included affiliate links for your convenience. I earn a small percentage from a purchase using these links. There is no additional cost to you. You can read more about affiliate links here.)
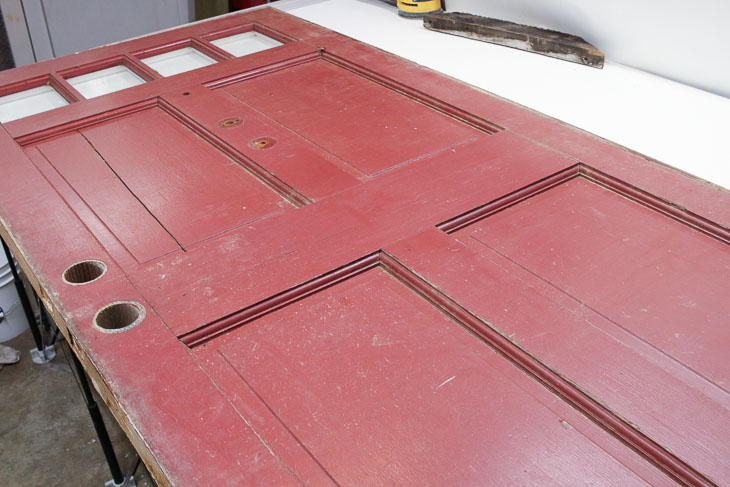
Lay the door on a flat surface like a workbench or saw horses.
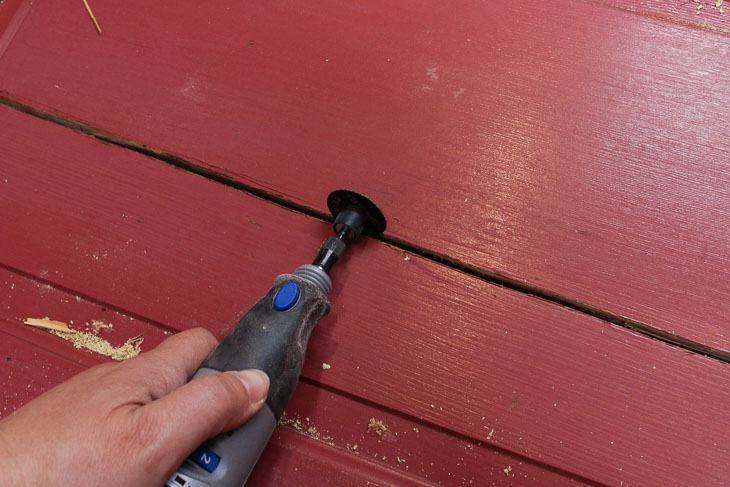
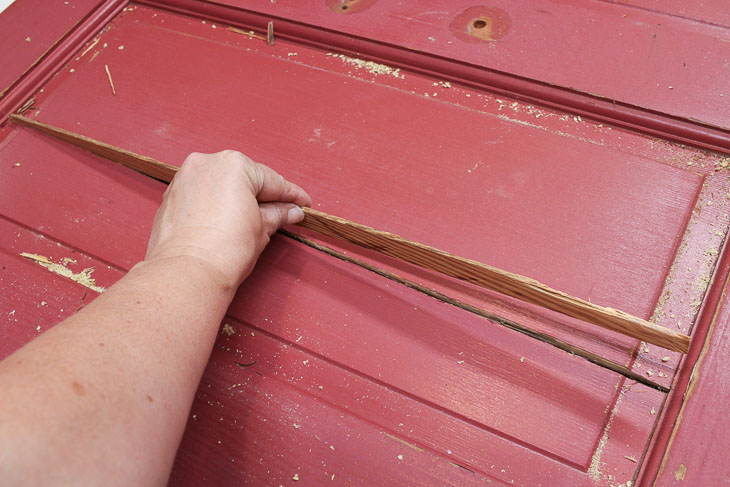
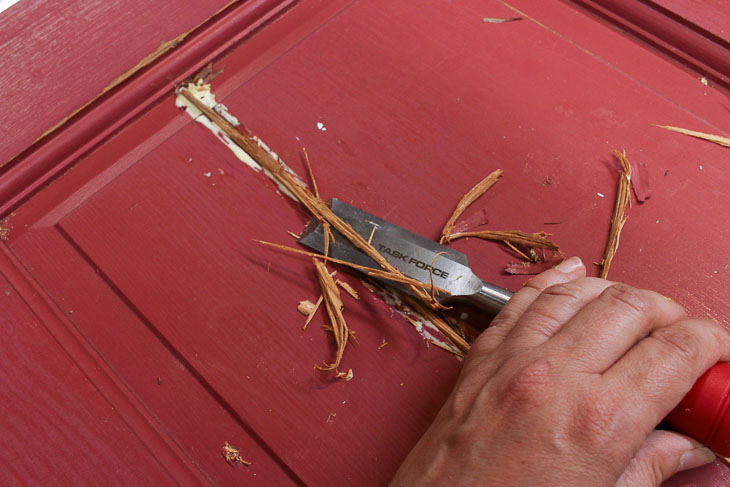
Using the Dremel with a cut off wheel, clean up the crack and open it to the width of your wood spline.
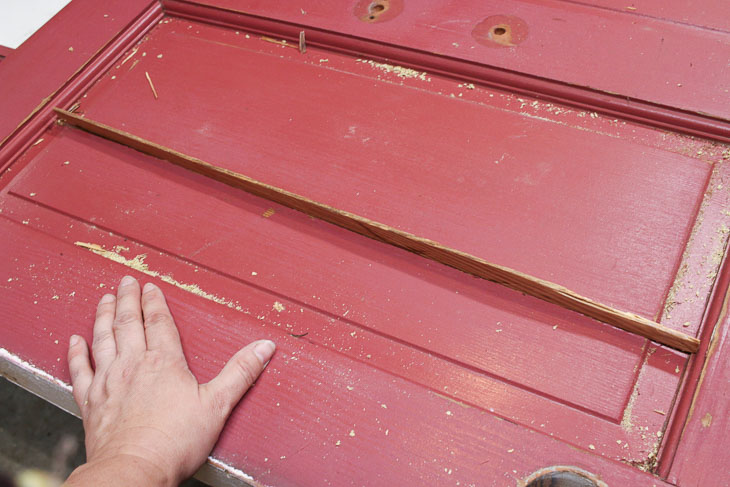
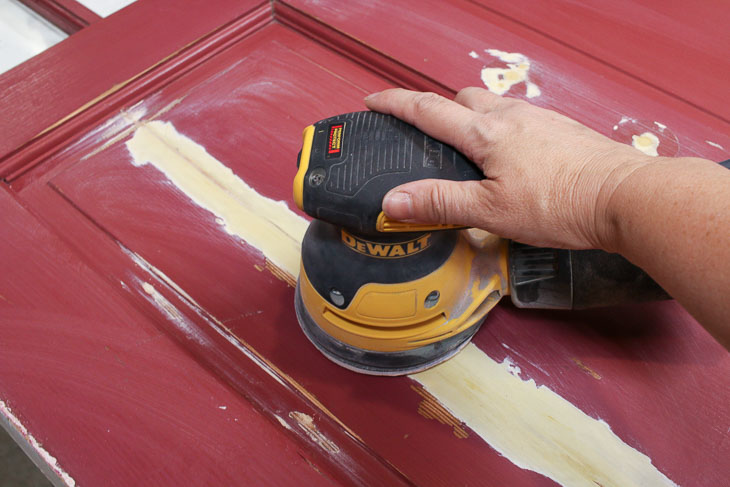
Sand smooth any jagged edges along the crack and any dings on the rest of the door.
Test fit the spline into the crack. Make any adjustments to the crack as needed or cut a narrower spline on a table saw.
The spline should fit snuggly in the crack.
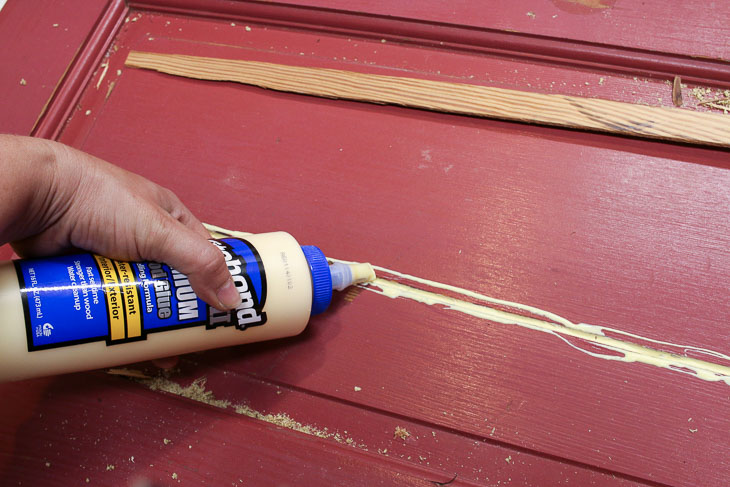
Remove the spline and apply a liberal amount of wood glue into the crack.
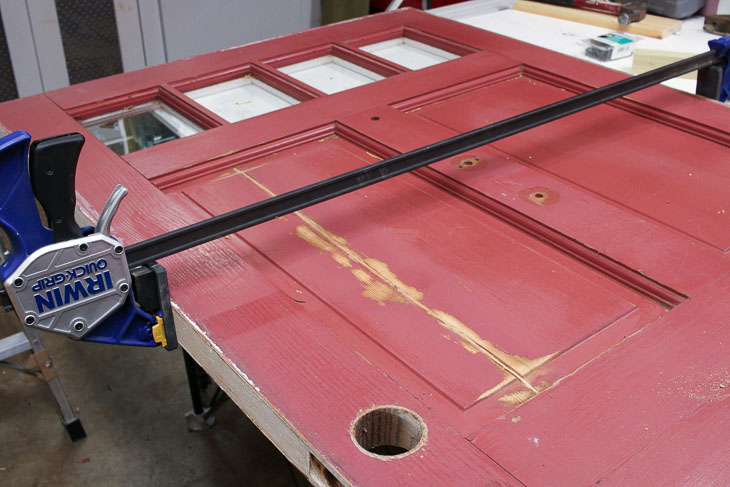
Insert the spline and clamp the door until the glue hardens.
Chisel off the excess spline (you don’t need to get it perfect, but you’ll want to remove as much of the spline that protrudes beyond the door panel.)
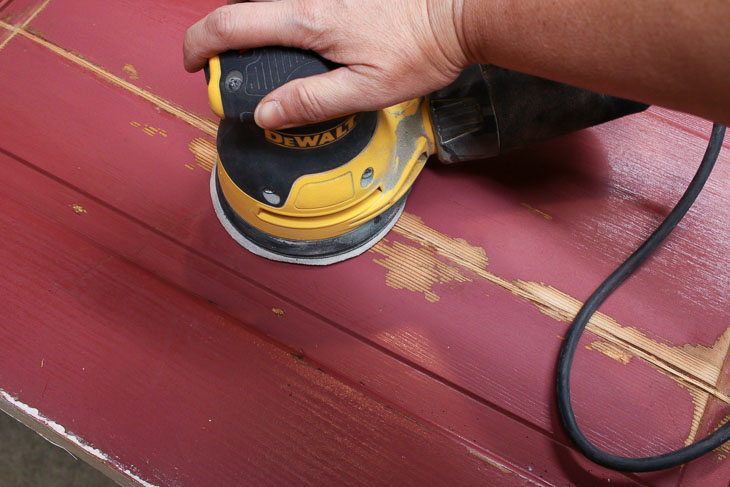
Sand the repaired crack until the spline is even with the rest of the door panel.
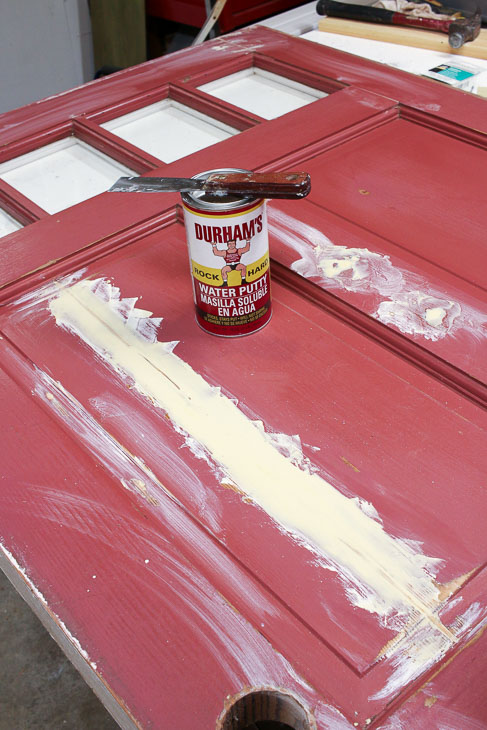
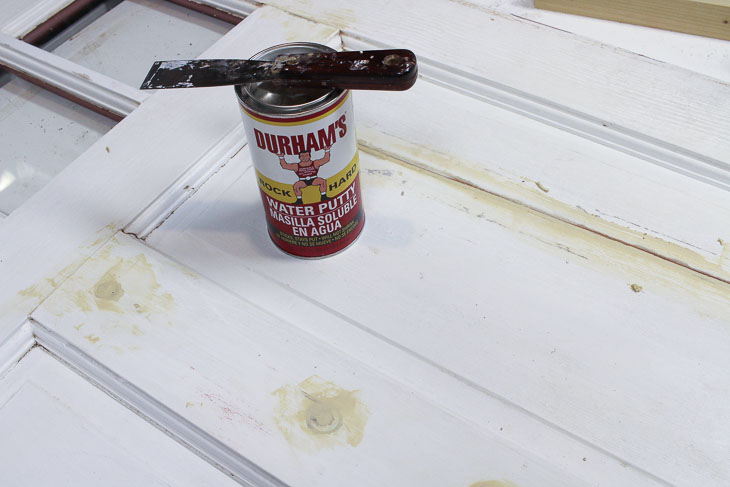
There will probably still be some minor cracks or voids, but these can be repaired with putty. Mix up a small amount of Durham’s Rock Hard Water Putty (just add water!) Apply along the repaired crack and fill in any small holes or dings on the door. Let the putty cure.
Flip the door over and repeat the process of removing the excess spline material and adding the wood putty.
After the putty has dried, sand until smooth. Start with a 120 grit sandpaper and work your way up to 220 grit.
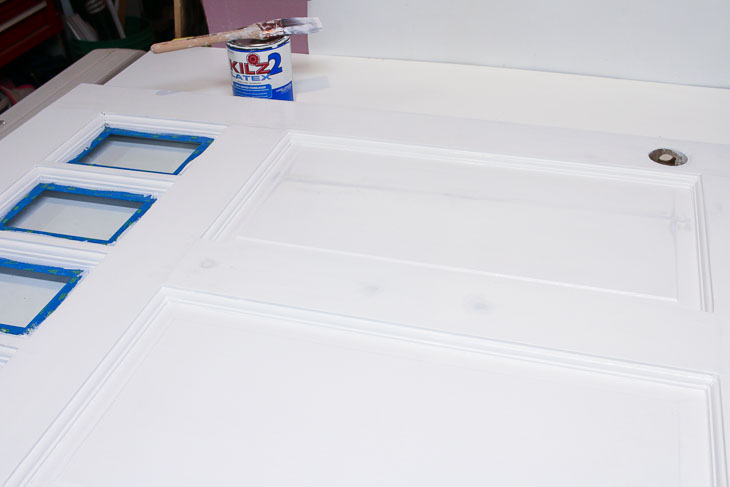
Clean the door of any sanding dust. Tape off the window edges (if applicable). Prime the door on both sides (allowing one side to dry before priming the other side.)
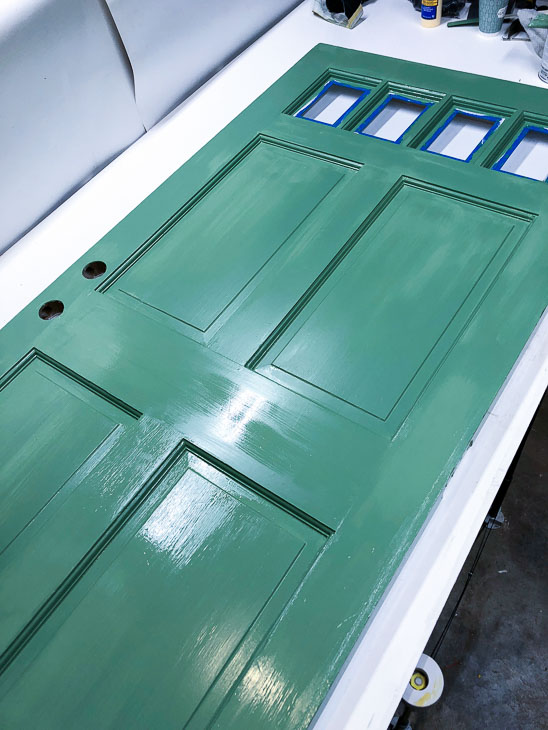
Paint your door any color you like!
Want to Stain Your Door Instead?
If you prefer the natural wood look on your door, be sure to choose a spline that matches your door’s wood species and skip the wood putty step.
Installing the Door:
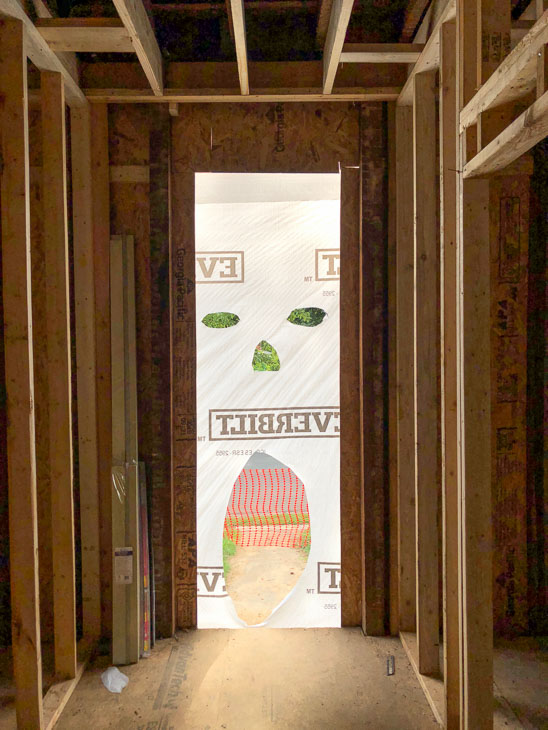
Back at the house, my framers had some fun with the house wrap at the front door.
After I added an exterior door frame kit to my repaired door, the framers hung it in the rough opening.
Because I didn’t paint the exterior of the door yet, you can barely see the repair above. But, after a fresh coat of paint, I challenge you to spot the repaired crack!
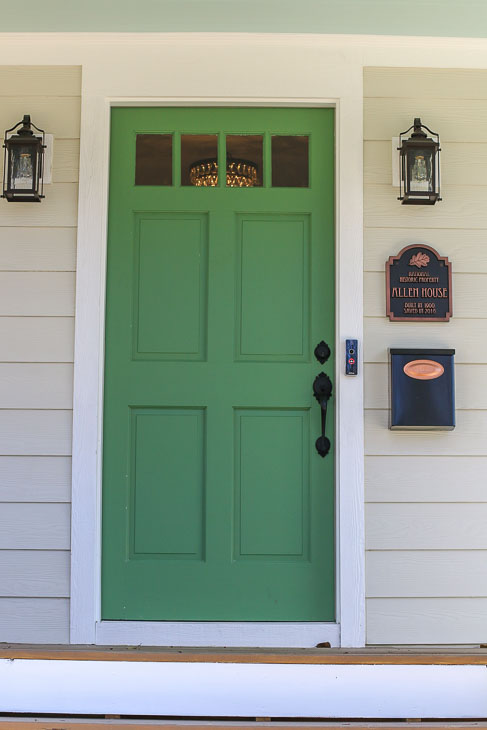
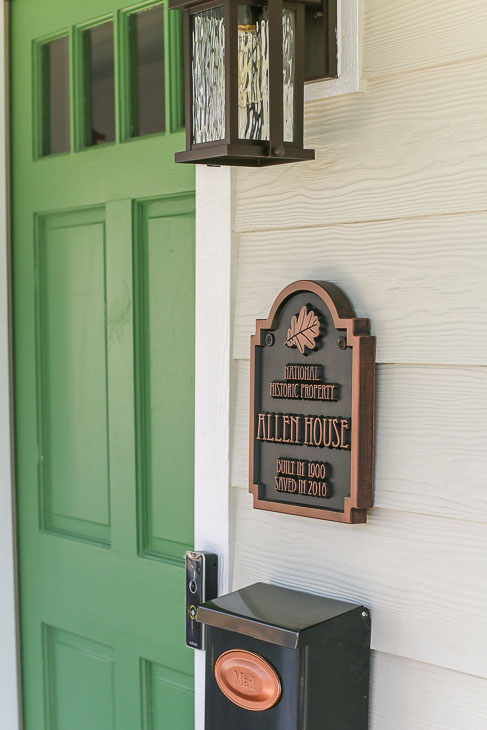
And just in case you thought I was only good at saving doors, apparently now I’m also a house saver! The Saving Etta house received her plaque denoting her name as it’s registered in the list of National Historic Properties.
Hopefully she’ll last another one hundred plus years!
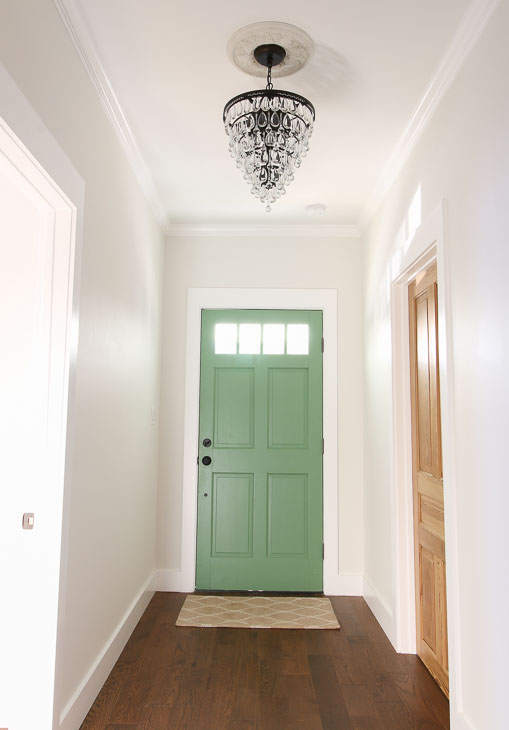
A funny story about the green door: Originally I was going to hang the door with the handle on the opposite side, but made a last minute change. The interior of the door was supposed to get painted gray to match the rest of the doors in the house (minus the salvaged 1900 doors shown above. They were left raw to show off the original wood grain and square peg construction.)
Many of you loved the green color and voted on Instagram to keep the front door green on both sides. Which is why Etta has a green front door inside and out!
What do you think? Do you like the double-sided green door? Do you have a cracked door panel in need of repair? I know you can fix it.
https://prettyhandygirl.com/wp-content/uploads/2019/03/fix-cracked-door-panel-feature.jpg353730Brittany Baileyhttps://prettyhandygirl.com/wp-content/uploads/2021/07/PHG-logo-tagline-2020-1030x211-R.jpgBrittany Bailey2019-03-01 07:00:002019-02-28 23:08:52How to Fix Cracks in Door Panels without Taking the Door Apart
Step-by-step installation guide to install cement tiles and handle intricate designs like a pro. Get expert results for any space!
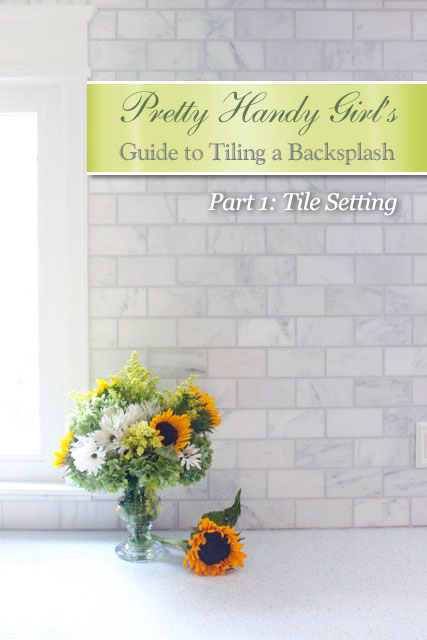
How to Install Cement Tiles
If you’ve been browsing Pinterest lately or flipping through the pages of your favorite home design magazine, you’ve probably seen (and likely fallen in love with) real cement tiles.
Cement tiles are trending, so much so that porcelain tile and ceramic tiles look alikes are popping up at most tile retail shops.
The first thing you’ll notice about real cement tiles, is the price tag can be steep.
What you probably don’t realize is cement tile can be a bit trickier to work with than standard ceramic or porcelain tiles.
Don’t let this dissuade you, because today I’m going to show you how to install those beautiful authentic cement tiles and achieve professional results.
Plus, because we’re friends, I’m going to share with you my affordable source for real encaustic cement tile options.
Cement tiles purchased from most tile retailers can run upwards of $20 per square foot. But, I’m about to let you in on my secret tile source.
Seeing those beautiful cement tiles and a great price prompted me to contact my friend at The Builder Depot and ask him about being a Saving Etta sponsor.
He agreed but on one condition; he asked me to write a tutorial on How to Install Cement Tiles and discuss the pitfalls and risks associated with improper installation techniques.
Apparently customers were unaware of the proper way to install cement tiles.
In fact, even seasoned tile installers were making costly mistakes because they were treating cement tiles like natural stone, or ceramic and porcelain tiles.
Both come in a wide selection of intricate designs, but there is a big difference between them.
Cement tiles make perfect choices for a kitchen backsplash, bringing unique character and timeless style to any space.
Their handcrafted appeal makes them a favorite among high-end retailers and design professionals.
What’s the Difference Between Cement Tiles and Porcelain or Ceramic Tiles:
Ceramic and porcelain tiles are slick (often shiny) and aren’t absorbent on the surface.
Encaustic tiles are highly porous and absorbent from the surface to the base.
Porcelain and ceramic tiles can be grouted immediately after the thinset mortar has cured.
Cement tiles must be sealed before grouting or you risk the grout staining (or permanently sticking to) the surface.
Porcelain and ceramic tiles do not need to be sealed.
Cement tiles need careful handling to avoid staining and scratching the tiles.
Porcelain and ceramic tiles are forgiving and can stand up to a lot of abuse.
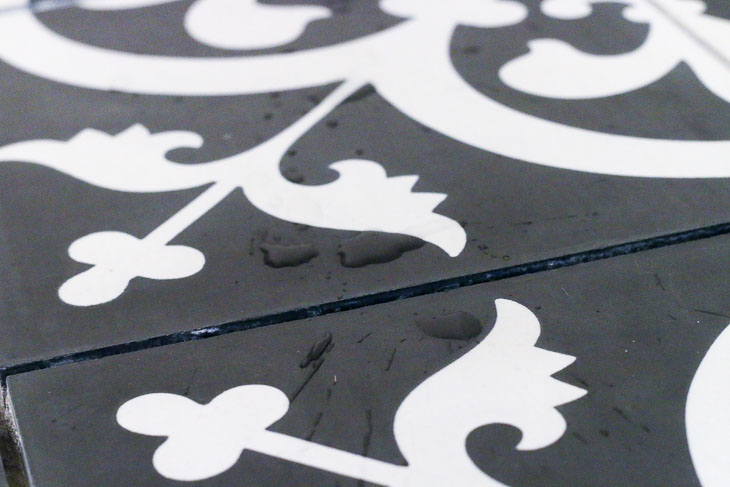
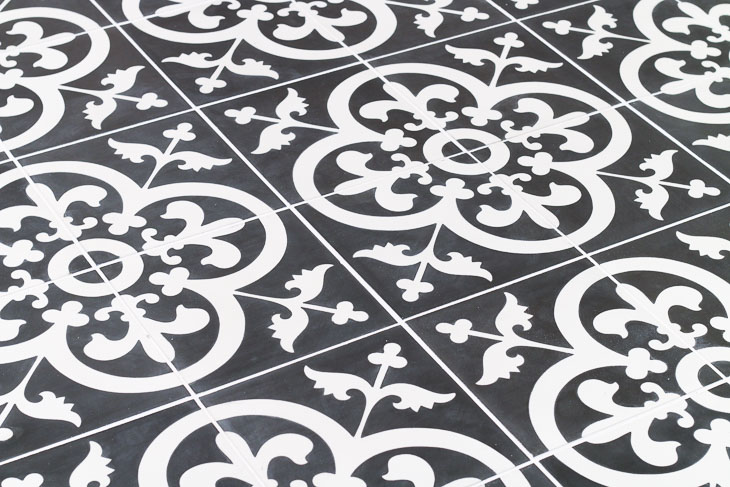
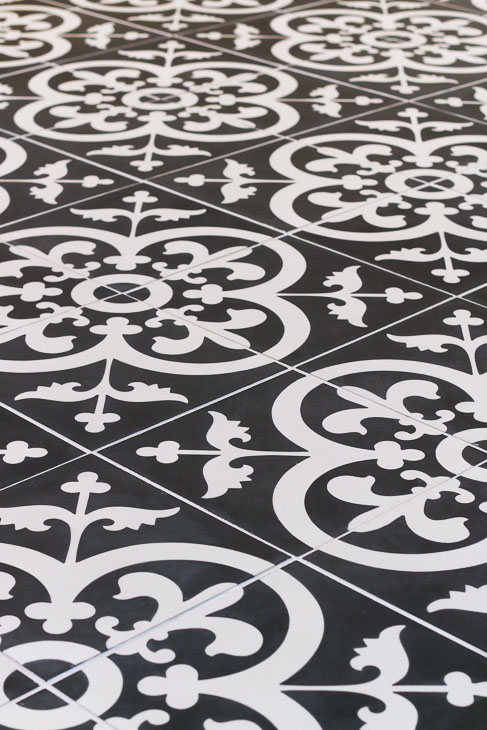
Encaustic cement tile patterns are created by pouring different colored clay baked into the tile. It’s not merely a coating.
Porcelain and ceramic tile patterns are applied in the glazes (painted on top of the tile).
Here’s a beautiful video showing exactly how encaustic cement tiles are made:
Now that you know more details about cement tiles, you can have a beautiful cement tile floor or install them as a wall tile.
But, you need to follow this tile project tutorial closely. (Almost all these instructions will apply to installing cement tiles on a wall, so keep reading.)
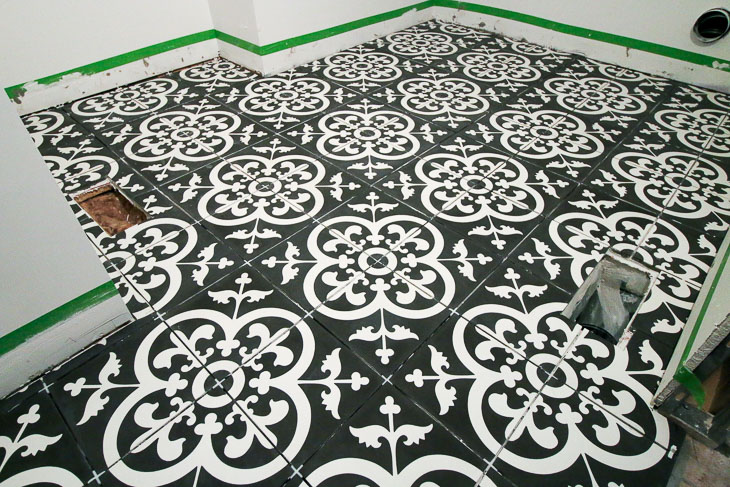
The most difficult part is choosing your desired pattern! There are so many gorgeous styles. You can even include a focal point piece to add to the center of the floor or wall.
Once you receive your cement tiles you’re going to be tempted to rip open the box and rub your grubby hands all over the smooth tiles (or am I the only weirdo that likes to stroke tiles?)
Regardless, before you open the box, wash your hands. Cement tiles are EXTREMELY porous and will absorb oils and stain easily.
Until you get to the sealing step, you’re going to have to handle these tiles with care (kid gloves wouldn’t be a bad idea.) Lest you think you can seal the tiles before installation, don’t try it.
The tiles have to be porous to release moisture while the mortar is curing. If you seal it ahead of time, there’s a good chance your tiles will develop a ghosting appearance.
Cement tiles can scratch easily. For best results, keep the packing material between the tiles until you are ready to install them.
Don’t mark your tiles with a pencil or pen for cutting (unless you will be cutting off the marks.) Even faint pencil lines can’t be easily removed from the tile surface.
How to Prepare Your Floor for Cement Tile Installation:
(I’ve included affiliate links for your convenience. I earn a small percentage from a purchase using these links. There is no additional cost to you. You can read more about affiliate links here.)
Just like when you paint a room, you’ll get the best results if you take the time to prep your space before you begin.
Before laying tiles on your floor, you must put down a substrate to prevent future flexing that can lead to cracks in your grout or worse in your tiles.
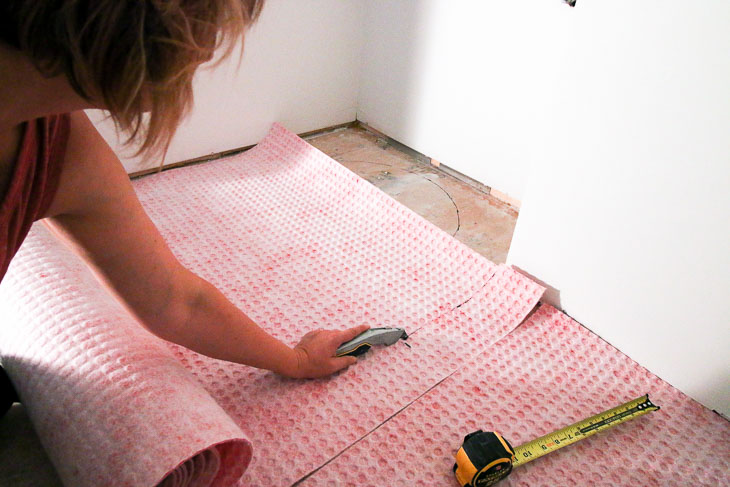
Typically tile installers will use cement backer board. But, because the cement tiles are so thick, I chose to use an uncoupling mat to reduce the finished floor thickness.
Measure and cut your mat (or cement board) with a utility knife. Dry fit the mats (or boards) before proceeding.
For improved waterproofing, you’ll want to cover seams with the recommended seam tape.
For completely waterproofed floors, add seam tape around the perimeter of the room (as shown in this video.)
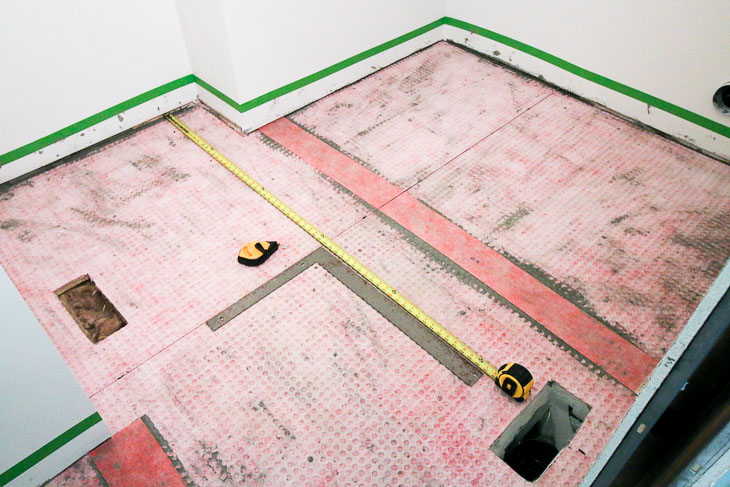
Next find the center of your room and mark perfectly perpendicular guidelines to use as a guide when laying out your tiles.
Dry fit the tiles with spacers in your room before you begin. Make any adjustments to the tile layout or pattern before you begin.
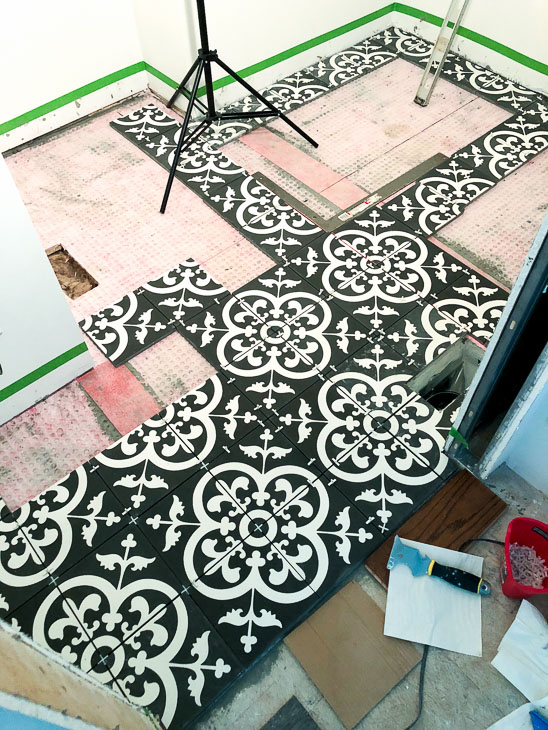
How to Install Cement Tiles:
With your substrate installed, it’s time to install your tiles. Before we begin, make sure you have these tools and materials.
A quick note on cutting the tiles. You can use a score and snap manual tile cutter for straight lines, but nothing beats a wet saw for angled and more complicated cuts.
If you don’t want to buy a wet saw, you can rent one. Tile setting is a one person job, but it helps to have an assistant to speed things along by making cuts and mixing more mortar and grout.
Here’s a video I made to help you learn how to install cement tiles properly and keep them looking beautiful!
Mix your thinset mortar according to the package directions. (I usually try to achieve the consistency of peanut butter.)
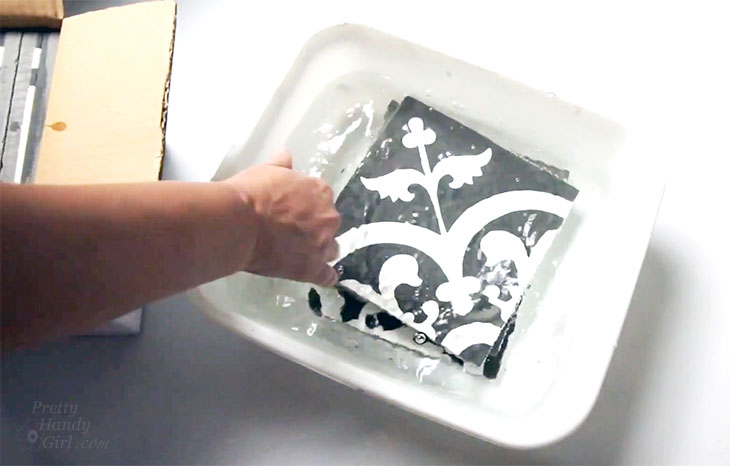
Prepping Your Cement Tiles:
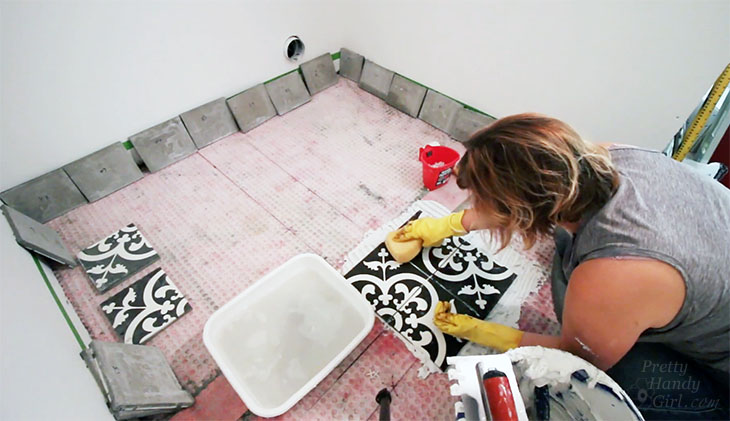
One of the most important tips for working with cement tiles is to soak them in water before installation. Allow them to soak for at least 30 seconds before laying them into the mortar.
If you don’t soak them, the tile will absorb too much moisture from the mortar.
Starting from the center of your room, apply the thinset mortar to a small area and use your 1/2” notched trowel to comb the thinset.
Lay your tiles down. Lift one tile to check and see if the mortar is completely covering the back of the tile. If not, your mortar consistency may be too dry.
Avoid the temptation to lay more than a few tiles at a time.
After your first small group of tiles are set, insert spacers. Check to make sure the tiles are level and the same height.
Then immediately clean any and all thinset off your tiles using a damp sponge.
Before sealing, make sure your tiles (and the thinset for that matter) are completely dry.
You can test the tiles for any remaining moisture by laying down a piece of plastic on the tiles after installing them.
If there is moisture the next day when you lift the plastic, they aren’t dry enough. Wait for them to dry or you could risk discoloration of your tiles.
Clean the tiles by sweeping off any debris and clean with a ph balanced cleaner (a bucket of warm water with one drop of dish soap is a good cleaner.)
Let the tiles dry. Wipe or buff with a rag.
Pour the sealer into the dish pan. Dip your pad applicator into the sealer liquid. Squeeze off excess sealer against the edge of the dish pan.
Apply the sealer in thin coats working in one direction. Remove any excess sealer from the tiles BEFORE it dries. (See the streaks below?
Those streaks and any puddling needs to be buffed off to avoid uneven drying.)
Let the first coat of sealer dry completely. In fact you may want to take a break for 30 minutes or so between coats.
Be prepared to apply many coats before your cement tiles are fully sealed. (My tiles needed 5 coats to seal them. Then I had to wait another 24 hours for the sealant to fully cure before grouting.)
It may seem like a long process, but this insures the tiles will withstand regular use and resist stains.
After each coat of sealant dries, you need to test to see if the cement tiles are completely sealed. Drip water onto the tiles.
If the water beads up, they are sealed. However, if the water absorbs into the tiles, add another layer of sealant and try the water test again later.
Once your tiles are fully sealed, wait 24 hours before grouting.
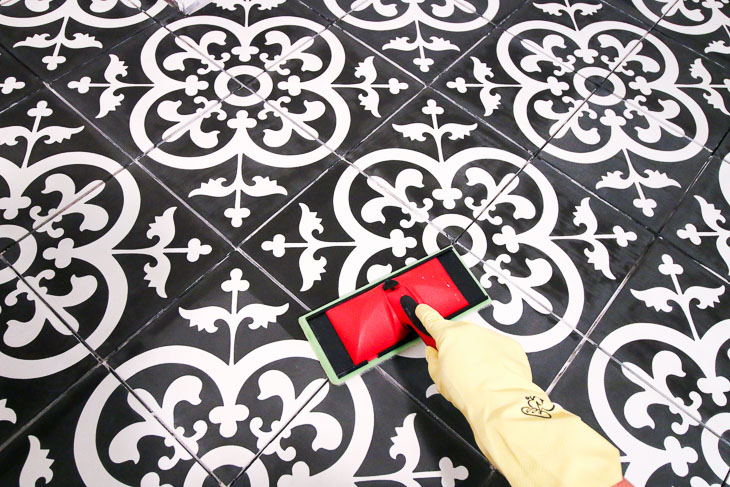
How to Grout Tiles:
Because I work alone, it takes me a little longer to grout. To prevent my grout from hardening too quickly, I like to float my mixed grout container in a bucket of ice water to slow down the setting action.
Load up your float with fresh mixed grout. Holding your grout float at a 45 degree angle against the floor, spread the grout over the gaps between the tiles in a diagonal motion.
Work in small 3 – 4 square foot areas. Then scrape any excess grout off the tiles using a clean grout float.
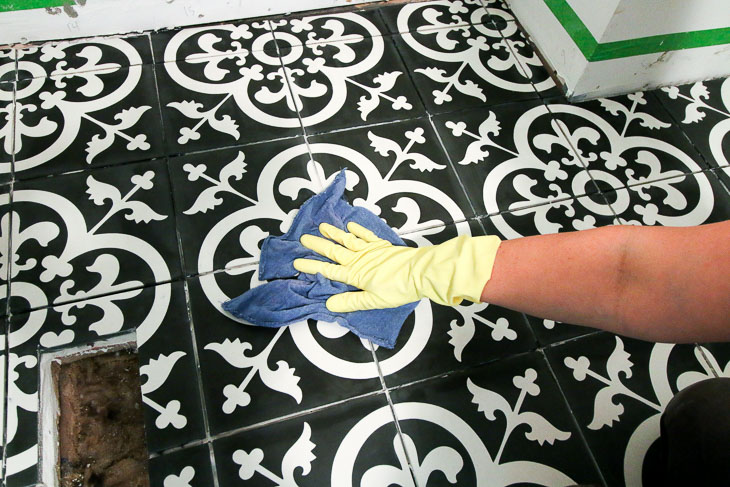
Immediately wipe off any excess grout using a clean damp sponge. Ring out and refresh your sponge with clean water frequently.
It is imperative to get all the excess grout off the tiles or you risk the grout staining or settling into the tiles.
Go ahead and move on to the next section, but go back to the previous tiles and buff off any haze with a dry rag.
After the grout has cured, clean your floors with a pH neutral mild cleanser. Then apply one final coat of penetrating sealer.
A new coat of sealer should be reapplied every 6-12 months for floors, and every 2-3 years for wall tiles.
Cement Tile Maintenance:
To protect your beautiful cement tile floors, clean up any spills immediately. Never leave anything sitting on the floor that could stain or scratch your tiles.
If your tiles get scratched or stained, you can use a fine grit sandpaper to sand off the stain on the surface of the tile. Just be sure to re-seal your tiles after sanding.
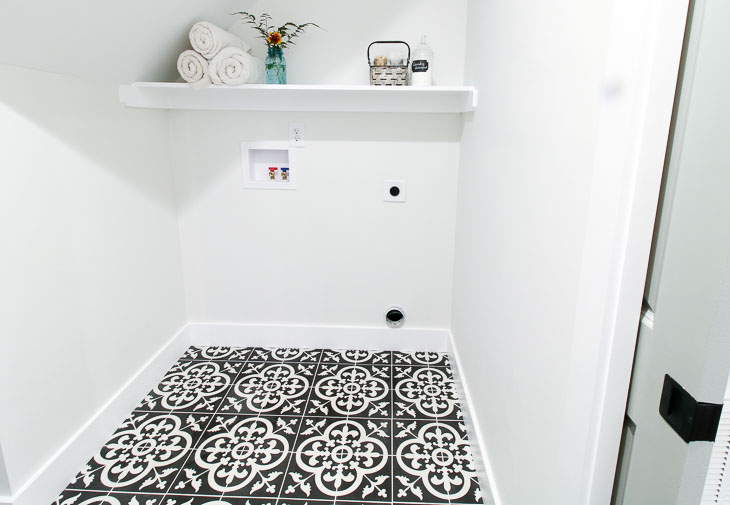
A big thank you to The Builder Depot for providing the laundry room tiles for the Saving Etta project and for giving me excellent instructions for installing the cement tiles.
What do you think? Do you love the cement tile look? They really add unique character to a home and are the perfect solution for modern kitchens and other high-traffic areas.
I hope you found this tutorial helpful. Happy tiling!
PIN FOR LATER:
Disclosure: The Builder Depot is a proud sponsor of the Saving Etta project. I was provided with materials for this project. I was not told what to write. All opinions and ideas are my own.
https://prettyhandygirl.com/wp-content/uploads/2019/01/grouted-cement-tiles.jpg487730Brittany Baileyhttps://prettyhandygirl.com/wp-content/uploads/2021/07/PHG-logo-tagline-2020-1030x211-R.jpgBrittany Bailey2019-01-28 10:00:002025-06-01 17:37:15How to Install Cement Tiles With Professional Results
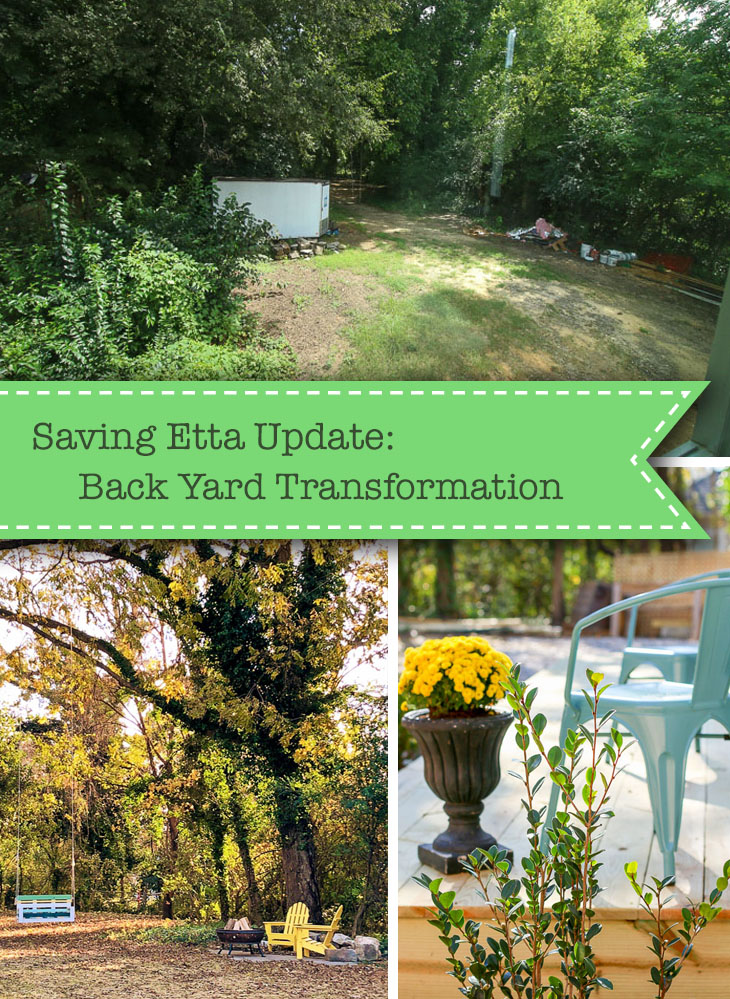
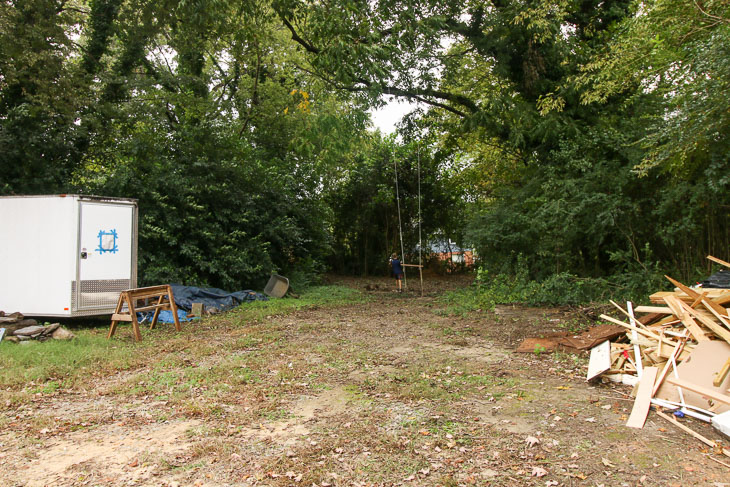
This has to be one of the biggest transformations (besides the demolition and framing) at the Saving Etta project! The backyard was an unruly mess of vines, overgrown shrubs, and weeds. I resisted the urge to do any landscaping until all the crews were finished outside. No sense in spending any time on landscaping when it would get messed up by trucks, equipment, and foot traffic.
While construction was going on, the yard took a beating. One week the demolition guys were pulling the dump truck into the yard to fill up with the debris. The next week an excavator dug the crawlspace and hauled the rest of the dirt to the back of the lot. Then we used the yard as a staging area for building supplies. Plus it doubled as extra parking on days when we had more than one crew on site. Over time most of the grass was gone and I probably picked up 4,532 random nails and screws littered in the yard. Needless to say, it was a mess by the time exterior construction was done.
On a particularly beautiful fall weekend, Pretty Handsome Guy (aka my husband) and I decided to plan a family yard work day at the house. We’ve tried to involve our boys in as much of the process as possible. We agreed to pay them for their time after the house sells. This seems to have been the incentive it took to get two teen boys off their devices and out for a yard work day.
Although there was a lot to do, I felt confident we could knock out a big chunk of work, especially using the power tools my friends at STIHL sent me. When I approached STIHL about being a Saving Etta sponsor, I assured them we’d have plenty of landscaping and yard work to showcase their new battery-powered line of tools. To be completely honest, I was a little skeptical of the power behind battery-powered vs. gas-powered equipment. But after trying the tools, I was thrilled with their performance. These STIHL tools have quickly become my favorite yard tools for the Saving Etta project AND at my own home.
Before they were delivered I had the privilege to try a lot of the STIHL gas and battery tools at the STIHL headquarters in Virginia Beach.
Joining me were a bunch of other badass builders, like April from Wilker Dos and Sarah from Ugly Duckling House. It was invigorating hanging out with other like-minded women who have figured out how to build and DIY their homes one project at a time. (See, you can do it too!)
During the event, we got to try all the new STIHL power tools. The STIHL battery-powered yard tools were definitely a hit from the start. Most of the attendees found them less intimidating. Plus, the tools were lighter weight and easier to handle.
Three Series of STIHL tools to meet your yard work needs:
The AP Series is designed for professional landscapers and people that use the tools on a daily basis on a variety of different properties. The battery has a longer run time, but also weighs the most of all the STIHL batteries.
The AK series handles the yard work of a typical suburban homeowner. The batteries have a slightly shorter run time, but the battery isn’t as heavy (a good thing for those of us who don’t lift weights on a daily basis.)
The AI series is perfect for small yards and quick clean up tasks. The AI tools plug in to charge (no external batteries.) The trimmer, leaf blower, and hedge trimmer would work well for small yards or town homes. Because there is no external battery, they are the lightest weight of the battery tools STIHL offers. The trade off is battery life is shorter than the AK or AP series.
Here’s what I love about the STIHL battery-powered AK series yard equipment:
The tools STIHL sent me are all within the AK series, so I’ll share what I love about them specifically. All the AK tools use the same batteries. Which means you don’t have to store a bunch of random batteries for each tool (although the chainsaw and mower need the AK 20 or higher battery to run for any length of time.)
In contrast to the gas-powered tools, the AK battery-powered tools are much quieter. In particular, this appeals to me most when it comes to the leaf blowers. I happen to live in a neighborhood filled with big tree-filled lots. I wish all my neighbors had the BGA 56 battery-powered leaf blower, because my Saturday and Sunday mornings would be a lot more peaceful in the fall. The unmistakable high-pitched leaf blower whine is constant in our ‘hood come September – December (and sometimes well into springtime.)
Despite my dislike of noise, my biggest pet peeve about gas-powered lawn equipment is the odor that sticks to your clothes after doing yard work. Guess what! With battery-powered tools there is no gas or stinky fumes to make you smell bad! Plus, there’s no need to keep a plethora of gas cans around for the tools that require a different ratio of gas to oil (and I can’t ever remember which tool uses which ratio.) Personally, I’d love to get rid of all our gas cans in the garage. (Something about keeping a highly flammable liquid in a room attached to our house has always made me nervous.)
Did you know a battery-powered landscape tool can save you time? It’s true because you don’t need to winterize your battery-powered tools before the cold weather sets in. And if you want to get technical, when your battery runs low, you can charge it while taking a quick little break. This saves time driving to the nearest gas station to fill up your gas can.
Finally, let’s talk about weight. No, not the holiday cookie weight I put on in December! The STIHL battery-powered tools weigh less than their gas-powered relatives. The mower was my personal favorite because it was so lightweight I could lift it into the truck by myself on days I needed to mow Etta’s front lawn. This was such a life saver since most of the time I was working solo at the house.
A little more about the STIHL AK tools I tried:
STIHL BGA 56 Battery-Powered Leaf Blower: This is by far the lightest leaf blower I’ve tried (I’ve used two other brands, one was a gas-powered and one was another battery-powered leaf blower.) The gripping handle is in the perfect spot to automatically keep the blower balanced during use. This blower has plenty of power for moving leaves (both dry and wet.) One thing I noticed recently, is there is no vibration to tire your wrists (I can’t say that about our gas blower.) My teen sons love using this blower too, especially because it is lightweight. And as I mentioned before, the noise is definitely less than a gas-powered blower.
STIHL HSA 56 Battery-Powered Hedge Trimmer:This trimmer packs quite a punch; in fact most of the skinny tree sprouts and thicker branches were easily cut by it. The HSA 56 made quick work of pruning and tackling the vines growing over the bushes. Noise and weight are both much less than a comparable gas hedge trimmer. And as I mentioned above, no gas, no mixing ratio, and easy to store for the winter!
STIHL MSA 120 C-BQ Battery-Powered Chain Saw: We have a rule in our house that if a tree is too big for a small chainsaw, then we shouldn’t be cutting it down ourselves. The STIHL MSA 120 C-BQ Chain Saw is perfect for the homeowner who wants to take down some spindly trees or low branches. It has enough power to get through some small hardwood trees on our lot. I loved using the chainsaw to break down large limbs to a manageable length for curbside yard waste pick up. It also came in handy when the lumber delivery forklift couldn’t get past a low limb.
STIHL RMA 460 Battery-Powered Mower:As I mentioned above, this is a surprisingly lightweight mower and yet it doesn’t disappoint when it came to mowing an overgrown jungle. After our summer vacation, I came back to knee high grass at the Saving Etta house. I wasn’t sure the mower would be able to handle it, but it cut through the grass with no problem. My husband has been cutting lawns since he was a teenager, so you can imagine the side-eyed look he gave me when I told him I thought he might like this battery-powered mower. One day I caught him trying it, and he told me he liked it. The one caveat is if you have a yard larger than about 1/3 of an acre, you may need a few extra batteries to replace when the first runs out. Of course it all depends on your lot size and mowing conditions. You might want to talk to your local dealer to find the mower that’s best for you. As a baseline, our lot is 1/2 an acre and mostly wooded, but we do have a fair amount of grass. The mower makes it through our lawn mowing on one AK30 battery charge. If we did run out, it’s not a big deal since we typically have one battery charging while the other is in use.
Although this post is sponsored by STIHL, I have to be totally honest when I tell you: We are in love with the STIHL battery-powered yard and lawn tools! If you were my neighbor, you’d see this to be true. We are frequently out in our yard using these pretty orange and white tools.
Now that you know a bit more about the STIHL tools I was using at the Saving Etta project (trying to SAVE the backyard); let me show you the transformation!
The Overgrown Mess of a Backyard:
Over the summer a healthy crop of weeds and brush took over most of the yard. After exterior construction was done, my husband and I loaded the boys into my truck and headed downtown. Luckily the weather was sunny and cool because it was a full day affair. Here’s the video of our work day:
By the end of the day we had cleared back at least 10 feet from each side of the yard and created three huge piles of yard waste.
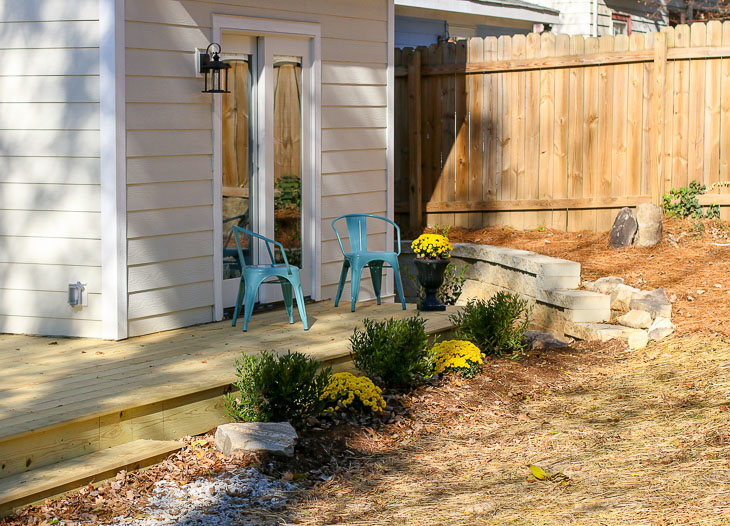
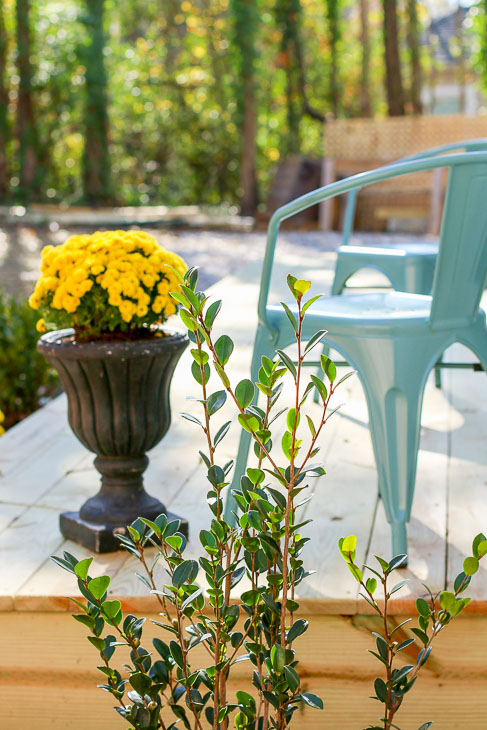
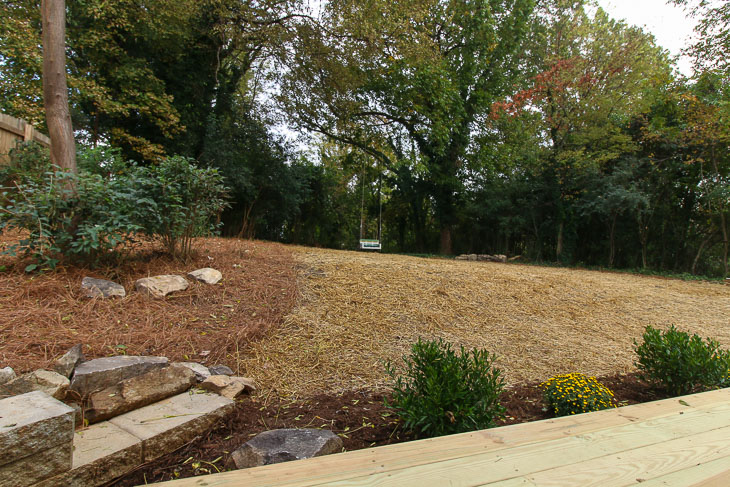
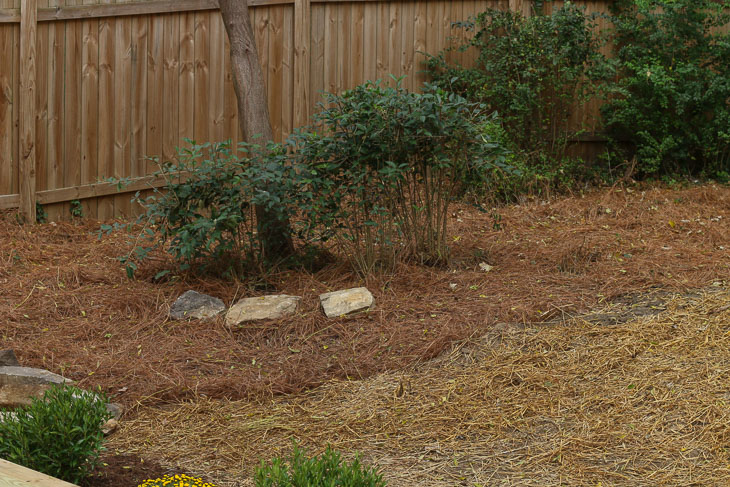
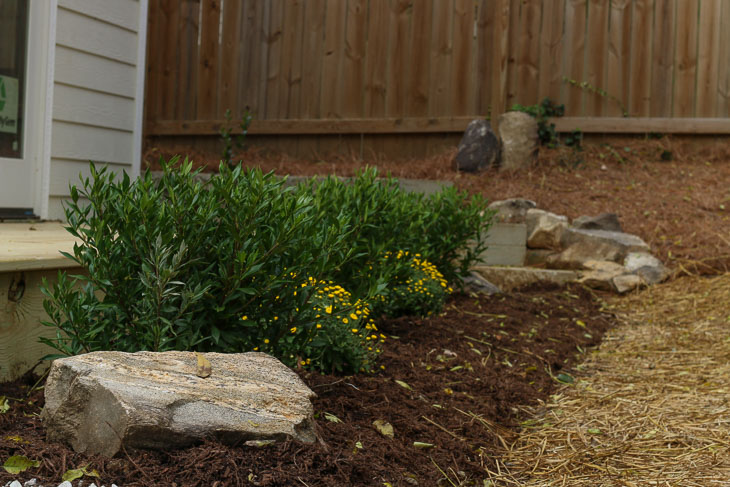
After removing the brush piles, the trailer, and leftover construction materials, we added some adirondack chairs and hung the porch swing I built using pallet wood. Isn’t this a peaceful scene? I could sit out on the swing for hours and take in the scenery.
We staged the fire pit area on top of the old shed concrete pad. I decided to leave the pad should the homeowners want to build a shed in the future. Without a garage, a shed would be a good place to store additional yard equipment.
Or they might continue to enjoy it as a little patio and fire pit.
Hope you enjoy the rest of the before and after photos.
Before:
After:
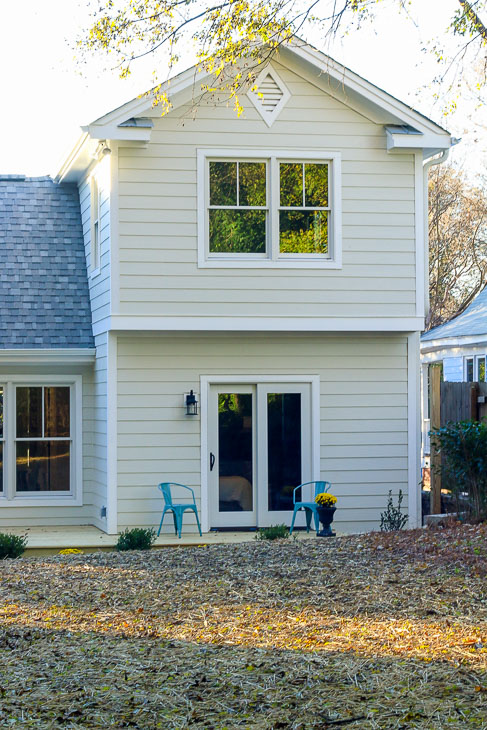
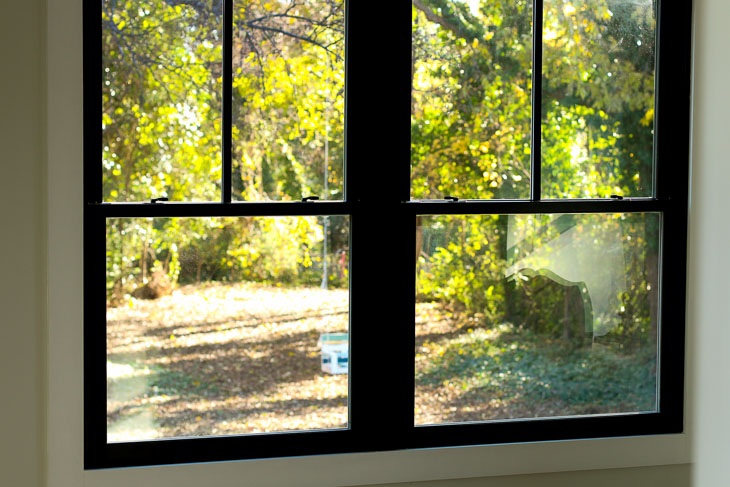
My favorite view of the backyard can be seen from the upstairs bedroom window.
Adding a deck off the back of the house really extended the living area. I had always envisioned a little bistro set outside the master bedroom.
If I lived here I’d spend mornings sitting out there with a cup of coffee enjoying the view.
Before:
After:
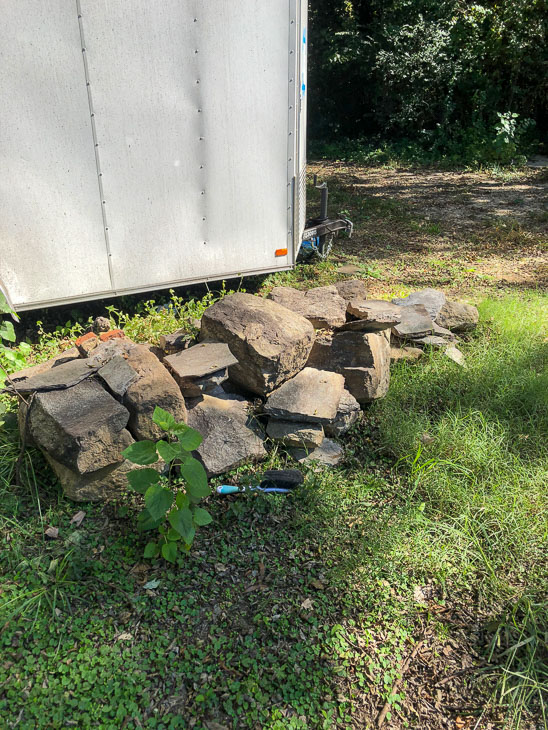
If you have a keen eye, you may have noticed all the big rocks in the landscaping.
These were the pier stones from under the original 1900 portion of the house. The mortar between them had crumbled to dust and some weren’t offering any stable support to the house. Instead of hauling them away, I decided to keep them to incorporate into the landscaping.
This one with the stripe on it is my favorite. If I lived here I’d have to give it a name, like “spot!”
Isn’t it amazing how much this yard has been transformed? It feels so private and secluded despite being within walking distance to downtown Raleigh.
A few weeks later, with the help of lots of rain in North Carolina, the grass blades started coming up!
I hope you enjoyed seeing the backyard transformation. What do you think? Do you dream of a yard this big and beautiful?
I can’t thank the folks at STIHL enough for helping make this construction site into a dream yard. If you need to upgrade yard equipment (or buy your first yard tools), I highly recommend the STIHL battery-powered yard equipment. They are a joy to use and more environmentally friendly than gas-powered tools. You should check out the STIHL equipment at a retailer near you.
Disclosure: STIHL is a Saving Etta (and Pretty Handy Girl) sponsor. I was provided with STIHL tools and safety equipment to makeover the Saving Etta yard. In addition, I was provided with an expense paid trip to visit STIHL headquarters. I was not told what to write. All opinions and words are my own. I will always let you know if you are reading a sponsored post.
There is a crisis in Wake County (and much of the country for that matter.) Affordable housing and the ability to maintain a home is a struggle for many people. Ply Gem has made it their mission to help keep people in their homes with the Home for Good Project. In the past few years they have donated over 1.8 million worth of home exterior products. Organized a small army of local contractors and volunteers to give time to take on a variety of home improvements and home repairs in the communities where they live and work.
I was honored to be a part of the kick off of the 2018 Home for Good Project, right here in my hometown of Raleigh, NC.
When Ply Gem reached out to me about being a sponsor for the Saving Etta project, we discussed how I could be a part of their larger mission to save homes. Ply Gem started the Home for Good project in 2016 to try to help homeowners stay in their homes by providing much needed repairs and renovations to houses in disrepair. Ply Gem reached out to the Habitat for Humanity’s Neighborhood Revitalization program to identify local homeowners who were in need of exterior renovations and repairs.
If you read my blog, you know that Habitat for Humanity is one of my favorite charities. All Ply Gem had to say was “Habitat for Humanity” and I knew I wanted to be a part of this wonderful project!
8 Days, 5 Houses and 400 Volunteers
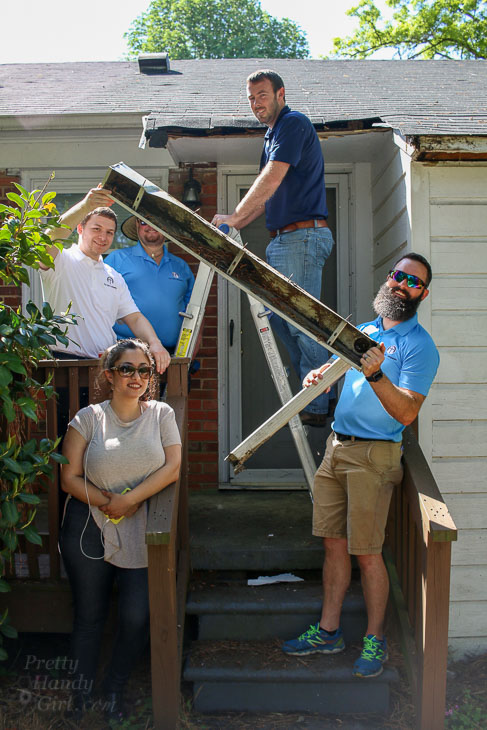
It began on one of the hottest weeks in Raleigh. The 2018 Ply Gem Home for Good Project kicked off on a Monday with 90 degree heat here in North Carolina. Despite the weather, hundreds of volunteers showed up to make a difference.
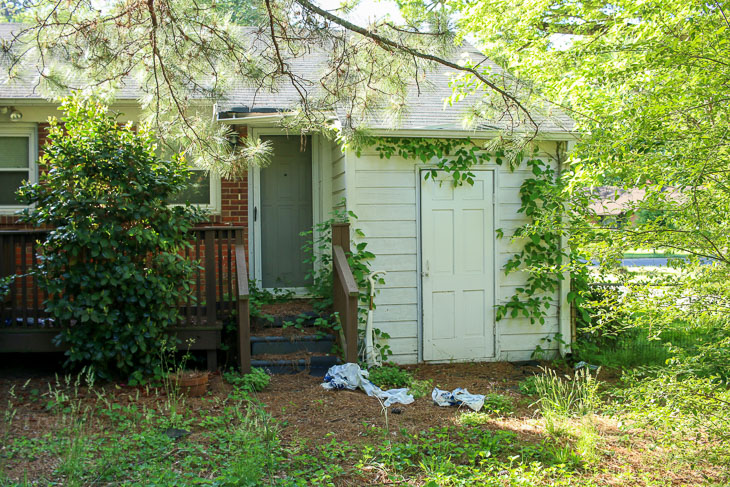
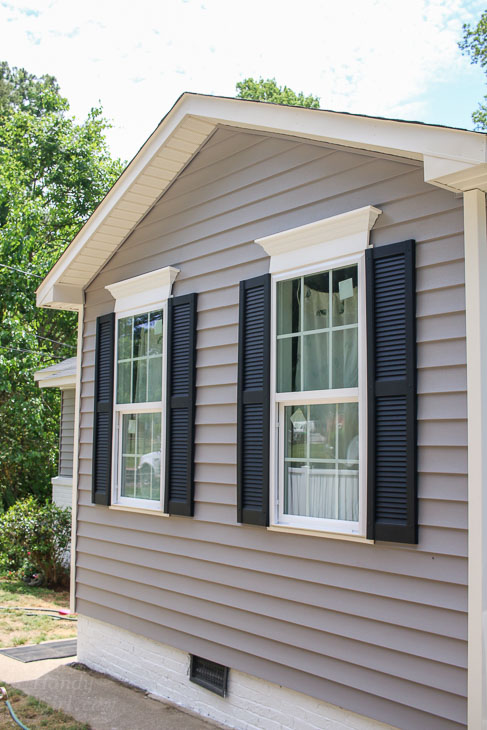
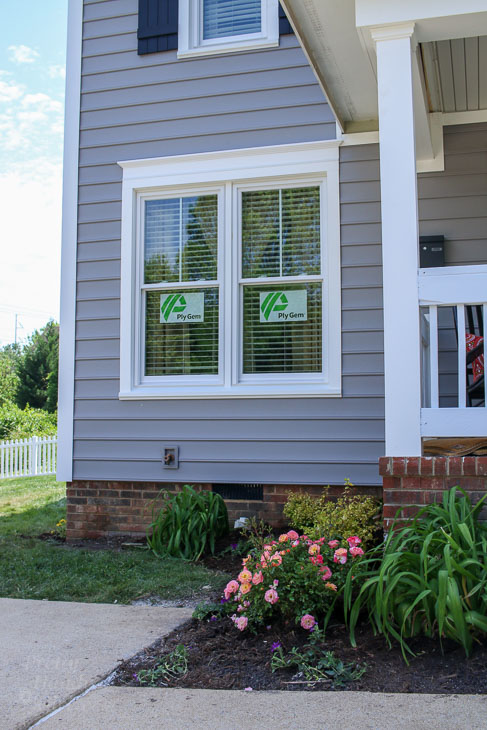
Each house had at least a dozen volunteers eager to chip in and make a difference for the homeowner. The repairs involved adding beautiful new energy efficient windows and long lasting maintenance free siding from Ply Gem. The homes also received a variety of other exterior renovations including new roofs (when needed), new paint, and landscaping.
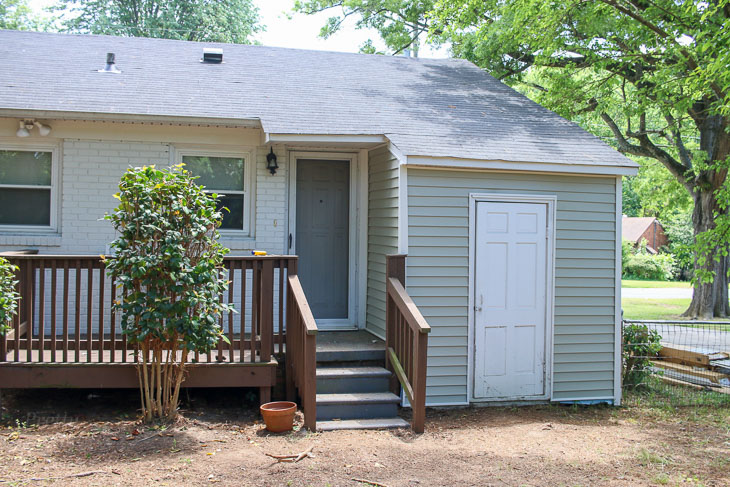
I took a day off from working on Etta and drove my work truck over to the Home for Good Project house I was assigned to. When I pulled up out front of this cute little ranch house, it looked in pretty decent shape until I got closer.
The yard was overgrown and the bushes were growing on the house.
A poison ivy vine had been climbing around the back storage structure and deck for a while. And the siding was in rough shape.
We all worked together to remove the poison ivy and trim branches from around the house.
Within an hour, the over grown bushes and vines were tamed and trimmed.
Next we moved on to maintenance tasks. We cleared the gutters and I took down a downspout to clear a clog.
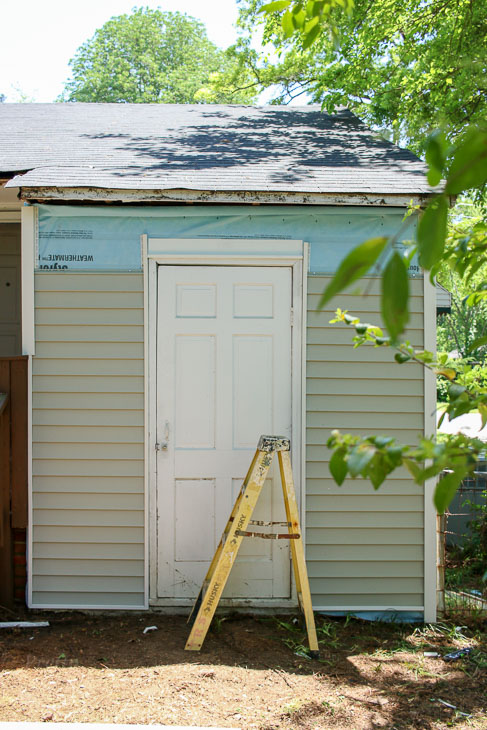
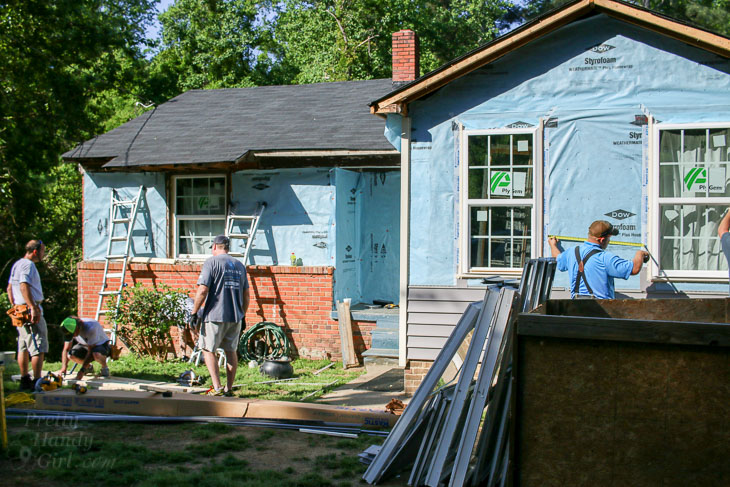
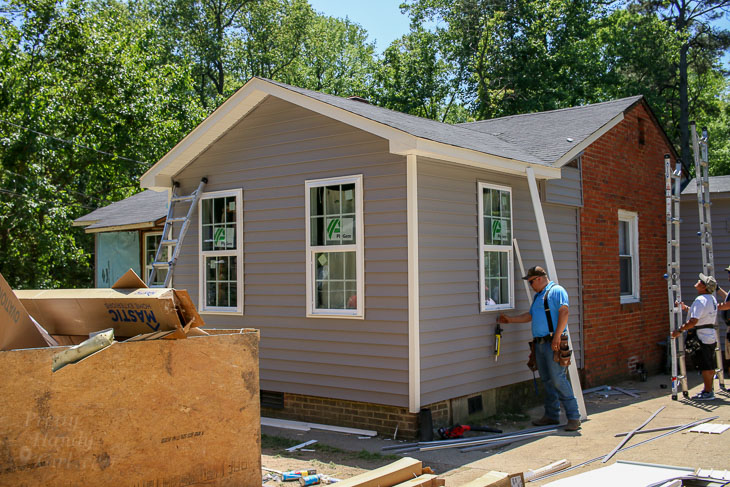
A group of contractors showed up to start installing the new vinyl siding.
It amazed me how quickly the siding was installed. And the light moss green color was a nice compliment to the house.
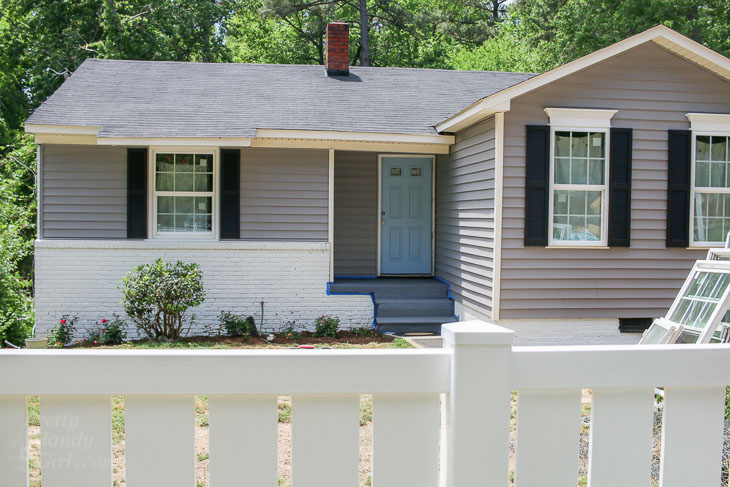
The house looked so much better by the end of the day. But, you won’t believe what this house looked like by the end of day eight! Ready to see some dramatic before and after pictures?
Front Before:
Front After:
Back Before:
Back After:
Back Deck & Shed Before:
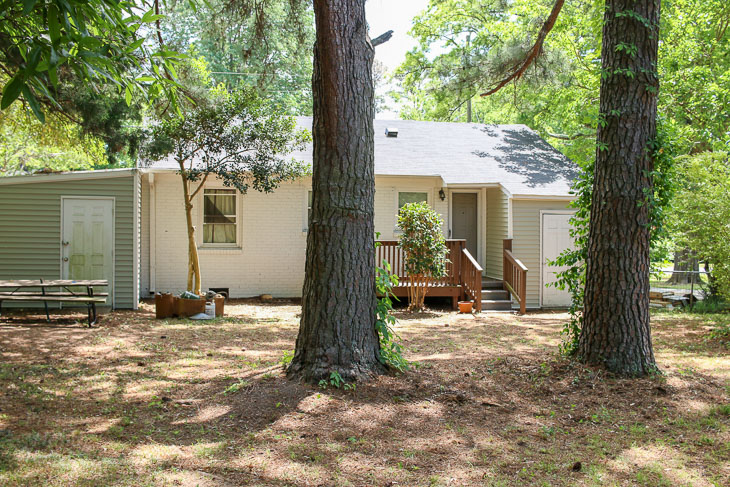
Back Deck & Shed After:
Hard to believe it’s the same house!
Want to see more? This is another Home for Good Project house around the corner from the one I worked on.
Front Before:
Front During Rehab:
Front After:
The siding, the windows, shutters, and trim were all donated by Ply Gem. Check out those beautiful new shutters, windows, and pediments!
Ready to see another transformation?
House Before:
House After:
New siding, windows, and trim made this house a show stopper!
I can’t get over that adorable yellow front door.
This was such an amazing experience to be a part of. I hope to be a volunteer for the Home for Good Project again next year.
Want to learn more about the Home for Good Project created by Ply Gem? This video will explain more about the program and give you a peek at the actual transformations.
Disclosure: This post is a sponsored post for Ply Gem. It was written as part of their sponsorship of the Saving Etta project. I was not told what to write. All words and opinions are my own. I am very particular about the brands I work with, and only partner with companies that provide quality materials and/or services.
https://prettyhandygirl.com/wp-content/uploads/2021/07/PHG-logo-tagline-2020-1030x211-R.jpg00Brittany Baileyhttps://prettyhandygirl.com/wp-content/uploads/2021/07/PHG-logo-tagline-2020-1030x211-R.jpgBrittany Bailey2018-05-28 07:00:002018-05-29 22:11:21Helping Homeowners Stay Home for Good with Ply Gem
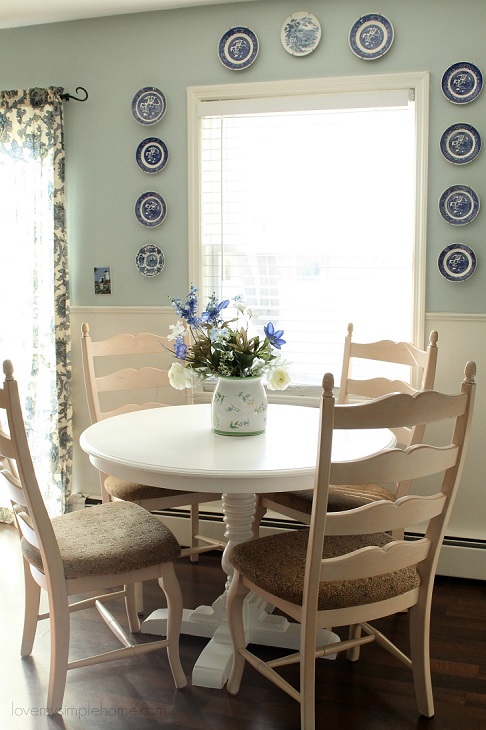
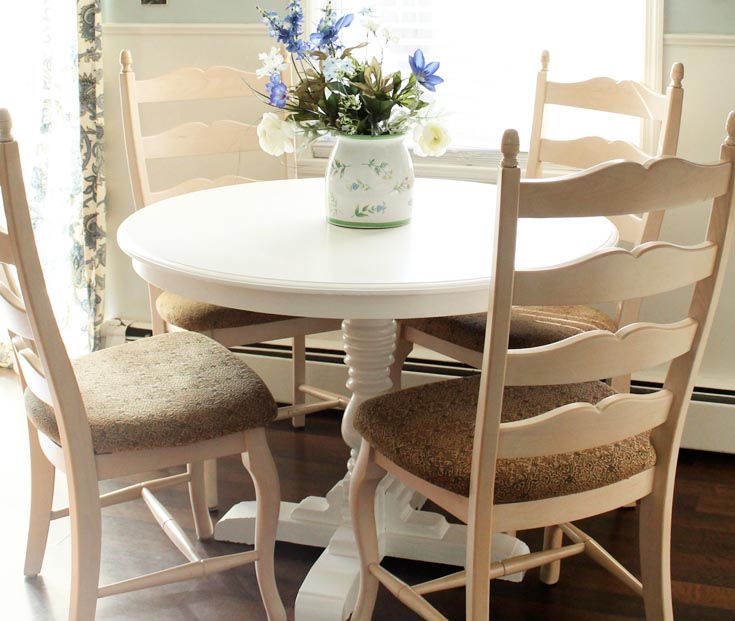
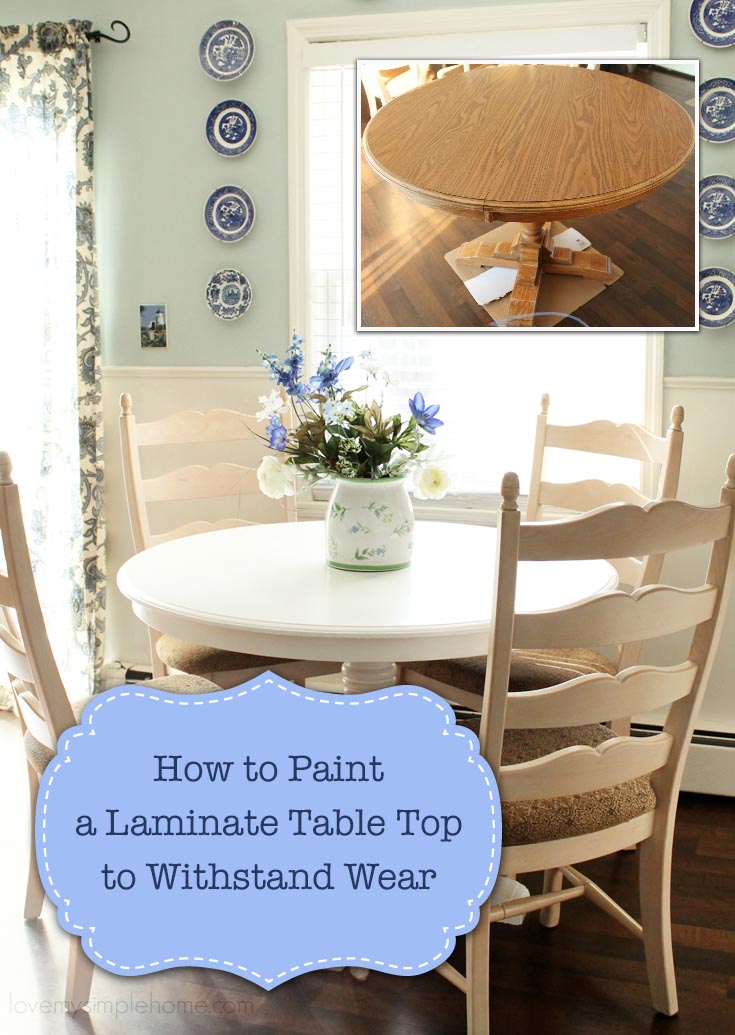
Do you have a laminate top dining table that you want to paint, but are not sure how to paint it so it will withstand the wear and abuse a table usually receives? I can help by showing you how I painted my table. It was easy to do but takes some patience.
Hello awesome readers, I am Julie from Love My Simple Home, and I’m so excited about today’s post! Over the summer I purchased this laminate dining table at a yard sale to use in my dining room. After storing the table for several months, I finally decided to pull it out of storage and give it a beautiful new finish with bright white paint.
Laminate Table Top Material List:
Palm Sander
Paint with Primer
Foam Roller
Paint Pan
Synthetic Paint Brush
Polycrylic Clear Satin
Paint a Laminate Table Top Step 1: Clean
The very first thing you need to do is wash the table off. Use a soapy sponge with water to clean all the dirt, oil, or grime off the table top and base. Use a clean dry towel to dry it completely.
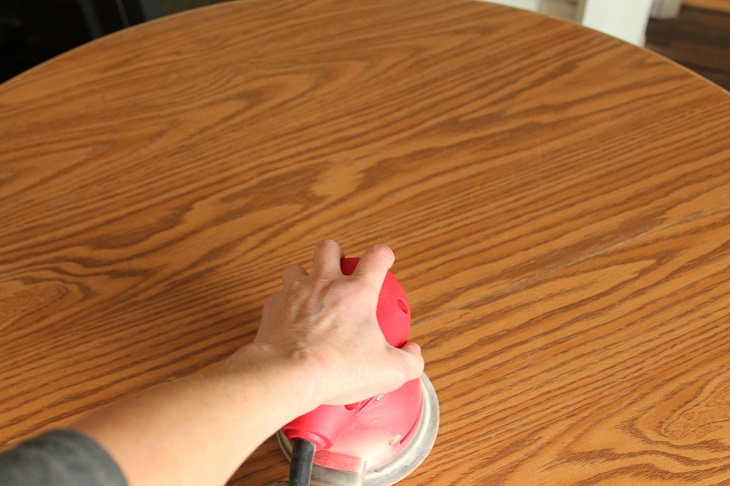
Paint a Laminate Table Top Step 2: Sand
The purpose of sanding is to give the paint/primer something to grab onto. Use a palm sander with 220 grit sandpaper and sand the top in the direction of the grain. You don’t need to sand too much, just enough to add some “tooth” for the paint to stick to. After sanding, clean the surface again with a soft clean cloth. If the base of your table is in poor condition, go ahead and sand it too. (You might find it easier to hand sand the base of the table.)
Paint a Laminate Table Top Step 3: Paint
A table that will be used daily needs a paint that is durable and can withstand spills. I recommend BEHR Premium Plus Ultra in an Eggshell enamel finish. (You don’t need an entire gallon, one quart is plenty.) This paint is stain-blocking and is paint & primer in one. For a super bright white, use Ultra Pure White.
Apply 4 thin coats of paint with a foam roller. Wait 2 hours between coats. Don’t let the first few coats discourage you. They will show the laminate underneath. Be patient, the end result will be a beautiful smooth finish.
This is what the table looks like after one coat:
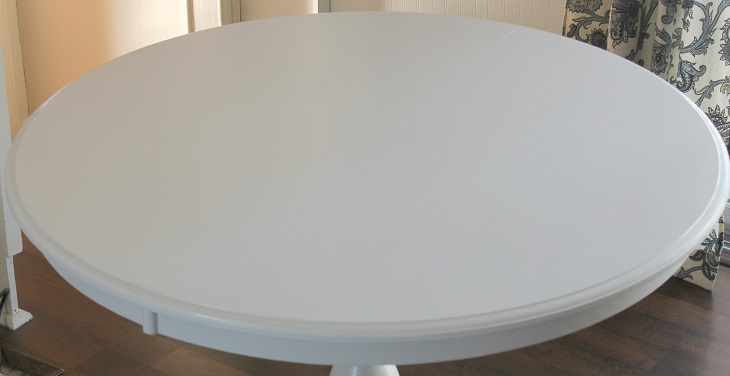
Here is the same table after 4 coats:
If you are painting your base, use a paintbrush to paint the legs and other parts of the table that are not easily accessible with the roller.
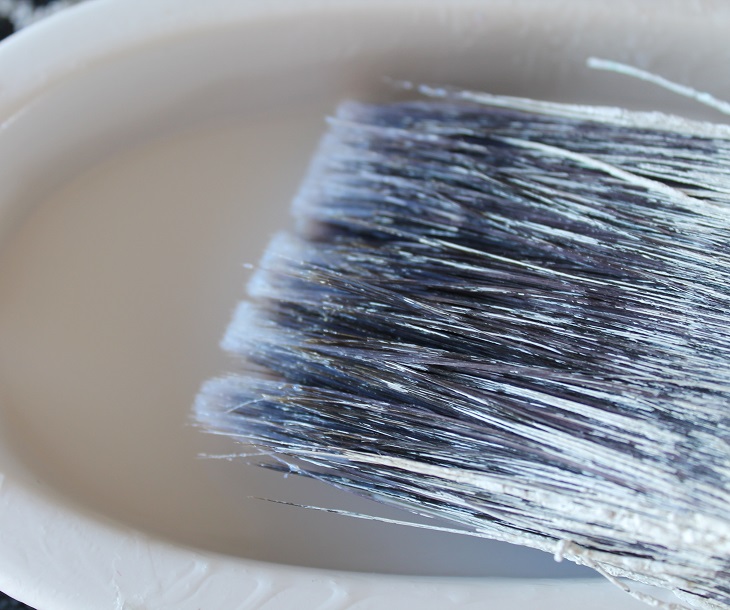
Paint a Laminate Table Top Step 4: Seal
The final step to keep your table beautiful and help it stand up to wear is to seal it! Use at least 3 coats of Minwax Polycrylic clear satin to seal the top of the table. Using a synthetic paintbrush apply one thin coat and let it dry overnight (patience). Then lightly hand sand with a 320 grit sandpaper. Clean off the surface and add another coat, wait 2 hours and apply the final coat (or more coats if desired).
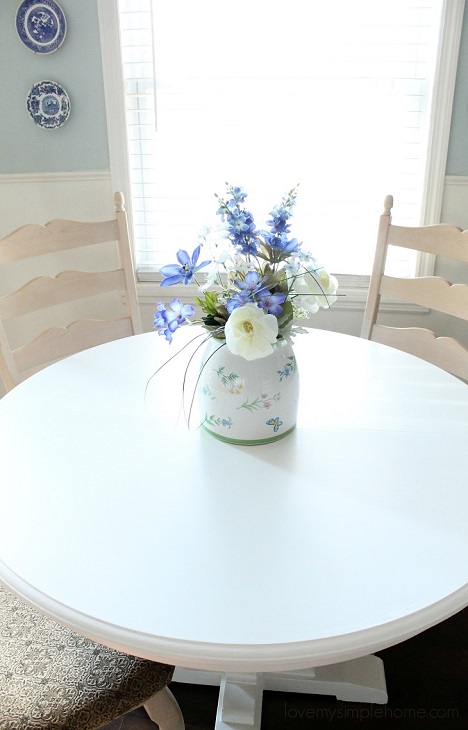
Allow the sealer to harden for at least 48 hours. Then start eating at your beautiful new table.
Would you believe this table was an ugly laminate tabletop if you had not seen the before pictures?
That’s it, I hope this tutorial was helpful!
If you liked this post, I think you’ll also love these posts because they will help you transform more furniture in your house!
https://prettyhandygirl.com/wp-content/uploads/2018/02/how-to-paint-laminate-table-horizontal-feature.jpg621735Julie at Love My Simple Homehttps://prettyhandygirl.com/wp-content/uploads/2021/07/PHG-logo-tagline-2020-1030x211-R.jpgJulie at Love My Simple Home2018-02-28 10:00:002018-10-17 18:36:30How to Paint a Laminate Table Top

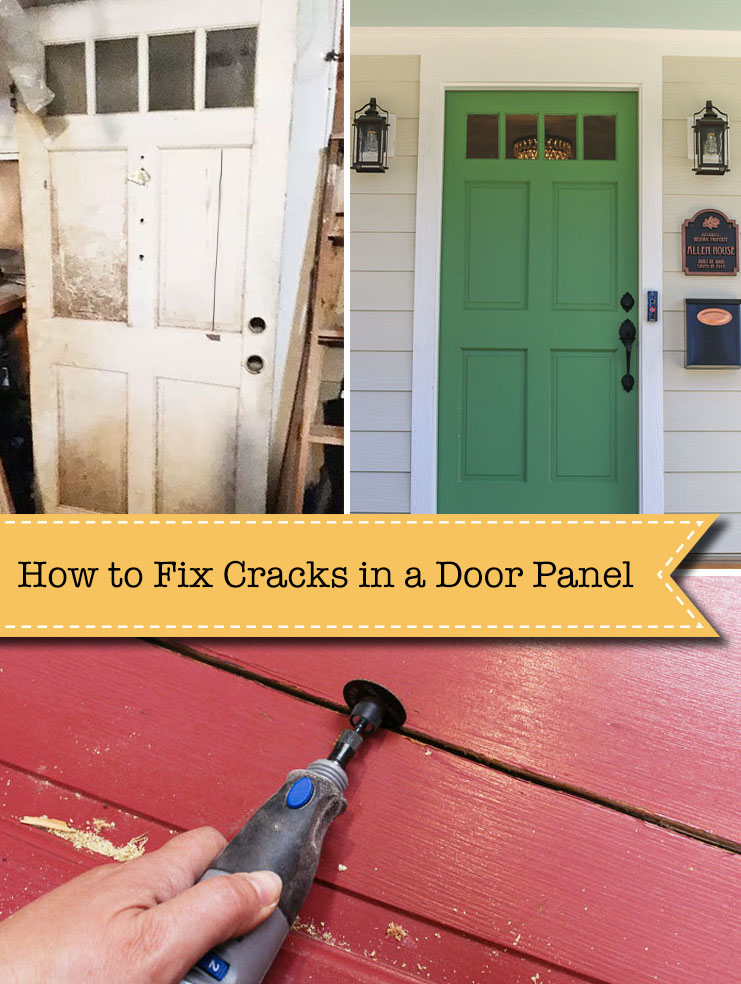 How to Fix Cracks in Door Panels without Taking the Door Apart
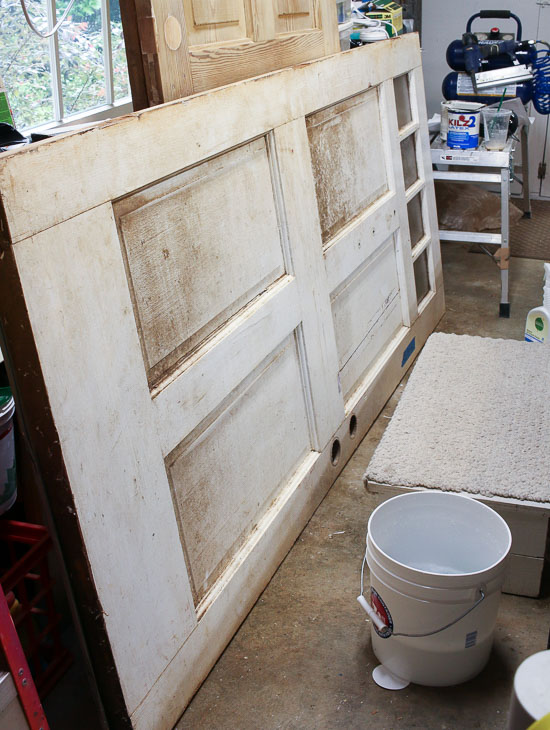
 Looking better already!
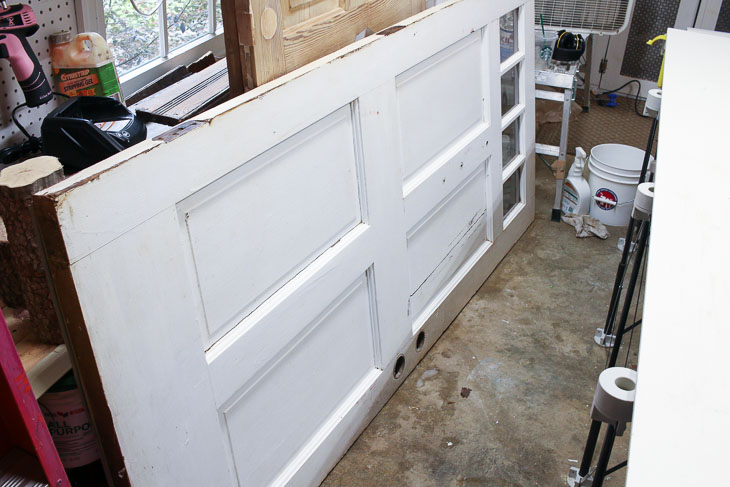


 How to Paint a Laminate Table Top