I love creating decorative birdhouses to donate for silent auctions. Over the years I’ve created a few, but this pinecone roof hand-painted birdhouse is one of my favorites! (You can see the other hand-painted birdhouses I’ve created and auctioned off for our preschool’s silent auction.)
Pinecone Roof for a Hand-Painted Birdhouse
Today I’ll show you how to create a nature-inspired pinecone roof for your birdhouse. This is a simple DIY project that will produce an adorable nature inspired birdhouse.
Materials:
Hopefully you have all the materials and tools on hand that you will need. This is a list of what you’ll need to add a pinecone roof to your birdhouse.
(I’ve included affiliate links for your convenience. I earn a small percentage from a purchase using these links. There is no additional cost to you. You can read more about affiliate links here.)
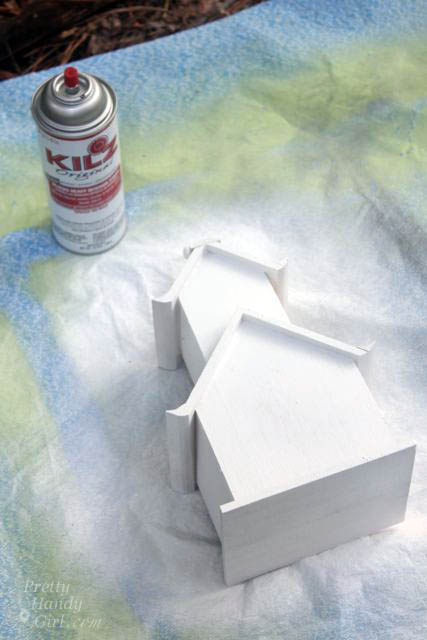
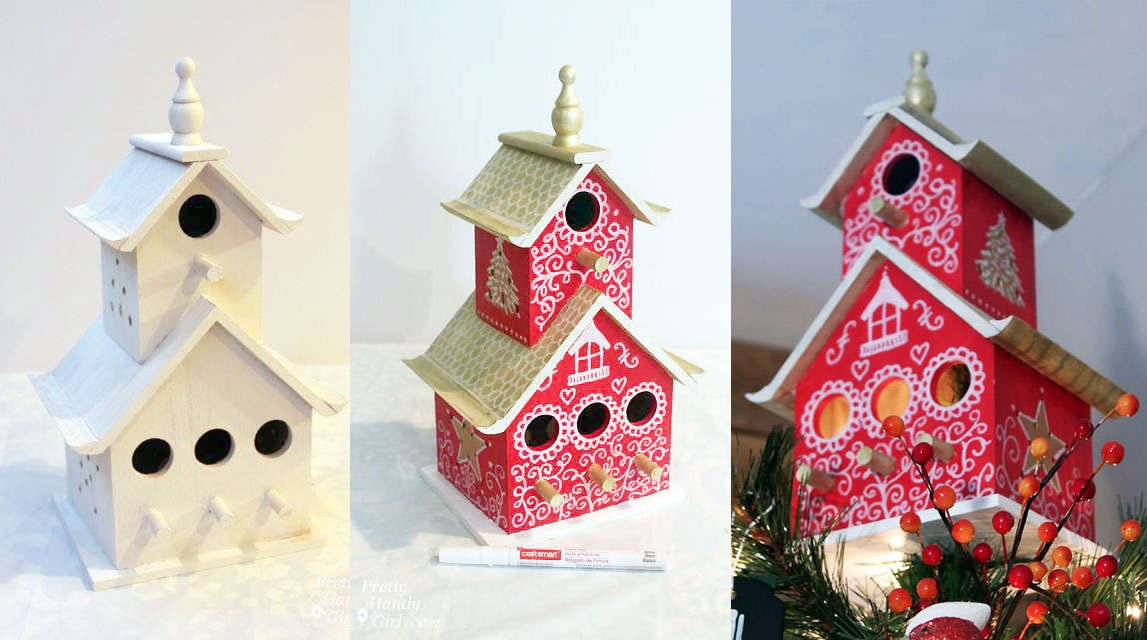
After priming and hand-painting the unfinished birdhouse, it was time to add the decorative elements to set this birdhouse apart from a store-bought house.
First you should know that I sawed off the perch that came with the birdhouse. And filled the hole with wood putty. Then after a light sanding and a coat of primer, I painted the whole birdhouse.
Adding the Pinecone Roof:
Use a pair of needle-nosed pliers to carefully de-scale several pinecones, you may want to wear gloves because those scales are sharp! Most people think you’d start from the top of the roof and add scales down, but if you have ever watched a house roof being tiled, they always start from the bottom and overlap shingles as they go up.
This little birdie abode is no different. Start by running a line of E-6000 (super strong glue) on the bottom of the roof. Then lay the first row of pinecone scales. Once the first row is complete, overlap a second row on top of the first. Here is a peek at the roof after three rows had been laid.
Once you reach the top, move to the other side. (Check back frequently to adjust any scales that move slightly during the roofing process.) This is what the house looked like when I was done with one side of the roof.
Repeat for the other side.
As the roof dries, search your yard for a stick to use as a perch. It took a while, but I found one that had a “T” shape so I could insert one end into the house.
Choose a drill bit that is the same size as the stick.
If you want to paint the stick before securing it, now is the time to do that.
Drill a hole into the front of the birdhouse.
Use some more E-6000 to line the hole, then slide the stick into the house. If the stick touches the house in multiple places, put a small dollop of glue behind where the stick and the house meet to hold it secure.
Add a screw eye to the center of the roof if you want to allow someone to hang the birdhouse. Simply measure the center of the roof and then used a drill bit slightly smaller than the screw eye to drill the pilot hole. Screw eyes can pretty much be twisted in by hand, or you can use your pliers if you need a better grip.
Now it is time to give the birdhouse some snow! First tape off the painted sides of the birdhouse with ScotchBlue painter’s tape to protect them from the spray.
I admit it, I’m cheap. I didn’t feel like buying some fake snow, so I chose to use white spray paint and glitter spray instead.
Hold the can several feet away, and spray in small bursts. If your have a can of spray paint that is almost empty this works best because it will spatter a little.
Give the birdhouse a light dusting of glitter spray. To protect the house, coat it with at least three coats of clear spray.
And here she is in her snow dappled glory! Doesn’t that pinecone roof look amazing?
I’m curious, how much would you have bid up to on this cute little one-of-a-kind bird house? The winning bidder paid $25 for the birdhouse. Not bad considering the house only cost me $3.
(I’ve included affiliate links for your convenience. I earn a small percentage from a purchase using these links. There is no additional cost to you. You can read more about affiliate links here.)
https://prettyhandygirl.com/wp-content/uploads/2010/11/add-eye-hook-to-roof.jpg15001049Brittany Baileyhttps://prettyhandygirl.com/wp-content/uploads/2021/07/PHG-logo-tagline-2020-1030x211-R.jpgBrittany Bailey2010-11-23 18:05:002025-06-09 17:24:20Pinecone Roof for a Hand-Painted Birdhouse
Our preschool silent auction is today. Every year I donate a one-of-a-kind hand-painted birdhouse to be auctioned off. I never spend more than $3 on the birdhouse and usually buy the unpainted versions at Michael’s or ACMoore. Then I get creative by hand-painting a scene and add unexpected touches to the house – thus creating birdhouses with style.
For inspiration, these are some of the birdhouses I’ve hand-painted in the past. I hope the birds find them cozy and love them as much as I do.
2008 – Jardin da Girasoli de Vendere “Vendor of Sunflowers”
Painting sunny sunflowers and some green grass gave this birdhouse a sunny garden look. I added a gold spigot for the new perch. Using a spade bit in my drill, I cut a hole slightly smaller than the spigot, then simply screwed the spigot in place. For added stength I coated the threads with some E-6000. Can anyone guess what the roof tiles are made from? They are canvas shims! Those are the freebie scraps of wood that come with a painter’s canvas! Painting them bright red took the little birdhouse from cute to bidding war worthy!
2009 – Red & White Bird Silhouette Round House
I apologize right now for the condition of this picture! Obviously this is the only picture I took of this cute little abode. The birdhouse was a $2 find at my local Goodwill. The roof was detaching and it was painted an ugly 90’s hunter green and burgundy. I gave the house a good cleaning, then glued and nailed the roof back on. After a fresh coat of primer and white paint, I hand-painted the red bird and branch design onto the curved birdhouse sides. Then the roof and base were painted a solid red. The perch is a curtain rod screw (that holds the rod in the curtain rod bracket). Then the house received a little green ribbon and a silver bell on the top. So simple, but one of my favorites!
For the next auction birdhouse I wanted to focus on a woodland theme. I scoured my yard for pinecones that were dry and spread open. I glued them onto the roof of an unpainted birdhouse purchased from Michaels. The house got a beautiful woodland scene with a Christmas wreath on the front and a Christmas tree on the back.
To protect all my birdhouses from the elements (should they really be “for the birds”), I coated them with a few coats of polyurethane. If you don’t seal the birdhouses they will rot overtime. They may still take a beating after each season, so it’s helpful to be able to have an access panel to clean out the inside and let it air out.
So, how much do you think my pinecone roof birdhouse will fetch today? I hope more than $3!
(I’ve included affiliate links for your convenience. I earn a small percentage from a purchase using these links. There is no additional cost to you. You can read more about affiliate links here.)
Well, I stripped out all the dried magnolia leaves and was determined to give it a new look for Thanksgiving. When I think of Thanksgiving, I think of turkey! So, turkey, pheasant, and peacock feathers seemed like an ideal filler for my plain wreath. I also threw in some other feathers I had in my décor stash.
All I did was tuck some feathers into the wreath. Played with the placement of the feathers until I liked the look.
Then I added a dark teal satin ribbon.
Not bad, but not very exciting. I wanted to add some color, so I grabbed some green potpourri nuts and gave them a fresh coat of spray paint (Rustoleum Apple Green) to freshen them up.
Then, I put a small dollop of hot glue on the backs and pressed them onto my wreath. My goal is to continue to re-use the wreath, so I used the glue sparingly.
Now, that looks much better.
Then I hung my feather wreath up and my door is festively decorated for Thanksgiving.
After Thanksgiving, I’ll be haulin’ down the Christmas decorations. I’m trying so hard to keep the kids from dictating our decorating with inflatable santas, elves and more. Personally, I prefer the classic white lights, some greenery and a red bow to top it off.
https://prettyhandygirl.com/wp-content/uploads/2021/07/PHG-logo-tagline-2020-1030x211-R.jpg00Brittany Baileyhttps://prettyhandygirl.com/wp-content/uploads/2021/07/PHG-logo-tagline-2020-1030x211-R.jpgBrittany Bailey2010-11-17 15:35:002016-02-24 19:38:11Feathers in my Wreath
I can’t believe I’m about to show you my dirty little secret. But, I feel bad for my friend Sandra from Sawdust and Paper Scraps. She has some work to be finished in her master bathroom. So, I hope she’ll feel better after I share my awfully tiny and incredibly outdated bathroom.
I’m warning you now, what you are about to see is disturbing. If you have children, please escort them from the room.
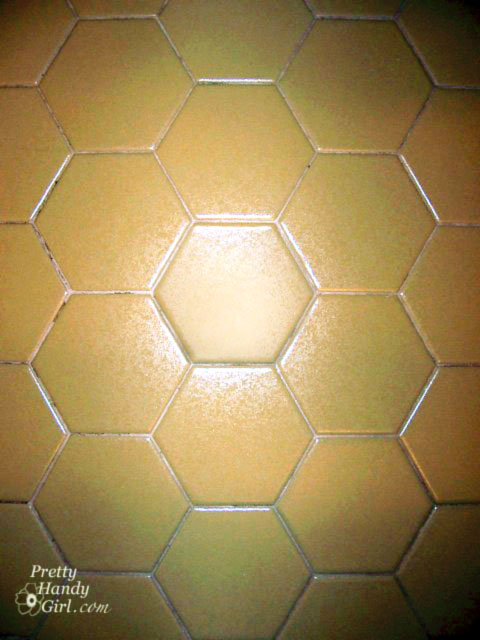
Exhibit A. Harvest Gold Tile
Exhibit B. Jackson Pollock sponge paint and stamping
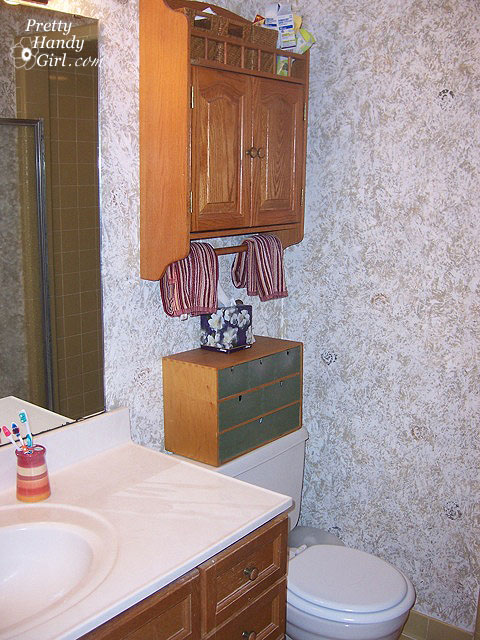
Exhibit C: Ugly Wall Cabinet on the Wall
Exhibit D. Outdated Oak Cabinet and Light Fixture
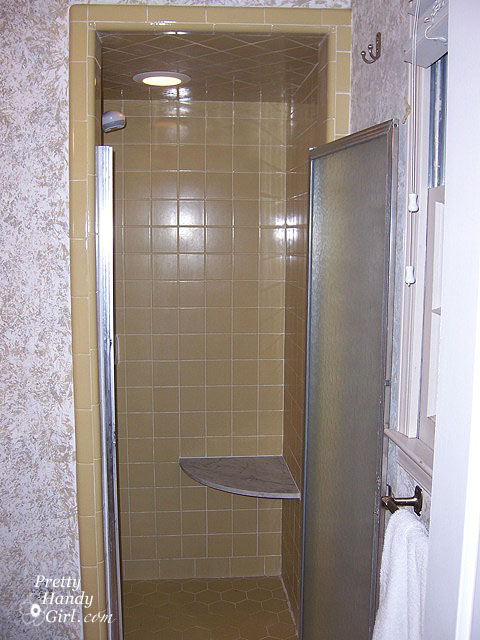
Exhibit E. Coffin-like shower.
I know, SCARY, right?!
Pretty Handsome Guy and I knew that one day we would be gutting this bathroom. Therefore, we decided not to do anything to the bathroom knowing that it was going to be euthanized renovated at some point.
Well, after about a year, I couldn’t stand it anymore. As a surprise for Pretty Handsome Guy, I gave our teeny 1970’s bathroom a minor face lift while he was away on business. I spent about $100 to give us a calmer start to our morning.
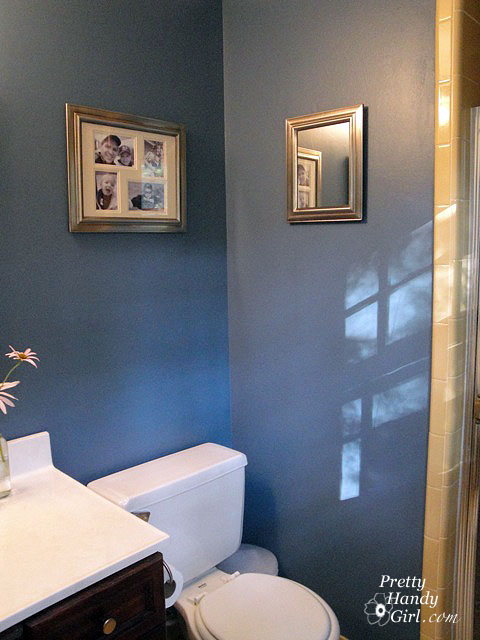
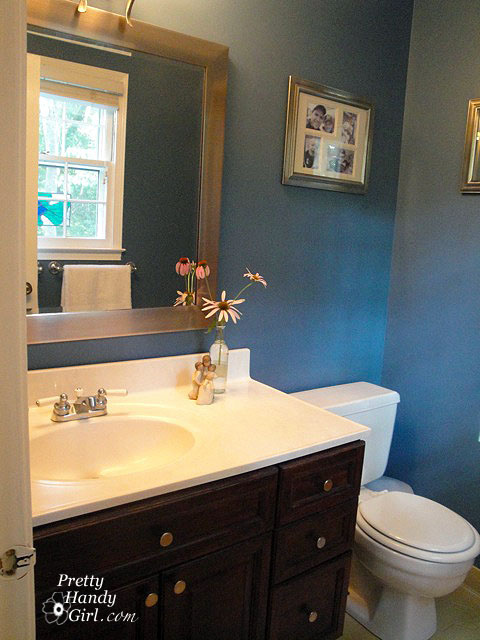
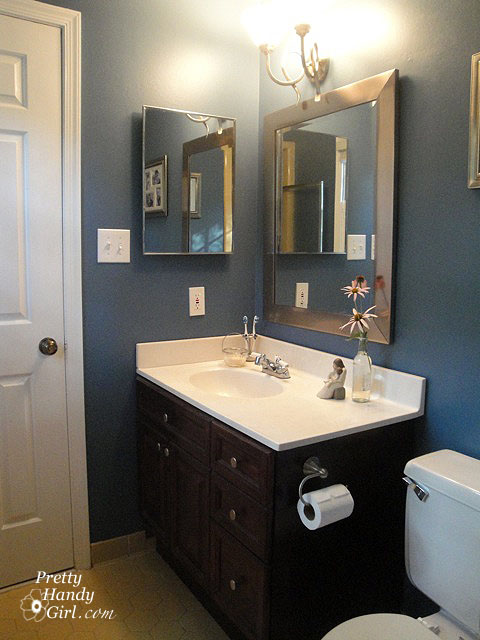
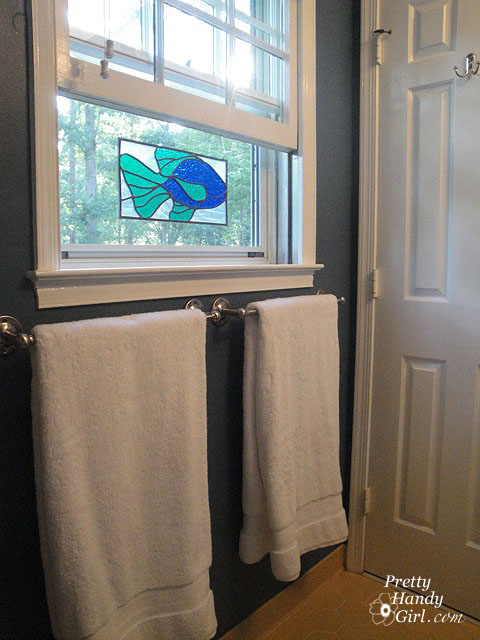
First I took down that ugly wall cabinet. Then patched all the holes in the wall. I sanded the walls to remove some of the bumps from all the random paint. I painted all the trim a glossy white. And the walls got a fresh coat of Ralph Lauren Durango Blue. I chose a deep color to draw attention away from the harvest gold tiles.
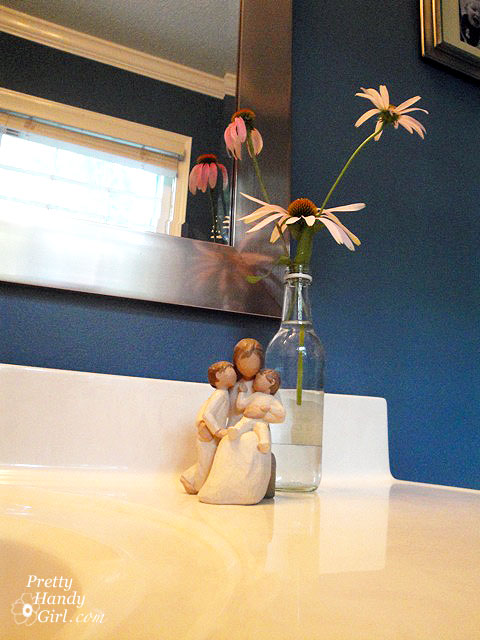
Then I hung some pictures…
…and a new mirror (bought on clearance at Target).
I ditched the Hollywood strip lights and replaced them with this very affordable Craig’s List find.
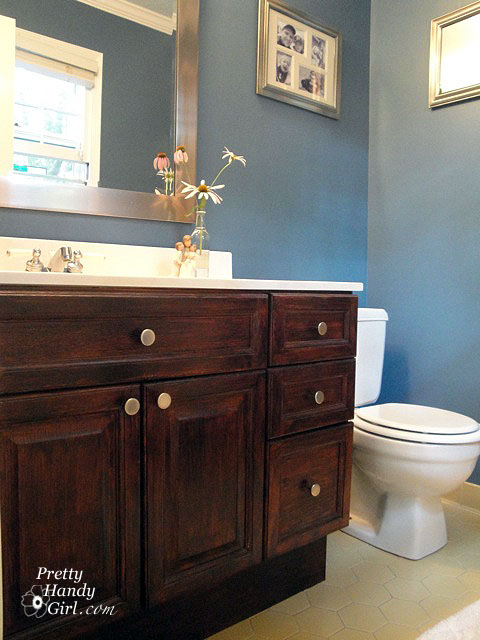
I really did not want to spend a lot of time on the vanity (stripping and sanding), so I roughed it up a little and put some Brazillian Rosewood gel stain on it. And left it for 24 hours to dry. Yup, that’s right, I didn’t wipe off the stain.
You know what else I didn’t do? I didn’t put a protective coating of polyurethane either!
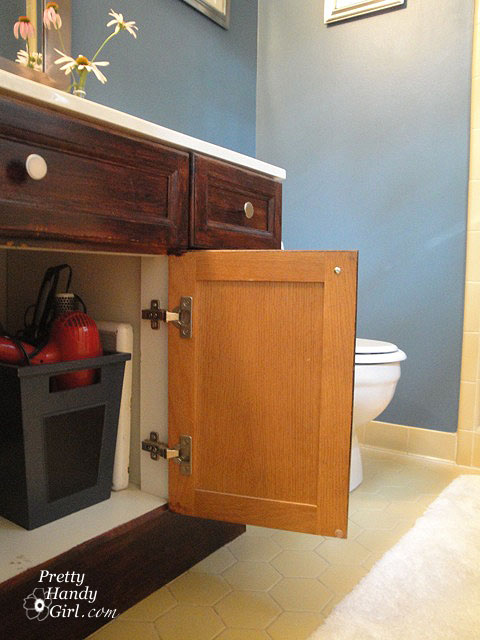
I also didn’t bother staining the inside of the cabinet. This is so opposite to my DIY code of conduct! I’m usually a perfectionist and I do it right the first time or I don’t do it at all. But, as I said, this bathroom is slated for demolition one day, so why put a lot of time or money into it.
Finally I installed some new towel bars and put new knobs on the cabinet.
Okay, sure the ugly tile is still there. And the shower still looks like this.
But, we now have a bathroom that we can enter without the risk of leaving with a migraine.
I am able to live with the bathroom as it is, until the happy day when I can knock down some walls, haul out some outdated tile and build my dream master bathroom.
Here are my plans for this dream:
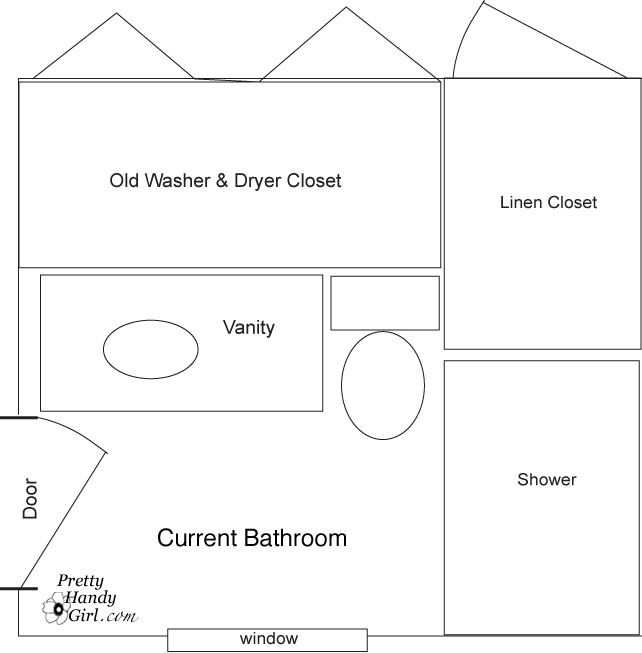
Existing Floor Plan: Luckily an old washer and dryer closet backs up to the other side of this bathroom. This will give us another 3′ of space along one wall!
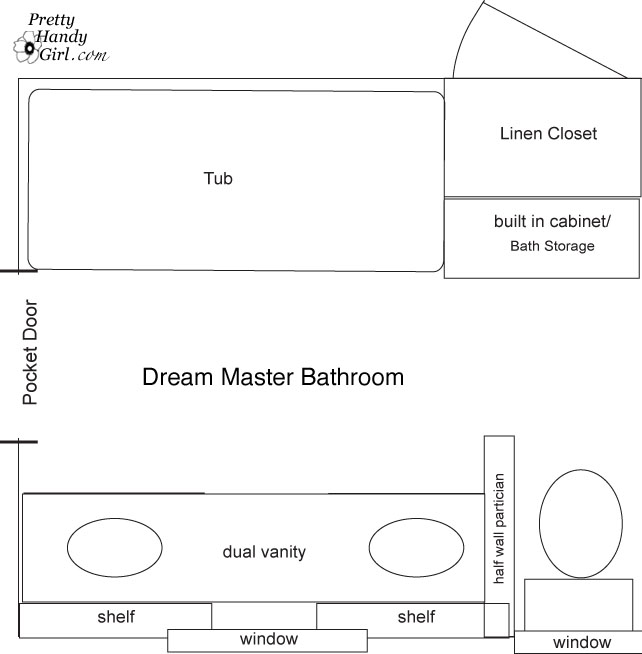
Renovation Floor Plan:
And this is what I envision our bathroom will look like one day!
Thanks to Lori Gilder of Interior Makeovers, Inc., who somehow has a window into my mind to see what I want our master bathroom to took like. She posted these photos from her portfolio on Houzz.com. She’s a fabulous interior designer who lives in Beverly Hills. Check out her blog and portfolio.
Sooooo, do you have a room or a space that is hideous? But, you don’t have the time, money, or effort to give it a full renovation? Why not make a few frugal changes so you can live with it until you can DESTROY IT (and then rebuild it of course.) It is amazing what some paint, new towels, pillows and/or a few fixtures can do.
https://prettyhandygirl.com/wp-content/uploads/2021/07/PHG-logo-tagline-2020-1030x211-R.jpg00Brittany Baileyhttps://prettyhandygirl.com/wp-content/uploads/2021/07/PHG-logo-tagline-2020-1030x211-R.jpgBrittany Bailey2010-11-13 09:20:002017-02-02 13:16:07I have a dirty little secret….my master bathroom is UGLY!
 …and a roof over our heads.
 I am thankful for the food that we put on our table, to sustain our bodies.
 I am thankful for this earth, which provides for us a home filled with beauty.
 I am thankful for my family, who remind me that life is good.
 And my sisters, who understand me to my core.
 I am thankful for my spouse, my best friend and better half.
 to spend with loved ones before they left our world.
 Most of all, I am thankful for my children…
 who humble me and remind me what life is like through a child’s eyes.


 Repeat for the other side.


