
I love creating decorative birdhouses to donate for silent auctions. Over the years I’ve created a few, but this pinecone roof hand-painted birdhouse is one of my favorites! (You can see the other hand-painted birdhouses I’ve created and auctioned off for our preschool’s silent auction.)

Pinecone Roof for a Hand-Painted Birdhouse
Today I’ll show you how to create a nature-inspired pinecone roof for your birdhouse. This is a simple DIY project that will produce an adorable nature inspired birdhouse.
Materials:
Hopefully you have all the materials and tools on hand that you will need. This is a list of what you’ll need to add a pinecone roof to your birdhouse.
(I’ve included affiliate links for your convenience. I earn a small percentage from a purchase using these links. There is no additional cost to you. You can read more about affiliate links here.)
- Unfinished Birdhouse
- Needle-nosed pliers
- E-6000
- Gloves
- Drill
- Drill Bits
- White Spray Paint
- Glitter Spray Paint
- Clear Coat Top Coat
Instructions:
Start with an unfinished wood birdhouse.

After priming and hand-painting the unfinished birdhouse, it was time to add the decorative elements to set this birdhouse apart from a store-bought house.
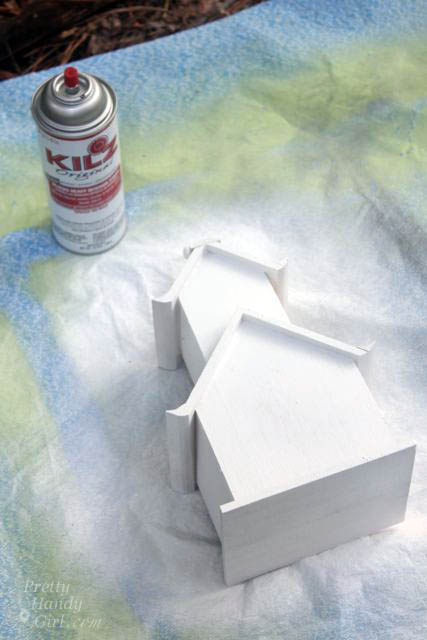
First you should know that I sawed off the perch that came with the birdhouse. And filled the hole with wood putty. Then after a light sanding and a coat of primer, I painted the whole birdhouse.
Adding the Pinecone Roof:
Use a pair of needle-nosed pliers to carefully de-scale several pinecones, you may want to wear gloves because those scales are sharp! Most people think you’d start from the top of the roof and add scales down, but if you have ever watched a house roof being tiled, they always start from the bottom and overlap shingles as they go up.
This little birdie abode is no different. Start by running a line of E-6000 (super strong glue) on the bottom of the roof. Then lay the first row of pinecone scales. Once the first row is complete, overlap a second row on top of the first. Here is a peek at the roof after three rows had been laid.

Once you reach the top, move to the other side. (Check back frequently to adjust any scales that move slightly during the roofing process.) This is what the house looked like when I was done with one side of the roof.
 Repeat for the other side.

As the roof dries, search your yard for a stick to use as a perch. It took a while, but I found one that had a “T” shape so I could insert one end into the house.
Choose a drill bit that is the same size as the stick.

If you want to paint the stick before securing it, now is the time to do that.
Drill a hole into the front of the birdhouse.

Use some more E-6000 to line the hole, then slide the stick into the house. If the stick touches the house in multiple places, put a small dollop of glue behind where the stick and the house meet to hold it secure.
Add a screw eye to the center of the roof if you want to allow someone to hang the birdhouse. Simply measure the center of the roof and then used a drill bit slightly smaller than the screw eye to drill the pilot hole. Screw eyes can pretty much be twisted in by hand, or you can use your pliers if you need a better grip.
Now it is time to give the birdhouse some snow! First tape off the painted sides of the birdhouse with ScotchBlue painter’s tape to protect them from the spray.

I admit it, I’m cheap. I didn’t feel like buying some fake snow, so I chose to use white spray paint and glitter spray instead.

Hold the can several feet away, and spray in small bursts. If your have a can of spray paint that is almost empty this works best because it will spatter a little.
Give the birdhouse a light dusting of glitter spray. To protect the house, coat it with at least three coats of clear spray.
And here she is in her snow dappled glory! Doesn’t that pinecone roof look amazing?
I’m curious, how much would you have bid up to on this cute little one-of-a-kind bird house? The winning bidder paid $25 for the birdhouse. Not bad considering the house only cost me $3.

If you liked this post, you’ll love this simple DIY Hummingbird Feeder:

Hey bird lovers! My family loves bird-watching , too. Over the years we’ve experimented with several bird feeders, bird food, and resource books. I’ve created a list of our favorite bird-feeding and watching items on Amazon:
(I’ve included affiliate links for your convenience. I earn a small percentage from a purchase using these links. There is no additional cost to you. You can read more about affiliate links here.)