how_to_securly_hang_a_keybox

One of the souvenirs I brought back from our London trip was this adorable little carved bird key box.

key_box_open

The colors, the wood and the artistic way it was carved spoke to me and told me that I had to have it in my kitchen! Despite the lack of space in our suitcases, I was able to cram socks and underwear inside to make room for it.

bird_key_box

When we got home I found the perfect spot to hang my little key box. Although the box had hangers attached, I knew the daily pulling and key snatching would eventually prove too much for the dinky hooks. So, I simply removed the hangers with a screwdriver.

dinky_hangers

Materials to hang a keybox: Read more

how_to_move_floor_vent

Remember last month when I showed you how to build a window seat in a bay window? I had promised to share with you how to move the floor register. I’m true to my word and am back with the tutorial today.

window_seat_bay_window_storage

When I built our kitchen window seat, I had two obstacles in my path. The first was moving the wiring for the outlet, the electrician and I simply pulled the wiring down from the outlet on the wall and re-routed it into the new outlet box in the front of the window seat. A relatively easy task. Moving the HVAC vent wasn’t very difficult, it just involved a little more cutting and measuring. But, this is a task you can handle!

I have seen some other methods for re-routing the floor vent. One such method involved building a wooden box to channel the air out the front. I caution you from doing this if you live in a humid climate. Mold can grow inside the wooden box. You could build a channel with HVAC rigid ductwork, but you’d be adding an extra turn which can cut down on the airflow. Another alternative would be to move the register to another location in the floor. I chose to move it to the front of the window seat.

How to Move a Floor Register Materials:

  • Carpenter’s Square
  • Pencil
  • 90 degree Ductwork (if you can’t use the existing)
  • Wall register
  • Small level
  • Roofing nails
  • Zip tie
  • Foil duct tape
  • Dremel Multi-Max
  • Drill with bits

Instructions: Read more

wall_mounted_hutch_tutorial

Have you heard the term sandbox when talking about software development? It’s the term used for the testing area where the engineers can “play” with their ideas before they go live to the public. Well, this little kitchen desk and hutch (kitchen command center) was my sandbox before I ordered our kitchen cabinets. It was my place to play with colors and style before making the very big step of ordering all the kitchen cabinets. When I had finished with the desk and hutch I was so thoroughly smitten with the colors that I had no problem ordering most of my kitchen cabinets in the same Sherwin Williams Copen Blue color!

Last week I showed you how I raised and transformed the Habitat ReStore desk into a counter-height desk. At the same time I bought the desk, I found a sheet of finish grade plywood that was an old folding table top. At $25 for the sheet, I brought it home and used it to create a wall-mounted hutch. After mounting it on the wall, I worked with my electrician to wire a lamp in the hutch. (Exterior wall mounted light from Lowe’s.) The result is a charming cottage style desk and hutch where I keep our lives organized!

full_kitchen_desk_command_center_subfloor

Are you ready to build your own wall-mounted hutch? Grab your tape measure and saw and let’s get busy! Read more

counter-height-kitchen-desk-tutorial

Where do you drop all your mail, papers, reminder notes, kid’s school notes, business cards, etcetera, etcetera…etcetera? If you answered the kitchen counter, I’m sure you are among many including myself who dropped everything on the counter. And then it piled up there until someone filed the papers and threw away the reminders of events past.

(As a Lowe’s Creative Ideas blogger I was tasked with creating a “drop zone” for my June project. And I was provided with a gift card to purchase the supplies.)

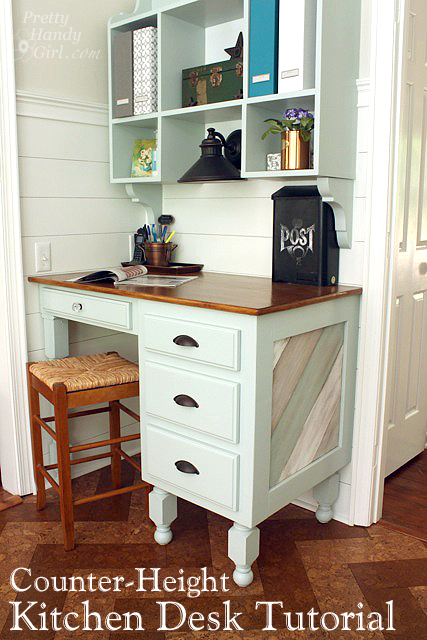
I was determined to keep our countertops clean in our new kitchen. Which meant I had to create a space that would hold it all and act as our drop zone! The idea of a kitchen desk seemed like the perfect spot. However, I didn’t want a regular height desk. I wanted a desk that was counter height so I could stand and write a note, file papers, put away the mail then dash off to complete my next DIY project. This handy girl really doesn’t have the time to sit still ;-).

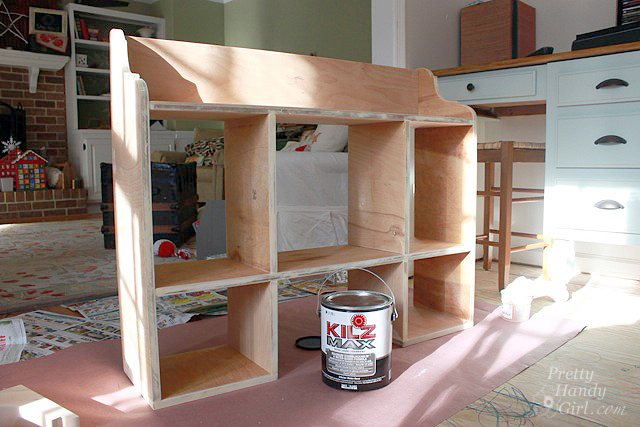
When I stumbled across a desk marked down to $35 at our local Habitat ReStore, it seemed like it had potential. A quick check of the drawers proved that the desk was still in perfect working order.

desk_table_top_legs_materials

I was talking to my friend Holly about my idea of the countertop height desk and she pulled four table legs out of her garage and gifted them to me! And, I had a heavily loved craft table that a neighbor gave away. I thought it would make the perfect top for the desk.

Here’s how I put them all together to make a cottage-style counter-height kitchen desk: Read more

home_tour

Welcome, welcome! I’m so glad to see you made it. I hope you didn’t get lost.

front_door_druids_ln_clematis

Did you just get here from Angie’s house at the Country Chic Cottage? Her home is so cozy and beautiful (so make sure you didn’t miss her stop on the tour!)

front_patio

I’m so glad to have you over for the 2013 Summer Tour of Homes.

chair_with_flowers_pillows

It’s hot outside for sure. These North Carolina summers are hot and humid.

mudroom_tour_door_open

Here’s a glass of sweet tea for you to cool off. Come on in and take a load off in our mudroom.
PostBreakblue

mudroom_tour

In fact, feel free to kick off your shoes and relax with me for the next few cyber minutes. I’m not going to talk much, instead I’ll let you soak up the sights. Feel free to ask your questions or leave a comment after you’re done. Read more