It’s true, I JUST took down the rest of the Christmas decorations. Yes — I know it is February — but honestly I’ve been a bit busy lately. I carved out a little time to spray paint a lantern and hot glue a new wreath. And that was all it took to put me in the mood to decorate for the season.

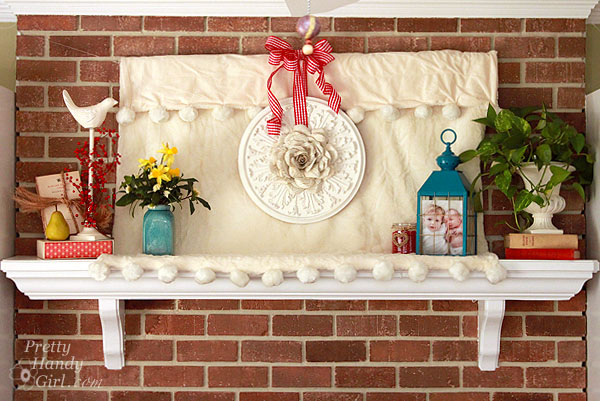
I wanted some cozy warmth and a little brightness on our mantle, so I hung a soft faux fur throw up. To avoid nailing into the brick, I used a wooden dowel rod that spans the width of the throw. I added two screw eyes in either end of the rod and fishing line that feeds through the eye hooks and wraps around nails that are secured into the crown moulding on either side of the fireplace.

I really like the softness of the throw.

A berry wrapped white bird on top of a paper wrapped book helps bring in a little more romantic red.

Michael’s has this crackle vase on clearance now, but be careful about filling it with water because it will leak. Inserting a small yogurt container inside made it possible for me to use it for fresh flowers.

I am really excited about the book page wreath I made, but I think I’m more excited about that old light fixture that I revamped. One of my facebook fans thought it was from Pier 1. That was the ultimate compliment for something I paid $5 for at the Habitat ReStore!

The paint color I used on the lantern is Rustoleum’s Lagoon, and it has sent me on a big aqua kick!

More books and a plant to balance the right side of the mantle.

I’ll have a tutorial for this book page wreath on Wednesday, so get busy finding an old book and a ceiling medallion!

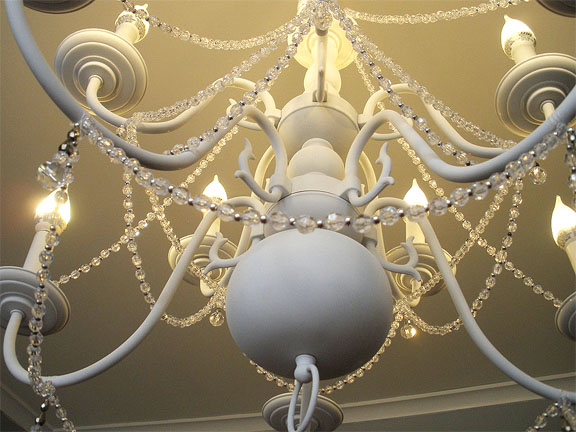
I used the chandelier turned candelabra to bring some Valentine’s whimsy to our kitchen table.

The hearts on a stick were purchased from the Dollar Tree, I just slipped green straws over the stems to beef them up a little.

I did pull the stems off the rest of the hearts and piled them in this other lantern with some faux grass.

A few recycled jars pulled together make a crisp and clean flower arrangement. We have some flowers blooming in our yard already (only about one month early), but I picked up these agapantus and alstroemeria (peruvian lilies) from the grocery store.

 I think of my sister everytime I see agapanthus, because they grow right outside her front door! Lucky duck.

My friend, Leen the Graphics Queen will recognize this bottle from our antiquing trip to Southport, NC. I’d never been to Southport before, but I will definitely have to go again. It is a really neat little town by the sea.

I couldn’t neglect the mudroom.  This is where my tree branch heart wreath hangs out.

Because this is our family’s main entrance, I chose some sweet smelling daphne and daffodils to create a fragrant and colorful welcome home.

I couldn’t truly welcome spring yet (since technically it is still a month and a half away.) So, I scribbled “Hello Spring?” on the chalkboard.

I hope you have a fabulous February and a sweet Valentine’s Day.

 P.s. How many of you watched the SuperBowl (or at least the commercials and/or halftime show) last night? What were your favorite commercials? I have to say I really liked the VW, Doritos and E-Trade commercial. And my son and I were up off the couch and dancing with Madonna! I thought she rocked the halftime show.

I am officially kicking Valentine’s Day decorating into high gear! Yesterday I shared with you my wooden branch heart wreath. Thank you for all your nice comments about it. I wasn’t sure anyone would like it because it looks so…well…different.

Do you remember my snowman wreath made from a Dollar Tree placemat?

Well, I was given the opportunity (by my  messy boys) to make a Valentine’s theme one.

You can view my tutorial for making the placemat “Just Like New” by turning it into a “Bee Mine” garden flag at I Am Momma – Hear Me Roar!

I’m guest posting there today while she hob knobs with THE Martha Stewart! Is that like 2 degrees of separation for me? I’d like to think so.

Have a great Thursday y’all! See you tomorrow for yet another Tool Tutorial Friday.

Valentines Day Wreath

When I saw this mirror frame Jaime from That’s My Letter made, I was instantly head over heels in love with the branch circles.

Valentines Day Wreath

Valentine’s Day Wreath

So much so, that every branch I passed by I would think, “Hmmm, I wonder what the disks on that branch would look like. It’s a sickness y’all.

So, this past weekend, I hauled in a bunch of branches and began to formulate a design for my Valentine’s Day Wreath that wasn’t overtly cutesy.

Valentines Day Wreath

I even called my neighbor to ask if I could have one of their logs from their woodpile. (Yes, I was coveting thy neighbor’s wood. Sheesh.)

I am thrilled with the final results. Although I had to engage in a few extra spray painting steps to get here, I’ll spare you the details. Let’s just say that no matter what color you paint thin wire, it just doesn’t show up on top of wood disks.

Valentines Day Wreath

Here is the tutorial y’all. Take it or leave it, but just be sure you ask before cutting down your neighbor’s cherry tree.

Valentine’s Day Wreath Materials:

(I’ve included affiliate links for your convenience. I earn a small percentage from a purchase using these links. There is no additional cost to you. You can read more about affiliate links here.)

Start by setting up a stop block by clamping a small piece of wood against the fence of your miter saw. (Or be prepared to be diligent about measuring every slice you cut. My slices are 1.5″ wide.) IMPORTANT: Wear your eye protection and hearing protection!

Valentines Day Wreath

Hold your branch against the fence and cut into the log. The larger logs cut fine, but the smaller branches and sticks tended to kick back all over the place, so be sure you stay on the right side of the saw and the slices are on the left. This way you’ll be out of the path of the flying disks. Cut, until you have a large collection of wood slices in a variety of sizes.

Valentines Day Wreath

It was at this point that I looked down and noticed this little worm squeezing out of the log!

Valentines Day Wreath

Ewwww. I rushed inside to research killing bugs in wood. I read you can either bake your wood in the oven at 175˚F – 200˚F for a few hours. Or microwave the wood for a minute. Being the perfectionist and neurotic termite-fearing person I am, I did both!

Valentines Day Wreath

After roastin’ and nukin’ those little buggers, you can lay out the slices onto the plywood in a heart shape.

Valentines Day Wreath

Trace roughly around the shape.

Valentines Day Wreath

As I said I’m a perfectionist, so feel free to skip this next step.

Fold a piece of scrap paper in half and cut out a half heart shape to give you a symmetrical heart shape. Trace around the template onto the plywood.

Valentines Day Wreath

Use a jigsaw or Dremel TRIO to cut out around the shape.

Sand the edges until they are no longer jagged.

Lay the scrap paper template back on top of the heart shaped plywood. Fold it in half. Drill a hole through the top of one of the sides of the heart (through paper and wood.) Open the template back up and mark where the hole is in the paper. Drill through the other side.

Valentines Day Wreath

Thread a length of ribbon through one hole. Tie a washer onto the end of the ribbon on the back side.

Valentines Day Wreath

Hang the heart up in your desired location. Adjust the length of the ribbon and then tie another washer onto the ribbon.

Valentines Day Wreath

Begin to lay the wood slices back onto the plywood and start gluing each one using Liquid Nails.

Valentines Day Wreath

It may take a little maneuvering and trials to get the slices to fit neatly within the heart shape. But, hey it wouldn’t be fun without a little trial and error.

Valentines Day Wreath

After your shape is filled, lay a folded towel, some scrap wood and heavy weights on top. Do a few bicep curls before setting them down, just because.

Valentines Day Wreath

While your wooden heart is drying, bend the word “Love” into the wire using needle-nosed pliers.

Valentines Day Wreath

Wrap white pipe cleaners around the word.

Valentines Day Wreath

Then wrap red pipe cleaners around leaving space so the white pipe cleaner shows through.

Valentines Day Wreath

Tie a bow at the top of the hanger ribbon. Thread another length of ribbon through the bow and secure it to the “L” and “e” in Love.

Valentines Day Wreath

Find a spot to hang your unique wreath.

Valentines Day Wreath

I wonder if I can put another word on there for St. Patrick’s Day? Maybe “Luck” with some green ribbon.

 Valentines Day Wreath

Valentines Day Wreath

Valentines Day Wreath


Welcome to our second Wednesday in 2012! Today I have a special guest for you: Bri from The Modern Parsonage is here to show you how she created that truly fabulous chandelier you see up there. But, before we get to the tutorial, let me tell you a little about this handy gal (and her partner in DIY crime!) Bri and her husband moved into a home that was previously a Pastor’s family home. They dove head first into the process of renovating the home to be more modern and fitting for the hip couple of professors that they are.

The Modern Parsonage showcases the renovation process, from idea to finished product, tossing in snapshots of design inspiration and everyday life.You can follow them as they transform their home one room (floor to ceiling) at a time. Check out their Staircase renovation, bathroom update, and installing flooring projects.

Okay, take it away Bri!

Let me begin by saying that I started this project thinking I needed a ton of prep work, money, and time to transform a boring, brass light fixture into a show-stopping (if I do say so myself) chandelier. O ye of little faith, I say to my former self. This is a beginner’s project and requires so little skill that I would go so far as to call it a fool-proof way to jazz up even the most tired light or lamp for significantly less than the cost of a new fixture. (Read: under $75)

Start with a cheap chandelier. I found one on my local Craigslist for $25, but I would recommend scouring your hand-me-down shop of choice since these brass fixtures are often the standard for apartments or new builds.

Next, I did some research online and adopted a few misconstrued beliefs that I will now dispel. First, it is perfectly fine to spray paint the plastic-protected electrical cord that runs up the chain. I was not aware of that and wasted quite a bit of time figuring out creative ways to protect the cord while spraying the chain. Second, either fully remove the plastic “candles” or spray paint them the same color as the fixture. I did not know that these were removable and you can still see the tape lines from where I thought I had to cover parts of the plastic. Learn from my mistakes, people.

After you have chosen a diamond-in-the-rough light, acquire the necessary resources. You will need:

  • A drop cloth
  • A place to hang your light (I hung mine in the basement, but you can just as easily use a tree if the weather is nice)
  • Two cans of the spray paint of your choice (it is always better to have extra on hand because spray paint has tricky drying times and you don’t want to run out in the middle of the project). I used matte white and it was just the cheap Ace Hardware brand.
  • A ventilator or mask. Always necessary when messing about with spray paint.
  • 220 grit Sandpaper
  • Deglosser. (This is only if you want to be super thorough. I wiped my chandelier down with just soap and water and the paint adhesion was still great.)
  • Beading of your choice. I used roughly 750 beads and got them at Michael’s, but it all depends on your taste.
  • White string (I got DandyLine brand and it is super strong).

For the optional chain cover:

  • Fabric of your choice (double the length of chain you want to cover and 7 inches wide).
  • Fabric glue
  • Iron-on Velcro
  • Thread
  • Also, an iron, that’s pretty important.

Now it’s time to get down to brass tacks. Get it? Because it’s a brass light? Anyway, lightly run your sandpaper over the fixture. Do not press too hard or the metal will scratch. The goal here is to rough up the surface so that the paint can form a strong bond. Next, give it a good once over with a damp cloth (soap and water will do, deglosser if you’re thorough) to remove any dust, grease, or grime. Let the light dry completely.

Don your mask. You will look beautiful, I promise, but more importantly, your lungs will thank you. Find a good spot to hang your light and start spraying.

As you can see, I tried to bundle up the electrical cord in the plastic bag, but that caused a lot of problems, including bare spots of brass. I also taped off the tops of the “candles” instead of just removing them and covering the exposed wire. So yeah, just don’t repeat my follies.

Spray painting is best in short, quick bursts. Long, sweeping motions are not your friend. It will take many, many thin coats so don’t be surprised if you have to use the entirety of two cans.

Once you have your desired level of coverage, let the light dry overnight. When the paint is fully cured, the real fun starts – beadwork. This part takes creativity and is really up to you. I did a lot of window-shopping for fancy-pants lights and finally decided I wanted a chandelier adorned with clear beads and small silver accents, embellished with teardrop crystals for extra pizzazz. I would say this is the longest part of the process; it took me about four hours to get all the beads strung and hung on the light.

With the hard part done, re-install or switch out your fixture (remember, black wire connects to black wire and white to white!).

At this point, if you’re happy with your light as is, you’re done! If you’re like me and have an awful chain and unpainted electrical cord, you may want to consider DIYing a chain cover. Much cheaper, totally easy, and no sewing machine required.

Begin with your fabric swatch and fold over about a 1/4 inch on each side, ironing the edges.

Apply a small line of fabric glue inside the seams to create a permanent hem. When the glue dries (15 minutes to a half hour), sew a running stitch on both long seams. I know this sounds complicated, but trust me, if I can do it, so can you. Pass the needle in and out of the fabric down the edges, knotting each end. (It allows you to scrunch the fabric, which is important.) Gently pull the knotted ends and push the fabric together to your desired length.

Once the scrunching is done, grab your iron-on Velcro and press it on. Run the iron over the whole cord cover to ensure a strong bond. Now all you have to do is wrap it around your chandelier chain, making sure the seam is on the least visible side, and admire!

Isn’t that chandelier beautiful?! I know people would pay a lot of money to bring that chic lady home. Thank you so much Bri from the Modern Parsonage for letting us into her home for the tutorial.

Would you like to be a guest on Pretty Handy Girl? Read my open invitation here.

You know that thing about your house that you really want to change, but it takes you a while to mull over how to change it? Well, that thing for me was our garage doors. They are the two giant doormen that greet me at least five times a day as I run errands and taxi my children to and from school. I always thought they could be a little more polished and more inviting. In this mulling over period I dreamt of painting the garage doors and boosting the character factor by adding grilles to the windows. I even created a paint preview to see what it would look like. I fell in love immediately and the hulking gray doors’ fate had been sealed.

I wasn’t exactly sure how I was going to add the grilles (cross pieces in the windows.) I thought about cutting up paint sticks or just plain strips of square dowels cut to fit, but I REALLY wanted them to look as real as possible and I liked the router profile of the real deal.

A few months later I literally almost tripped on a stack of donated window grilles at my local Habitat for Humanity ReStore. You know, the cheap ones that are pressed up against the window and always fall out. Grrrr!

That was when the “A-ha” moment happened and I figured that I could use them to dress up my garage doors. I carefully measured the panes on the garage then found a set of four grilles that would give me two cross pieces per window! Perfect! And the best part about those grilles is that they only cost $2 a piece. For $8, some paint and glue I was able to transform my garage doors from boring bland to cottage charm!

And here is the tutorial for how to add grilles to plain jane garage door windows!

Materials:

  • Reclaimed grilles from Habitat ReStore
  • Hand saw
  • Pencil
  • Tape measure
  • Paint
  • Loctite Outdoor Sealant Glue
  • Windex
  • Rubbing alcohol
  • 3M painter’s tape
  • Razor blade scraper
  • Paintable flexible caulk
  • Caulk gun
  • Wet rag
  • Gloves

Start by cutting the grilles down to size. This is how I got two crosses from each grille. First, cut the grille into two pieces as shown below:

No power tools needed. A handsaw works great.

Next, cut off the excess so you are left with two crosses that fit perfectly in the window panes of your garage door.

Test fit the cross. If your measurements are off, no worries, 1/2″ gaps can be filled with caulk.

After cutting all of the cross pieces, clean them off. Lightly sand and paint them the same color as your garage doors.

After the paint is dry, clean the glass with windex and then use rubbing alcohol to remove any dirt and debris from the glass.

Spread a bead of Loctite Outdoor Adhesive onto the backs of both the vertical and horizontal bars. Center and press the grilles onto the glass. Use painter’s tape to hold them in place.

Wait 24 hours for the glue to harden and dry. Then scrape any excess glue off the glass with a razor blade.

Time to fill in the cracks! Caulk all the seams. For the larger gaps, 1.) Apply painter’s tape on both sides of the void to 2.) keep the caulk off the window and give you a crisp, clean edge. (I’ll have a special caulk gun tutorial for you on Friday!)


3.) Remove the painter’s tape while the caulk is still wet. Let the caulk dry.


 And you’re done! How is that for adding instant character?!


I could kiss these beauties! They are definitely welcoming doormen now.

Speaking of welcome, I repainted our faded Welcome sign and hung it back up. Are you an eagle eye reader? What else changed in the pictures below? Five things have changed, can you spot them all? I’ll start you off:

  1. Painted doors
  2. Added grilles
  3. Refreshed welcome sign

Okay, one more lookey at my beautiful garage door windows and then you have to leave.

I want to give a big shout out and thank you to Waste Management and The Bagster who helped make my garage makeover a possibility. You can see more of my garage transformation here.