Giant Lighted Christmas Ball Tutorial | Pretty Handy Girl

Giant Lighted Christmas Ball Tutorial | Pretty Handy Girl

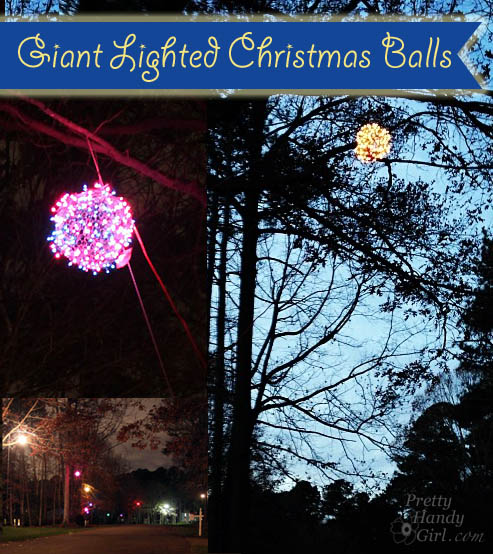
A few years ago we discovered a street in our city that is lit with giant hanging lighted ornament balls. We drove down the street with our low beams on and were truly speechless. It was magical, ethereal and beautiful seeing giant orbs of light suspended in mid-air. Since then I’ve scoured store shelves to find these beautiful lighted spheres. Little did I know that they were truly a DIY project.

This year, our neighborhood decided to hold a workshop to teach anyone who was interested how to make giant lighted ornament balls. You know I was there with bells on ;-). Here’s how to create your own hanging lighted Christmas ornament balls complete with hanging suggestions!

Giant Lighted Ornament Balls Materials Cost breakdown:

  • Chicken Wire: 2′ x 50′ roll (yields about 12 balls) – $24
  • 3 – 100 light strings of outdoor Christmas lights (green wire is best) – $10
  • Twisty tie from the light strands
  • Poly-braided rope or clothes line rope – $10 per 100 ft.
  • Extension cord: $15
  • Small water bottle
  • Gloves
  • Aircraft sheers for cutting wire

Cost: approximately $37 per ball with extension cords and hanging supplies (not including gloves and shears)

Optional: 

  • Three way plug in adapter $5 (to add more balls to one cord),
  • Extra extension cords
  • Timer


Giant Lighted Ornament Balls Instructions:

Cut a section of chicken wire 46″ long (using a 24″ width roll). Shape the section into a cylinder.

Giant Lighted Christmas Ball Tutorial | Pretty Handy Girl

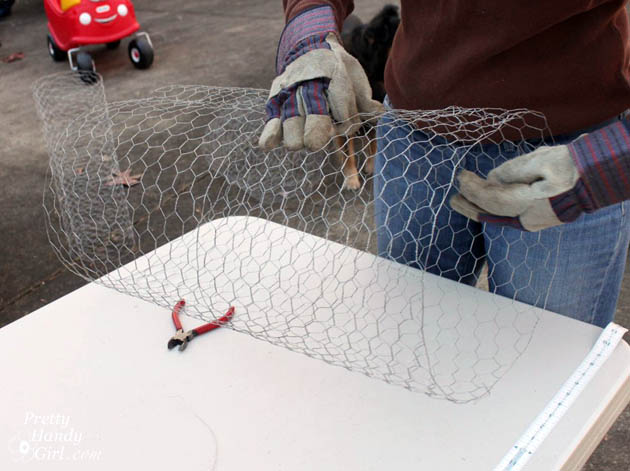
Secure the ends of the chicken wire by folding the ends over and securing to the opposing side. Stop about 8″ from each end. Read more

How to Make Pine Cone Garland

How to Make Pine Cone Garland

Happy December! The holidays are such a wonderful time of year and an opportunity to get creative with entertaining, cooking and decorating. Mostly, I love to make things simple and today’s lesson on how to make a pine cone garland will be just that. An easy, quick, not to mention very inexpensive craft you can do to decorate your home this season. And it can be done in about 30 minutes {minus an adventurous walk in the woods to get pine cones}, here is how.

Supplies:

Pine Cone Garland

  • Pine cones – These can be found simply going outside and looking around the pine trees. Depending on where you live, you’ll find all kinds of sizes. If you collect pine cones from outdoors, be sure to ‘de-bug’ them by baking them for 30 minutes on a low temperature. You can also get pine cones at craft stores, thrift stores, flea markets and such. Or maybe in a friend’s attic? Put those old holiday decorations to a new use.
  • Just twine or ribbon – This is to hang the cones. You can use anything you might like, or what matches your style.
  • Screw Eyes – Find these in the hardware section at the home improvement store. A small box will only cost a few dollars.
  • Optional supplies include a drill with a small bit and glue

 Instructions Read more

Très Frugal DIY Gift Idea Round Up

Can you believe all the wonderful DIY gift ideas that we had for you this past month? 31 DIY gift ideas that are frugal and attractive in this Très Frugal DIY Gift Idea Round Up.

And if that’s not enough, you can view 10 DIY Gift Ideas that take 15 minutes or less to create:

Happy Holidays to you!

PHGFancySign

How to make a hanging ornaments table runner | Pretty Handy Girl

I have half of the dynamic duo from At the Picket Fence today and I couldn’t be more thrilled! Heather and Vanessa are the sibling duo who create and blog about their beautiful homes and share scrumptuous recipes! I’m honored to have Vanessa here today to share this brilliant Ballard Designs knock off project.

How to make a hanging ornaments table runner | Pretty Handy Girl

page_break_2

Hi there! I’m Vanessa from the blog At the Picket Fence and I’m so thrilled to be visiting here today! Brittany’s kinda my hero and is helping me find the courage to tackle more DIY projects. Come 2014 my house isn’t gonna know what hit it! At this time of the year more than ever, being frugal is the name of the game and I love to try and come up with creative gift giving ideas for friends and family. Today I’m sharing with you a so simple, no-sew project!

I just love me some Ballard Designs. Don’t you? But, their prices don’t love me back. So, I have to resort to knocking them off. That always sounds so wrong doesn’t it? Kinda has a Bonnie and Clyde ring to it. I’m just going to think of it as imitation being the sincerest form of flattery! This is my version of their hanging ornament table runner from last year and just to prove how very très frugal this really is, here’s the cost difference:

Theirs ~$79.00 …….. Mine ~ $15.00

How to make a hanging ornaments table runner | Pretty Handy Girl

Supplies Needed:

  • Drop cloth cut to size of runner you want (don’t wash the drop cloth first!)
  • Fabric squares or remnants in color/patterns of choice
  • Twine
  • Ribbon in coordinating color
  • Glitter Paint writer in color of your choice

Instructions: Read more

School Library Reveal | Pretty Handy Girl

School Library Reveal | Pretty Handy Girl

For a month I’ve been working on the school library makeover that was facilitated by a donation from Overstock.com. This morning I got my emotional reward. I walked into the library ready to put on the finishing touches in the room. There were a few kids in the main section of the library reading. But, when I turned the corner and gazed into what used to be the dark back corner…

library-before-pic-1

…I was surprised to see a dozen kids sprawled on the rug, dog beds and bean bags.

School Library Reveal | Pretty Handy Girl

They were all piled back there and quietly reading! My heart almost burst. The librarian told me it’s been like that since we finished painting. The kids love to hang out there. And not just the younger grade levels, all the kids love it! My heart is just singing with joy. Read more