Breeze Inn Cottage - Tybee Island | Pretty Handy Girl

Breeze Inn Cottage - Tybee Island | Pretty Handy Girl

I can’t wait to invite you in to tour this adorable Mermaid Cottage on Tybee Island, GA. Breeze Inn is full of charm, color and antiques. This beach cottage is owned by the fabulous fiction author, Mary Kay Andrews. Decorating and furnishing this cottage was a labor of love for Mary Kay. In fact, she told me that many of the things that you see in the cottage were collected for years before she owned Breeze Inn! Check out this Breeze Inn Cottage Tour – we love it!

Mary Kay was sweet enough to let me tour and photograph her cottage. Won’t you come on in and join me?!

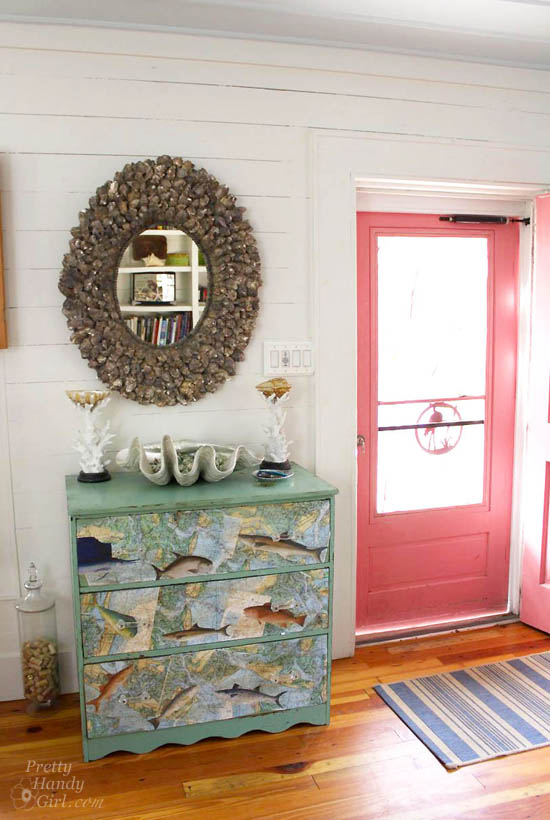
Right inside the door is a one-of-a-kind decoupaged dresser with fun fish decorating the drawers! And I am crushing on the amazing shell framed mirror over it. The plank walls add that perfect relaxed coastal feel to this little house.

Breeze Inn Cottage - Tybee Island | Pretty Handy Girl

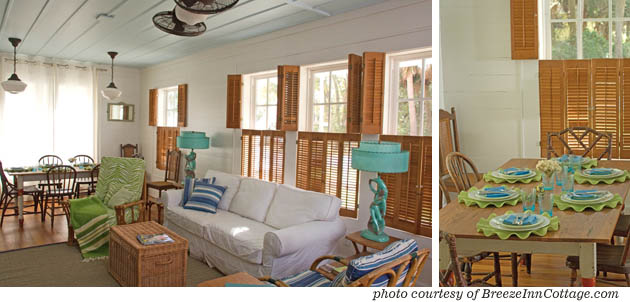
You enter directly into the cozy and comfortable living room. The dining room is part of the open front room of the cottage. I can imagine playing games at the table with the kids, while keeping up with conversations happening on the couch.

Breeze Inn Cottage - Tybee Island | Pretty Handy Girl

Just off the dining room is the kitchen. The sherbet green walls are fun and funky… Read more

wall chalkboard

Chalkboards are popping up everywhere (like Brittany’s DIY chalkboard calendar from last week) and you can easily make one, but how about upping the usefulness by making a chalkboard WITH a chalk ledge?  Jaime here from That’s My Letter to show you how easy it is to add a chalk ledge to your chalkboard.

chalkboard with ledge

You definitely need a place to put all that chalk (or chalk markers like we prefer).  This chalk ledge protudes a minimal  1 3/4″ from the wall but still has space enough to hold lots of chalk.

chalkboard with ledge 5

I also attached a galvanized pail for more chalk markers.

chalkboard with ledge 1

wall chalkboard 1

I installed this chalkboard near our back door mudroom area.  Unfortunately the key pad for our alarm system is nearly smack in the middle of that wall.  I simply cut out a square in my plywood using a jig saw to accommodate the key pad.  My kids love their new chalkboard and somehow the key pad isn’t quite so obvious once they start drawing around it.

chalkboard with ledge 2

Supplies:

  • 1/2″ plywood (cut to desired size)
  • 1×2 pine board (cut to length of plywood)
  • 1 3/8″ x 1/4″ thick flat trim moulding (cut to length of plywood)
  • black chalkboard paint
  • blue painters tape
  • stain
  • polyurethane
  • foam brushes
  • drill
  • Kreg pocket hole jig (not necessary but definitely easier if you have one)
  • 1″ pocket hole screws
  • wood glue
  • 3/4″ trim nails
  • countersink bit
  • 2 1/2″ toggle bolts
  • 5/8″ spade bit (check toggle bolt requirements)
  • pencil
  • level

Instructions:

Step 1: Cut your plywood to size, using your Kreg pocket hole jig make pocket holes every 8″ along bottom edge of plywood (on back side). (I used the portable base with automaxx clamp here, much easier that slipping a large piece of plywood into the jig.) Read more

I love making unique garden flags. My go-to material for these outdoor accessories are Dollar Tree placemats! You read that right. $1 fabric placemats! But, if you don’t live near a Dollar Tree and you have old placemats, you could upcycle them into a Valentine’s Day garden flag!

A few years ago, I made this Let it Snow flag:

Although it doesn’t seam to convince Mother Nature to bring us some white powder, it has held up nicely in the cold and rain. I’ve since set out to create a garden flag for each season. I have a Fall themed flag and a Summer flag. So, why not a Valentine’s Day flag?!

Start by collecting some supplies. Feel free to substitute what you have on hand.

Materials:

  • Dollar Store placemat
  • Ruler
  • Soap sliver (pencil or disappearing fabric marker)
  • Letter stencils (I chose a set by Martha Stewart Plaid)
  • Round paint brush
  • Tulip Fabric paint (white and black)
  • Tulip glitter fabric paint
  • Tulip glitter transfer sheets
  • Fabric scraps (red, pink and white)
  • Polyester stuffing
  • Scrap fabric, towel or rag (for ironing the glitter iron-ons)
  • White thread
  • Scissors

Begin by ironing the fabric you will be using (including the placemat). Use caution when ironing the placemat, the DollarTree ones I bought are polyester and needed a cooler iron. Read more

David Bromstad HGTV host

If I had to choose one HGTV host that I would like to meet in person, that would be a no-brainer. David Bromstad has always been my favorite designer with the transformation talent. With his “push the color envelope” attitude and ever present jovial (and often joking) nature, I think he’d be a blast to meet at a party or maybe collaborate on a DIY project for charity! (A handy girl can dream, right?) The other thing that gains David extra gold stars on my list of celebrities I’d like to meet, is the fact that he’s an artist too.

David Bromstad painting

I am in love with his short painting tutorials on Color Splash. He really knows how to empower others to try their hand at artistic expression.

David-Bromstad-painting_tutorial

You can imagine that I’d be super excited when I received an email asking if I wanted to interview David Bromstad. That email was replied to INSTANTLY! Of course I hoped it meant he was coming to Raleigh, NC and we’d have coffee together and chat. But, you know, that was a dream that didn’t happen this time. Instead, I interviewed David just before the holidays via a phone conversation.

Without further adoration and praise… I have with me (virtually) today: the one — the only — Color Splash host, David Bromstad! Jump on your couches, scream like the Beatles are playing at the Ed Sullivan theater and share my exuberance to have him on the blog today. Read more

DIY Wooden Arrows

DIY Wooden Arrows

Although I don’t typically decorate for Valentine’s Day, this year I couldn’t resist a little craft project to celebrate the holiday. After all, it is about love and chocolate and who can resist love and chocolate? Instead of the usual craft creating something heart shaped, I decided to pay a little attention to Cupid and his arrows. I put together these easy DIY wooden arrows and now I’m going to show you how you can make one too!

This project is really easy, and totally customizable so you don’t have to be exact with your measurements. Feel free to be a little more free style. You can paint it {or not}, just about any color you’d like.

Materials

  • Wooden Shims
  • Wood Glue
  • Miter Saw (or a hand saw and miter box)
  • Pencil
  • Ruler
  • Spray paint, craft or wall paint or wood stain {optional if you will paint/stain it}
  • Frame for framing {optional}

Instructions

1. First select some nice wood shims to use. Make a rough representation of what you’d like your arrow to look like.

This was a rough image of what I came up with. Two shims for the point and a few more for the tail. Wooden Shims

2. Start cutting your arrow and tail parts. You can cut the pieces like the arrow on the right or left, shown below. Either way you’ll need some pieces with a 45 degree angle. That’s where your miter saw comes in. See Brittany’s post about how to use a miter saw here. It’s one of the first power tools I learned to use and is very easy to handle and work with.

Wooden Arrows3. To cut the 45 degree angles, first set your saw at the 45 degree mark. Then cut one end of the wooden shim to 45 degrees.

Read more