Faux Etched Soap Dispenser

Faux Etched Glass Soap Dispenser Gift

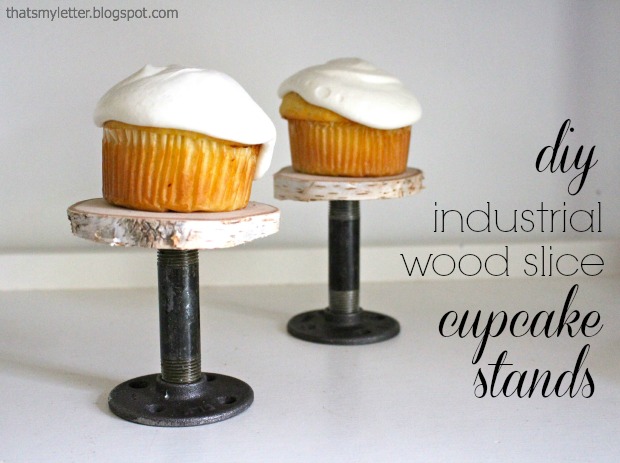
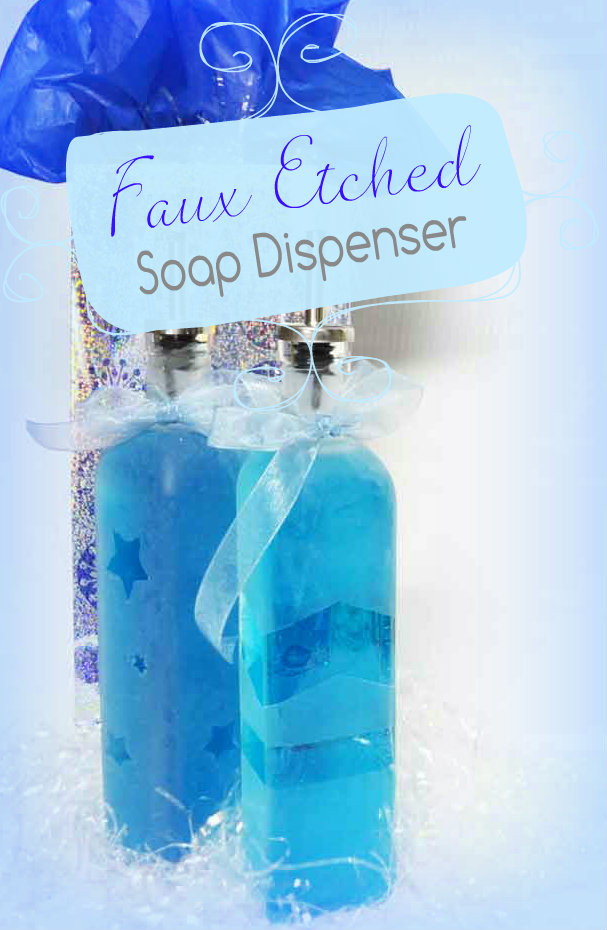
Hi everyone! I’m so excited to show you a fun Très Frugal DIY gift idea today – a faux etched soap dispenser.

Of course you could use this paint technique on any glass item – a vase, votive, or pretty up a simple jar – but, to me, there’s something luxurious about dish soap in a beautiful decanter. Even if the actual process of using the soap isn’t quite so luxe.

Materials:

Faux Etched Soap Dispenser

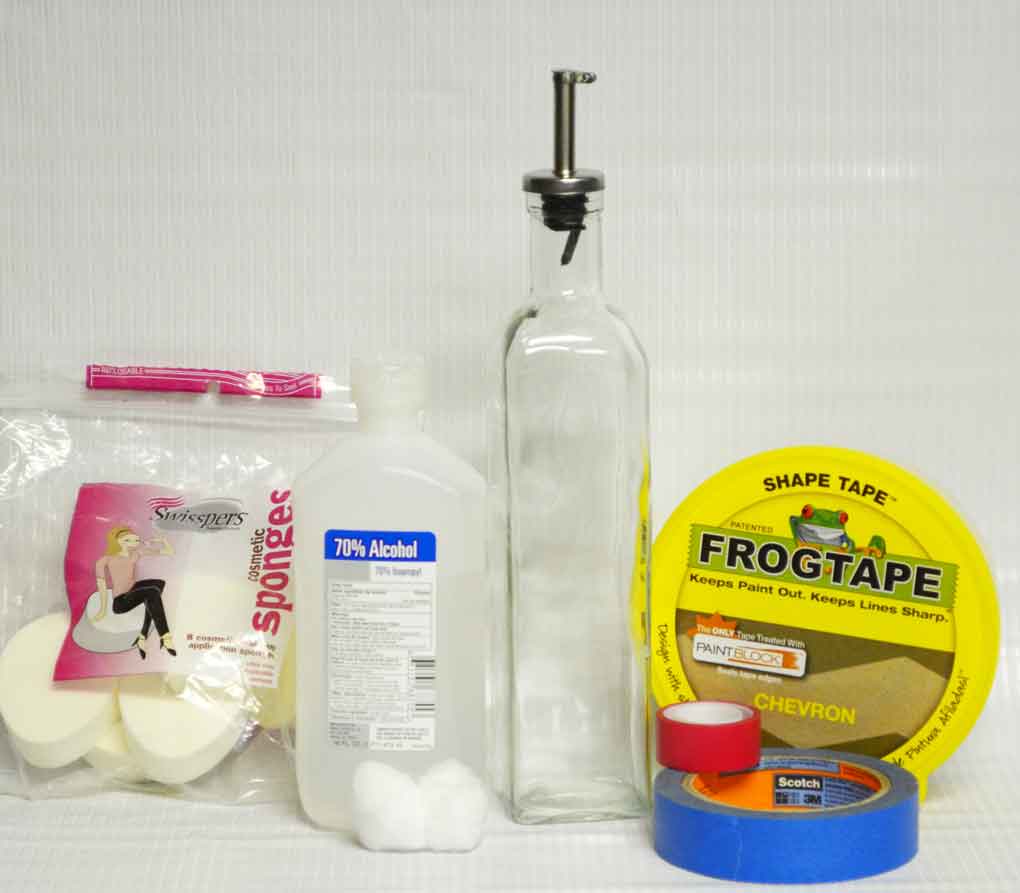
  • Glass dispenser (available at some dollar stores and most kitchen sections of large discount stores)
  • Rubbing alcohol
  • Cotton balls
  • “Frost” medium in either spray or liquid (*see below for types of frost paint)
  • Removable tape – you can use almost any type of masking tape, washi or even painter’s tape
  • Foam make up sponges

Optional: sticker shapes or stencils


*Types of Frost Paint:

Frost paint is simply a translucent white paint giving the appearance of etching without the chemical acid of true etching cream. It’s available as a spray paint, both by Krylon and Rustoleum, as well as others.

It’s also available as a liquid, made by Plaid, which is the product I used because I had it on hand. I’ve used it a few times with great results, most recently on some Pantry JarsThe tutorial below is for liquid frost medium.

The spray paint is definitely faster, however the liquid can be tinted with regular craft paint, which might be kind of fun.


Instructions: Read more

cupcake stand

Make these DIY industrial cupcake stands now and you’ll be ready for all the upcoming holidays, Thanksgiving and Christmas are fast approaching!  The cool black steel plumbing parts base combined with the natural wood slice platform lends itself to an unexpected industrial feel.

Each cupcake stand costs $5.50 in parts (not including the birch log), very reasonable for a unique, DIY project that could easily lend itself to become a favor or small gift.

cupcake stand 3

Supplies required (for one DIY Industrial Cupcake Stands):

  • 1/2″ black steel floor flange
  • 1/2″ x 3 1/2″ black steel nipple
  • birch log (approx. 5″ in diameter)
  • hand saw or circular saw
  • palm sander or sandpaper
  • drill
  • 3/4″ circular drill bit
  • E-6000 glue

DIY Industrial Cupcake Stands Instructions:

cupcake stand 4

Step 1: Using a handsaw or circular saw slice off 3/4″ thick disc of wood from the birch log. (If you’re concerned about bugs, you can bake them as shown here.)

Step 2: Sand wood slices smooth.

Step 3: Using a drill with a 3/4″ circular bit drill out a small hole for the nipple piece, only about 1/4″ deep, be careful not to let the tip of the bit pierce through to the other side of the wood slice.

cupcake stands 5

Step 4: Apply E-6000 glue to one end of nipple and screw it into flange.

Step 5: Apply E-6000 glue to circular hole in wood slice.

Step 6: Gently ‘screw’ other end of nipple into wood slice.

cupcake stand 6

Let the glue dry while the cupcake stands are upside down.

When dry, flip the stands over and load them up!  They are perfect not only for cupcakes but candles too:

cupcake stand 2

Cupcakes, candles and individual pies too!  Mini pumpkin and pecan pies are on definitely my Thanksgiving menu this year:

DIY Industrial Cupcake Stands

Jaime signatureLearn more about Jaime ~


Pin for later!

DIY Industrial Cupcake Stands

How to DIY a GIANT artist canvas | Pretty Handy Girl

Have you ever yearned to own a giant piece of artwork but the cost was prohibitive? Or you knew you could create some awesome abstract paintings, but buying large canvases would cost too much. Well, for those hesitant artists, I have this quick tutorial for building your own GIANT canvas!

Materials:

How to DIY a GIANT Artist Canvas

  • 2×2″ boards for frame supports (two sides, top, bottom and center support)
  • Kreg Jig and pocket hole screws
  • Drill
  • White fabric (canvas material would be best, but use what you have)
  • Staple gun and staples
  • Paint brush
  • Gesso (if you don’t have gesso, primer would probably work fine)

Instructions:

Cut your 2×2″ lumber down to size. Cut your top and bottom the full widths. Cut the two sides and the center support 3″ shorter to accommodate the height of the added top and bottom pieces. Note, if your canvas is portrait (instead of landscape), your support will be a center horizontal brace instead of vertical as shown. Read more

Easy Fall Wreath Tutorial

Easy Fall Wreath Tutorial

Who’s too busy to spend more than 5 minutes creating a new wreath for Fall? {Raising my hand high!} Well, I’m about to give you the Easiest Fall Wreath tutorial…EVER!

Do you have one of these store bought wreaths? Pretty, but maybe a little lacking in color. Or maybe you’re just sick of looking at the same store bought wreath going on ohhhh six years now?

Easy Fall Wreath Tutorial

Quick! Go grab these five things:

Easy Fall Wreath Tutorial Read more

state-pride-600

I have this amazingly creative friend named Beckie. I’m sure you know her as the brains behind Infarrantly Creative. Well, this time she had the genius idea of having an entire week of State Pride related crafts, recipes, and tutorials revolving around our home states. The fun started yesterday and is continuing all week.

Don’t feel left out, because next week you can join in by Showing Your State Pride in the link party on Monday the 23rd at www.infarrantlycreative.net.

In the meantime, here’s the line up that will have you zig zagging across the US for loads of creative inspiration: Read more