Install a Post Mounted Birdhouse | Pretty Handy Girl

Install a Post Mounted Birdhouse | Pretty Handy Girl

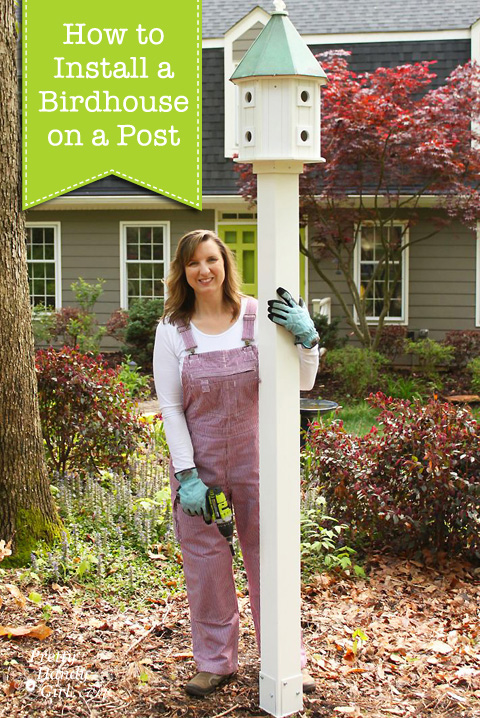
Hey y’all! I’m back with another easy tutorial. This is another #DIYCourage project sponsored by Duluth Trading Co. Do you love birds? Want to add some birdhouses to your property without attaching them to trees? Today I’m going to share a super simply DIY project that will make the birds happy and make you smile. Learn how to install a birdhouse on a post within an hour.

Install a Post Mounted Birdhouse | Pretty Handy Girl

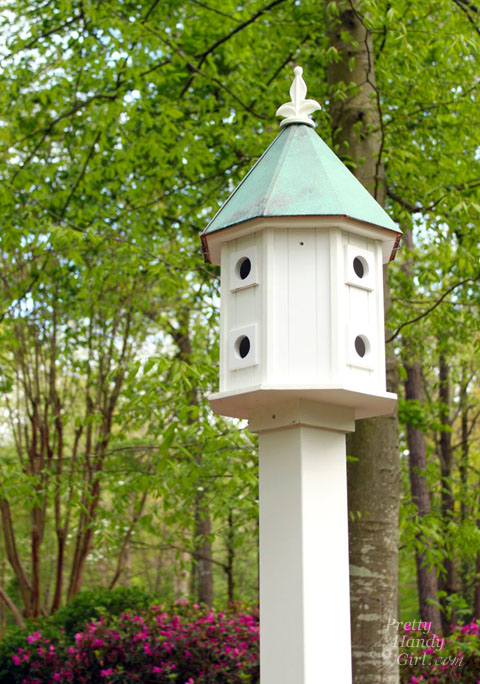
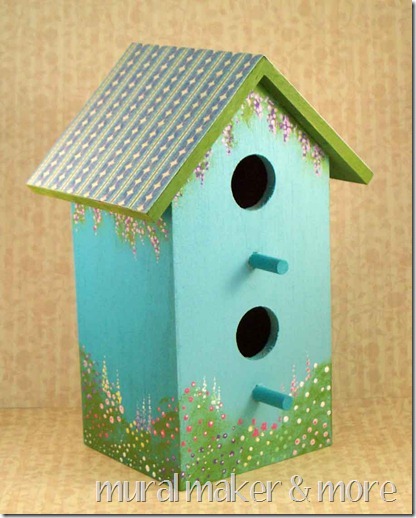
My sons and I love watching the birds come to our kitchen window feeder. We want to make our yard a welcome place for all birds. We wanted to add more birdhouses to the yard by adding a two-story birdhouse. We already have two birdhouses (one that is a little wacky and made with knives), but I’ve always admired the two story birdhouse condos that house eight nests. When I saw one at the Southern Ideal Home Show (with a discounted price tag) I snatched it up.

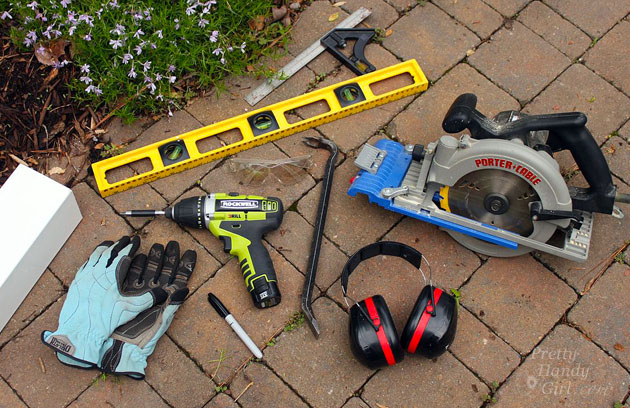
Install a Birdhouse on a Post Materials:

(I’ve included affiliate links for your convenience. I earn a small percentage from a purchase using these links. There is no additional cost to you. You can read more about affiliate links here.)

Install a Post Mounted Birdhouse | Pretty Handy Girl

How to Install a Birdhouse on a Post Instructions:

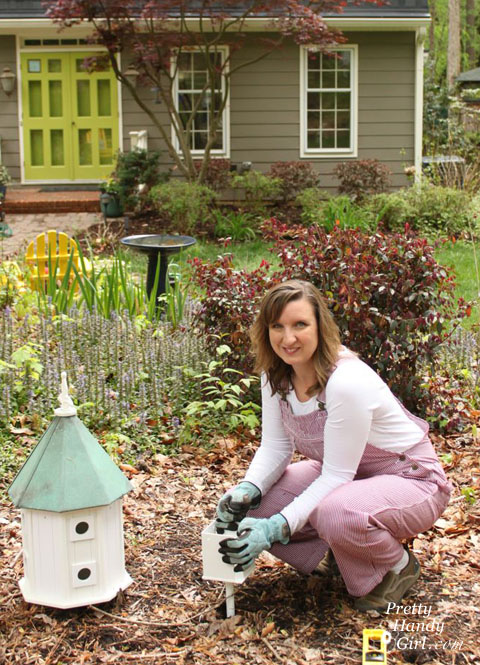
Select a location to install your birdhouse. Try to find a spot that will get a decent amount of shade during the day (to keep the birdies from getting too hot.)

Install a Post Mounted Birdhouse | Pretty Handy Girl

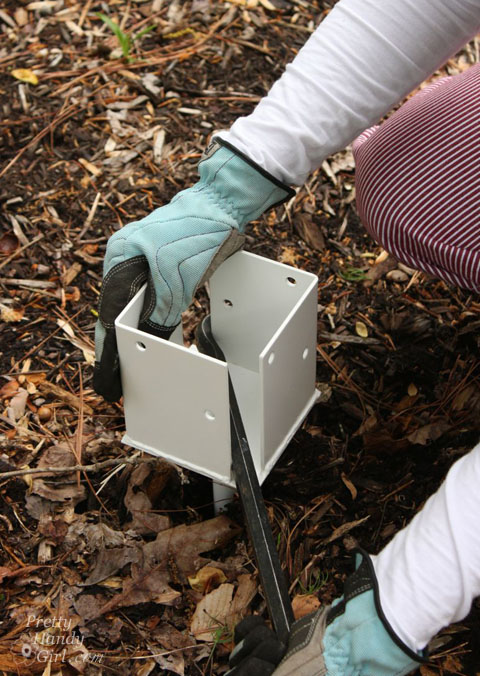
Twist the post anchor into the ground. When it becomes difficult to turn, insert the pry bar for added leverage.

Install a Post Mounted Birdhouse | Pretty Handy Girl

Set your 4×4 post into the anchor.

Read more

How was your weekend everyone? I had a truly fabulous weekend surrounded by some seriously creative and talented bloggers. I was in Salt Lake City, Utah attending the SNAP 2012 conference. Sadly, there was one blogger who is equally as creative and talented that couldn’t make it this year. (But, we’re going to have to tie her up and make her come next year!) This fabulously talented lady is none other than Colleen also known to the blog world as Mural Maker.

head shot

Colleen and I have never met, but we’ve bonded online because we have similar fine art backgrounds. Colleen is equally willing to share her talents and help empower others to paint just like she does (with step by step photographic tutorials.)

Ooo, ooo, ooo, I think I see her marching up the parade path right now. She has a paint brushes in hand and WOW, look at her toss that spinning artist’s palette in the air like a pizza pie. Now that takes talent! The crowd is excited. The colorful paints are beginning to fly. So, settle back and enjoy the show. Read more

When Courtney (The Joy of Decorating) organized the Raleigh group for I <3 Thrifting Day she took us to an “off the beaten” path shop. Tucked into an industrial zone off Capital Blvd. in Raleigh, you would miss it unless you were specifically looking for it.

Here are just a few of the inspirational photos I took on my visit to Revival Antiques & Accessories:

Old bead board or flooring pieces cut, painted and turned into a coat rack!


A pendant light made from corrugated cardboard!

Here’s a closer look at the cardboard.

Give me chippy paint or give me death! Okay, I know I’m being dramatic, but I seriously love anything rustic with chipping paint.

Decorative scroll embellishment on an armoire.

Just think how easy these ampersand pillows would be to make!

Hello, does this vignette remind you of Miss Mustard Seed? Me too.

Painted and numbered chippy buckets.

Another scale and a buggy wheel. Makes my wheels churn thinking what I could make with it.

I just love the detail on this drawer pull (and of course the chippy paint.)

Bare wire framed pendants are very popular right now.

I think I like the pendant even more because of the antique light bulb.

Antique cameras are sculptural and easy to decorate with.

I spotted this shelf made from old shutters.

Or you could turn an old shutter into a coat rack.

This armoire is too stunning for words!

If I owned this dresser, her name would be buttercup.

Old typewriter keys are just graphic goodness.

This tool caddy is adorable, but I bet it would be easy to make. I think I could use Julie’s (Follow Your Heart Woodworking) tool caddy tutorial that appeared on Funky Junk Donna’s.

A cute little nook shelf. Complete with (you guessed it) chippy paint and beadboard.

This birdcage photo display gives me a few ideas. How about you?

2nd only to chippy paint, I love blue bottles!

Little antique crates can be found everywhere at ReVival Antiques.

A buoy birdhouse! How adorable.

{Yawn!} That’s it for today, I’m ready for my cat nap.

If you liked anything you saw in this post, be sure to visit or contact:

Revival Antiques & Accessories
1505 Capital Blvd, Suite 14-A
Raleigh, NC 27603

919-833-3444
www.revival-antiques.com

Disclaimer: This is NOT a sponsored post. Revival Antiques doesn’t know me, they didn’t poke or prod me to write this. It is just one of those places that I thought you might like to visit with me. So, I brought you along for the visual tour.

Ahhh, the birds are chirping and the flowers are in full bloom. The azaleas in our yard look like fireworks exploding with color.

I long to open the windows and let in the sounds and the sweet smells.

But, alas, the pollen bomb is still in full dumping mode.

I’m not going to let that get me down. I decided to bring the outdoors in and finished switching out my Valentine’s Day decorating (yup, I like to get the most out of my seasonal décor.)

So, without further ado, here is how I’m celebrating Spring!

I saw the window idea at Classicly Amber (via Pinterest) and had just pulled a few old windows out of a curbside pick up pile. Speaking of Pinterest, if you haven’t tried it yet, you are missing out! It is a great place to “pin” ideas you see and be able to refer back to them easily.

Beth at The Stories of A2Z gave a tutorial on using Pinterest HERE. She’s the one who introduced me in the first place, so I’ll let the master show you the ropes!

I always make it a point to refer back to the original source if I get an idea somewhere else. (Granted, some things are so widespread amongst bloggers, that it is hard to credit the original source.) Pinterest has helped me keep all the ideas together and makes it easier to find the original source. Plus, you can follow other people’s pins and boards. Feel free to sign up and follow mine HERE. Then you can steal my ideas before I blog about it…just kidding!

The striped pedestal holding up the plant is actually a cake stand I made recently using a plate and a candlestick. I’ll be blogging about it later this week, but trust me it is nothing new. You’ve probably seen this trick somewhere else.

This little adorable birdhouse was lovingly painted by my 7 year old son. I always have a stock of $1 birdhouses that they like to decorate on a rainy day. This one brings so much sunshine into my heart.

I love how easy this centerpiece was to create. I rested the ceramic bird into  a shredded paper bag nest. Then set the nest on top of a ceiling medallion ($3 at a yard sale) and surrounded the medallion with ivy.

And finally, my favorite: a robin’s egg nest that I made with chicken eggs.

You can view the tutorial for making the eggs and nest at TLC’s Parentables today.

If you struggle with decorating and creating vignettes, you might want to read a few of the guidelines I use when designing groupings and seasonal décor HERE.

Entering this post into the CSI Spring Decor and Vignettes challenge:

Visit thecsiproject.com

Okay, so I know you all think I’ve gone off my rocker. I bought a bunch of silverware (err, excuse me flatware) from Goodwill recently. I made some Fork Photo Holders (which I absolutely adore!) And had been thinking of some cool projects to do with the knives.

Inspiration hit when my chickadee’s birdhouse roof caved in. I knew I had to act quickly and build a new birdhouse for my repeat nesters! Here is a look at the dynamics surrounding the chickadee’s annual nest location.

I had no idea that the little chickadees could continually defend their bird house from the larger birds, but they do. Every year!

I bought this $3 unpainted birdhouse at AC Moore and painted it a pretty blue;  gave it a white wash; and put a few coats of protective polyurethane on it.

Then, because I can’t leave well enough alone, I decided that the birdhouse needed something extra. Knives!!! Of course, right?!

So, here is what I did:

Materials:

Painted and Polyurethaned Birdhouse
Knives (about 14)
Wire
Wire cutters
Staple Gun
1/4″ Staples
1 Spoon or Fork Handle
Dremel power tool (with metal cutting disc, drill bit, and engraving tool)

Instructions:

Begin by removing the standard perch (yes, I really can’t leave well enough alone!)

I used my Dremel 8000 that I got for Christmas. Love it!

Then clamp the spoon or fork to a work surface and use a metal cutting wheel attachment on the Dremel to cut off the handle (those sparks will fly, so be sure to use safety goggles and keep the work area clear.)


Mark the width of the handle on the birdhouse.

Use a drill bit attachment to drill a series of holes to fit the spoon handle (perch) into.

I got tired of drilling holes and eventually cleared out the leftover material with the engraving tip. (If anyone is a Dremel expert and has a recommendation for a better bit to use, I’m all ears!)

Dip your handle (perch) in the E-6000,

and insert it into the slot you made in the birdhouse.

Now, time to play with the knives! Oooo, that sounds so sadistic! Measure the height of your birdhouse roof and then line up your knives to double that length (to cover both sides of the roof.)

Wrap a wire around the first knife a few times, then wrap it around the second knife a few times to connect them.

Continue connecting the knives together until you reach the double height length of the roof.

Repeat tying the knives together on the opposite side.

Drape the knives over the birdhouse roof and adjust any that have fallen out or are not lined up.

If some of the knives want to fall out, add a drop of E-6000 to the underside to secure the wire to the knife.

Load your staple gun with 1/4″ staples and staple the wire to the roof. Tap any that didn’t sink into the wood with a hammer.

Finally, add a hook to the top of your birdhouse and hang it up outside! I hope the chickadees appreciate their new home.

Note: At first I wanted to use more knives so that you couldn’t see any space between the knives, but those suckers were so heavy that I had to modify my plans.

PHGFancySign