The last few years I found myself up late on December 24th frantically wrapping presents, not exactly the way to get into the spirit! This year I knew I wanted to do it differently. These are the three things I wanted to happen:
I wanted to spend some time being creative while wrapping the presents.
Find some time to spend with friends that didn’t involve eating cookies (I have to admit, I’ve gained 10 lbs. since I began blogging, I’ll refer to it at the new blogger’s bloat.)
And finally, give myself time to really get creative and then share the results with my readers.
My genius plan was to have a girlfriend get together and wrapping party. So, I invited four girlfriends to come chat and wrap.
Unfortunately a stomach bug, an out-of-town hubby, and life with kids put a damper on everyone’s plans except Renee’s. Despite our small numbers, we still had fun talking, catching up and wrapping some creative packages!
Over the next few days I’ll share with you the tutorials. I hope you get some ideas for your gifts (if you still haven’t wrapped yours). And I hope you don’t spend the evening of December 24th wrapping them all by yourself.
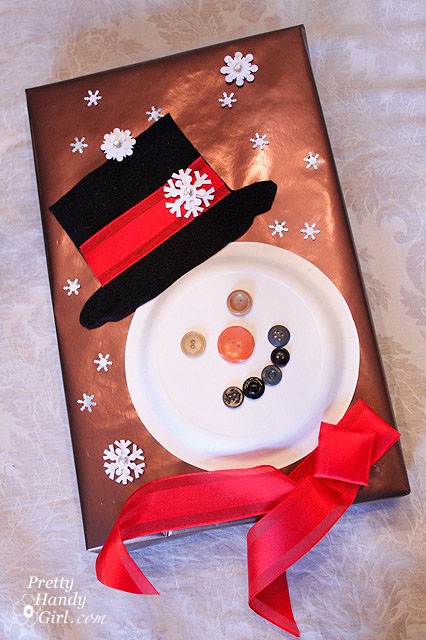
Snowman Present
Materials:
Black felt or black construction paper
Cake size paper plate
Buttons (2 eyes, 1 nose, 5-6 mouth)
Red Ribbon
Snowflake stickers, snowflake paper punch, and/or other embellishments
Wrapping paper
Elmer’s glue
Hot Glue Gun
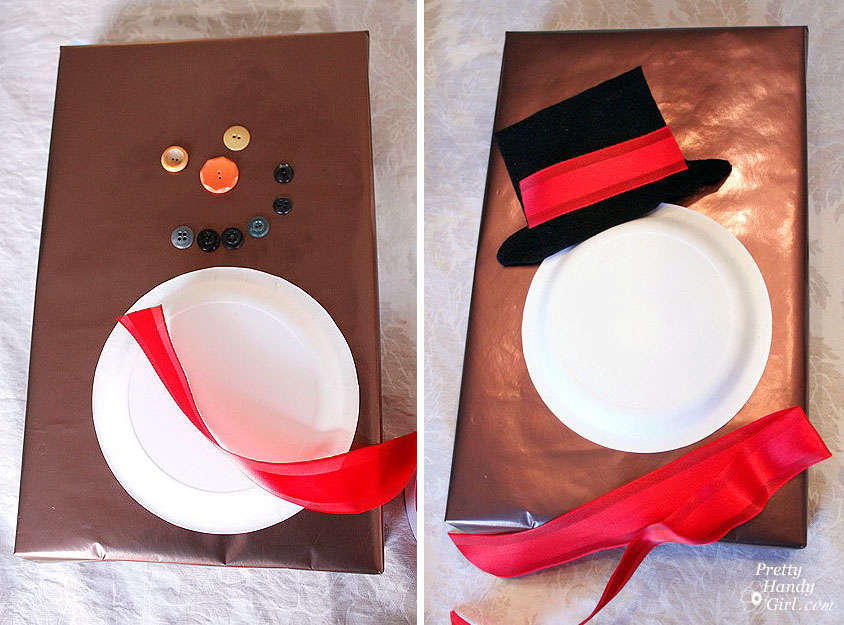
Start by wrapping your present as you would normally.
Preheat your hot glue gun.
Then cut out your black felt or construction paper in the shape of a hat. Feel free to use this template or make your own.
Cut a piece of red ribbon for the brim of your snowman’s hat. Then gather your snowman pieces and lay them out on your package.
Use the hot glue gun to glue the cake plate upside down to the package.
Then glue the brim ribbon to the hat.
Glue your hat on the package letting the brim overlap the cake plate.
Cut another piece of ribbon for your snowman’s scarf and fold it in half. From the folded edge, you will want to fold about 2 inches back on itself. This will be your snowman’s scarf knot. Play with the scarf and “knot” until you like how it looks, then use the hot glue to affix it to the gift box.
Use some more hot glue to adhere the buttons to the cake plate.
Then embellish your package with snowflake stickers, etc. Besides the stickers, I used the snowflake hole punch to punch many little flakes. Then I glued them with a small dot of elmer’s glue.
“Frosty the Snowman!”
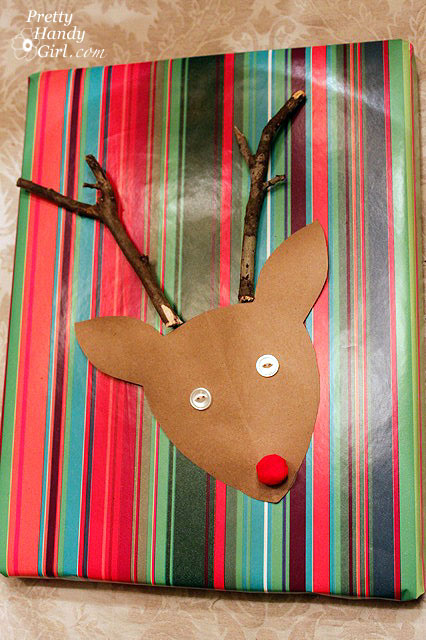
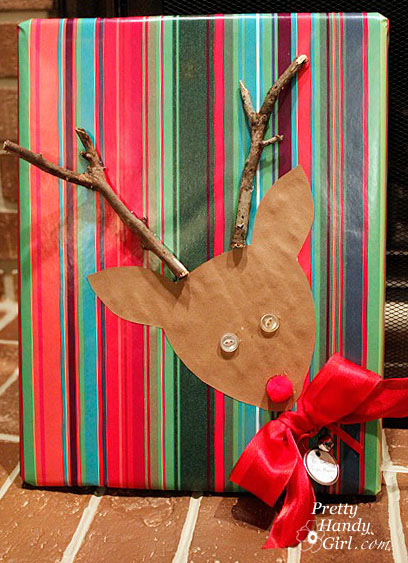
Rudolf Gift Wrap
Materials:
Two twigs
Brown craft paper or paper bag
Two buttons for eyes
1 Red pom pom
Red Ribbon
Snowflake stickers or hole punches
Jingle bell
Elmer’s glue
Hot glue gun
Preheat your hot glue gun.
Wrap your present as you normally would.
Cut out a reindeer head from the craft paper or a paper bag. Feel free to use this template or make your own.
Lay out your reindeer pieces on the package where you want them.
Coat the back of the reindeer head with Elmer’s glue and attach it to your gift.
Using your hot glue gun, run a thick line of glue onto the back of your twigs and attach them over the reindeer head.
Use hot glue to attach the eyes and nose.
Tie a bow with your red ribbon. Attach a gift tag and jingle bell to the bow and then hot glue it to the package.
Finish off decorating your gift by adding paper punch snowflakes with elmer’s glue and/or stickers.
“Rudolf the Red Nose Reindeer!”
Side note: I bought the paper punch, stickers, and embellishments in the scrap-booking aisle at Target. And our Costco has the biggest spools of wired ribbon I’ve ever seen.
Be sure to check back these last few days before Christmas because I have SIX days of creative gift wrappings to share with you! Head on over to Day #2.
https://prettyhandygirl.com/wp-content/uploads/2014/12/FinalSnowman.jpg640426Brittany Baileyhttps://prettyhandygirl.com/wp-content/uploads/2021/07/PHG-logo-tagline-2020-1030x211-R.jpgBrittany Bailey2010-12-16 22:56:002021-08-24 17:22:11Creative Gift Wrapping Day #1
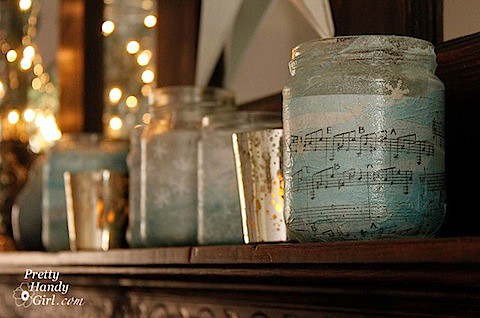
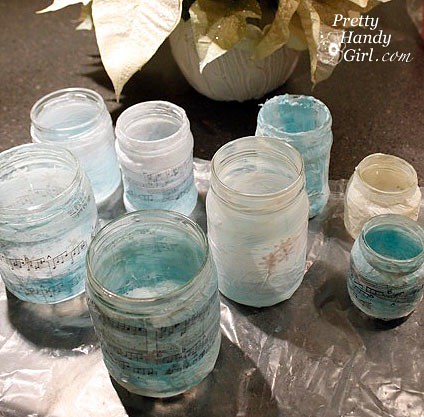
This has to be one of my favorite activities to do with the kids!
Start by saving jars for a month or more! Salsa, jelly, vegetable, and baby jars all work well. Soak the jars to remove the labels and scrub any excess glue off.
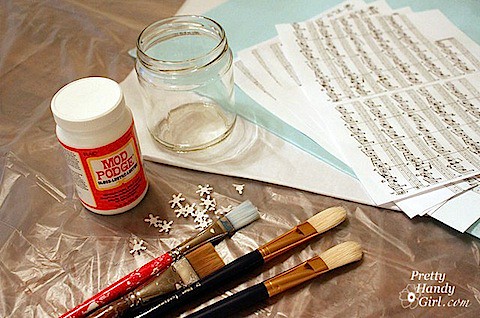
Materials:
Clean Jars
Mod Podge (or diluted School Glue)
Brushes
Jar of water to rest brushes in
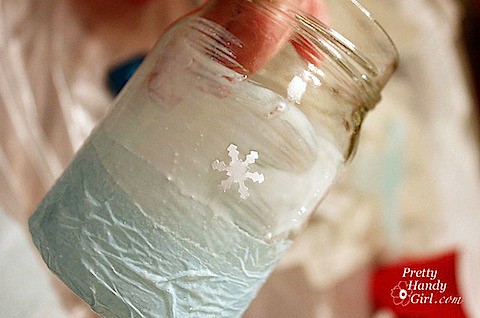
Tissue Paper (I limited the palette to whites and blues)
Magazine cut outs, sheet music, stickers, or decorative hole punches
Plastic tablecloth or sheet to cover your work area
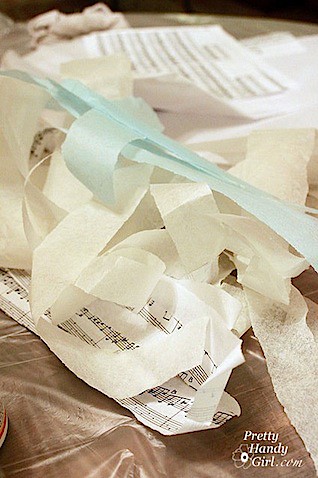
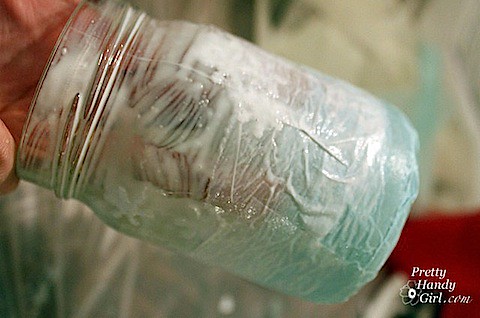
1. Tear your tissue paper, sheet music, or other paper into small strips and/or cut magazine pictures into small pieces.
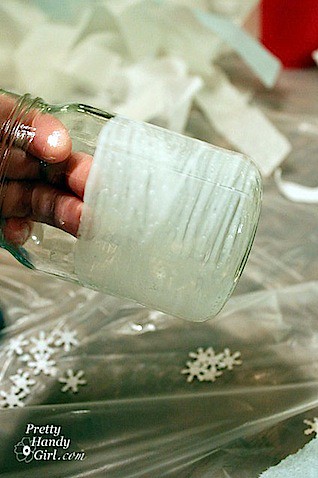
2. Brush a coating of Mod Podge onto the outside of the jar.
3. Lay down your first layer of papers. (You be the creative genius here! You really can’t go wrong.)
4. Coat the top of your paper layer with more Mod Podge and continue until the jar has been covered. It is okay to and encouraged to overlap layers. (Again, you are the creative genius!)
5. Finish your jar by brushing on a final coating of Mod Podge. Be sure everything has been coated.
6. Rest your votive holders on wax paper to dry. (Did you know that I never buy wax paper anymore? I use recycled cereal bags.) After an hour, flip your jars over to allow the other end to dry.
Insert your tea lights or use flame-less candles and enjoy!
They are so adorable, that after the season has passed, I’ve been known to use these for pencil holders, for makeup brushes or impromptu vases for a bud or two. They also make a great gift from your child to an adoring Grandparent! What do you think? Are they gift-worthy?
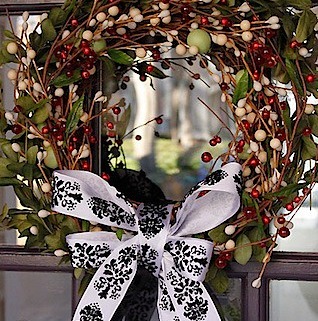
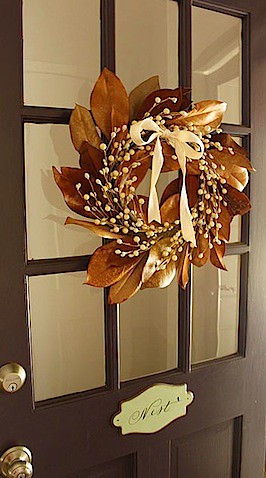
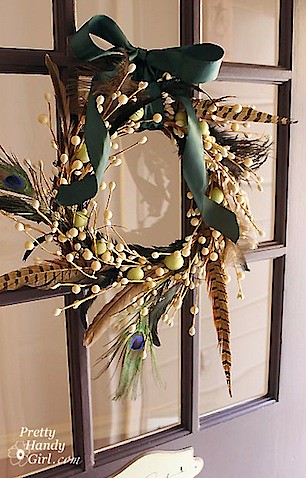
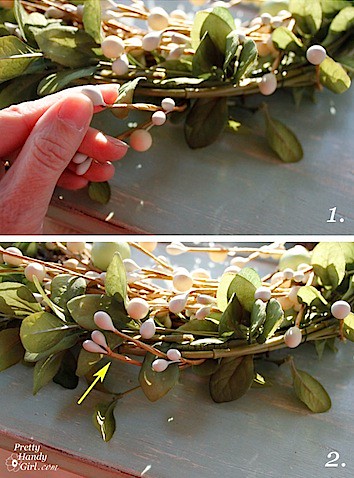
I am getting a lot of mileage out of my white base wreath I bought at Target several months ago. With it I’ve been able to make a Magnolia Leaf Wreath for the fall.
Now it was time to give the wreath an injection of Christmas spirit. I removed the feathers, but left the green nuts on it. I had a green fabric leaf wreath that I made out of some floral filler stalks. All I did was twist 4 of the stalks into a circle shape and secure with a few pieces of floral wire.
I set my white base wreath inside the green leaf circle.
To secure the two together, 1) I fed some of the base wreath twigs under the leaf wreath and 2) twisted them over to hug the green leaf wreath.
That couldn’t be any easier! No glue, no mess.
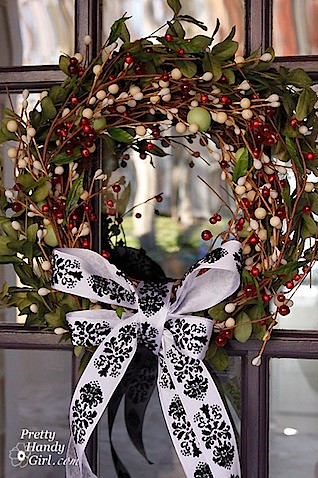
I compared two different ribbons next to my wreath and ultimately chose the black and white one.
Tied a pretty bow and stood back to admire.
Hmmm, I like it, but it just wasn’t feeling Christmasy enough, so I quickly tucked some red floral sprigs with teeny bells on them into the wreath and gently curved them to match the shape of the wreath.
Now that is more like it!
In less than 10 minutes I have my Christmas wreath! This base wreath has been the best $10 I’ve spent all year!
I’m going to try to use this wreath all year and will be sure to share the transformations with you.
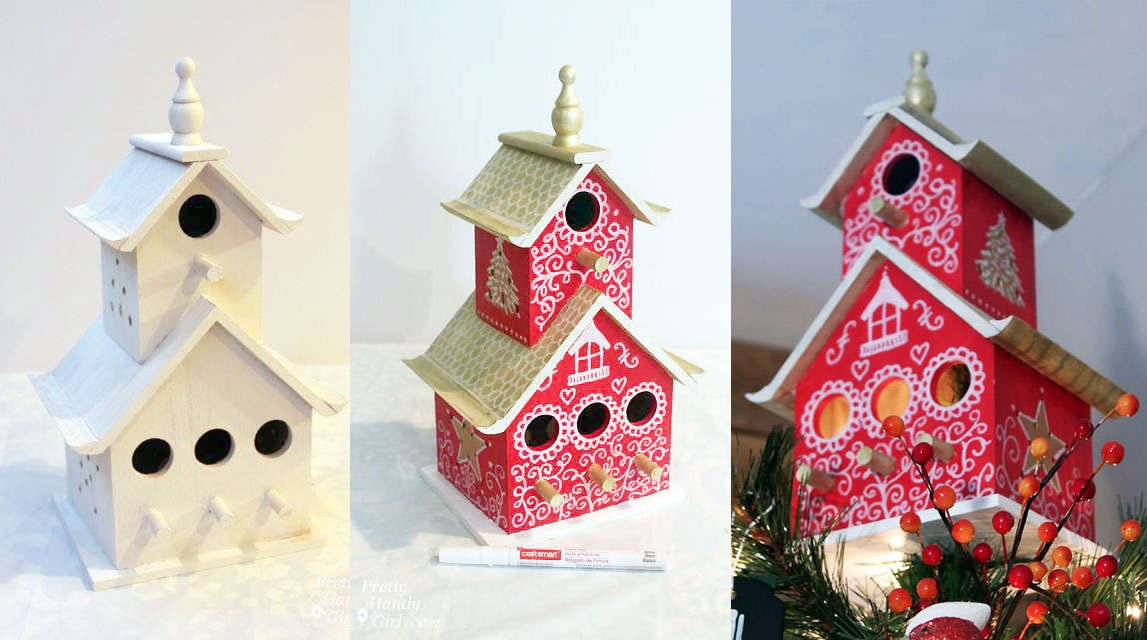
I love creating decorative birdhouses to donate for silent auctions. Over the years I’ve created a few, but this pinecone roof hand-painted birdhouse is one of my favorites! (You can see the other hand-painted birdhouses I’ve created and auctioned off for our preschool’s silent auction.)
Pinecone Roof for a Hand-Painted Birdhouse
Today I’ll show you how to create a nature-inspired pinecone roof for your birdhouse. This is a simple DIY project that will produce an adorable nature inspired birdhouse.
Materials:
Hopefully you have all the materials and tools on hand that you will need. This is a list of what you’ll need to add a pinecone roof to your birdhouse.
(I’ve included affiliate links for your convenience. I earn a small percentage from a purchase using these links. There is no additional cost to you. You can read more about affiliate links here.)
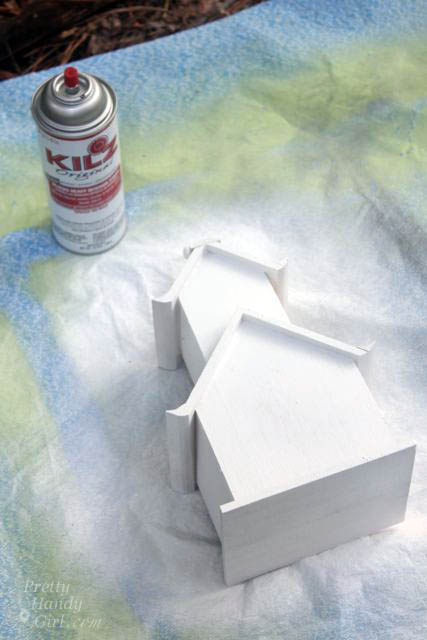
After priming and hand-painting the unfinished birdhouse, it was time to add the decorative elements to set this birdhouse apart from a store-bought house.
First you should know that I sawed off the perch that came with the birdhouse. And filled the hole with wood putty. Then after a light sanding and a coat of primer, I painted the whole birdhouse.
Adding the Pinecone Roof:
Use a pair of needle-nosed pliers to carefully de-scale several pinecones, you may want to wear gloves because those scales are sharp! Most people think you’d start from the top of the roof and add scales down, but if you have ever watched a house roof being tiled, they always start from the bottom and overlap shingles as they go up.
This little birdie abode is no different. Start by running a line of E-6000 (super strong glue) on the bottom of the roof. Then lay the first row of pinecone scales. Once the first row is complete, overlap a second row on top of the first. Here is a peek at the roof after three rows had been laid.
Once you reach the top, move to the other side. (Check back frequently to adjust any scales that move slightly during the roofing process.) This is what the house looked like when I was done with one side of the roof.
Repeat for the other side.
As the roof dries, search your yard for a stick to use as a perch. It took a while, but I found one that had a “T” shape so I could insert one end into the house.
Choose a drill bit that is the same size as the stick.
If you want to paint the stick before securing it, now is the time to do that.
Drill a hole into the front of the birdhouse.
Use some more E-6000 to line the hole, then slide the stick into the house. If the stick touches the house in multiple places, put a small dollop of glue behind where the stick and the house meet to hold it secure.
Add a screw eye to the center of the roof if you want to allow someone to hang the birdhouse. Simply measure the center of the roof and then used a drill bit slightly smaller than the screw eye to drill the pilot hole. Screw eyes can pretty much be twisted in by hand, or you can use your pliers if you need a better grip.
Now it is time to give the birdhouse some snow! First tape off the painted sides of the birdhouse with ScotchBlue painter’s tape to protect them from the spray.
I admit it, I’m cheap. I didn’t feel like buying some fake snow, so I chose to use white spray paint and glitter spray instead.
Hold the can several feet away, and spray in small bursts. If your have a can of spray paint that is almost empty this works best because it will spatter a little.
Give the birdhouse a light dusting of glitter spray. To protect the house, coat it with at least three coats of clear spray.
And here she is in her snow dappled glory! Doesn’t that pinecone roof look amazing?
I’m curious, how much would you have bid up to on this cute little one-of-a-kind bird house? The winning bidder paid $25 for the birdhouse. Not bad considering the house only cost me $3.
(I’ve included affiliate links for your convenience. I earn a small percentage from a purchase using these links. There is no additional cost to you. You can read more about affiliate links here.)
https://prettyhandygirl.com/wp-content/uploads/2010/11/add-eye-hook-to-roof.jpg15001049Brittany Baileyhttps://prettyhandygirl.com/wp-content/uploads/2021/07/PHG-logo-tagline-2020-1030x211-R.jpgBrittany Bailey2010-11-23 18:05:002025-06-09 17:24:20Pinecone Roof for a Hand-Painted Birdhouse
Our preschool silent auction is today. Every year I donate a one-of-a-kind hand-painted birdhouse to be auctioned off. I never spend more than $3 on the birdhouse and usually buy the unpainted versions at Michael’s or ACMoore. Then I get creative by hand-painting a scene and add unexpected touches to the house – thus creating birdhouses with style.
For inspiration, these are some of the birdhouses I’ve hand-painted in the past. I hope the birds find them cozy and love them as much as I do.
2008 – Jardin da Girasoli de Vendere “Vendor of Sunflowers”
Painting sunny sunflowers and some green grass gave this birdhouse a sunny garden look. I added a gold spigot for the new perch. Using a spade bit in my drill, I cut a hole slightly smaller than the spigot, then simply screwed the spigot in place. For added stength I coated the threads with some E-6000. Can anyone guess what the roof tiles are made from? They are canvas shims! Those are the freebie scraps of wood that come with a painter’s canvas! Painting them bright red took the little birdhouse from cute to bidding war worthy!
2009 – Red & White Bird Silhouette Round House
I apologize right now for the condition of this picture! Obviously this is the only picture I took of this cute little abode. The birdhouse was a $2 find at my local Goodwill. The roof was detaching and it was painted an ugly 90’s hunter green and burgundy. I gave the house a good cleaning, then glued and nailed the roof back on. After a fresh coat of primer and white paint, I hand-painted the red bird and branch design onto the curved birdhouse sides. Then the roof and base were painted a solid red. The perch is a curtain rod screw (that holds the rod in the curtain rod bracket). Then the house received a little green ribbon and a silver bell on the top. So simple, but one of my favorites!
For the next auction birdhouse I wanted to focus on a woodland theme. I scoured my yard for pinecones that were dry and spread open. I glued them onto the roof of an unpainted birdhouse purchased from Michaels. The house got a beautiful woodland scene with a Christmas wreath on the front and a Christmas tree on the back.
To protect all my birdhouses from the elements (should they really be “for the birds”), I coated them with a few coats of polyurethane. If you don’t seal the birdhouses they will rot overtime. They may still take a beating after each season, so it’s helpful to be able to have an access panel to clean out the inside and let it air out.
So, how much do you think my pinecone roof birdhouse will fetch today? I hope more than $3!
(I’ve included affiliate links for your convenience. I earn a small percentage from a purchase using these links. There is no additional cost to you. You can read more about affiliate links here.)


 Repeat for the other side.


