How to Finish Raw Plywood Edges | Pretty Handy Girl

How to Finish Raw Plywood Edges | Pretty Handy Girl

Recently I’ve been working on building drawers for our pantry. The material I chose to use is finish grade plywood. Plywood is strong, but unfortunately it has a raw edge that isn’t the most attractive side of the wood. No problem, it can be covered. You could use wood putty to smooth the raw edges of the plywood, but you won’t get perfect results and it is only recommended if you are going to paint your plywood. Instead, I have a solution for you on How to Finish Raw Plywood Edges to give you a more professional look. In fact, some people may not be able to tell it was plywood to begin with!

This is an easy tutorial and requires no power tools (unless you consider an iron a power tool.) You will need to purchase veneer edging for this project. Don’t worry if your edging is wider than your lumber, we’ll fix that. Ready to learn How to Finish Raw Plywood Edges? Let’s get this project heated up.
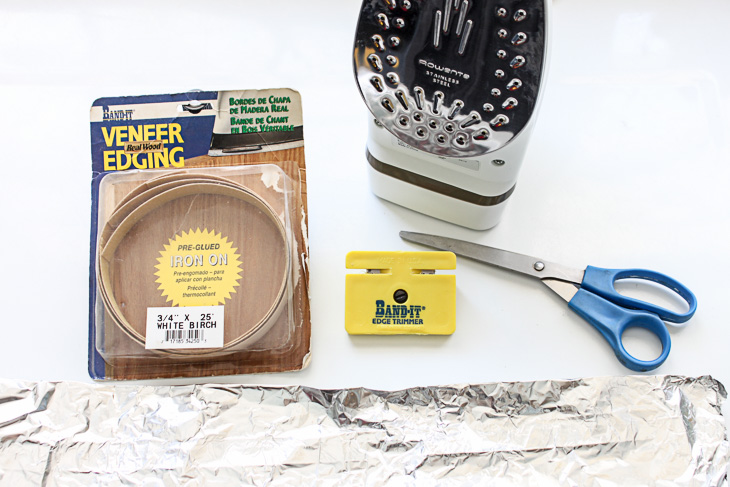
Materials:

(I’ve included affiliate links for your convenience. I earn a small percentage from a purchase using these links. There is no additional cost to you. You can read more about affiliate links here.)

How to Finish Raw Plywood Edges | Pretty Handy Girl

Instructions:

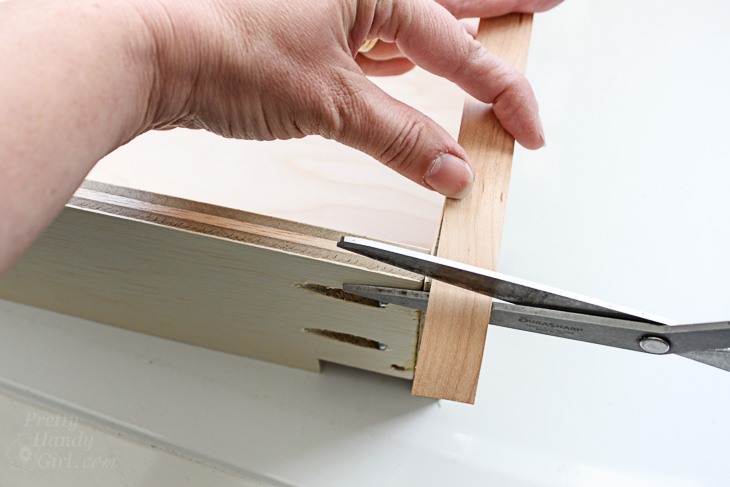
Pre-heat your iron on the cotton setting. Measure the length of your veneer edging on your plywood. (Do not cross your edging over any joints. Keep the veneer piece the same length as the cut wood.) Cut the excess off.

How to Finish Raw Plywood Edges | Pretty Handy Girl

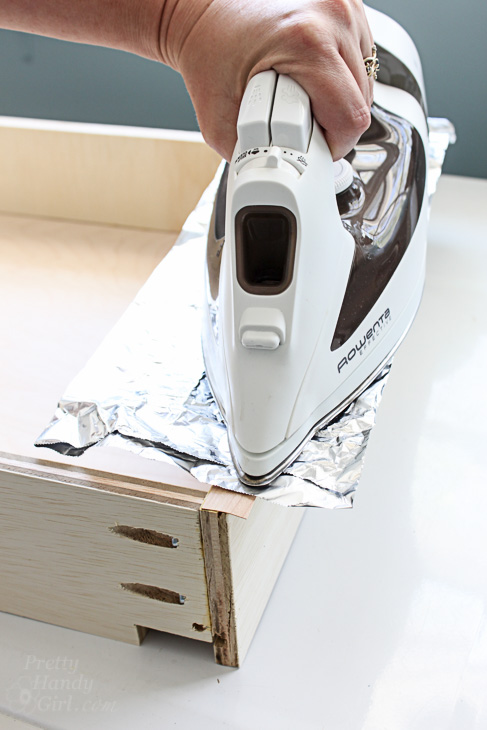
Rip off a piece of foil the length of the plywood or at least the length of your iron. Lay the edge veneer on top of the plywood edge. Lay the aluminum foil between the veneer edging and the iron. Press the iron to heat up the glue on the underside of the edging. Keep moving the iron so as not to scorch the wood. Usually 30 seconds is all you need to activate the glue.

How to Finish Raw Plywood Edges | Pretty Handy Girl

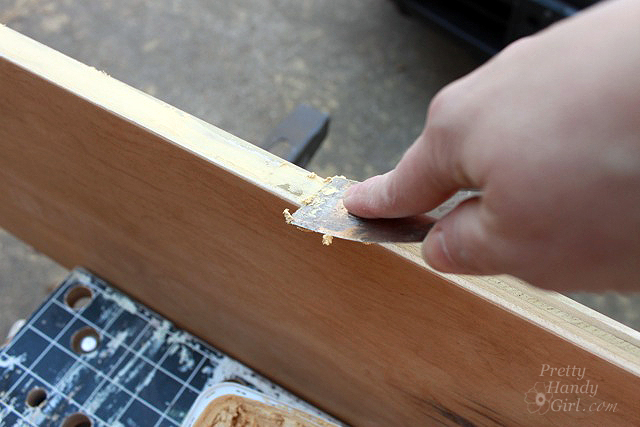
After the entire edge veneer has been glued, use a flat edge on the trimming tool to burnish the veneer firmly onto the raw plywood edge. If any areas still aren’t glued, reheat and repeat the process on that spot.

How to Finish Raw Plywood Edges | Pretty Handy Girl

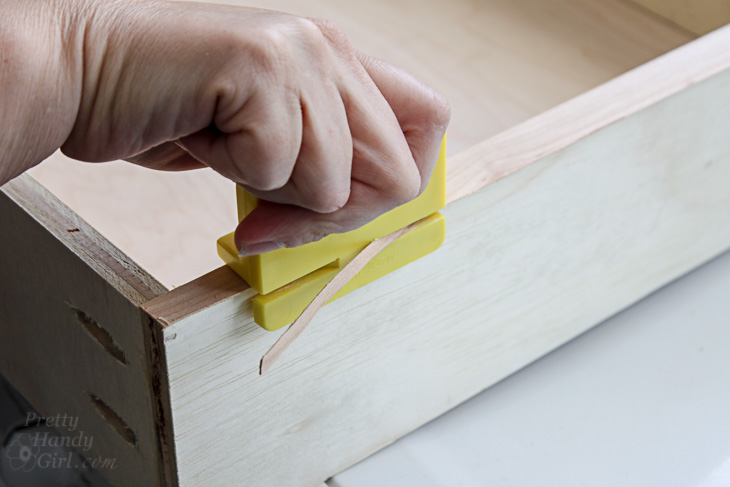
Turn the trimmer tool and run it along the side of your plywood to trim off the excess edging. You may need to make a few passes to remove all the excess veneer.

How to Finish Raw Plywood Edges | Pretty Handy Girl

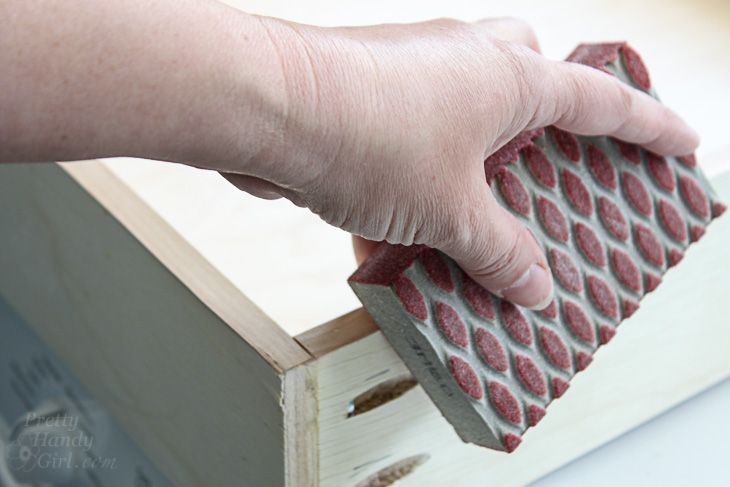
Sand the edges smooth and remove any rough spots.

How to Finish Raw Plywood Edges | Pretty Handy Girl

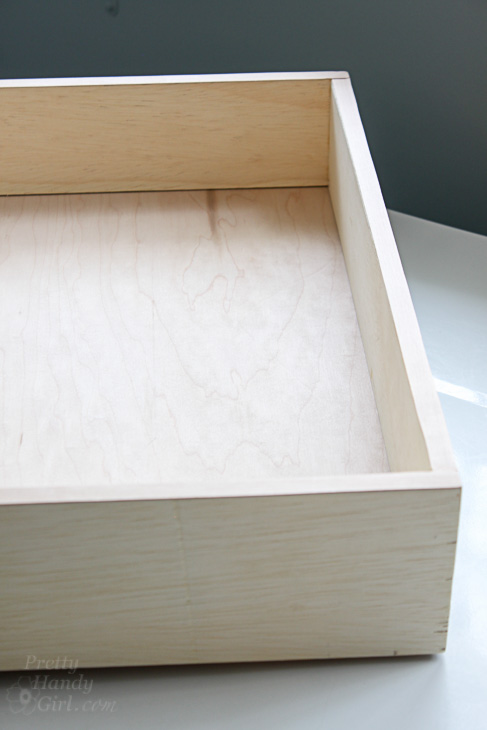
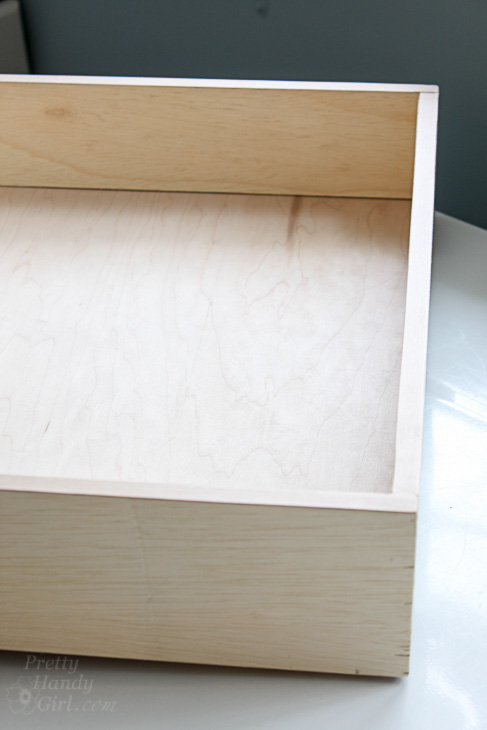
Check it out, you are done and your plywood looks like it was solid wood not plywood!

How to Finish Raw Plywood Edges | Pretty Handy Girl

If you learn better watching a video, you’ll appreciate that I made a Facebook Live video to show you How to Finish Raw Plywood Edges:

Don’t forget to Follow Me on YouTube for more tutorial and tip videos. I’m always bringing you along as I work. 😉

How to Finish Raw Plywood Edges | Pretty Handy Girl

Now that you know this trick, you can build anything using plywood and finish off those raw edges.

How to Finish Raw Plywood Edges | Pretty Handy Girl

Until next time, enjoy fooling people with your clean finished edges on plywood. No one has to know that it’s not solid wood. 😉

How to Paint an Abstract Water Lilies Painting | Pretty Handy Girl

How to Paint an Abstract Water Lilies Painting | Pretty Handy Girl
I have an unsightly electrical panel in my kitchen. But, luckily I found a way to cover it using an Abstract Water Lily Painting.

How to Paint an Abstract Water Lilies Painting | Pretty Handy Girl

Best of all, I recycled an old canvas and used paints I had to create an abstract painting that goes with the colors in my kitchen. Want to make your own? I created a video tutorial so you can paint along!

But, first here are some supplies you’ll need.

(I’ve included affiliate links for your convenience. I earn a small percentage from a purchase using these links. There is no additional cost to you. You can read more about affiliate links here.)

Materials:

Instructions:

Do some research and find images you are drawn to. Use them as inspiration but don’t copy them. Feel free to view my Pinterest board of art ideas for this water lily painting.

Follow along as I show you how to paint this abstract water lily painting:

Let your painting dry and hang it up!

How to Paint an Abstract Water Lilies Painting | Pretty Handy Girl

I love that this painting coordinates with the colors in my kitchen and covers up the ugly electrical panel.

How to Paint an Abstract Water Lilies Painting | Pretty Handy Girl

Do you have an ugly electrical box? Or do you want to create some beautiful abstract art? Either way, I hope you enjoy this tutorial.

Like this tutorial? Then you’ll also like How to Paint a Giant Abstract Ocean Painting!

How to Paint Giant Abstract Ocean Painting


Pin for later!

DIY Abstract Water Lily Painting | Pretty Handy Girl

DIY Gold Leaf Vases from Recycled Bottles | Pretty Handy Girl

DIY Gold Leaf Vases from Recycled Bottles | Pretty Handy Girl

Remember when you were a child and you would pick wildflowers and present them proudly to your mom in a soda bottle? The simplicity of a fresh picked bouquet and the opulence of real gold leaf makes these DIY Gold Leaf Vases the perfect gift for anyone! I like to keep recycled bottles on hand to dress up and use for vases. Teachers, my hairdresser, a friend. . . no one is exempt from receiving a pick me up bouquet.

Make a dozen of these beautiful gold leaf vases and keep them on hand for a quick gift or to display your own horticultural achievements!

DIY Gold Leaf Vases from Recycled Bottles | Pretty Handy Girl

Ready to make a few DIY Gold Leaf Vases in minutes? Let’s get leafin’.

Materials:

(I’ve included affiliate links for your convenience. I earn a small percentage from a purchase using these links. There is no additional cost to you. You can read more about affiliate links here.)

DIY Gold Leaf Vases from Recycled Bottles | Pretty Handy Girl

Optional:

Preparing Recycled Jars and Bottles:

Clean out your bottles and jars with soap and water. Soak them to remove the labels. Any gummy label residue can be removed with Lemon Essential oil (my favorite non-toxic glue residue remover).

DIY Gold Leaf Vases from Recycled Bottles | Pretty Handy Girl

The lemon oil works faster and doesn’t leave any toxic or drying chemicals on your skin. But, if you don’t have any lemon essential oil on hand, use Goo Gone or rubbing alcohol (be sure to wear gloves or wash your hands immediately after use.)

DIY Gold Leaf Vases from Recycled Bottles | Pretty Handy Girl

If there are any date stamps on your bottle, you can remove it with a Q-tip and Acetone based Nail Polish. I can’t help laughing every time I use this trick because I learned it from the Lego Movie! Anyone else remember the Fleece Crested Sceptre of Q-tip and The Pole-Ish Remover of Ni-Eel?

Clean your bottle or jar really well with rubbing alcohol.

DIY Gold Leaf Vases from Recycled Bottles | Pretty Handy Girl

Instructions:

Lay your clean glass bottle on a covered work surface (you will make a mess.)

DIY Gold Leaf Vases from Recycled Bottles | Pretty Handy Girl

Paint the adhesive sizing onto your glass bottle. Anywhere the adhesive lays gold will stick, so decide if you want to be random or use clean lines.

DIY Gold Leaf Vases from Recycled Bottles | Pretty Handy Girl

Allow the adhesive to dry (you can use a hair dryer to speed the process and prevent the adhesive from running and dripping.)

Carefully lift up pieces of the gold leaf and lay them flat on top of your glass bottle. Pat the leaf into the adhesive.

DIY Gold Leaf Vases from Recycled Bottles | Pretty Handy Girl

Use your brush to dust off any excess gold leaf. Continue adding gold leaf until all the adhesive is covered.

DIY Gold Leaf Vases from Recycled Bottles | Pretty Handy Girl

Wipe off any excess gold leaf flakes with a dry rag and you are done!

DIY Gold Leaf Vases from Recycled Bottles | Pretty Handy Girl

Here’s a quick video to show you how the gold leafing process works.

Fill your new gold leaf vases with flowers and enjoy!

DIY Gold Leaf Vases from Recycled Bottles | Pretty Handy Girl

Or give them to someone special.

DIY Gold Leaf Vases from Recycled Bottles | Pretty Handy Girl

Leave me a comment to let me know how you like this project. Or let me know if you have another way to upcycle glass jars and bottles.


Pin for later!

DIY Gold Leaf Bottle Vases | Pretty Handy Girl

Easy Peppermint Snowflakes | Pretty Handy Girl

Easy Peppermint Snowflakes | Pretty Handy Girl

Last year I made these Easy Peppermint Star Ornaments. They were a lot of fun to watch as they melted and fuzed into a snowflake ornament. My son asked if we could make them again this year. Because the kids are officially out of school now, I thought this would be the perfect holiday activity today.

Won’t you join us as we make these Easy Peppermint Star Ornaments?

(I’ve included affiliate links for your convenience. I earn a small percentage from a purchase using these links. There is no additional cost to you. You can read more about affiliate links here.)

Materials:

Directions:

Pre-heat oven to 300ËšF.

Unwrap the candies. You’ll need 13 candies per star. Lay the peppermints onto a baking sheet covered with parchment paper. Arrange them into a snowflake design:

Easy Peppermint Snowflakes | Pretty Handy Girl

Place the baking sheet into the pre-heated oven. Bake for 8 minutes.

Remove the tray and immediately use a large needle to create a hole in the top of one of the outer points of the snowflake.

Easy Peppermint Snowflakes | Pretty Handy Girl

Allow the peppermints to cool and thread a green ribbon through the hole and tie.

Easy Peppermint Snowflakes | Pretty Handy Girl

Wrap up the Peppermint Star Ornaments in treat bags and give them to your friends and neighbors!

Easy Peppermint Snowflakes | Pretty Handy Girl

Or hang them on your tree ;-).

Easy Peppermint Snowflakes | Pretty Handy Girl

Here’s the quick video wrap up for how to make Easy Peppermint Star Ornaments:

Be sure to plan on making more than you need. The melting process can create some not so desirable snowflakes, but they still taste good ;-).


Pin for later!

How to Make a Vintage Rustic Sleigh Ride Sign | Pretty Handy Girl How cool! You can use this technique to make or transfer any sign graphic.

How to Make a Vintage Rustic Sleigh Ride Sign | Pretty Handy Girl How cool! You can use this technique to make or transfer any sign graphic.

How to Make a Vintage Rustic Sleigh Ride Sign:

You guys, I’m super excited about this Vintage Rustic Sleigh Ride Sign I made using scraps from my workshop. This sign turned out 200 times better than I imagined in my head. I knew I had to share the tutorial with you so you can make your own vintage signs for any holiday! Let’s get this party started.

Sign:

First I suggest measuring the space where you want to hang your sign (it would suck to build it too large or too small.) Begin laying out your scrap wood. It’s best to line up the same width boards along each row. If you need to, you can rip down scraps on a table saw.

scrap-layouts

Once you have the scraps laid out, add any stain or paint if you desire. I added a combination of glaze, stain and burned some boards to give them a similar color value but still let them look unique.

scrap-wood-assembled-2

Supports:

The key to building a sign with lots of scrap wood is to space your supports well. Each board should have two vertical support pieces on the back, unless the board is really short. You might be able to get away with just one support for those shorties.

Cut 1″ x 4″ boards to the height of your sign. Flip the scraps over and glue each support board.

add-back-support-boards-wood-glue-4

Nail each support board 3-4 times to each scrap.

secure-supports-finish-supports-6

I ended up using 5 supports for my sign.

scrap-wood-sign-support

Allow the glue to dry. Flip your sign over and make sure the scrap boards are well secured.

scrap-woods-layout-2

Transferring the Image:

Now it’s time to have some fun. I made a shoebox projector by following the directions in this video:

I created a basic sketch for the sign. (You are welcome to use this image, but please use for personal use only. Do not resell products with this image on it. And please be sure to credit and link back to this post if you use my image and blog about it.)

How to Make a Vintage Rustic Sleigh Ride Sign | Pretty Handy Girl How cool! You can use this technique to make or transfer any sign graphic.

For your convenience, this image has already been flipped and reversed for projecting it in the shoebox projector.How to Make a Vintage Rustic Sleigh Ride Sign | Pretty Handy Girl How cool! You can use this technique to make or transfer any sign graphic.

Send the image to your phone. Insert the phone into the shoebox. (The brightness has to be turned all the way up and you might want to change the display setting to stay lit longer.) Turn the lights out. Move the shoe box back and forth until you have the image sized as large as you want. Then move your phone forward and back to focus.

shoebox-projector

I will say that my image isn’t as clear as I expected, but my magnifying glass is old and scratched up. However, it gave me enough information to trace my image. Use chalk to trace around the design.

chalk-outline-sign-image

Painting Your Sign:

Now you’re ready to paint your sign. It’s not hard at all, think of it like coloring in the lines of a coloring book. Here’s my video tutorial to help you learn all my tips and tricks while painting signs:

All done? Great! Hang your “new” Vintage Rustic Sleigh Ride Sign with pride.

Holiday Home Tour 2016 | Pretty Handy Girl

I won’t let on that you just made it. Let’s let everyone think we scored this fun sleigh ride sign at an antique shop. 😉

Holiday Home Tour 2016 | Pretty Handy Girl

Holiday Home Tour 2016 | Pretty Handy Girl

Where are you going to hang your vintage rustic sign? I think I’m going to make another one for our kitchen. Maybe a market sign with a pig silhouette?

Holiday Home Tour 2016 | Pretty Handy Girl

Hope you are enjoying the holidays!

PHGFancySign


Pin for later!

Add vintage charm to your holiday home with this DIY Reindeer Sleigh Sign | Pretty Handy Girl #DIYholiday #holidayhome #holidaysign