Tealight Centerpiece

In my constant attempt to save things from the landfill, I came up with this nifty transformation of an old Hollywood light fixture.

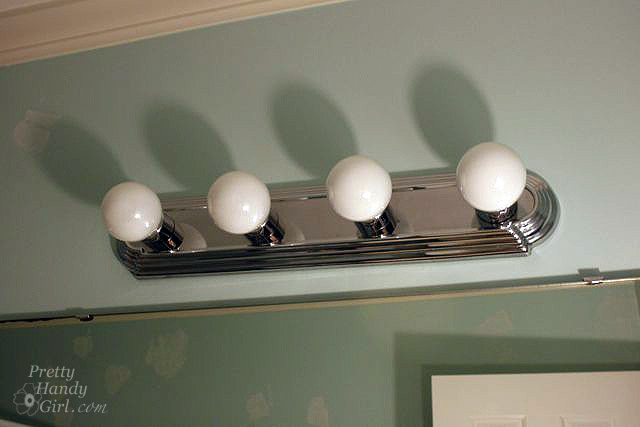
Can you believe that I took this…

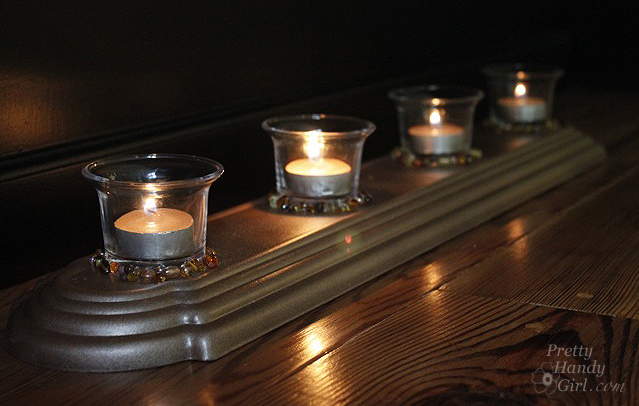
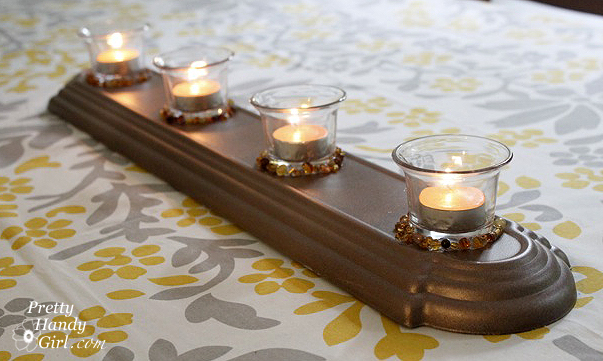
And turned it into this?

Materials:

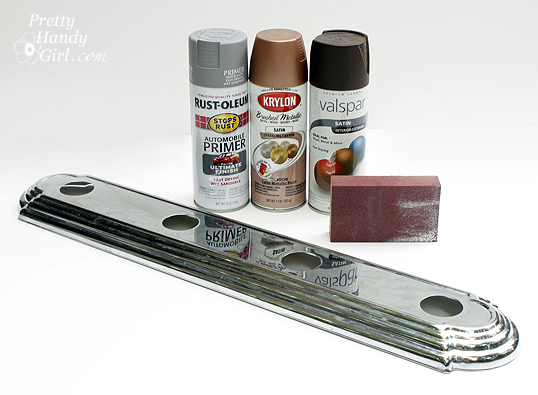
  • Trim (canopy) piece of an old light fixture
  • Sandpaper or sanding block
  • Spray primer (automobile primer works best on metal)
  • Valspar java brown spray paint
  • Krylon sparkling canyon spray paint
  • Drop cloth (or plastic sheet)
  • Votives
  • E-6000 glue
  • Brown and amber beads
  • Hot glue gun and glue sticks
  • Scoop or spoon to pour beads from
  • Popsicle stick
  • Tweezers

You are sick of staring at that old hollywood light fixture in your bathroom. Come on, you can admit it. It’s okay, you are among friends. If you need help, I’ll even show you how to remove that dated style offender. And hey, if you are lucky enough to live in a house without one — but you still want to replicate this project — head on over to your local Habitat for Humanity ReStore. I guarantee they will have plenty to choose from.

1. Start by wiping off the light fixture (unless you are a fabulous housekeeper and yours doesn’t have years of collected dust like mine did.)

2. Scuff up the metal surface with sandpaper.


3. Spray the light fixture with the spray primer. Let it dry. Then spray a coat or two of the java brown spray paint. After the brown paint is dry, lightly dust the light fixture with the sparkling canyon spray paint until you are happy with the color.


4. Try to let the painted fixture dry overnight to allow the paint enough time to harden.


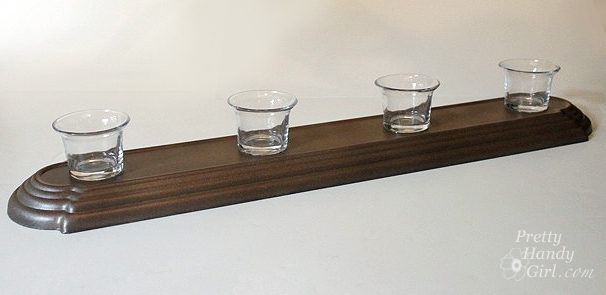
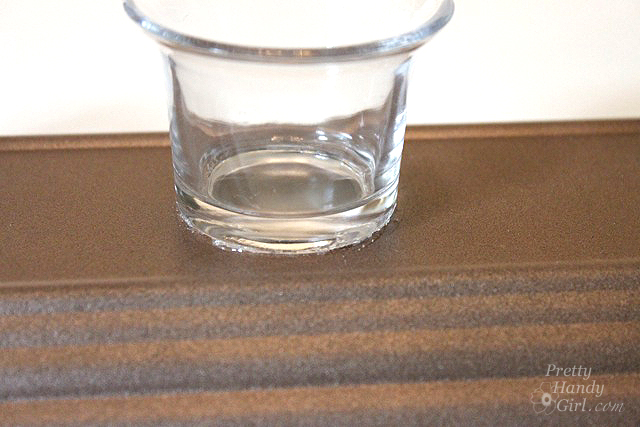
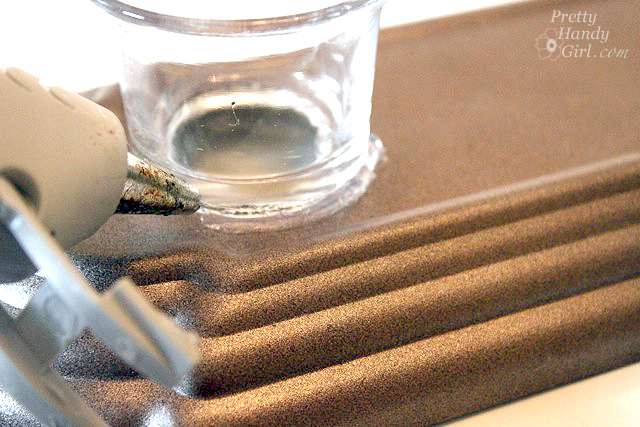
5. Clean your votives with some soap and water and let it dry thoroughly. Squeeze a line of glue around the bottom of the votive.


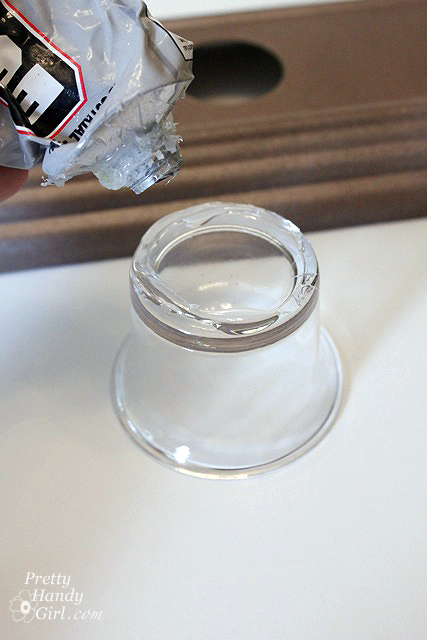
6. Center the votive over the hole on the light fixture.


7. Repeat for the rest of the holes.

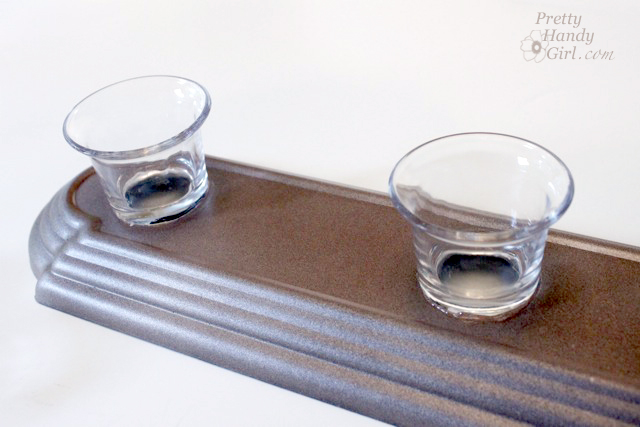
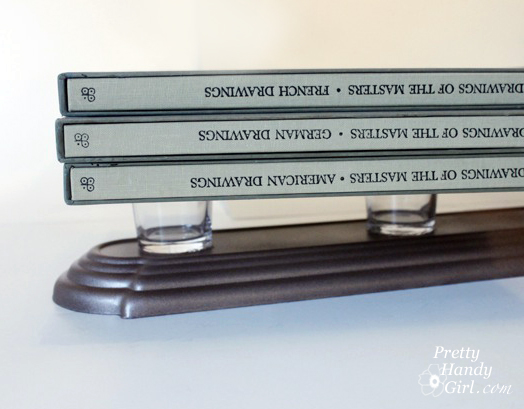
8. Weigh the votives down with some books while the glue sets (a few hours.)


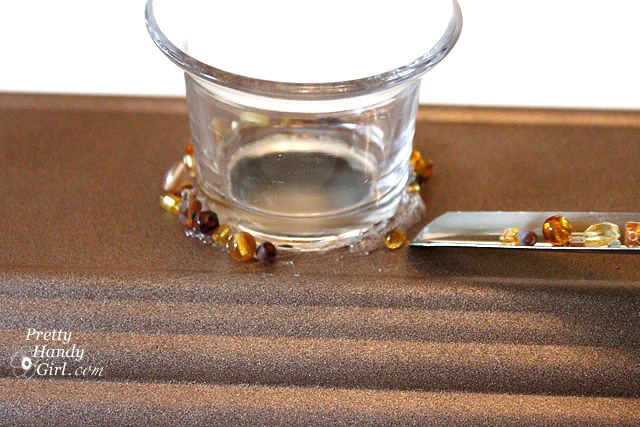
9. Plug in the hot glue gun. (Have you read my Hot Glue Gun Safety post? If not, you should because your fingers will thank me.) While it is heating up, take out the beads you want to use. Set them in a little scoop or spoon.

10. Run a bead of hot glue around the votive. Only work in a small 1-2″ section at a time. This will give you enough time to arrange the beads before the glue hardens.

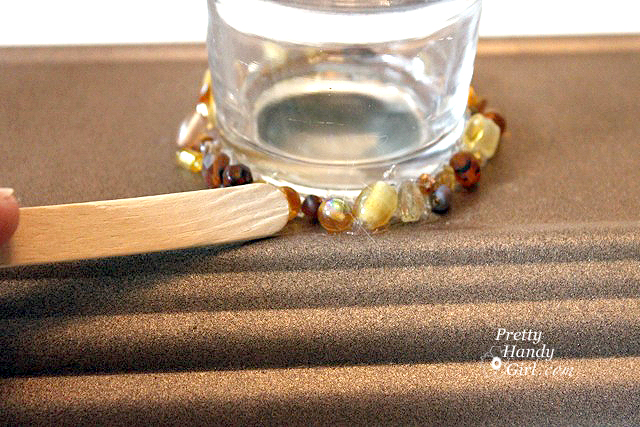
11. Pour the beads into the hot glue.

12. Use your popsicle stick to maneuver the beads into the glue.

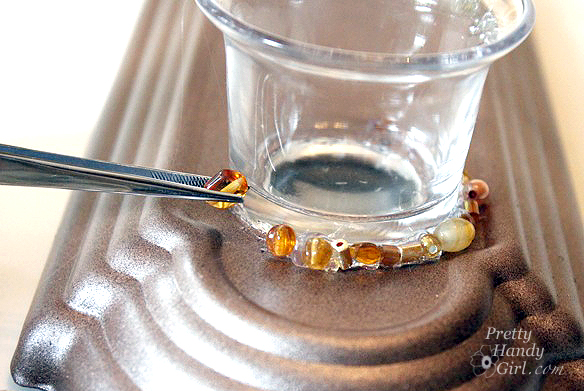
13. Use the tweezers to place any singular beads and perform any detail work.

14. Glue beads around the base of the other votives. Let the glue cool and then pull off any hot glue strings.

15. Put your tea lights into the votives and set it on your table…

…bathtub edge or sideboard.

What do you think? Do you like it or I am just trying to put lipstick on a pig?

Sharing this post with:

2011 Fall Home Tour

2011 Fall Home Tour

Fall is here, fall is here! Finally the cooler temps are near!

I’m not sure about your area of the world, but this summer seemed a little too hot for my liking. My husband told me about the term “Global Weirding“. It seems fitting for all this nonsense Mother Nature is throwing at us lately.

Luckily fall seems to have come just on time. Fall is my favorite time of year. Maybe it is the painter in me that loves all the colors. Or maybe it is the nature lover in me that longs to be outdoors in the fresh crisp air. Whatever it is, I love FALL!

I spent some time this past week putting out some autumn inspired décor. Although I’m definitely self conscious about my decorating skills, I tried to abide by my words from last year about not striving for perfection. So, now I’m taking a big breath and pressing the publish button to share my home looking warm and cozy (in my opinion.)

Antique books are my go-t0 decorating objects. I love books and I love those old linen covers. Even a torn and tattered book looks nice lassoed together with some friends.

Sometimes, even an open book can look warm and inviting.

I was so happy to bring my Ballard knock off painted pear out of storage. He really looks handsome with the autumn colors.

I love all the colors in this photo! I can’t imagine having a monotone autumn mantle.

Of course, Mr. Gourd looks handsome too. (Shhh. I don’t want to hurt his feelings, but I do love the pear more.)

Yes, I’m still switching things in and out like a high school football coach. I actually like the gourd, so he’s back in but the chicken wire basket is out. However, I wanted to show you the vintage map lampshade I made. The tutorial will be served up before you know it! Hopefully I’ll have a new lamp by then. This one is just a substitute for one on injured reserve.

You may have noticed this little terrarium on the side table. I was inspired by some insanely expensive versions here. Never fear, I will have a tutorial so you can make your own soon!

fall mantel with vignettes

A full view of the mantle decorated. It is hard to believe that in a few months the stockings will need to be hung.

I had fun with this little vignette. A crow in an antique corn grinder? Now that is pretty silly. And another terrarium that makes me smile.

Quoth the Raven “Nevermore”

The acorn jar was an afterthought. It was just a quick little hot glue craft. Speaking of which, if you haven’t read my post about hot glue gun safety, it is a must! Your fingers will thank me.

It is fun having another surface to decorate. The top of our armoire (also known as the family command center) has some pretty purples and greens.

My Pottery Barn knockoff lantern makes a re-appearance.

Beautyberry and Orange Peel Cestrum from our yard.

The dining room has a simple centerpiece made with corn kernels and a candle.

But, I might be switching it out once I get this beauty back from my friends at the Habitat ReStore. Can you guess what it used to be? I’ll give you a hint: Hollywood glam never looked so good.

Are you as nutso about paint chip projects as I am? I’m semi-worried that I might get arrested next time I’m pulling samples at my local paint department. Is there a law against taking too many?* Okay, so let’s just say that I have collected many samples over the years while contemplating room colors (which is true!)

*Paint chips may be free, but please use consideration when taking paint chips. Try not to take more than 2-3 of each color and definitely don’t take the last of a color. It might be a good idea to ask permission from the paint store employee if you need to take more than a dozen.

But, what do you do with all those left over paint chips once you have decided on your color? It seems a shame to throw them away, doesn’t it.

Why not use them to make a lamp shade?

I actually saw this lamp shade on JossandMain.com last week and thought, “Ooo Ooo Oooo! This gives me an idea of what to make with all those paint chips!”

Materials:


  • Lamp shade (best if it isn’t tapered)
  • Paint chips
  • Clear packing tape
  • White paper tape (low stick)
  • X-acto knife
  • Cutting surface
  • Metal ruler
  • Hot glue gun and glue sticks

Tutorial:

Start by laying out your paint chips side-by-side and organize them any way you like.

To judge how many strips you need, rest the seam of your lamp shade on the end of the paint chips and roll it until you reach the seam again. If you still have paint chips under your shade, then you have enough! I had one small gap leftover, so I added two of the same colored chips together so the small strip wouldn’t be as noticeable.

Butt the paint chip strips tightly together. Put paper tape on top of the chips to hold them together.

Gently turn them over and tape the seams with clear packing tape.

Once all the strips have been taped together, trim off the excess tape.

Measure the height of your lampshade and trim your paint chips to the same height.

Test fit your paint chip roll.

Use your hot glue gun to run a line of glue on the seam of your lamp shade. Glue the end of the paint chips to the shade.

Run a line of hot glue on the top and bottom edges of the lampshade and roll the paint chips around the shade. Secure the end by hot gluing it to the shade.

And that is it! A super easy and very colorful home decor project.

I think it is beautiful whether the light is off…

…or on.

When choosing the paint swatches you wish to use, try pulling colors from a painting or use colors that are compliments to your wall color.

What?! You still want more paint chip home décor ideas?! How about a whole round up of them? Go ahead and scoot your index finger on over to Parentables for 11 Paint Chip Projects to see 9 more amazing paint chip projects:

I guarantee, you’ll never pass through the paint department without grabbing a few paint chips again!

The other day I showed you how to prep and sand a branch to make a towel bar. If you haven’t viewed that tutorial, you may wish to do so now.

Okay, so let’s get started. This shouldn’t take too long, but you’ll want to grab a few supplies before you begin.

Materials:


  • Prepped tree branch
  • Tape measure
  • Pencil
  • Level
  • 2 Handrail brackets
  • Drill with drill bits
  • Philips head screwdriver
  • Safety Glasses
  • Miter saw or hand saw
  • Water-based Polyurethane
  • Brush
  • 180 grit or finer sandpaper
  • Damp Rag


Tutorial:

Start by marking the desired height of your towel bar. I hung mine at 38″ high.

Use the drill and the philips head bit to insert one screw into the bottom of your handrail bracket. Drive the other two screws into the bracket.

Repeat the steps above to install your second bracket.

Rest your branch on top of the brackets. Mark the desired length of your towel bar onto the branch.

Cut the branch with a miter saw or hand saw.

Sand down any rough edges at your cuts. Lay the branch on top of the brackets.

Center the branch and check to make sure it is relatively level. If it isn’t, you might need to move one of your brackets.

Hold the “U” shaped hook under the handrail bracket and make a mark where the holes are on the branch.

Choose a drill bit slightly smaller than your screw.

Drill pilot holes into your branch for the first bracket only.

Rest the branch onto the bracket and drive the screws loosely through the “U” shaped hook and into the bottom of the branch.

Line up the other end of the branch onto the handrail bracket and trace the holes through the “U” shaped hook.

Remove the screws holding the first hook and drill pilot holes where you marked for the 2nd “U” shaped hook.

Lay the branch back on top of the handrail brackets. Attach the screws through both “U”shaped hooks and into the branch’s pilot holes.

Wipe off the branch with a damp rag. Brush a water-based polyurethane over the entire branch and allow it to dry (about 30 minutes.)

Gently sand any burrs or imperfections off the branch and wipe the branch with the damp rag.

Add another coat of polyurethane.

Repeat sanding and adding a coat of polyurethane until your branch has 5 coats of poly. Do not sand the last coat.

Let the branch dry completely for a day and then add towels to your unique branch towel bar!

I purposely left some extra overhanging branch on the ends for extra towels.


I don’t know about you, but I love it! I think the branch is unique and adds some warmth to the bathroom. How about you? Do you like it? Or is a branch in your bathroom just wack-a-doodle!

Linking to: Funky Junk Interiors Branch Party.

Slipcover a Couch Beautifully

We definitely have paranormal activity in our home. Things move without explanation. Pillows that were strategically placed by me to look magazine pretty inevitably end up on the floor after I leave the room. Kid sized chairs levitate on their own and land on top of the couch.

Slipcover a Couch Beautifully

And don’t even mention this pillow that has systematically lost all its buttons one-at-a-time!

Slipcover a Couch Beautifully

When questioned, both boys emphatically shout “It wasn’t me!” Hmmph.

Well, if this continues I might have to call in an exorcist, because it is getting VERY annoying.

But, I know you don’t want to hear about my boring ghost stories. Instead I thought I’d share with you a great source for brand name (to remain un-named) slipcovers at a fraction of the cost! May I introduce to you UglySofa.com.

Slipcover a Couch Beautifully

And let me tell you, the name is a misnomer, because this family-owned company is actually on a mission to give you a beautiful sofa! When UglySofa.com emailed me and said they wanted to send me a “brand name” slipcover to try out, I was skeptical. I mean – come on – how can you sell slipcovers from the famous PB&J (minus the J) at a fraction of the cost? I really doubted their authenticity. But, low and behold, a few days later my boxpleat slipcover arrived and when I opened it up, it truly was the brand they said it was and the quality was just as good as the slipcover I bought years ago from the store “that shall not be named.”

Slipcover a Couch Beautifully

I immediately ran over to pull back the worn red slipcover I’ve been using for as long as my oldest has been alive. WARNING: What you are about to see is a flashback to the 90’s. I admit, I did recover this sofa way back in my college years when hunter green was popular color. (I’m sad just wondering when blue-gray will be the “dated color”.) But, if you saw the granny fabric that lay beneath you’d be even more horrified.

Slipcover a Couch Beautifully

Now don’t even ask me why we still have a sofa that is well over 20 years old. Someday we’ll get around to replacing it…until then I have my new slipcovered sofa! Isn’t she pretty?!

Slipcover a Couch Beautifully

Have you ever purchased a slipcover because it looked beautiful in the catalog only to get it in the mail and you can’t for the life of you figure out how they got the slipcover to look so good?

Slipcover a Couch Beautifully

That used to happen to me too, until I worked as a photo stylist for Plow & Hearth (one of my responsibilities as a graphic designer for their catalog). I learned how to install slipcovers so they look beautiful.

Here are a few easy tricks for installing a slipcover so it look less like a rumpled college frat house slipcover. Please excuse my “butt shots”. I’m still new to this little thing called vlogging!

Start out by getting the ginormous cover on.

Find the “Back” tag on your slipcover. (And don’t look at the famous PB & J (minus the J) tag. Ha, I made you look ;-).

Slipcover a Couch Beautifully

Throw the “back” of the slipcover over the back of your sofa.

Locate the center of your slipcover and center it between the two arm rests.

Then line up the front skirt of your slipcover. I like to let the skirt puddle on the floor a little instead of kissing it.

Slipcover a Couch Beautifully

Smooth out the fabric with your hands, and neatly tuck and fold under any excess fabric.

Slipcover a Couch Beautifully

This is especially crucial on the arm rest, you want to disguise any excess fabric so the slipcover looks like it was custom made for your sofa.

Slipcover a Couch Beautifully

Wrap the side panels around the side.

Slipcover a Couch Beautifully

Locate the D- rings on the back of the slipcover.

Slipcover a Couch Beautifully

Feed the straps from the side panels through the D-rings in the back of the slipcover, and loop back between the two rings.

Slipcover a Couch Beautifully

Pull the straps until the slipcover is tight. Be sure to leave enough slack to be able to tighten the other side.

Slipcover a Couch Beautifully

Tuck any excess fabric into the folds behind the side panels and the d-rings.

Once you have the slipcover positioned, folded and tucked the way you like, then insert several cardboard light-sabers shipping tubes into the crevices between your cushions.

Slipcover a Couch Beautifully

These will secure and hold your slipcover in place.

And now, another little video on eliminating the wrinkles in your slipcover. I just used my hands and a squirt bottle filled with water. Be prepared as I almost cross the line. I admit it, sometimes I have the mind of a 7th grade boy.

I hope those videos were helpful for you! Do you like my new UglySofa.com slipcover?

Slipcover a Couch Beautifully

The boxpleat slipcover has a nice relaxed weave, very similar to a grain cloth.

Slipcover a Couch Beautifully

And the sides drape nicely over my sofa’s arm. The color I chose was ivory linen.

Slipcover a Couch Beautifully


Slipcover a Couch Beautifully